
The Lustre file system is one of the most widely used parallel storage solutions in High-Performance Computing (HPC) environments. In this guide, I introduce the core concepts behind Lustre, explaining how its distributed architecture enables multiple clients to access massive datasets efficiently while delivering the high throughput required by modern HPC clusters.
Before deploying or administering a Lustre environment, it is important to understand how its architecture differs from a traditional filesystem. Unlike local filesystems such as ext4 or XFS, the Lustre file system distributes metadata and file data across dedicated servers, allowing storage resources to scale while supporting parallel read and write operations.
Throughout this guide, I explain the main Lustre components, including the Management Server (MGS), Metadata Server (MDS), Object Storage Server (OSS), their associated storage targets, and the Lustre clients. Understanding how these components interact provides the foundation for working with Lustre in production HPC environments.
Why Lustre Exists? What are typical workloads that use Lustre?
The Lustre file system is used when (typically speaking):
- Demands for high throughput (GB/s or TB/s).
- Thousands of clients accessing data.
- Huge datasets (scale of TB or PB).
The typical workloads that use Lustre are:
- Scientific simulations.
- Oil & Gas tasks.
- AI/ML training.
- Big data analytics.
- Rendering farms.
Main Components of Lustre File System
The Lustre file system is built from three main server roles + clients. Let’s discuss some details of each server role and the client role:
MGS – Management Server:
- This server role is responsible for storing the file system configuration:
- The MGS uses a type of database named Management Target (MGT).
- The MGS tells clients where the MDS and OSS servers are (we’ll talk about MDS and OSS further).
- It’s like a directory service for the entire Lustre cluster.
MDS – Metadata Server:
- This server role is responsible for handling file names, directories, permissions, and file layout:
- The MDS uses a type of database named Metadata Target (MDT).
- Each file system has one MDT, which holds the root directory (think of it as the starting point for the Luster file system).
- The Metadata Server (MGS) does not store file data; it only stores file metadata.
Important: "file data" and "file metadata" aren't the same thing (they're fundamentally different, especially in distributed systems like Lustre).

File data:
-- The actual contents of the file.
-- What users/applications read and write.
-- Examples:
Text inside a .txt file;
Pixels in an image;
Bytes of a database file.

File metadata:
-- Describes the file, not its content.
-- Examples:
File name;
Size;
Permissions (rwx);
Owner/group;
Timestamps (created, modified);
FID (in Lustre);
Striping layout (which OSTs hold the data).

----- Make sure to understand this point before going ahead! -----
OSS – Object Storage Server:
- This server role is responsible for handling actual file data (and not file metadata).
- Provides file I/O services and handles networking requests for one or more local OSTs:
- The OSS uses an Object Storage Target (OST) to store the file data.
- The user file data can be split (or cannot) into multiple objects/chunks, and each one can be stored on OSTs.
- Each OSS usually manages multiple OSTs.
- So, this is why Lustre file system is fast:
- Multiple servers read/write in parallel.
Clients:
- The Luster clients run the Luster client software.
- They mount the Lustre file system to use it:
- Afterward, they use the file system like a normal directory. For example:
- cd /mnt/lustre
- Afterward, they use the file system like a normal directory. For example:
The following picture shows, in a simple way, the Lustre file system architecture and all the components that we’ve seen before:

Lustre Networking (LNet):
LNet is a custom networking API that provides the communication infrastructure for handling metadata and file I/O for the Lustre servers and clients.
Summary of the Main Components of Lustre
| COMPONENT | ROLE |
| MGS (Management Server) | Cluster/filesystem configuration |
| MGT (Management Target) | Storage unit inside MGS |
| MDS (Metadata Server) | File Metadata (names, directories, permissions, file layout) |
| MDT (Management Target) | Storage unit inside MDS |
| OSS (Object Storage Server) | File data |
| OST (Object Storage Target) | Storage units inside OSS |
| Clients | Access the Lustre filesystem |
Lustre Cluster
At scale, a Lustre file system cluster can include hundreds of OSSs and thousands of clients. As we can see in the following picture, more than one network type can be used:
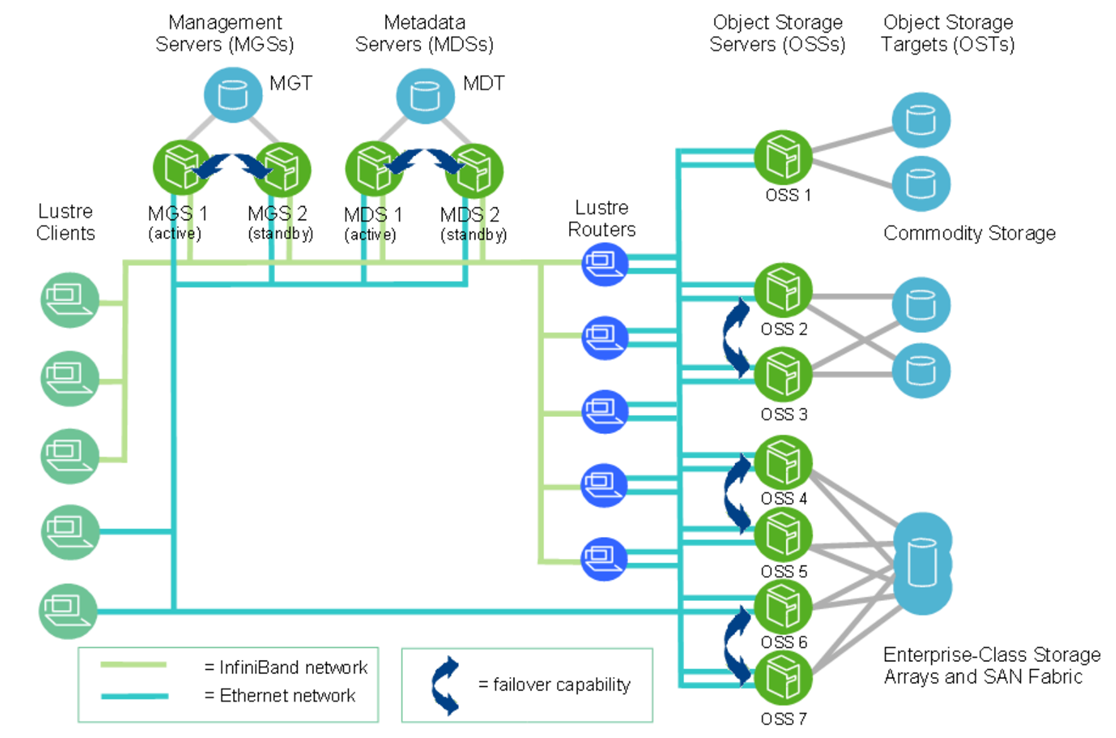
Note: This picture is from Lustre documentation (https://doc.lustre.org/lustre_manual.pdf).
Lustre File System Storage and I/O
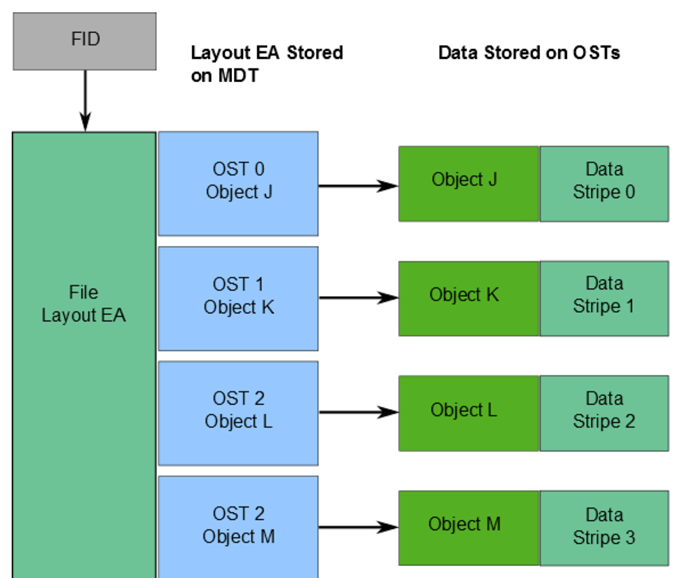
What is a FID (File Identifier)?
A FID is a unique internal identifier for files/objects in Lustre (like an inode in local filesystems).
It is 128-bit, composed of:
— SEQ (64-bit) – unique across the entire filesystem.
— OID (32-bit) – object ID.
— Version (32-bit).
Why are FIDs important?
— Ensure global uniqueness across all MDTs and OSTs.
— Then, it avoids conflicts from underlying filesystem inode duplication.
— The SEQ helps map a file/object to a specific MDT or OST.
Where the file data location is stored:
— Stored in an extended attribute called layout EA (on MDT).
Layout EA:
— Points to object(s) on OST(s) that contain file data.
— Behavior:
1 object –> Entire file stored on one OST.
Multiple objects –> File is striped (RAID 0) across multiple OSTs.
LFSCK (Consistency Tool):
Lustre uses LFSCK to verify and repair metadata:
— Checks FID in directory entries and rebuilds if missing/invalid.
— Verifies linkEA (extended attribute):
Stores file name + parent ID.
Can reconstruct the full file path from the FID alone.
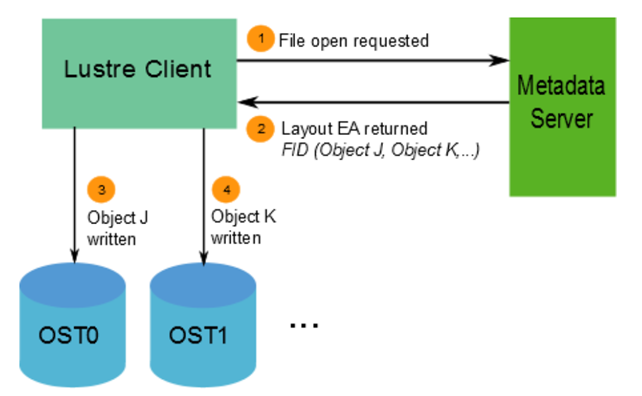
The following picture shows an example of those components:
Lustre File System and Striping
One of the main factors behind the high performance of Lustre file systems is the ability to stripe data across multiple OSTs in a round-robin fashion (similar to RAID 0). So, users can optionally configure, for each file, the number of stripes, stripe size, and OSTs used.
Why striping is useful:
— Considering high performance, multiple OSTs can be accessed in parallel, increasing the total bandwidth.
— Given better capacity, a file can span multiple OSTs if a single OST doesn’t have enough space.
How striping works:
— A file is divided into chunks (called stripes).
— Each chunk is stored in a different object on an OST.
— Key behavior:
When the data written exceeds the “stripe_size”, the next chunk goes to the next OST.
This continues in a round-robin cycle.
Key configuration parameters:
— stripe_count: The number of OSTs used (number of objects that a file will be divided).
— stripe_size: The size of each chunk before moving to the next OST.
Default values:
— stripe_count: 1 –> no striping (single OST)
— stripe_size: 1 MB
Customization:
— Users can configure striping:
Per file.
Per directory.
— This is done using tools like: lfssetstripe.
Examples:
File A:
— stripe_count= 3 –> The “file a” spreads across 3 OSTs.
File B & C:
— stripe_count= 1 –> stored on a single OST.
File C:
— Larger stripe_size –> More data per chunk is used before switching to another OST.
The following picture shows the details of the previous example:

Important:
LOV = Logical Object Volume
OSC = Object Storage Client

A logical object volume (LOV) aggregates the OSCs to provide transparent access across all the OSTs.
Let’s provide an example:
The command:
dd if=/dev/zero of=/lustre/testfilebs=1M count=100…. creates a 100 MiB file with ~331 MB/s write speed.
The “lfs getstripe” command means:
lmm_stripe_count: 1
— The entire 100 MiB file is stored on a single OST.
— No parallelism here.
lmm_stripe_size: 4194304
— Data is written in chunks of 4 MB.
— But since stripe_count= 1 → all chunks go to the SAME OST.
lmm_pattern: raid0
— This is striping mode (RAID0 style).
— No redundancy.
— Pure performance distribution.
lmm_stripe_offset: 3
— First OST used. OST index 3 (So the file is stored on OST0003).
obdidx: 3 –> OST index 3.
objid: 130 –> internal object ID inside that OST.
To recap:
Default Lustre Stripe size is 1M, and Stripe count is 1:
— Each file is written to 1 OST with a stripe size of 1M.
— When multiple files are created and written, the Metadata Server (MDS) will do best effort to distribute the load across all available Object Storage Targets (OSTs).
The default stripe size and count can be changed:
— Smallest stripe size is 64K and can be increased by 64K, and the stripe count can be increased to include all OSTs.
— Changing the stripe count to all OSTs indicates each file will be created using all OSTs. This is best when creating a single shared file from multiple Lustre clients.
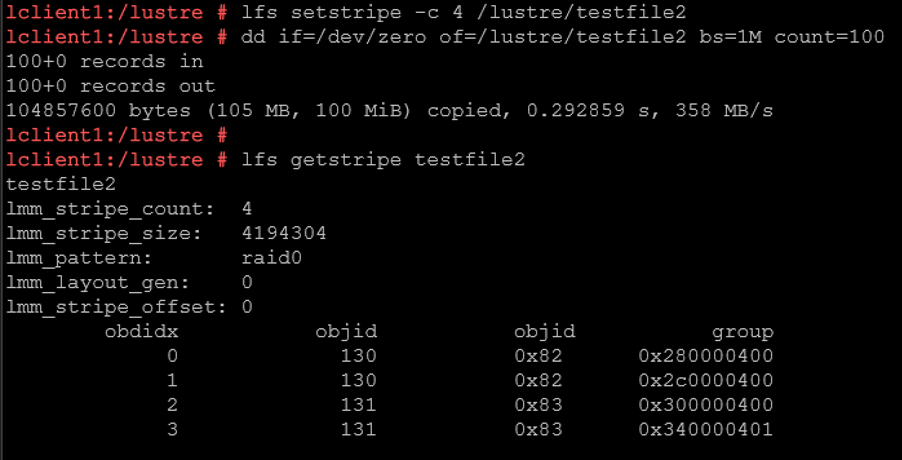
For example:
lfs setstripe -c 4 testfile2
dd if=/dev/zero of=/lustre/testfile2 bs=1M count=100
— The “testfile” will be split across 4 OSTs.
— Potentially get 4x throughput (depending on hardware).
— The file is distributed across ALL 4 OSTs.
Lustre Striping: Write-Path
Let’s explore the step-by-step flow for a write-path operation:
1- So, first, the communication flow between Client –> MDS:
The client wants to create the file testfile2: lfssetstripe-c 4 testfile2
MDS replies to the Client with the file layout:
Stripe count = 4
OSTs = [0,1,2,3]
Stripe size = 4MB
2- Client receives MDS’s instructions and writes in parallel (all at the same time) – Client splits data and sends to OSSs.
3- Each OSS writes its portion/chunk.
Each one independently sends an acknowledgment back to the Client.
4- Client aggregates responses:
Once all chunks are written:
— Client completes the write operation.
— Updates metadata on MDS.
⚡ Why this is powerful (important for HPC):
-- Parallel writes = 🚀 high throughput.
-- Multiple disks are used simultaneously.
-- Bottleneck avoided on a single disk.
Lustre Striping: Read-Path
1- Communication flow between Client –> MDS:
— “Where is this file?” (metadata lookup)
— MDS returns:
Stripe layout.
OST locations.
2- Client communicates directly with OSSs (direct reads):
— Client reads directly from OSTs.
— Same striping logic:
Chunk 1 ← OST0
Chunk 2 ← OST1
Chunk 3 ← OST2
Chunk 4 ← OST3
3- Data flows back to the Client:
— No commit.
— No metadata update (unless atime is enabled).
Keep in mind:

👉 Write path = client pushes data to OSTs
Client → MDS → Client → OSS/OST (parallel) → ACK → MDS (finalize)

👉 Read path = client pulls data from OSTs
Client → MDS → Client → OSS/OST (parallel reads)
That’s it for now 🙂
If you need more details, we encourage you to check the Lustre documentation by clicking here!