Creating an SMB File Server with PowerFlex shows how to create a File Server using the PowerFlex solution.
First and foremost, our PowerFlex solution is a lab environment made of nested virtual machines (VMs). We are running the 4.5.2 version!
PowerFlex can work as a file-based storage system, providing SMB and NFS shares to network clients. Before starting and creating our shares, we must deploy a Resource Group. The Resource Group will create a cluster from a pre-configured Template. This cluster will serve volumes through NAS protocols such as SMB and NFS.
The following picture shows that our Resource Group for the file-based cluster is called “RG Files SW Only.”:

We have written an article introducing the PowerFlex File Services feature and how to deploy a resource group. Click here to read this article!
File Server Structure
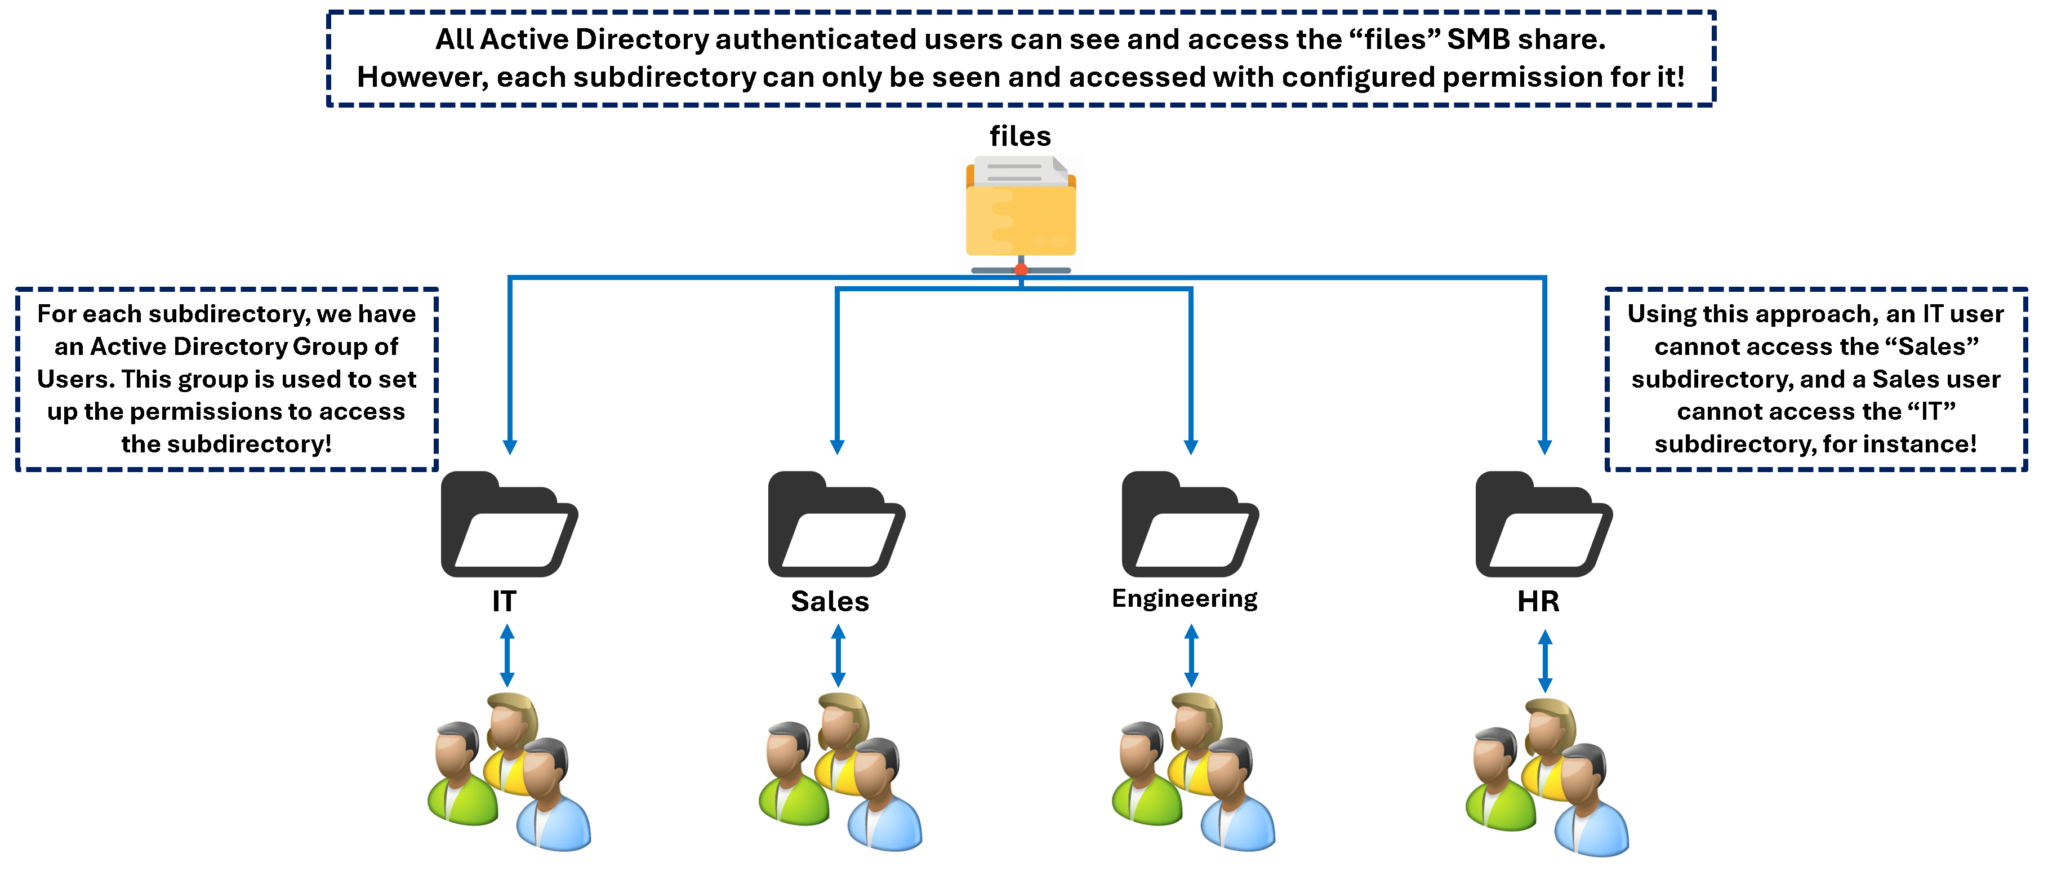
Our SMB file server will have the following structure:

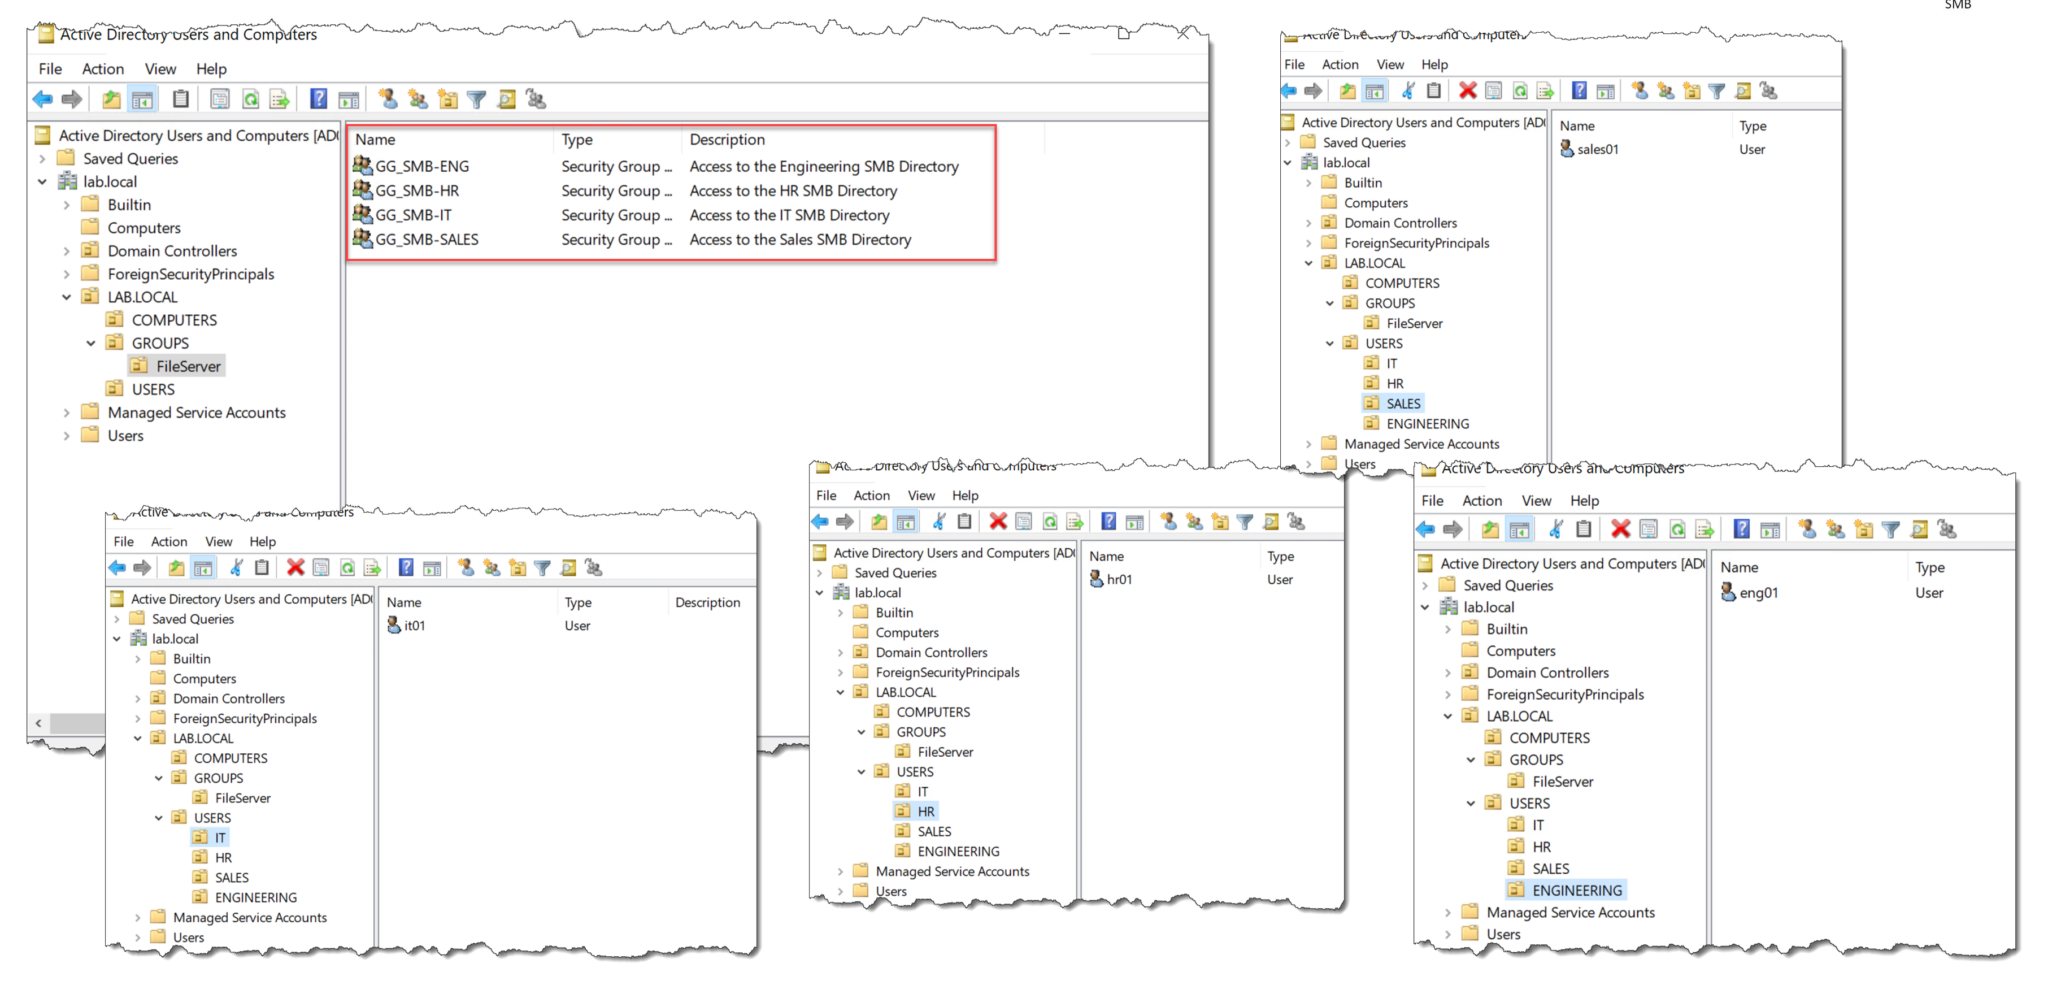
In the following pictures, we can see all AD Users and Groups:

Creating a NAS Server
The first step is to create at least one NAS Server. The NAS Server is responsible for providing access to the file systems. When a NAS Server is made, a Docker container is created on a node. Each NAS Server has a Primary Node and a Secondary Node. Each node has a Docker container that provides access to the file system.
As the following picture shows, both NAS Servers have been created. The IP address shown in the column “Preferred IPv4 Interface” is set up inside the Docker container (… and this is the IP address that will be used to access the share):

Creating a File System and an SMB Share
The next step is creating a File System. Log in on the PowerFlex Manager UI –> File –> File Systems –> + Create File System.
The first step in the creation wizard is to specify the NAS Server:

During the File System creation wizard, we can create an SMB share. We are doing it (in this case, for instance, the SMB share has the same name as the File System):

From a Windows-joined station, try accessing the created SMB share:
Start –> Run –> \\192.168.158.200 (To remember, this is the IP address of the NAS Server)

Looking forward, the next step is to adjust the “Sharing” and “NTFS” permissions of our SMB share. Access a joined Active Directory machine and follow the steps below – in this case, we have joined with the domain administrator account to adjust these permissions:


The next step is to create all subdirectories and adjust their permissions:

On the PowerFlex UI, edit the “files” SMB share and enable the “Access Based Enumeration”:

Mounting the SMB Share Through GPO
We can create a GPO for the share to mount it automatically for each use. In this case, for instance, we have created a GPO for the IT organizational unit users. When an IT user login on a domain computer, the share will be mounted automatically:

We have created one Group Policy Object (GPO) for each Organizational Unit (OU) used to group users for the same department. Making the correct OUs in Active Directory Users and Computers (ADUC) is essential because the GPOs will be created and applied using this structure!

Using Quotas
What is Quotas?
PowerFlex includes quota support, allowing administrators to limit how much space users can consume in a file system. User quota, quota trees, and user quotas on trees are supported. All three types of quotas can co-exist on the same file system and may be used in conjunction to achieve grained control over storage usage.
User Quotas:
User quotas in PowerFlex Manager limit a user’s file system space usage. Default quotas apply to all users but can be customized for specific users, with options to allow unlimited access or inherit default limits.
Tree Quotas:
Tree quotas in PowerFlex Manager limit the size of directories on a file system and can be applied to new or existing directories. If a non-existent directory is specified, it is created automatically; existing directories with data can also have quotas applied. Tree quotas cannot be nested within the same directory, and each tree quota has its customizable grace period, defaulting to 7 days.
User Quotas on Tree Quotas:
Once a quota tree is created, user quotas can be enforced within the directory. When multiple limits apply, users are restricted by the first limit reached. For example, a user may have a 25 GB file system quota and a 10 GB quota within a specific directory, and all users combined in that directory are limited to 100 GB. The other limits do not occur when the first limit is reached (in simple words, when the first limit is reached, the other limits do not matter anymore!)
Quotas Limits:
All quotas consist of three major parameters that determine the amount of space that can be consumed on a file system and define the behavior when a limit is being reached or exceeded. These parameters are:
- Soft Limit (GB)
- Grace Period (time)
- Hard Limit (GB)
The soft limit is a capacity threshold that triggers the grace period timer to start. The grace period continues to count down as long as the soft limit is exceeded. If the soft limit remains exceeded long enough for the grace period to expire, no new data may be added by the user or to the directory. However, suppose enough data is removed from the file system or directory to reduce the utilization below the soft limit before the grace period expires. In that case, data can continue to be written normally.
The grace period has a minimum value of 1 minute and a maximum value of unlimited.
A hard limit is also set for each quota configured. Upon reaching a hard limit, the user cannot add new data to the directory. When this happens, the quota must be increased, or data must be removed from the file system before additional data can be written.
Quota Planning
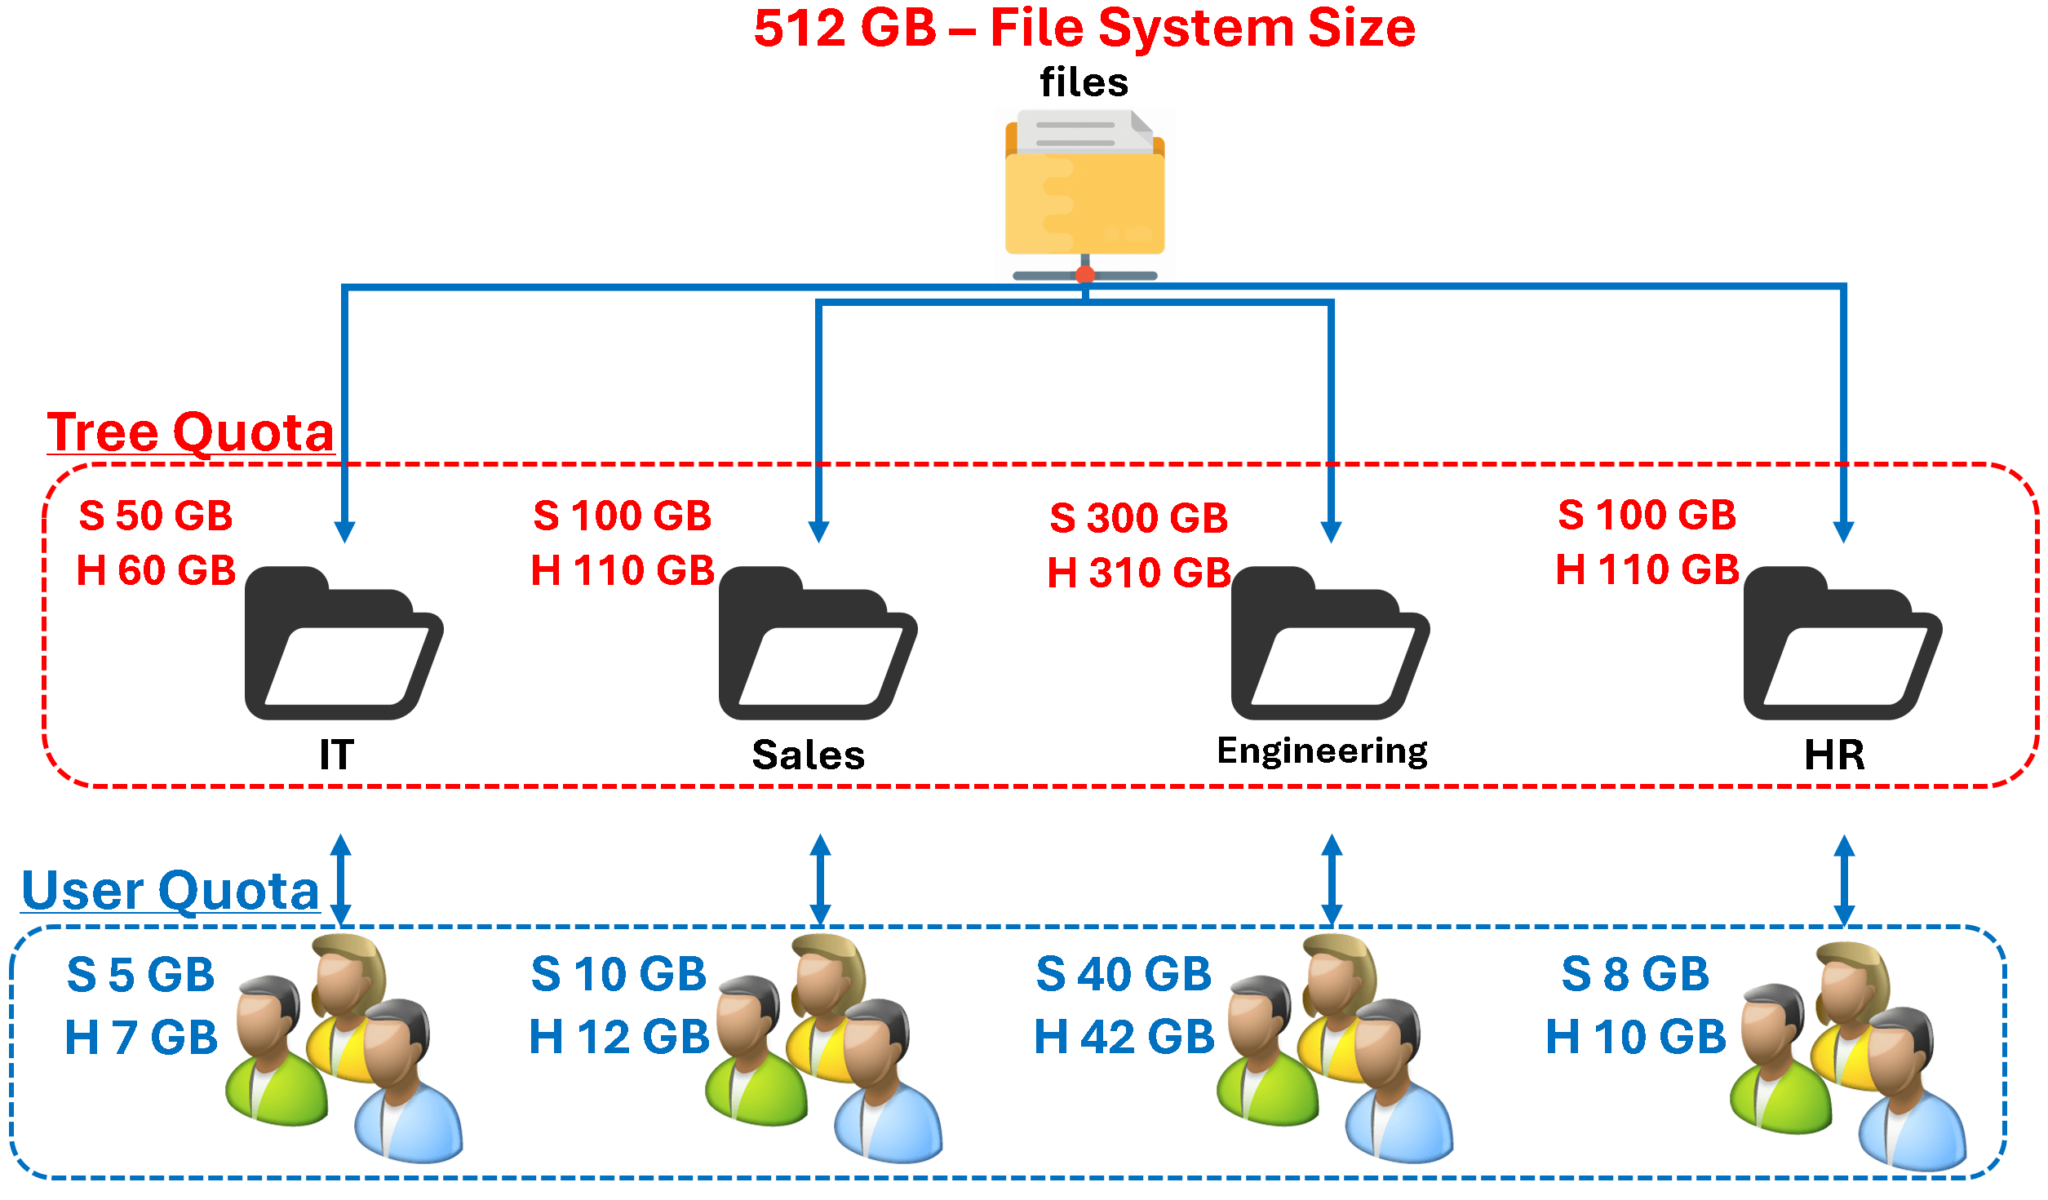
In this case, for instance, our quota planning is shown in the following picture.
As we can see, we can apply the quota at the “Tree” level (directory level) or the “User” level (or a combination of both):
S = Soft Limit
H = Hard Limit

Applying Quotas
To apply Tree Quotas, select the File System –> Click “View Details” –> Quotas:

Since the Quotas are not enabled, click “Properties” to enable it:

Under “Tree Quota” click “+Add”:
We will add the Tree Quota for the subdirectory “IT”:

Note: Create each Tree quota based on your needs!
In the following picture, we can see all the Tree Quotas based on our quota planning:

That’s it 🙂