DHCP Server on NSX-T is an article that provides all the steps to set up a DHCP Server on an NSX-T Segment. With this configuration, NSX-T will be your DHCP Server for the specific NSX-T Segment.
First and Foremost, What is DHCP?
Basically, DHCP is an acronym for Dynamic Host Configuration Protocol. Through this network protocol, supported network devices can acquire IP addresses and other configurations automatically with DHCP.
How it works?
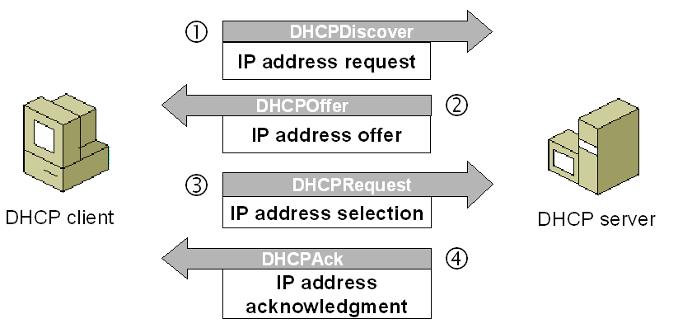
- Each network device is considered a DHCP Client. Each DHCP Client sends a broadcast packet “DHCPDiscover” searching by a DHCP Server
- If a DHCP Server exists on the network, it will reply with a message “DHCPOffer” explaining to the DHCP Client the possibility of giving an IP address
- Now, the DHCP Client sends a message “DHCPRequest” requesting the IP address to the DHCP Server
- Finally, the DHCP Server replies with a message “DHCPAck” sending the IP address to the DHCP Client
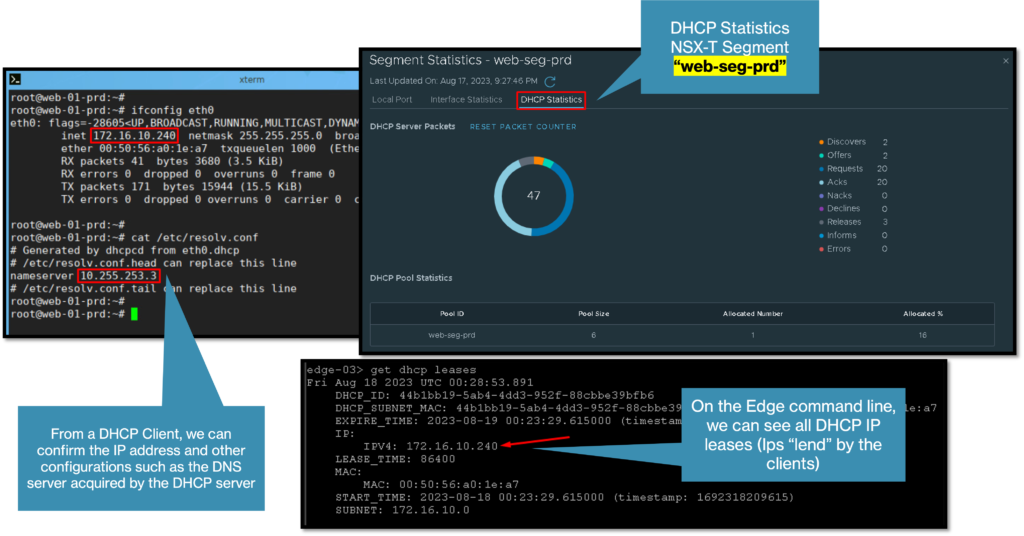
Just to remember, by default, the DHCP Server “lends” the IP for the DHCP Client for an amount of time (8 hours, 8 days, etc – this amount of time is configurable). After the lend time finishes, the DHCP Server can lend the same IP address again to the DHCP Client or can lend a different IP address.
In the picture below, we can see how the DHCP protocol works:
How can we use DHCP on the NSX-T?
On NSX-T, we can use DHCP in some ways. In my opinion, both ways are interesting and maybe can be a real possibility of usage.
The first way is to configure a DHCP Server on each NSX-T Segment. The second way is to configure to use the DHCP Relay resource. We have already written an article that explains how DHCP Relay works and how we can configure it. You can access this article using the below link:
https://dpcvirtualtips.com/how-to-configure-dhcp-relay-for-an-nsx-t-segment/
Now, we will show how to configure the NSX-T to operate as a DHCP Server for a specific NSX-T Segment.
DHCP Server Profile Creation
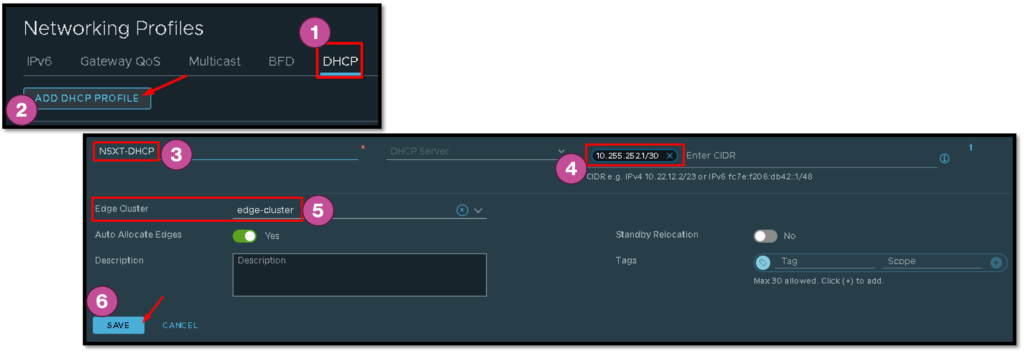
The first step here is to create the DHCP Server Profile.
On the NSX Manager user interface, we can do it by accessing the menu:
Networking –> Settings –> Networking Profiles –> DHCP –> ADD DHCP PROFILE
In this example, our DHCP Server Profile name is “NSXT-DHCP” and the Profile Type is “DHCP Server”.
The IP 10.255.252.1/30 will be used for gateway DHCP only – in our case, we will only configure the DHCP Server on each NSX-T Segment individually.
It is necessary to select the Edge Cluster and click on SAVE to finish the DHCP Server Profile creation:
Setting DHCP Config in an NSX-T Segment
The next step is to set up the DHCP in an NSX-T Segment.
To achieve this aim, we need to edit the desired NSX-T Segment and click on “EDIT DHCP CONFIG”.
In this example, we are selecting the DHCP Type as “Segment DHCP Server”, the DHCP Server profile that we created before, and the other specific configurations (DHCP Server Address, DHCP Ranges, Lease Time, DNS Servers, etc):
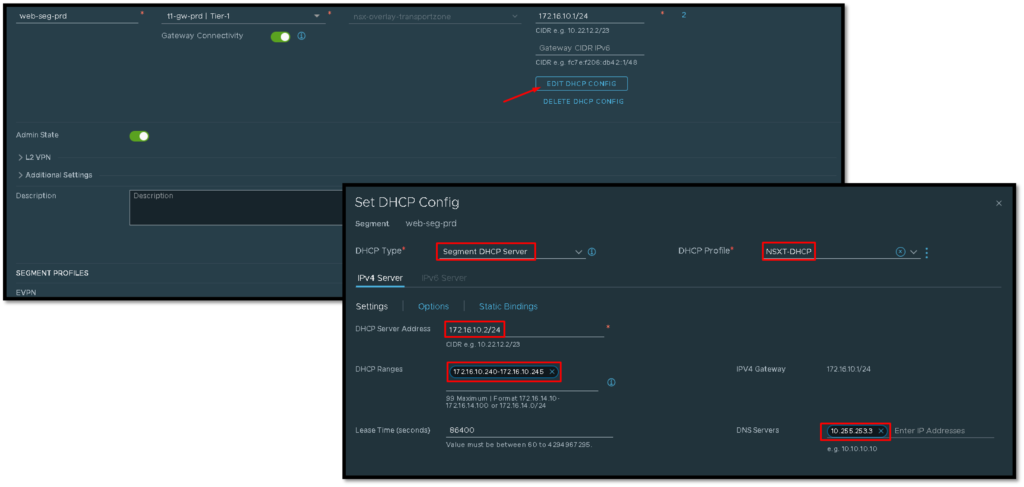
The NSX-T Segment called “web-seg-prd” will have available an IP range from 172.16.10.240 to 172.16.10.245 to lend to the Virtual Machines present on this NSX-T Segment.
Checking DHCP Details