Network Address Translation (NAT) on NSX-T is an article that explains some ways to use the NAT on NSX-T. We will provide some examples of SNAT (Source NAT) and DNAT (Destination NAT).
First and Foremost, What is NAT?
When we are talking about NAT, we are talking about some techniques when it is possible to translate the IP addresses. It is a method by which IP addresses are mapped from one realm to another, in an attempt to provide transparent routing to hosts, access services, solve network overlap issues, etc.
Just to remember, the NAT technology was developed to solve the problem of a limited number of Internet IPv4 addresses. The need for NAT arises when multiple devices need to access the Internet but only one IPv4 Internet address is assigned by the Internet Service Provider (ISP). In this scenario, the entire local network can access the Internet using and sharing this only “valid” IPv4 Address through the NAT configuration. This is a real-world use of NAT 🙂
So, at this point, our aim is to pass to the reader that the main concept of NAT is to make a translation of the IP address to solve or address something!
Here, we will provide an example based on our lab topology and we will show how the use of NAT can solve the network communication issue between VMs inside different NSX-T Segments but with the same L3 Subnet. This is our challenge and the NAT will be our redemption 🙂
Network Address Translation (NAT) Support on NSX-T
NAT can be configured on Tier-0 or Tier-1 Gateways. NSX-T supports three types of NAT options:
- Source NAT (SNAT): In simple words, we use this type of NAT when we need to translate the source IP address to another one. Usually, the source IP address is inside one NSX-T Segment and it is translated to another IP to reach somewhere in the Physical/External network;
- Destination NAT (DNAT): We use this type of NAT when we need to translate the destination IP address to another one. Usually, the destination IP can be an IP from outside the NSX-T environment and we need to translate it to an IP inside the NSX-T Segment, for example;
- Reflexive NAT (stateless NAT): This type of NAT is known as “Stateless NAT”. We can configure, for example, a translation from a single IP source to multiple destination IP addresses (range). There are other examples of usage but this is not the case in this article.
Important: Some important considerations of the type of NAT and HA mode of Tier-0 and Tier-1 Gateways:
- SNAT and DNAT are both supported on Tier-0 and Tier-1 Gateways when they operate in Active/Standby (A/S) HA Mode;
- Reflexive NAT is only supported by a Tier-0 Gateway when it operates in Active/Active (A/A) Mode.
In our lab, we will apply NAT on Tier-1 Gateway and it is operating in Active/Standby HA Mode.
Challenge: How can we access the web page provided by the new VM?
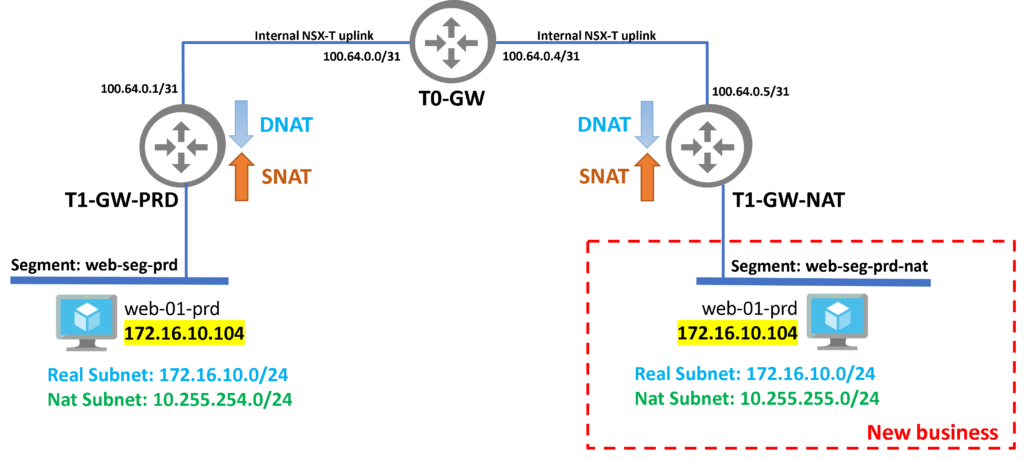
So, based on our topology we will explain some details to clarify your comprehension of where the use of NAT will solve our first challenge here!
T1-GW-PRD: This is the Tier-1 Gateway (Production Gateway) and we have a lot of NSX-T Segments attached;
web-seg-prd: This is the NSX-T Segment that we are using for Web Servers VMs. This NSX-T Segment is just connected to the Tier-1 Gateway “T1-GW-PRD”;
web-01-prd: This is our main Web Server VM that is using the local IP 172.16.10.104;
In the business world things change and happen faster a new business has been bought and the IT team needs to join the new business to the current environment. But the new Web Server has the same IP address 🙂
How can we solve it in a fast way because time is money, right?
The simple and short answer here is: with NAT 😉
Proving more details about how we can solve it:
- This new business can be placed into a new NSX-T Tier-1 Gateway. In this example, this new Tier-1 Gateway is “T1-GW-NAT”;
- Also, we have a new NSX-T Segment to place those new web server VMs (web-seg-prd-nat);
- When someone tries to access the web page provided by the new web server VM, they need to access using the IP address of the NAT subnet 10.255.255.0/24;
- So, the NSX-T will translate the traffic to the Real subnet 172.16.10.0/24 and the web page will open normally.
Creation Process of New Tier-1 Gateway
Here, we have the summarized steps to create a new Tier-1 gateway. This is not rocket science.
Basically, we need to create a new T1 GW, set the HA mode as Active/Standby, set the Edge Cluster, Linked it to your T0 GW, and click on SAVE:

Creation Process of New NSX-T Segment
Here, we have the summarized steps to create the new NSX-T Segment. This is the L2 Segment when we will place those VMs from the new business.
We need to type the NSX-T Segment name, connect it to a T1 GW, choose the Transport Zone, specify what is the L3 subnet, and click on SAVE:

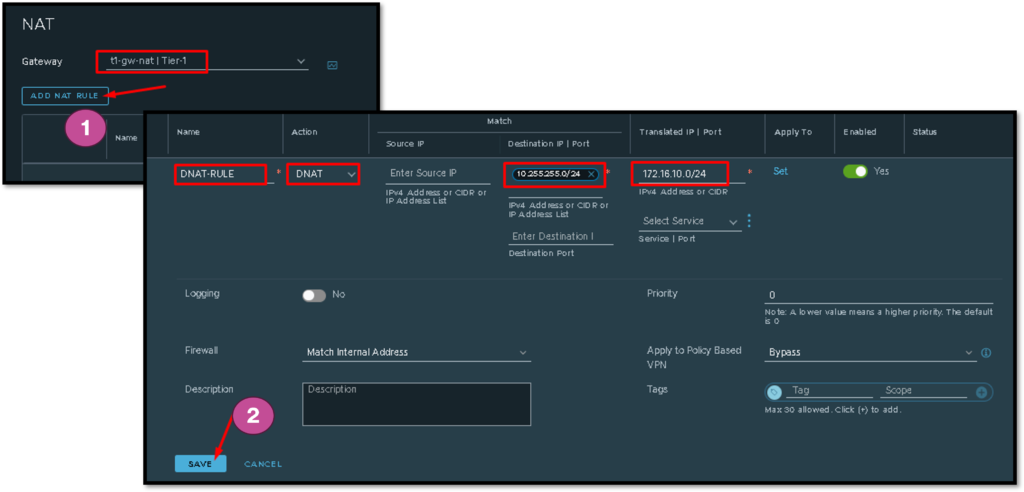
Creation Process of Destination NAT (DNAT) Rule
Now, we need to create the NAT rule to perform the translating process for us.
Firstly, we need to select in which T1 GW this NAT rule will be created. In this example, we are creating a NAT rule on the new T1 GW (the gateway that we have created before).
After it:
- Type the rule name;
- Select the Action (in this case, DNAT);
- On Destination IP, type the NAT network (in this case, 10.255.255.0/24);
- On Translated IP, type the Real network (in this case, 172.16.10.0/24).
Click on SAVE to finish the rule creation process:
Tier-1 Router Advertisement Configuration
The other network devices need to know about our NAT network 10.255.255.0/24. Inside the Tier-1 GW, we need to enable the route advertisement of the NAT IPs.
To do that, we need to enable the option “All NAT IP’s” under the Route Advertisement configuration, as shown in the below picture:
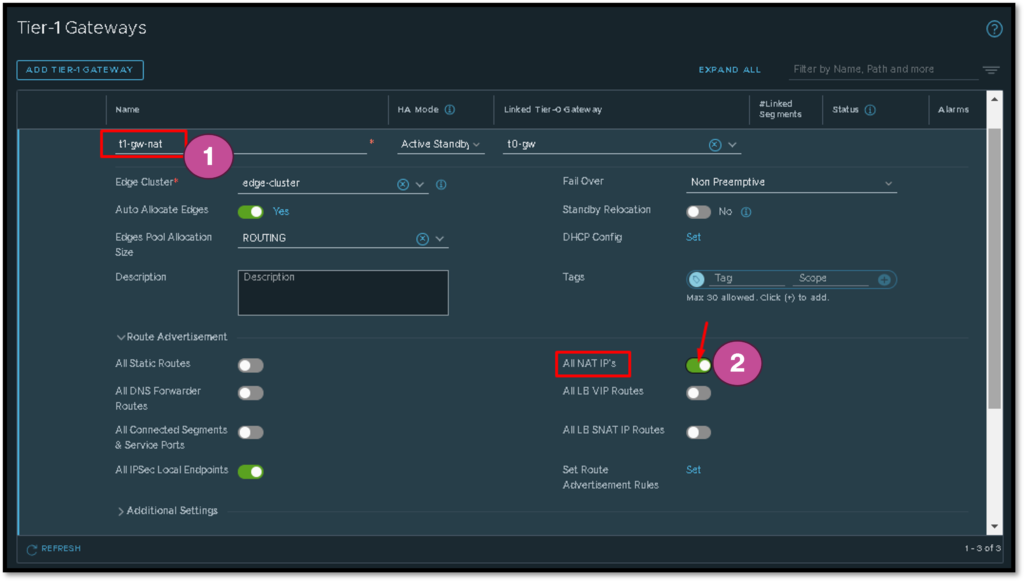
At this point, the web page for this new VM is available from other NSX-T Segments. But if someone in the external network (outside NSX-T) needs to access it, certainly it will not work yet, because the physical network does not know the NAT network 10.255.255.0/24.
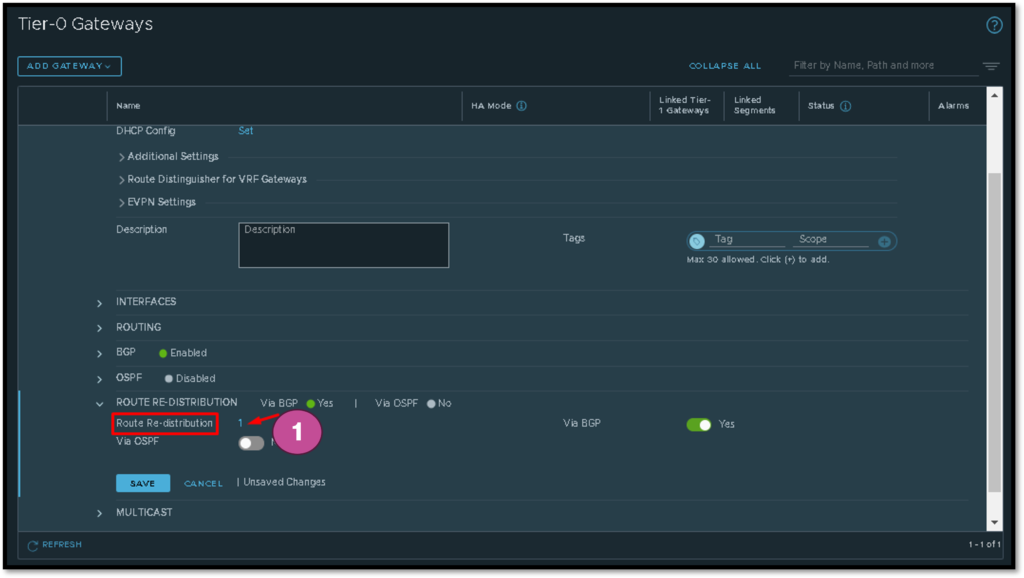
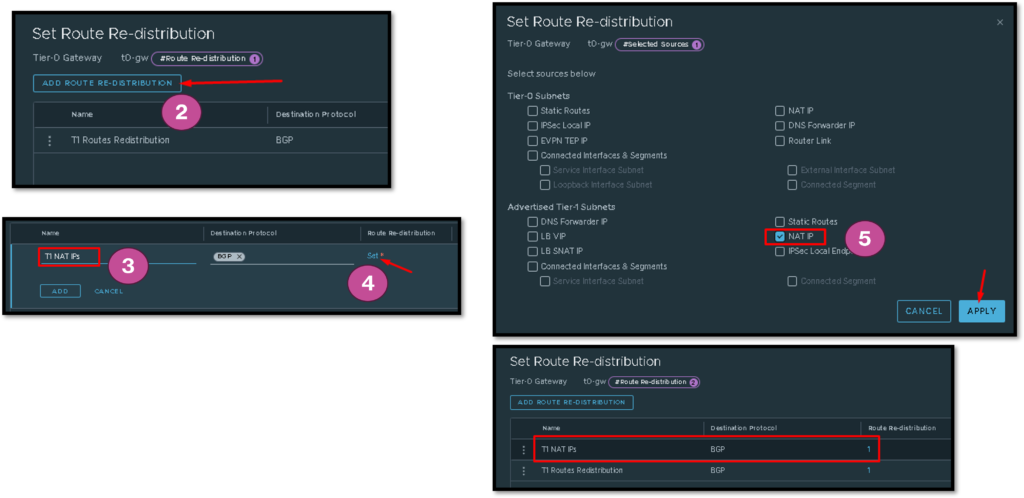
Tier-0 Router Redistribution
As the T1 GW is linked to the T0 GW, after enabling the route advertisement of NAT IPs, the T0 GW has the NAT network 10.255.255.0/24 in its routing table 🙂
Now, the T0 GW needs to redistribute this information to your neighbors (generally, the neighbors of the T1 GW are Physical Routers or Physical L3 devices) – just to remember, the T0 GW is placed in the boundary between the virtual world and the physical world.
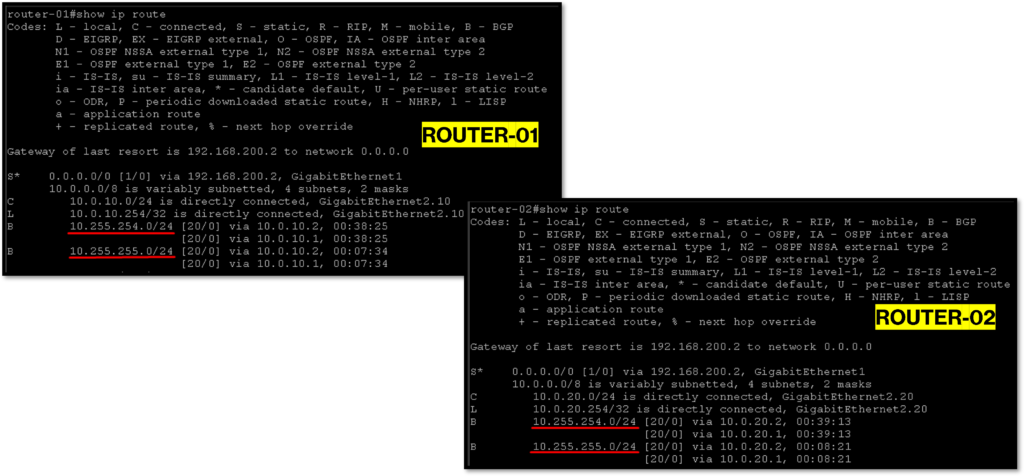
In our lab, we are using the dynamic routing protocol BGP (Border Gateway Protocol) to exchange routing information between T0 GW and our Physical Routers. To redistribute the NAT network 10.255.255.0/24 to the Physical Routers, we need to create a route re-distribution, such as shown in the below pictures:
After that, our pair of Physical Routers can have the network 10.255.255.0/24 in their routing table 🙂 :
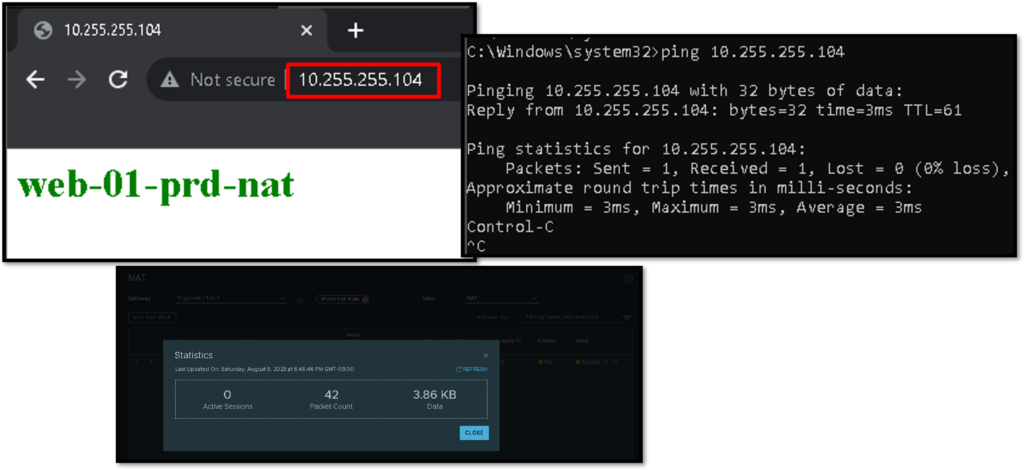
Accessing the Web Page
From somewhere in the physical network, we can access normally the web page provided by the new VM.
Look that we are using the NAT IP 10.255.255.104 and this IP is translating to the Real IP 172.16.10.104.
Just to remember, as we created the NAT rule using subnets /24, the translation process will be 1:1 (one-to-one). For example:
NAT IP 10.255.255.104 –> will be translated to the Real IP 172.16.10.104
NAT IP 10.255.255.105 –> will be translated to the Real IP 172.16.10.105
…..
NAT IP 10.255.255.200 –> will be translated to the Real IP 172.16.10.200
etc 🙂