Creating an NFS Share in the vSAN File Services article shows how to create and mount an NFS share. We will create it in the vSAN File Services and mount it in a PhotonOS client VM.
First and Foremost, What is an NFS Share?
NFS is an acronym for Network File System. It is a network protocol developed by Sun Microsystems in 1984. It allows a user of a client computer to access files over a network, much like local storage is accessed. However, those files are somewhere in the network. This means that users can access files stored on remote computers as if they were stored locally. We can find some NFS versions, such as NFS 3 and NFS 4.1.
NFS is a protocol based on client-server communication. It means that we have an NFS client and an NFS server. The server part is responsible for sharing the content that will be accessed by the client. So, the client can read files from this share and also create/copy new ones into this share.
So, an NFS share is a logical part of NFS protocol implementation that permits NFS clients to access it!
Creating an NFS Share into vSAN File Services
We have a lab environment with an enabled vSAN cluster. We have already enabled and configured the vSAN File Services in this cluster.
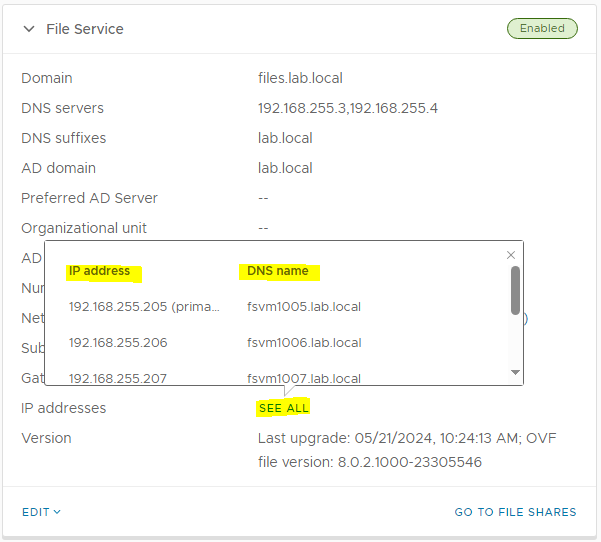
As we can see in the following picture, our file service domain is “files.lab.local”. We can also see various details of this service:

Under “IP addresses,” we can click on “SEE ALL.”
On this page, we can see all IPs and FQDNs used by the vSAN File Services. The first IP/FQDN is the primary FQDN for the vSAN File Services (in our scenario, the FQDN fsvm1005.lab.local was selected as the primary):
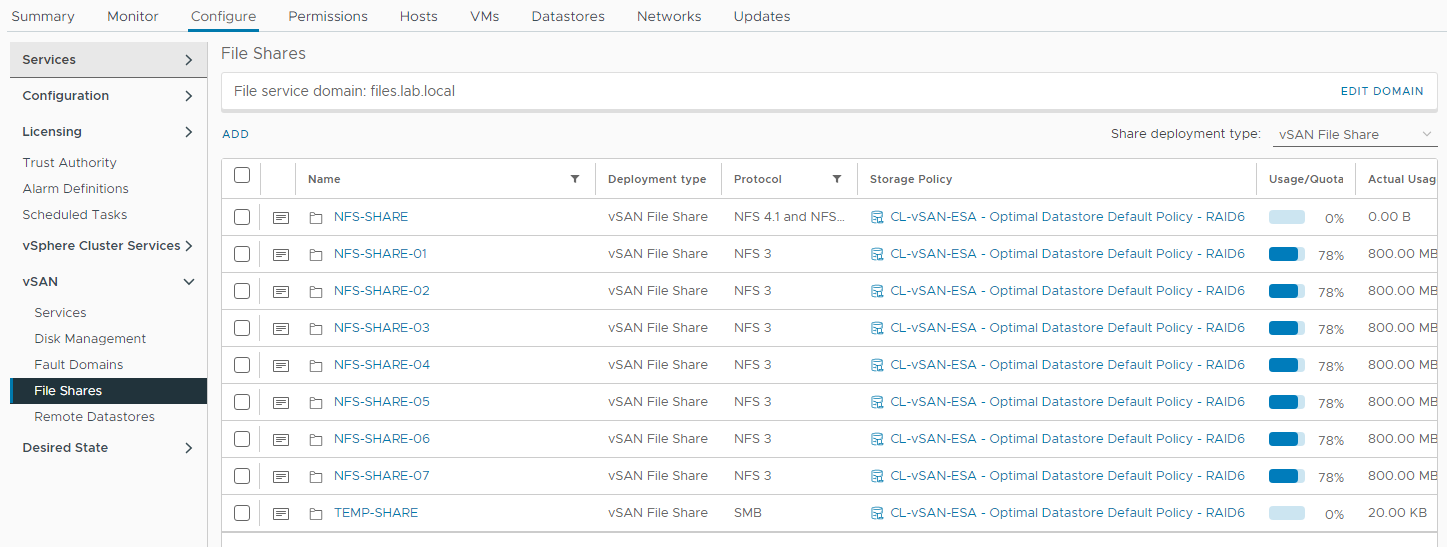
We can see all file shares on the “Files Shares” menu under the Configure tab. In our example, we have already created some NFS and SMB shares:
Creating a new NFS Share
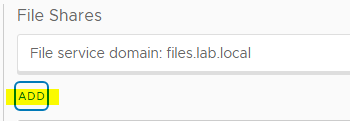
To create a new NFS Share, click on “ADD” to start the creating wizard:
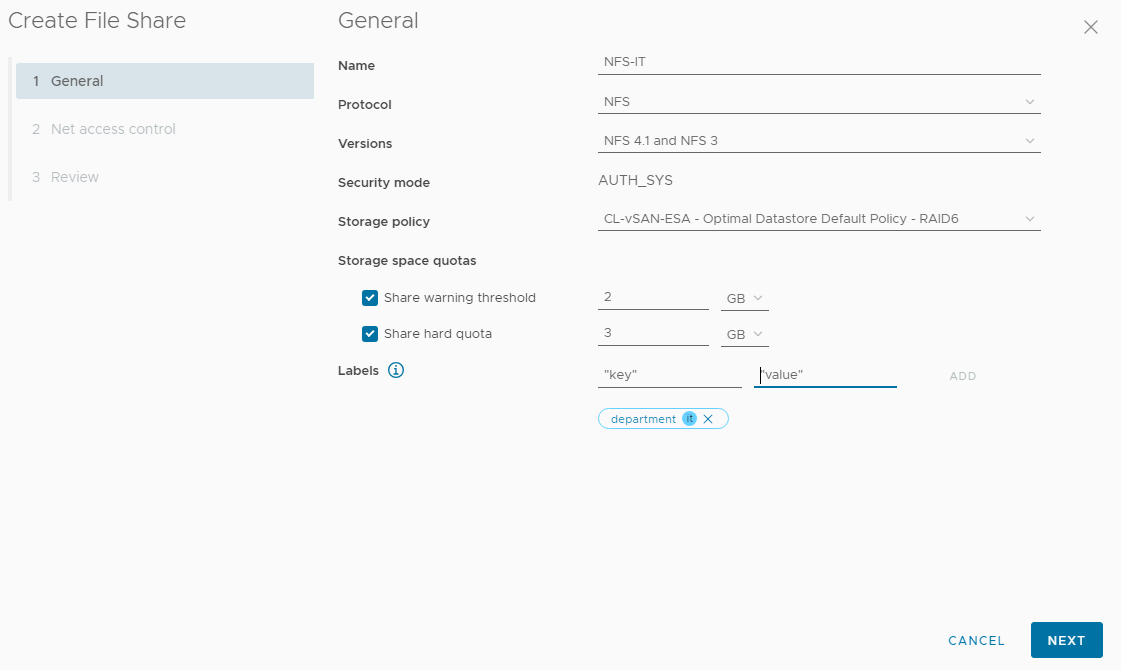
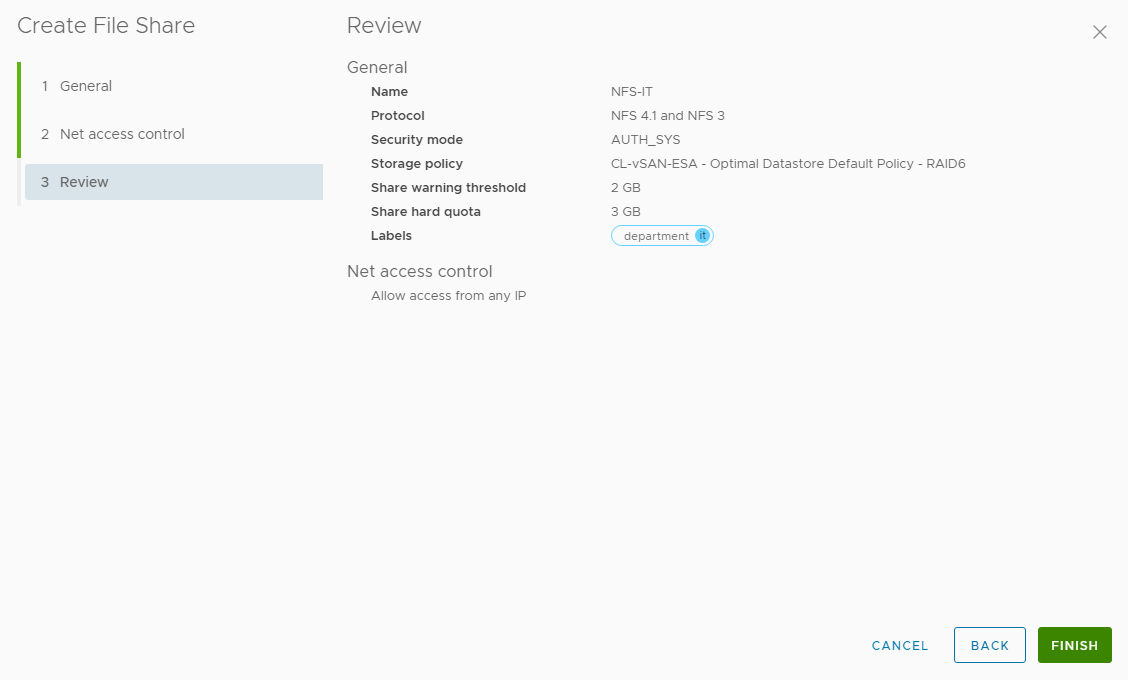
In this example, the share name is “NFS-IT.”
Under the Protocol, we can select NFS or SMB. If we select NFS, we can choose NFSv3, NFSv4.1, or both. In this case, we are using both NFS protocol versions for this share. It means that we can mount this share using both NFS protocol versions.
Another important thing here is the Quota. We can set a warning threshold and a hard quota. In our example, it will work as:
- If the share reaches 2GB of usage, a warning message will be triggered;
- 3GB will be the maximum size of this share. It means that its usage will not be more than this size:
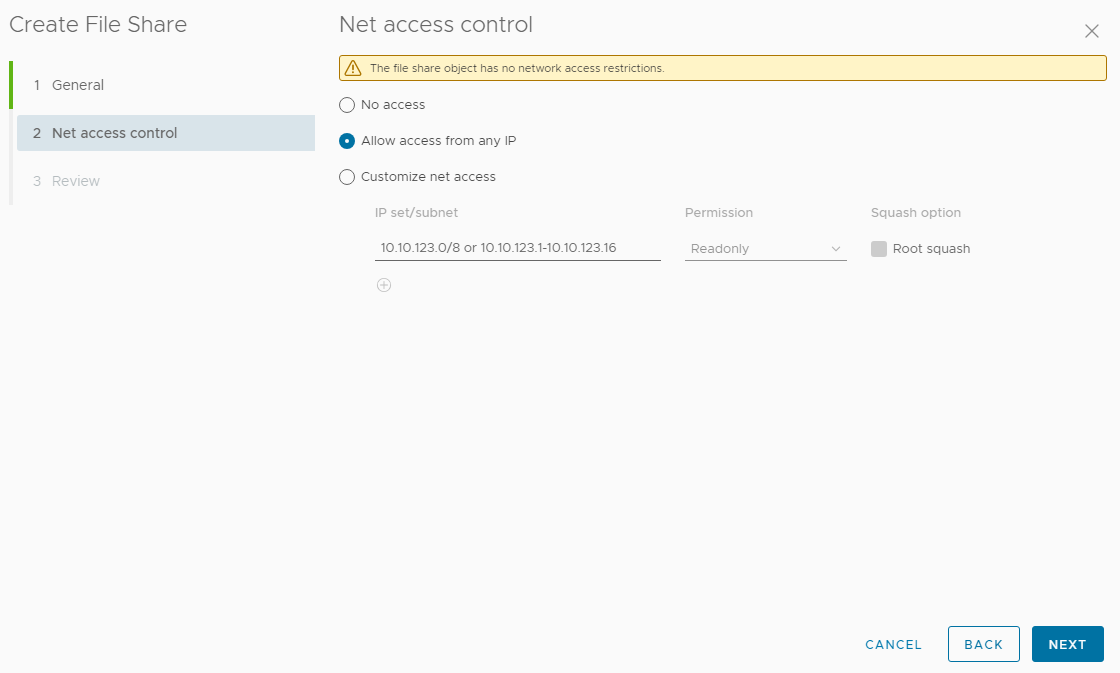
Here, we can define a net access control to our share. We can allow some specific IPs or a subnet range to access the share. We can also set the file’s permissions (read-only, read-write, etc.).
The “Squash option” is a security feature in the NFS protocol. How it works:
- When a client machine’s root user tries to access files on an NFS server, the “root squash” option (if enabled) will map the client’s root user to an anonymous user ID on the server. This effectively “squashes” the root user’s privileges, preventing the ownership of the root account on one system from migrating to the other system;
- If you do not enable the “root squash” option, a client machine’s root user will map the remote share with root privileges. It means that this user will have root privileges on this share:
Click on FINISH to create the share:
Looking for Details in Our NFS Share
After creating the share, we can select it and click on the box next to the selection icon, as seen in the following picture.
As we created an NFS share supporting both protocol versions, we have different export paths for each. All these details can be seen under the share’s properties.
It means:
- On a client NFS, if you need to mount the remote share using the NFS v3, you must use the export path for NFS version 3. On the other side, if you need to mount the share using the NFS v4.1, you must use the export path for NFS version 4.1:
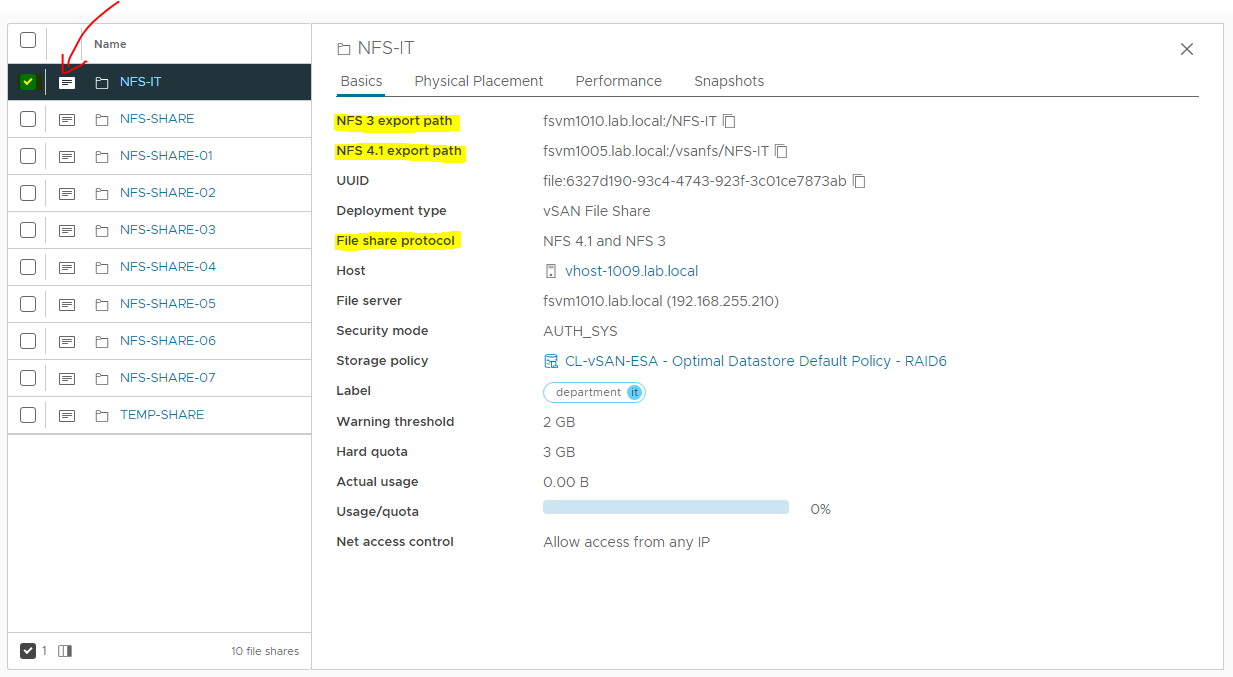
Note: The vSAN File Services exports the NFS share through a specific FSVM:
- For an NFS v3, you must use the export path provided by the vSAN File Services;
- For an NFS v4.1, you can mount the share through the FSVM primary FQDN. Within NFS v4.1, a feature called “Referrals” is responsible for receiving the client connection through the primary FQDN and redirecting access to the FSVM running the docker container for that specific share.
Mounting the NFS on a PhotonOS Client
We can see all exported shares from a specific NFS server on a client machine. Below, we can see an example:
showmount -e fsvm1005.lab.local

#You should replace the fsvm1005.lab.local for your NFS server IP or FQDN.
In the above picture, we check all NFS shares available on the FSVM “fsvm1005.lab.local.” The only available NFS share in this case is “/NFS-SHARE-07” (the share name that the client must use to mount it).
First, we need to create a local directory that will be used to mount the remote NFS share. In this example, we will create a local directory “NFS-IT” under /data:
root@photonos-01 [ /data ]# pwd
/data

root@photonos-01 [ /data ]# mkdir NFS-IT

root@photonos-01 [ /data ]# ls -lad NFS-IT
drwxr-x--- 2 root root 4096 May 21 20:16 NFS-IT
Next, we need to mount the remote NFS share.
For NFS v3, the mount command is:
mount -t nfs fsvm1010.lab.local:/NFS-IT /data/NFS-ITFor NFS v4.1, the mount command is:
mount -t nfs fsvm1005.lab.local:/vsanfs/NFS-IT /data/NFS-ITAfter mounting it, we can apply the “df -Th” command to see all mount points details:
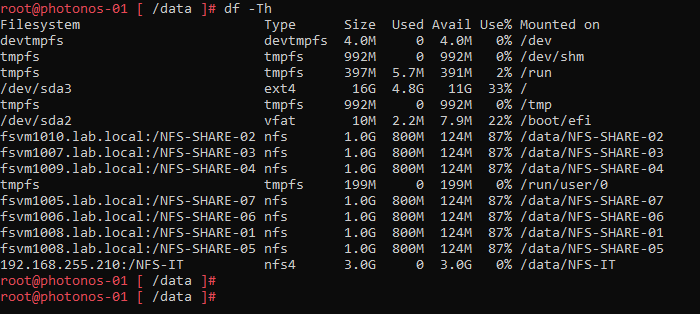
We can access the mount point and create some files usually:

NFS v3 or NFS v4.1?
So, as we learned, we can create an NFS share in the vSAN File Services that supports both NFS versions (3 and 4.1). However, what version should I use? What version is better? What version is worse? This is a tricky question; the best answer is “it depends”!
First, NFS v4.1 introduces state, whereas NFS v3 is stateless. This means that in NFS v4.1, the NFS server handles the lock files and monitors all related operations, while in NFS v3, the client side is responsible for that.
Second, the sequential writes appear almost identical between NFS v3 and NFS v4.1. So, determining which NFS protocol version provides the best performance will depend on variables such as network latency, network throughput, disk technologies (HDD, SSD, NVMe), etc.
Finally, the NFS v4.1 version brings some security improvements compared to the NFS v3 version. Below, we will share some of these improvements:
- The NFS v4.1 has improved file locking mechanisms (as we said), which can help prevent unauthorized access and maintain data integrity;
- Supporting a new file attribute, which can provide more granular control over file permissions;
- Supporting authentication with Kerberos.
So, many client systems can only support one version of the NFS protocol. Based on this, you must evaluate all variables to determine which NFS protocol version fits all your needs.
vSAN File Service Virtual Machines (FSVMs)
After enabling and configuring the vSAN File Services, some VMs, known as FSVMs, will be deployed in your cluster. These VMs are responsible for providing the distributed services for the vSAN File Services service.
Inside each FSVM, we can find some docker containers that are responsible for providing our shares.
For example, if we access an FSVM console through vSphere Client and apply a “docker ps” command, we can see all running containers inside this FSVM, as we can see below:

Based on the above picture, we can conclude that the “fsvm1007” is running inside the FSVM “vSAN File Service Node (51)”.
Note: All FSVM VM names are managed by EAM service. We do not recommend to change it!
By default, each ESXi host in the vSAN cluster has an FSVM running locally. If you need to put an ESXi in maintenance mode, what will happen with its FSVM? The answer is:
- The docker container will migrate to another running FSVM;
- It is transparent for clients (or should be 🙂 );
- vSAN is responsible for monitoring and balancing the docker containers when necessary (you will probably receive an alert under vSAN Skyline Health about it).
To Wrapping This Up
The vSAN File Service feature can be a choice for proving NFS and SMB share capabilities for an existing vSAN cluster. However, remember that new shares mean more vSAN space will be used, so be careful. It is a good idea to test it in a lab environment before putting it in a production environment!