Working with Local Users and Groups on RHEL demonstrates how to manage Linux users and groups in a Linux system using the command line. All examples provided here are based on Red Hat Enterprise Linux 10; however, they should also work with any other Linux distribution.
Linux Users
A user account provides security boundaries between people and programs that can run commands. Users have usernames to identify them to human users and for ease of working. Internally, the system distinguishes user accounts by the unique identification number, the user ID (UID), which is assigned to them. In most scenarios, if a human uses a user account, then the system assigns a secret password for the user to prove that they are the authorized user to log in.
Every process (running program) on the system runs as a specific user. So, every file has a specific user as its owner. With file ownership, the system enforces access control for users of the files. The user associated with a running process determines the files and directories accessible to that process.
There are three main types of user accounts in a Linux system. They are:
- Superuser: The account with admin rights in the system. For the majority of Linux distributions, the root account is the admin account. The root account has the user ID (UID) 0. This account has full system access without any restrictions.
- System User: These accounts are used by processes that provide supporting services. These processes, or daemons, typically do not require running as the superuser and do not have a controlling terminal session. They are often assigned nonprivileged system user accounts to secure their files and other resources from each other and from regular users on the system. Users do not interactively log in with a system user account.
- Regular User: Most users have regular user accounts for their day-to-day work. Like system users, regular users have limited access to the system.
Note: All three main types of user accounts are locally stored in a Linux system. However, we can integrate a Linux system with an external directory (like an Active Directory) and allow external users to access the Linux system. Those accounts are considered “regular users”, for example.
Local User Accounts
At this point, the output of most commands displays users by name, but internally, the operating system uses UIDs to track users. The mappings of usernames to UIDs are defined in databases of account information. By default, systems use the /etc/passwd file to store information about local users.
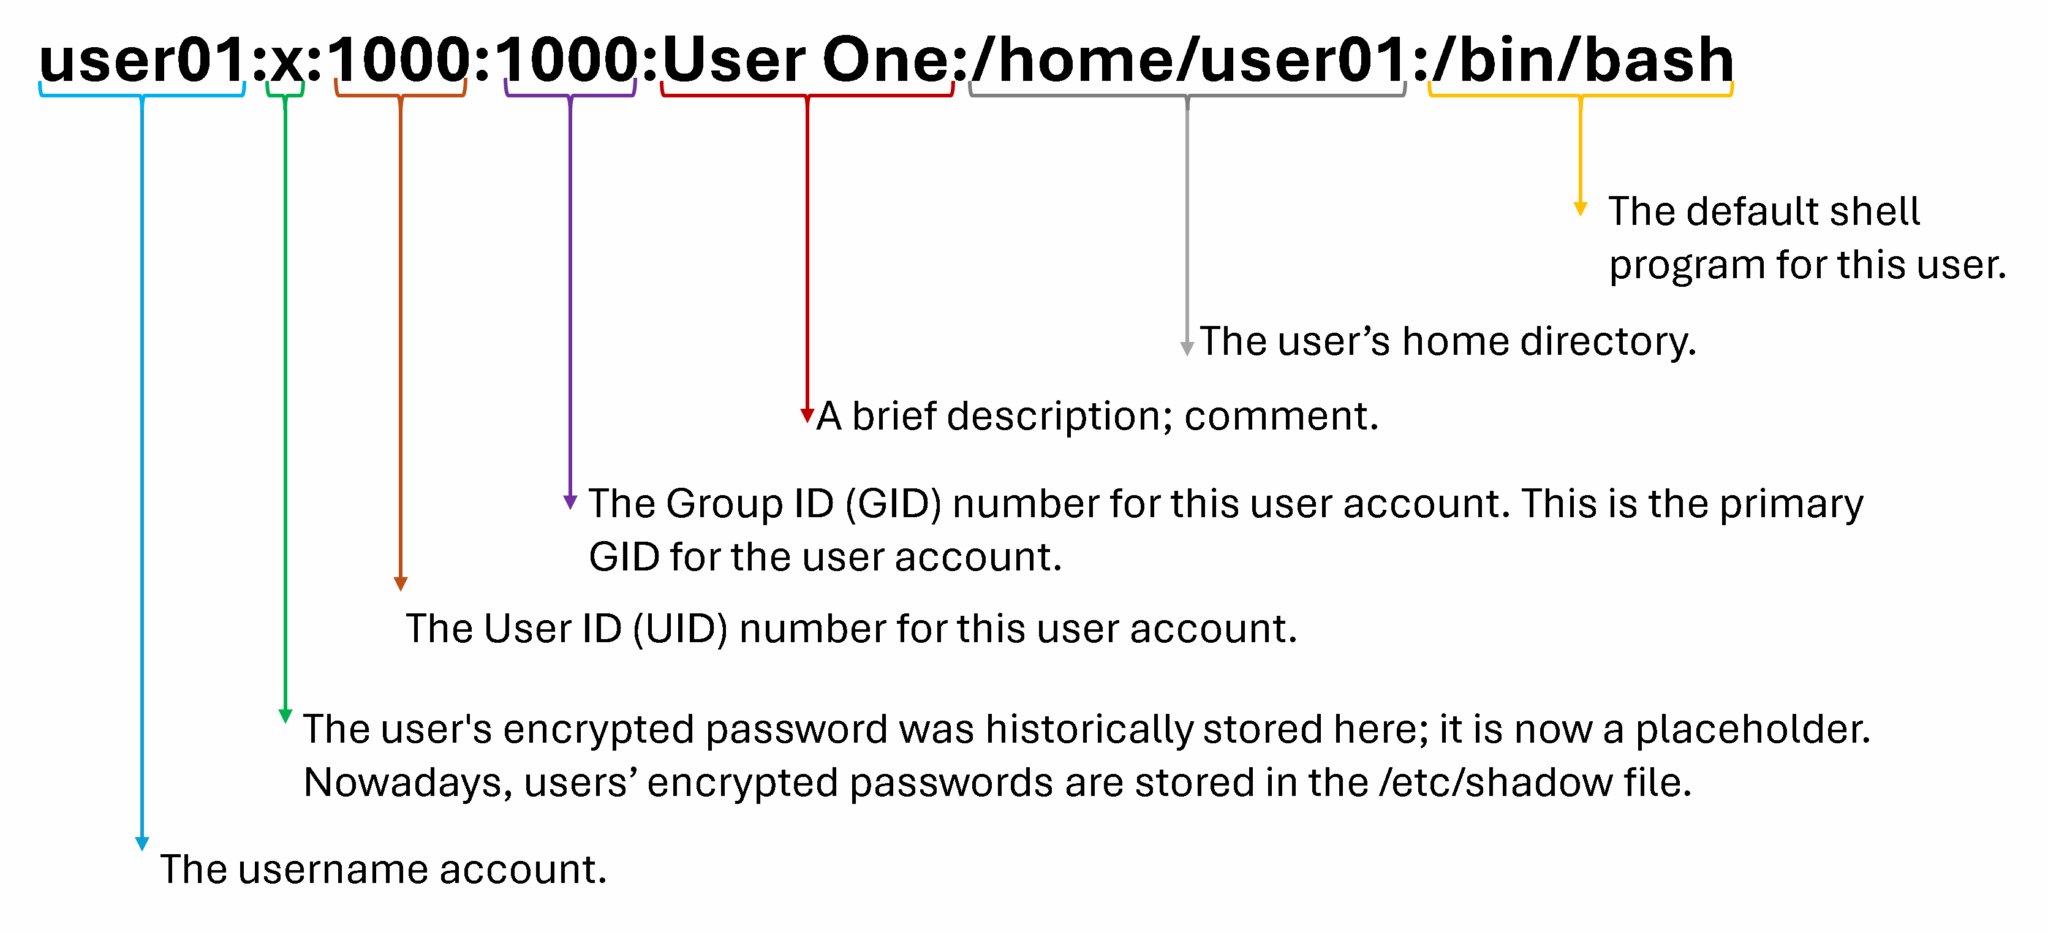
Each line in the /etc/passwd file contains information about one user. Basically, the file is divided into seven fields, each separated by a colon. Let’s provide an example of that, considering the line of this file for the username “user01”:
/etc/passwd entry example:
Previously, encrypted passwords were stored in a world-readable format /etc/passwd file. These passwords were considered adequate until dictionary attacks on encrypted passwords became common.
The cryptographically hashed passwords were moved to the /etc/shadow file, which only the root user can read.
Like the /etc/passwd file, each user has an entry in the /etc/shadow file. An example entry from the /etc/shadow file has nine colon-separated fields. Let’s provide an example of that, considering the line of this file for the username “user03”:
/etc/shadow entry example:

Linux Groups
A group is a collection of users that must share access to files and other system resources. By using groups, you can grant file access to a set of users rather than to a single user.
So, like users, groups have group names for easier recognition. Internally, the system distinguishes groups by their unique identification number, the Group ID (GID), which is assigned to them. The mapping of group names to GIDs is defined in the identity management databases that store group account information. By default, systems use the /etc/group file to store information about local groups.
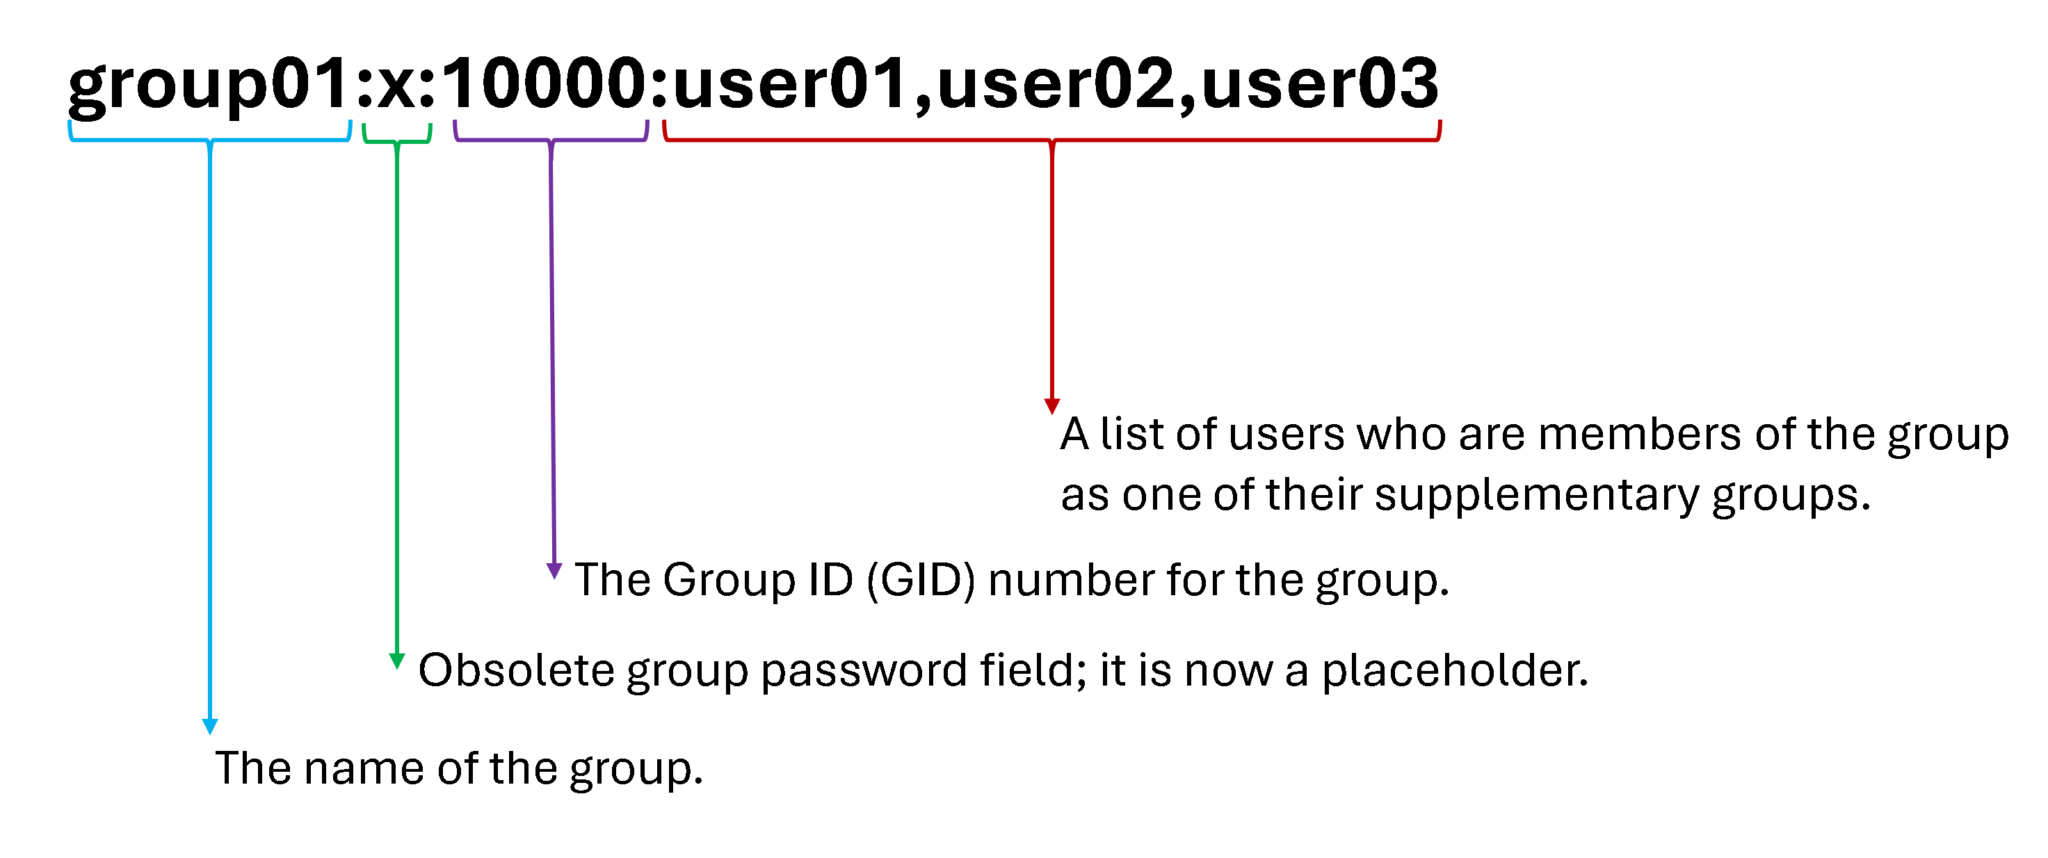
To illustrate, each line in the /etc/group file contains information about one group. Each group entry is divided into four colon-separated fields. Let’s provide an example considering the group name “group01”:
/etc/group entry example:
Primary Groups and Supplementary Groups
Every user has exactly one primary group. For local users, this group is listed by GID in the /etc/passwd file. The primary group owns files that the user creates.
When a regular user is created, a group with the same name as the user is made to be the primary group for the user. The user is the only member of this User Private Group. This group membership design simplifies file permission management by default separating user groups.
Users might also have supplementary groups. Membership in supplementary groups is stored in the /etc/group file. Users are granted access to files based on whether any of their groups have access, regardless of whether the groups are primary or supplementary. For example, if the user01 user has a user01 primary group and wheel and webadmin as supplementary groups, then that user can read files that any of those three groups can read.
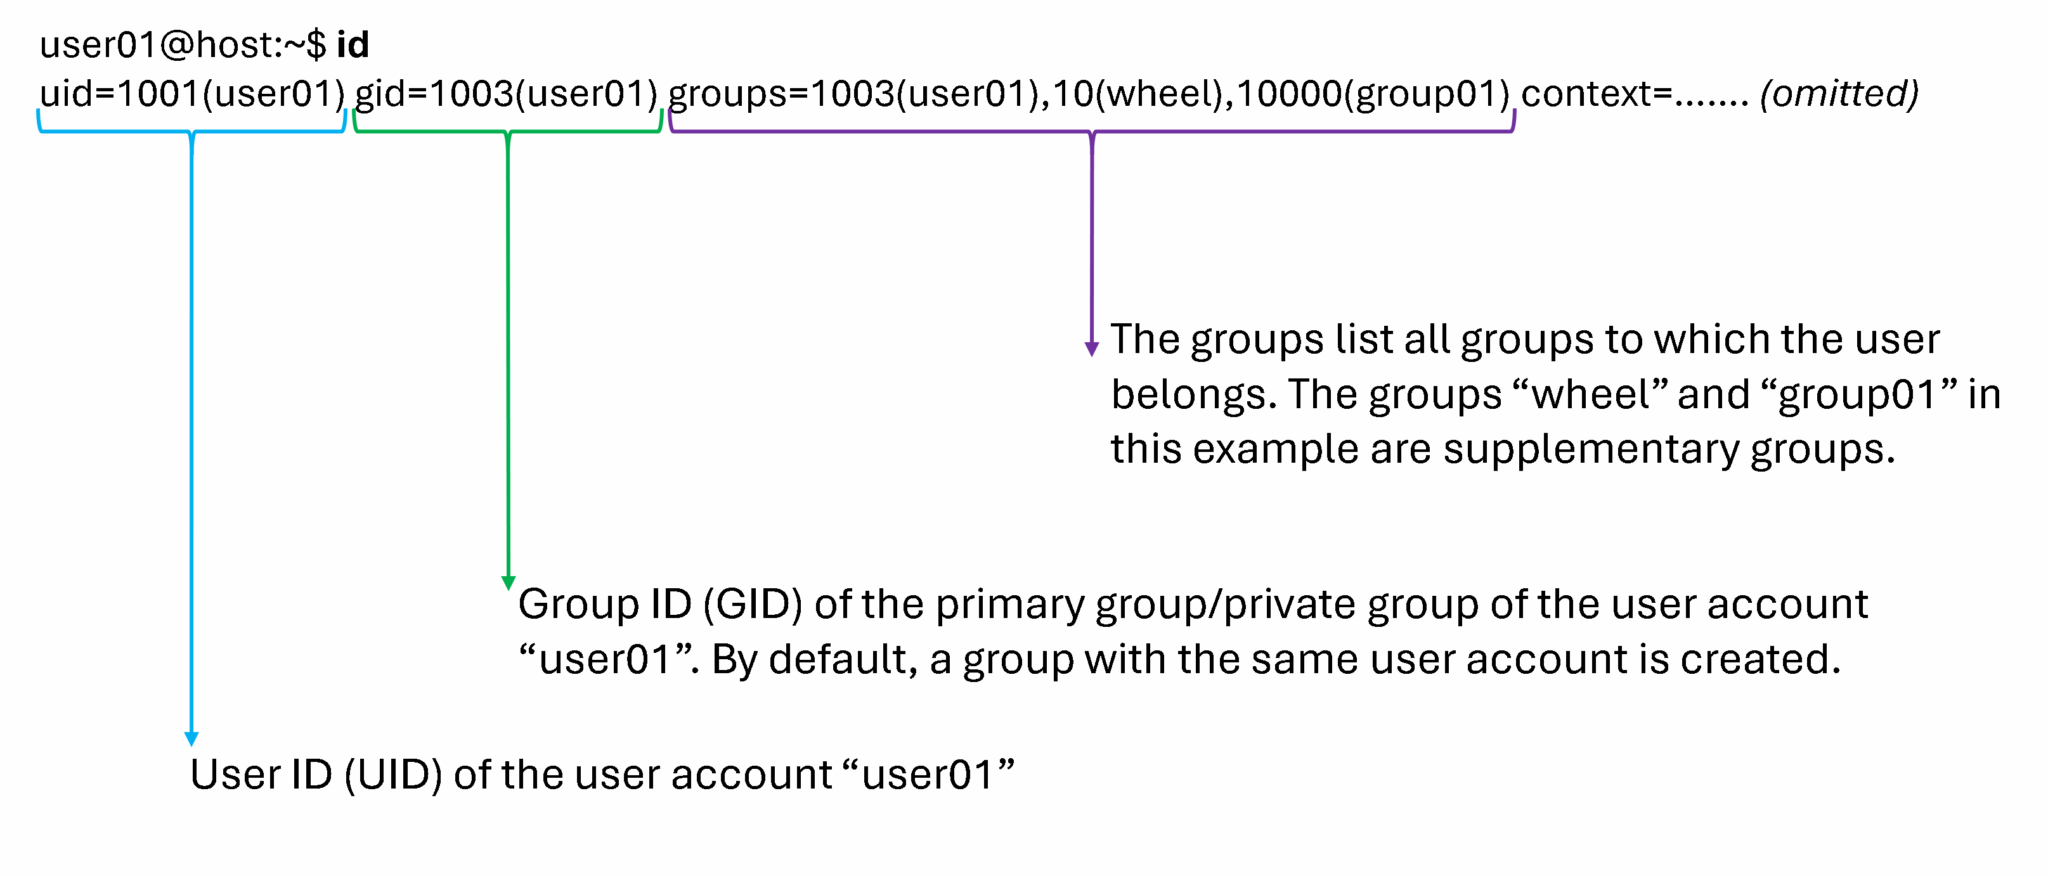
The id command can show group membership for a user. In the following example, the user01 user has the user01 group as their primary group (gid). The groups item lists all group memberships for this user, and the user also has the wheel and group01 groups as supplementary groups:
Creating Users
We can use command-line tools to manage local user accounts. The useradd command creates a user account named thorthor
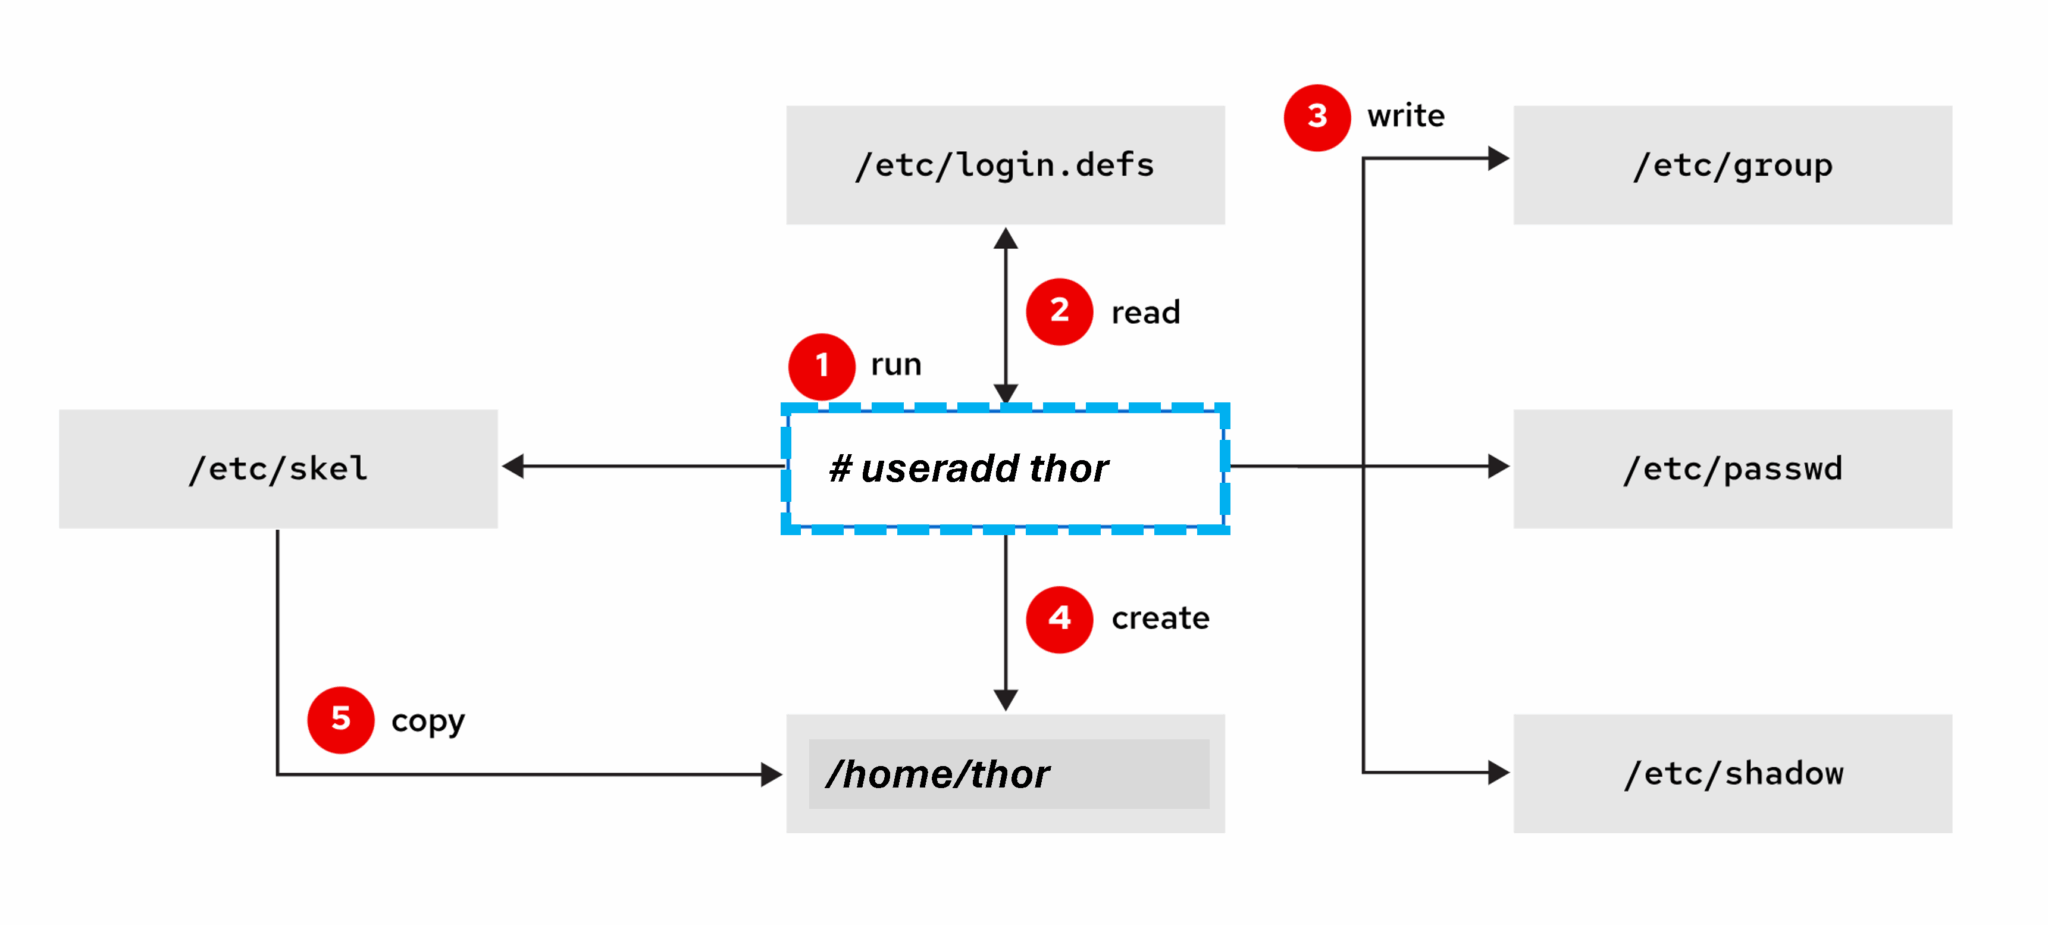
1- Firstly, run the useradd command as the superuser.
2- Secondly, the useradd command reads the configuration for user creation from the /etc/login.defs file.
3- The useradd command writes an entry in the /etc/group, /etc/passwd, and /etc/shadow files with the information that is assigned to the thor
4- The useradd command creates the home directory of the thor/home/ path.thor
5- Finally, the useradd command copies the user profile files in the /etc/skel directory to the thor
Important:
- At this point, a valid password has not been set for the account, and the user cannot log in until one is set (it can be done with the
passwdthorcommand). - By default, the
useraddcommand assigns new users the first free UID that is greater than or equal to 1000, unless you explicitly specify a UID by using the-uoption.
UID Ranges
Generally, Red Hat Enterprise Linux utilizes specific UID numbers and ranges for particular purposes:
- UID 0: The superuser (
root) account UID. - UID 1-200: System account UIDs that are statically assigned to system processes.
- UID 201-999: UIDs that are assigned to system processes that do not own files on this system. Software that requires an unprivileged UID is dynamically assigned a UID from this available pool.
- UID 1000+: The UID range to assign to regular, unprivileged users.
Modifying Existing Users
The usermod --help command displays the options to modify an account. The following table shows some common options for managing user accounts:
usermod option | Usage |
|---|---|
-a, --append | Use it with the -G option to add the supplementary groups to the user’s current set of group memberships instead of replacing the set of supplementary groups with a new set. |
-c, --comment | Add the |
-d, --home | Specify a home directory for the user account. |
-g, --gid | Specify the primary group for the user account. |
-G, --groups | Specify a comma-separated list of supplementary groups for the user account. |
-L, --lock | Lock the user account. |
-m, --move-home | Move the user’s home directory to a new location. You must use it with the -d option. |
-s, --shell | Specify a particular login shell for the user account. |
-U, --unlock | Unlock the user account. |
Deleting Users
The userdel command removes the usernameusername user from the /etc/passwd file, but leaves the user’s home directory intact. The userdel -r command removes the user from the username/etc/passwd file and deletes the user’s home directory.
Note: When you remove a user without specifying the userdel -r option, an unassigned UID now owns the user’s files. If you create a user and that user is assigned the deleted user’s UID, then the new account owns those files, which is a security risk. Typically, organization security policies disallow deleting user accounts, and instead lock them from being used to avoid this scenario.
Setting Passwords
The passwd command sets the initial password or changes the existing password for the thorthor user.
The root user can set a password to any value. If the password does not meet the minimum recommended criteria, then the terminal displays a message. You can retype the same password, and the passwd command updates it successfully. For example:
root@host:~# passwd thor
New password: mypassword
BAD PASSWORD: The password is shorter than 8 characters
Retype new password: mypassword
passwd: password updated successfully
root@host:~#
Configuring Password Aging
The chage command manages password aging policies and some account expiration settings for user accounts. Common options:
| Option | Description |
|---|---|
-l | Lists the password aging information for a user (read-only, no changes). |
-m days | Sets the minimum days between password changes. |
-M days | Sets the maximum days the password is valid. |
-W days | Sets the number of inactive days after password expiration before the account is locked. |
-I days | Sets the number of inactive days after password expiration before account is locked. |
-E date | Sets the account expiration date (YYYY-MM-DD format). |
Examples:
1- View password aging info:
[root@rhel10-01 ~]# chage -l thor
Last password change                                    : never
Password expires                                        : never
Password inactive                                       : never
Account expires                                         : never
Minimum number of days between password change          : 0
Maximum number of days between password change          : 99999
Number of days of warning before password expires       : 7
2- Force a user to change their password after 90 days – User must change password every 90 days:
chage -M 90 username3- Set minimum days between changes to 5 – User can’t change password again within 5 days:
chage -m 5 username4- Warn user 7 days before password expires:
chage -W 7 username5- Lock account after password expires + 10 inactive days:
chage -I 10 username6- Set account expiration date – After this date, login is disabled:
chage -E 2025-12-31 usernameCreating Groups
The groupadd command creates groups. Without options, the groupadd command uses the next available group ID (GID) number from the range that the GID_MIN and GID_MAX variables specified in the /etc/login.defs file. By default, the command assigns a GID value that is greater than any other existing GIDs, even if a lower value becomes available.
The groupadd command -g option specifies a GID for the group to use. For example:
root@host:~# groupadd -g 10000 group01
root@host:~# tail /etc/group
...output omitted...
group01:x:10000:
Modifying Existing Groups
The groupmod command changes the properties of an existing group. The groupmod command -n option specifies a new name for the group. In this case, for instance, we’re renaming the group “group02” to “group0022”:
root@host:~# groupmod -n group0022 group02
root@host:~# tail /etc/group
...output omitted...
group0022:x:988:
The groupmod command -g option reassigns the group name to a new GID:
root@host:~# groupmod -g 20000 group0022
root@host:~# tail /etc/group
...output omitted...
group0022:x:20000:
Deleting Groups
So, the groupdel command removes groups. For example:
root@host:~# groupdel group0022Note: We cannot remove a group if it is the default primary group of an existing user. Similar to using the userdel command, ensure that you first locate files that the group owns to prevent potential security risks.
That’s it for now 🙂