Working with Stratis on RHEL 8 shows what Stratis is and how we can configure it on Red Hat Enterprise Linux.
First and foremost: What is Stratis?
Stratis is a local storage management solution built for Red Hat Enterprise Linux. It abstracts LVM and XFS filesystems into a single, unified interface, making complex storage tasks – thin provisioning, snapshots, tiering, and more – accessible through a streamlined CLI and a daemon that handles low-level device-mapper operations behind the scenes.
Core Components of Stratis
- stratisd: The background daemon managing pools and filesystems.
- stratis-cli: The primary command-line tool that you’ll use to create and manage resources.
- D-Bus API: Enables integration with higher-level tools or automation frameworks.
Key Components and Terminology
| Term | Description |
|---|---|
| Blockdev | Physical disk or partition added to a pool. |
| Pool | Virtual storage aggregate made from one or more block devices. |
| Filesystem | Thin-provisioned XFS volume carved from a pool. |
| Snapshot | Point-in-time copy of a filesystem within a pool. |
| Thin Provision | A virtual storage aggregate is made from one or more block devices. |
| Tiering (Cache) | Uses faster devices for caching hot data, managed automatically by stratisd. |
Installing and Enabling Stratis
Based on Red Hat documentation, Stratis is a Technology Preview in RHEL 8 and must be explicitly installed and enabled before use in the environment.
1- Install the package:
dnf install stratisd stratis-cli -y2- Start and enable the daemon:
systemctl enable --now stratisd3- Verify it’s running:
systemctl status stratisd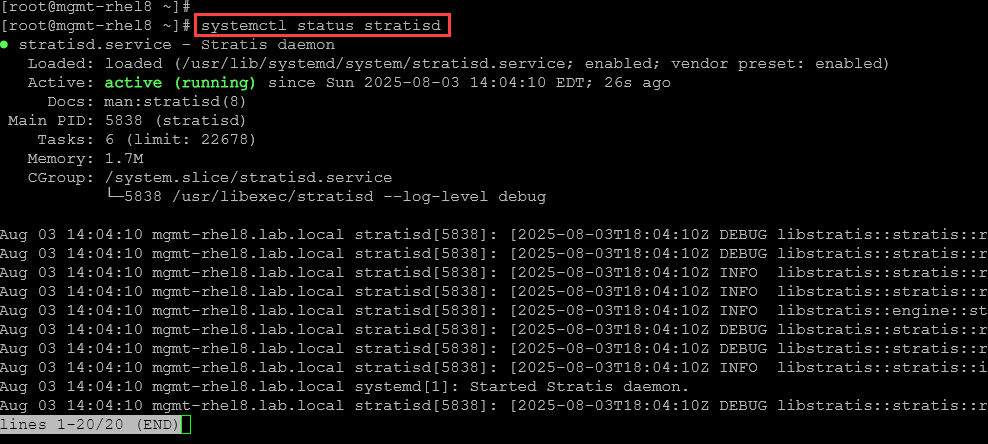
Basic Operations
1- Create an unencrypted pool.
To create a pool, we need to specify the block devices. In our case, for instance, we’ll use three block devices, each of which is 8GB in size:

stratis pool create my-stratis-pool /dev/sdj /dev/sdk /dev/sdl2- Inspect pools:
stratis pool list
3- Create a filesystem:
stratis filesystem create my-stratis-pool myfs01Where:
myfs01 –> Filesystem name
4- Inspect filesystems:
stratis fs list
5- Mount and use:
# Create a local directory to use as a mount point:
mkdir /mnt/stratis-myfs01

# Mount the stratis fs:
mount -t xfs /dev/stratis/my-stratis-pool/myfs01 /mnt/stratis-myfs01
6- Inspect the mount point with “df”:
df -Th | grep -i -E "filesystem|stratis"
7- Create a second filesystem named “myfs02“:
stratis fs create my-stratis-pool myfs02
stratis fs list
8- Configure the /etc/fstab to mount both Stratis filesystems automatically on system boot. Use the UUID for this task.
Getting the UUIID for each filesystem:
blkid /dev/stratis/my-stratis-pool/myfs01
blkid /dev/stratis/my-stratis-pool/myfs02
Add the entries on /etc/fstab:
UUID=98d845c0-2a74-4bc6-b7a2-c5cb74c54329       /mnt/stratis-myfs01     xfs     defaults,x-systemd.requires=stratisd.service    0       0

UUID=1ffdb348-3219-41ee-8fef-9dc93981dbe1       /mnt/stratis-myfs02     xfs     defaults,x-systemd.requires=stratisd.service    0       0
Mount:
mount -a
systemctl daemon-reload
9- Create some files in the first filesystem and then create a snapshot of it:
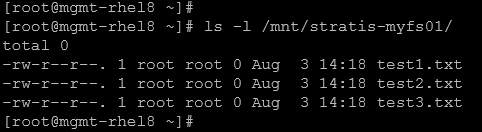
stratis fs snapshot my-stratis-pool myfs01 myfs01-snapWhere:
myfs01 –> Filesystem name
myfs01-snap –> Snapshot name
10- Inspect filesystems and snapshots:
stratis fs list
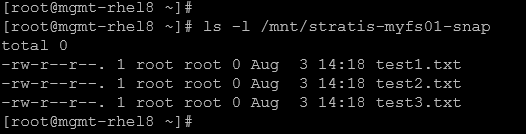
11- The snapshot can be mounted normally:
mount -t xfs /dev/stratis/my-stratis-pool/myfs01-snap /mnt/stratis-myfs01-snapAnd we can confirm that all files created in the filesystems are in the snapshot:
12- To delete a stratis filesystem, we need first to unmount it and then remove it:
umount /mnt/stratis-myfs01
stratis fs destroy my-stratis-pool myfs01
stratis fs list
13- Rename the stratis filesystem “myfs01-snap” to “myfs01” and update the /etc/fstab – Since we’ve removed the “myfs01”, we need to remove or update its UUID:
stratis fs rename my-stratis-pool myfs01-snap myfs01

# Getting the new UUID for myfs01:
blkid /dev/stratis/my-stratis-pool/myfs01

sed -i s/98d845c0-2a74-4bc6-b7a2-c5cb74c54329/45f1e608-997d-48f5-abf3-35b6f4e305d2/ /etc/fstab
Where:
98d845c0-2a74-4bc6-b7a2-c5cb74c54329 –> Old UUID
45f1e608-997d-48f5-abf3-35b6f4e305d2 –> New UUID
14- Reboot the system and inspect the stratis filesystems:
stratis fs list
That’s it for now 🙂