An Introduction to Job Submission on a Slurm Cluster provides the basic commands for submitting jobs.
First and foremost, we’ve written an article explaining how to deploy a Slurm cluster in a lab environment. If you wanna check this article, please click here.
srun – Interactive/Immediate Execution
The “srun” command is used to launch a job step (or job steps /parallel jobs) and connect your terminal to it. Let’s provide some practical examples:
1- Run a simple command:
srun -N1 -n1 hostname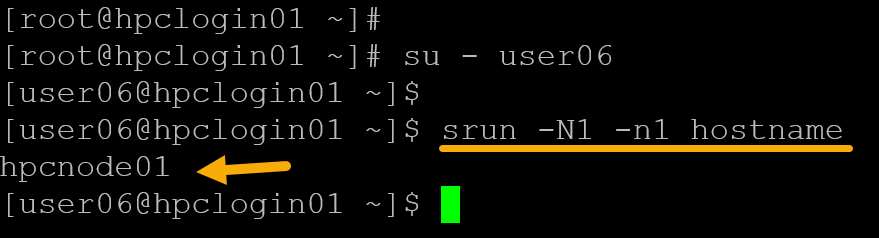
In this case, for instance:
-N, --nodes=<minnodes>[-maxnodes]|<size_string> = Request that a minimum of minnodes nodes be allocated to this job. A maximum node count may also be specified with maxnodes. If only one number is specified, this is used as both the minimum and maximum node count. So, in this case, "-N1" means "I need one node".

-n, --ntasks=<number> = Specify the number of tasks to run. Request that srun allocate resources for ntasks tasks. The default is 1 task per node, but note that the ---cpus-per-task option overrides this default. This option applies to job and step allocations.

hostname = In this case, for instance, "hostname" is the command to be executed by the job.
The command’s output is “hpcnode01“, indicating that “hostname” was executed on the first compute node, “hpcnode01”.
Important: Look at the command prompt – we’re on a login node, and the job was submitted using it.
2- Execute the same command, but using different options with “srun”:
srun -N1 -n2 hostname
Look at the srun error:
srun: error: Unable to allocate resources: Requested node configuration is not availableAs we learned before, the “-n” option specifies the number of tasks to run. The default is one task per node, which explains the error we’re seeing.
Important consideration: All compute nodes in our lab have 1 CPU per node. So, in the previous example, we were trying to run 2 tasks (-n2) on a single node (-N1). It explains why it did not work as expected. If the nodes have been configured with two CPUs, this command would work as expected!
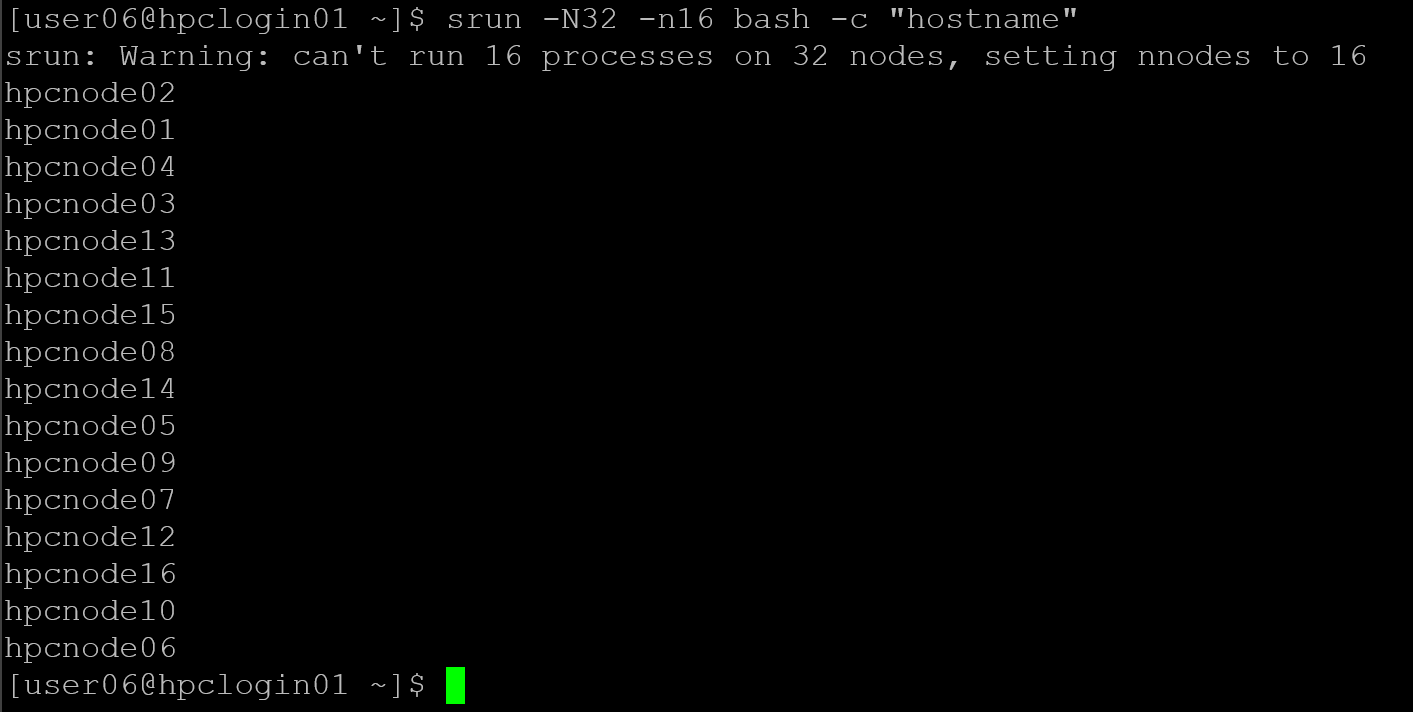
Another example:
srun -N32 -n16 bash -c "hostname"Based on our scenario, to remember, each node has one CPU. So, we cannot run 16 tasks (-n 16) on 32 nodes (-N32). The “srun” command detected it and adjusted the number of nodes to 16, as we can see in the following picture:
Another one, if we request a number of nodes that our partition does not have, we’ll have the following error:

As shown in the previous picture, we submitted a job requesting 50 nodes (-N50), but our partition does not have that many. So, the job was queued and waited for resources. Inspecting the queue, we can see this job:

PD means “Pending”. Under “Nodelist (Reason)”, we can confirm the reason for this job state!
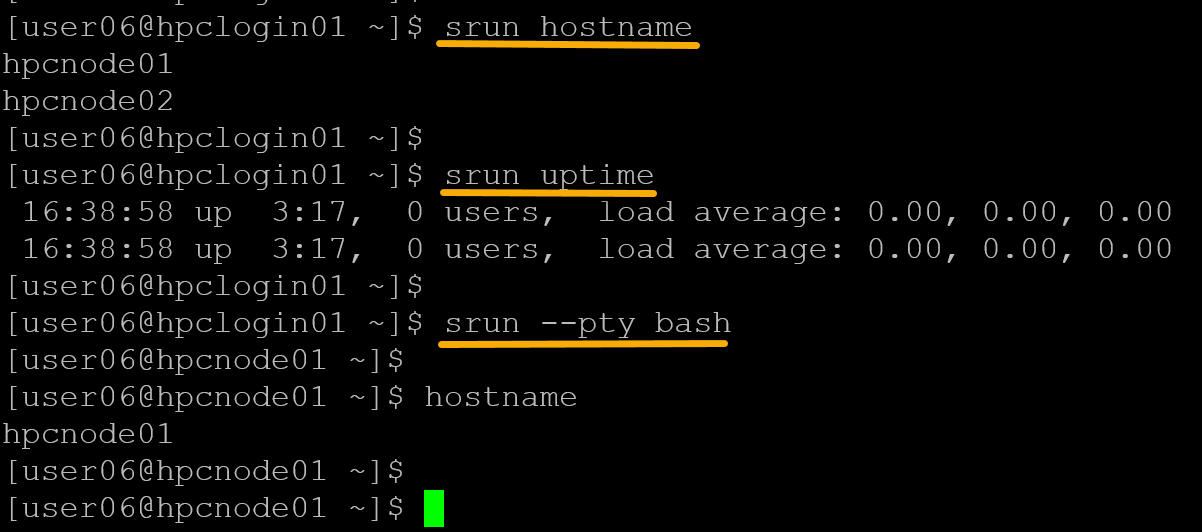
3- Interactive shell on a compute node:
Another interesting use of “srun” is to acquire an interactive shell from a compute node:
srun --pty -N1 -n1 bash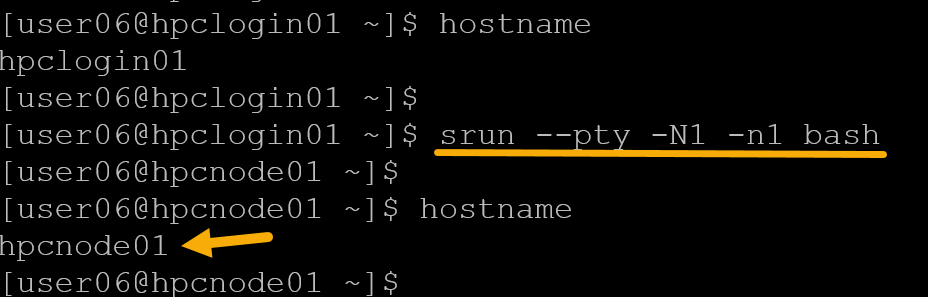
As we can see in the previous picture, we’re on the login node, execute “srun”, and then we get the compute node 01 shell (we’re literally on the compute node 01 shell).
The “squeue” command, for instance, can show the job details:

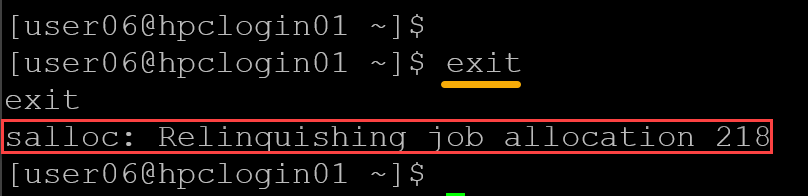
To finish the job, just type “exit” on the compute node command line:
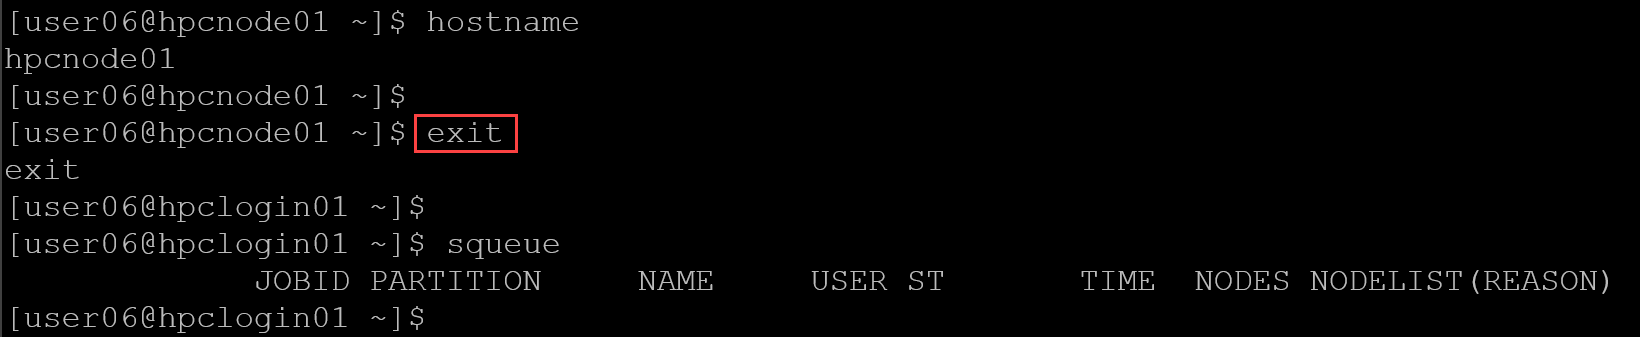
Note: Look at that after exiting, the job was finished!
sbatch – Batch Submission (Scripted Jobs)
With “sbatch”, we write a script, Slurm schedules it, and runs it when resources are free.
1- Simple batch script:
Create the file “test.batch” with the following content:
#!/bin/bash
#SBATCH --job-name=testjob
#SBATCH --nodes=1
#SBATCH --ntasks=1
#SBATCH --time=00:01:00
#SBATCH --output=test_%j.out

hostname
date
sleep 10
Important:
- Each sbatch script must include the “#SBATCH” directives (or equivalent command-line options).
- Slurm reads the script.
- Parses all lines starting with “#SBATCH”.
- Uses them to define:
- Resources (nodes, tasks, time);
- Job name;
- Output files;
- Account, partition, QOS, etc.
Without them, Slurm will use defaults, which is dangerous in HPC:
- Wrong partition;
- Too little time;
- Too many CPUs;
- Job killed;
- Accounting errors.
Best practice (…. put in the script at least):
#SBATCH --job-name=
#SBATCH --account=
#SBATCH --partition=
#SBATCH --nodes=
#SBATCH --ntasks=
#SBATCH --time=
#SBATCH --output=
Submit the job:
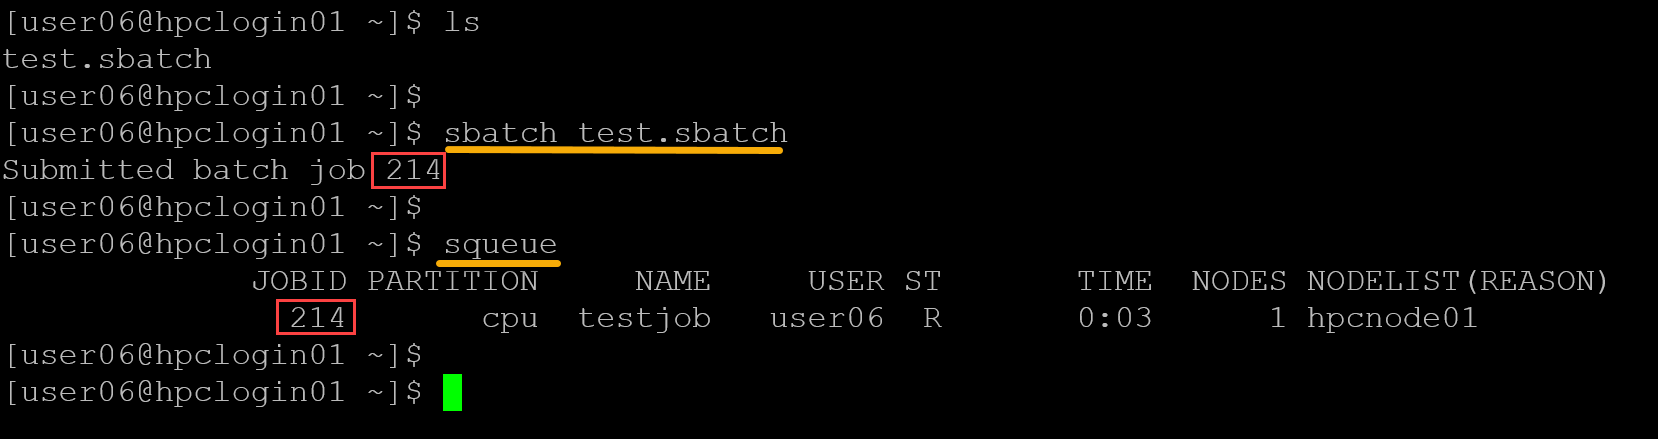
sbatch test.sbatchCheck the job:
squeueAs we can confirm in the following picture, the job was submitted using “sbatch”, and the job ID 214 was generated for this job. For each submitted job, Slurm is responsible for generating a unique job ID:
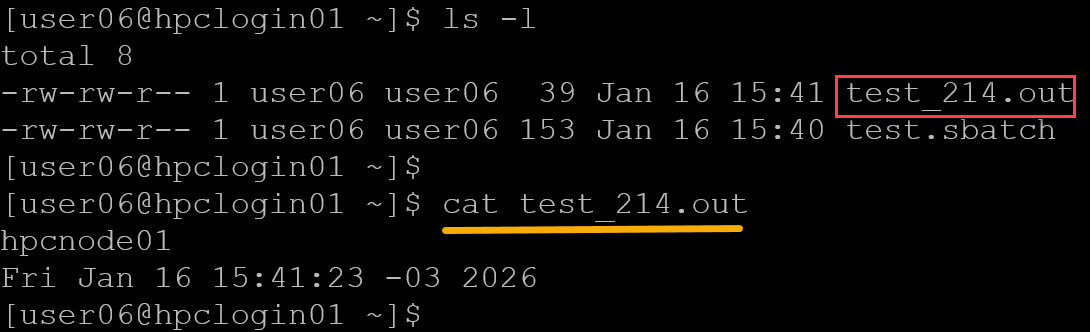
The batch script has the entry “#SBATCH –output=test_%j.out”. With that, a file is generated containing the batch script output:
2- Parallel batch job:
Create the file “parallel.batch” with the following content:
#!/bin/bash
#SBATCH --job-name=parallel
#SBATCH --nodes=4
#SBATCH --ntasks=4
#SBATCH --time=00:05:00
#SBATCH --output=parallel_%j.out

srun hostname
Submit the job:
sbatch parallel.batchAnd check the queue:
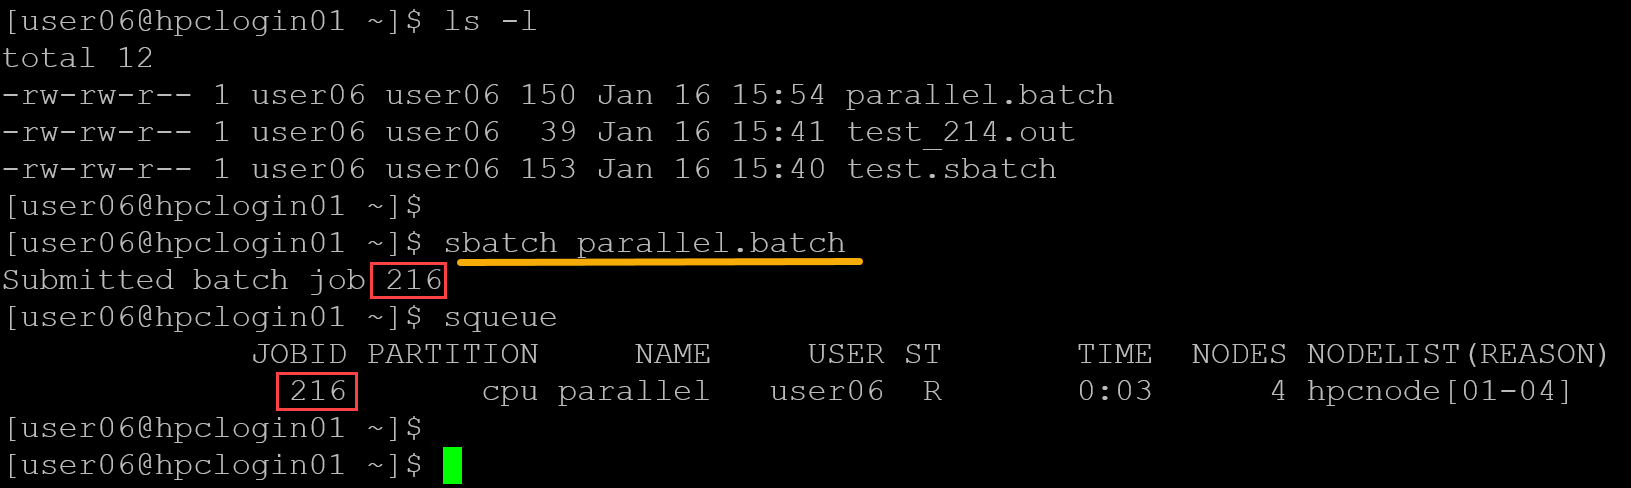
In this example, the job was configured to run for 5 minutes (#SBATCH –time=00:05:00). So, the job is still running until the configured time is done:
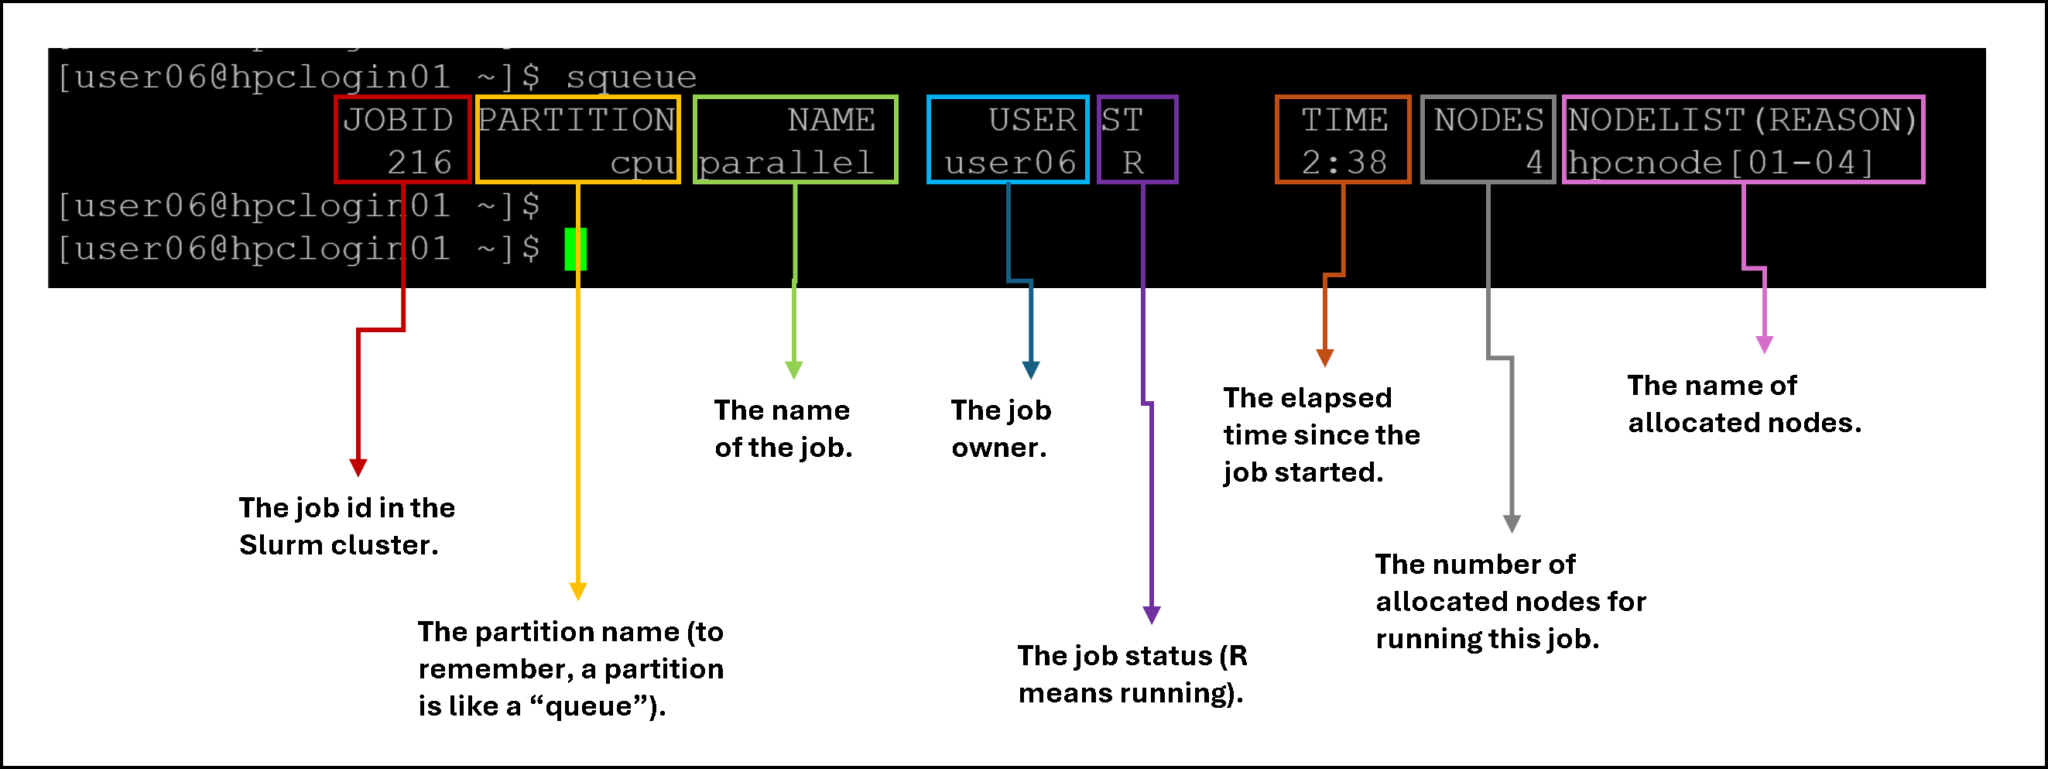
squeueThe “squeue” command provides valuable details. Let’s dig into them:
Afterward, we can check the output file for our parallel job:
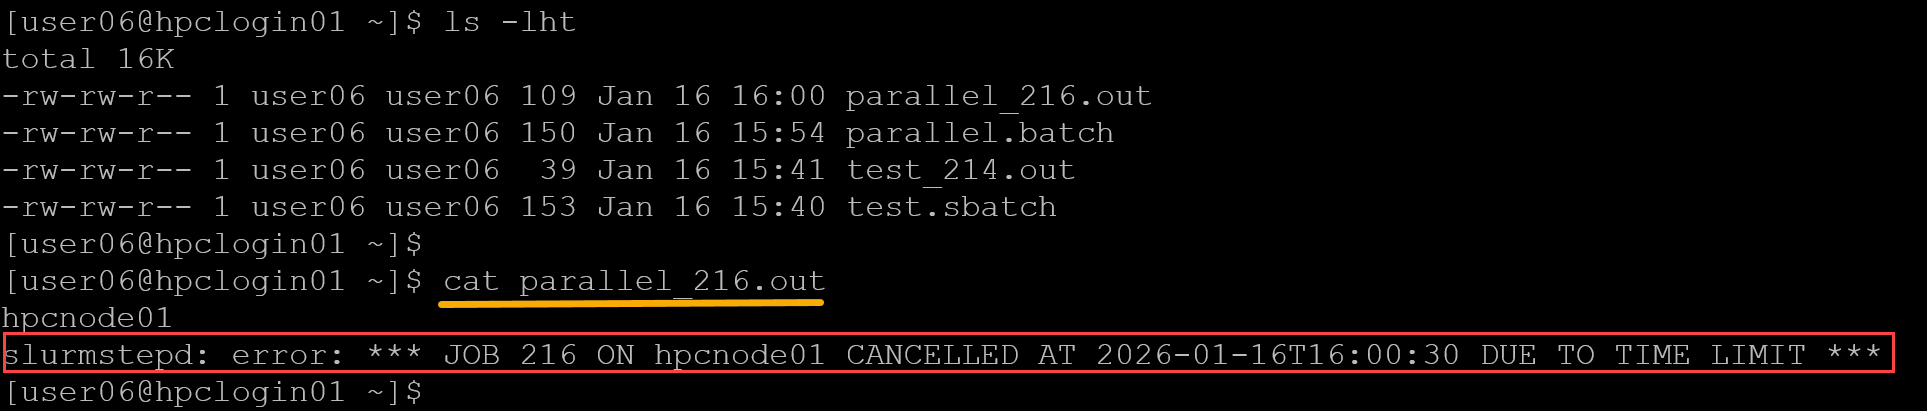
Look at the message:
slurmstepd: error: *** JOB 216 ON hpcnode01 CANCELLED AT 2026-01-16T16:00:30 DUE TO TIME LIMIT ***It is expected to see this because we configured the job’s runtime (#SBATCH –time=00:05:00). Slurm sees it and executes the job for this amount of time!
Key Differences Between srun and sbatch
| Feature | srun | sbatch |
|---|---|---|
| Mode | Interactive / immediate | Batch/queued |
| Terminal | Attached (PTY possible) | Detached (runs in background) |
| Typical use | Testing, debugging | Production jobs |
| Scheduling | Immediate allocation | Queued by Slurm scheduler |
| Script needed | No (can run inline) | Yes |
What is “salloc”?
In a basic way, the “salloc” is a command used to allocate resources and keep them for yourself, so you can run many “srun” commands inside that allocation.
We can think of:
srun → run a step
salloc → reserve resources
sbatch → submit batch job
Let’s provide you with an example:
1- Reserve two compute nodes for 10 minutes:
salloc -N2 -n2 -t 10:00The message “salloc: Granted job allocation 218” confirms the allocation of resources. In this case, 218 is the job id assigned for this allocation:

Now, all “srun” commands will execute using the allocated nodes (in this case, hpcnode01 and hpcnode02). For example:
To terminate the allocation, type “exit”:
To Wrap This Up: srun vs sbatch vs salloc
| Command | Does what | Typical usage |
|---|---|---|
| srun | Runs one job step | Quick test, one command |
| salloc | Reserves nodes interactively | Debug session, development |
| sbatch | Submits job script | Production workloads |
That’s it for now 🙂