How to create a vSAN Cluster is an article that explains what is vSAN and how steps are needed to create a vSAN Cluster.
Before we are starting to create a vSAN Cluster, I need to share one of the best places to get more details about vSAN. This place is the VMware vSAN Design Guide. I highly recommend reading and querying this article to understand how vSAN works and all details about that:
https://core.vmware.com/resource/vmware-vsan-design-guide
Firstly, What is vSAN?
So, vSAN is a hyper-converged, software-defined storage (SDS) platform that is fully integrated with VMware vSphere. Also, vSAN is a VMware platform likes vSphere.
Basically, How does vSAN work?
Each physical host present on a vSAN Cluster can be a lot of physical disks. So, vSAN aggregates locally attached disks of hosts to create a distributed shared storage solution. In other words, the datastore will be created with the contribution of disks by each ESXi host present on the cluster. It is a very important concept that you need to understand.
If each ESXi host contributes to the vSAN datastore, the network is a KEY point on the vSAN Cluster. All I/O (Input/Output) occurs on the vSAN network. So, a vSAN Cluster needs to use a high-speed network with low latency to work as expected. This is another concept that you need to understand here.
All data placed in the vSAN datastore is stored in “Objects”. In this case, an Object can be understood as a container or something like that. For example, the vmdk file is part of a Virtual Machine (VM). When this file is placed on the vSAN Datastore, it is split into small pieces called “Components”. So, from the vSAN perspective, one Object is a composition of some Components:
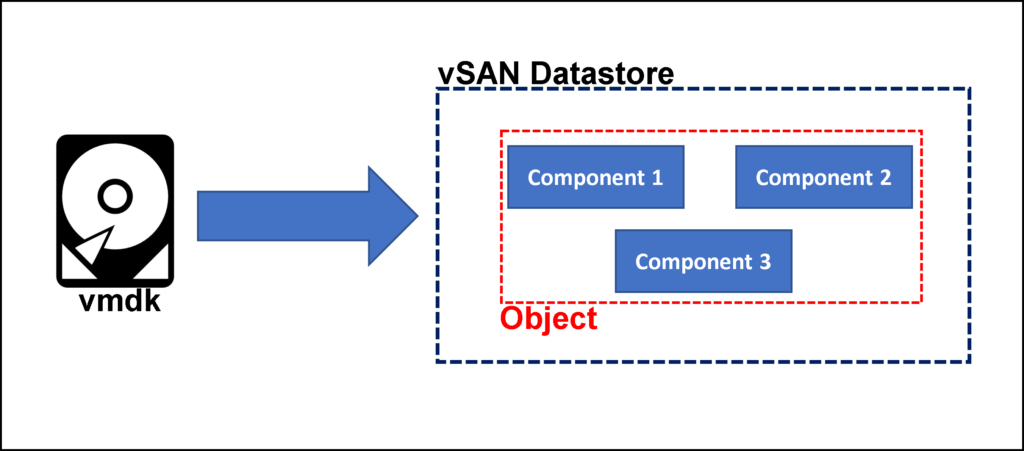
There are different vSAN types of Objects and to define how that is stored on the vSAN Datastore, we have the vSAN Policies (or SPBM – Storage Policy Based Management).
Basically, each vSAN Policy determines how the data is stored in the vSAN datastore, if there is some redundancy rule, reservations, I/O limitations and etc. By default, when the vSAN datastore is created, the policy called vSAN Default Storage Policy is used to provide it.
Is there some disk number limitation per host present in a vSAN Cluster?
Related to the disk, each ESXi host inside a vSAN Cluster can have the following disk configuration:
For Hybrid vSAN Cluster:
- 1 SSD disk for the cache layer
- 1 or more (up to 7) disks for the capacity layer
- Maximum of 5 Disk Groups (DG) per ESXi host
or
For All-Flash vSAN Cluster:
- 1 SSD disk for the cache layer
- 1 or more (up to 7) disks for the capacity layer
- Maximum of 5 Disk Groups (DG) per ESXi host
So, each ESXi host (independent of the vSAN cluster is Hybrid or All-Flash), can have a maximum of 35 disks for the capacity layer. Below, there is a Disk Group (DG) deep dive for both types of vSAN Cluster (Hybrid and All-Flash):
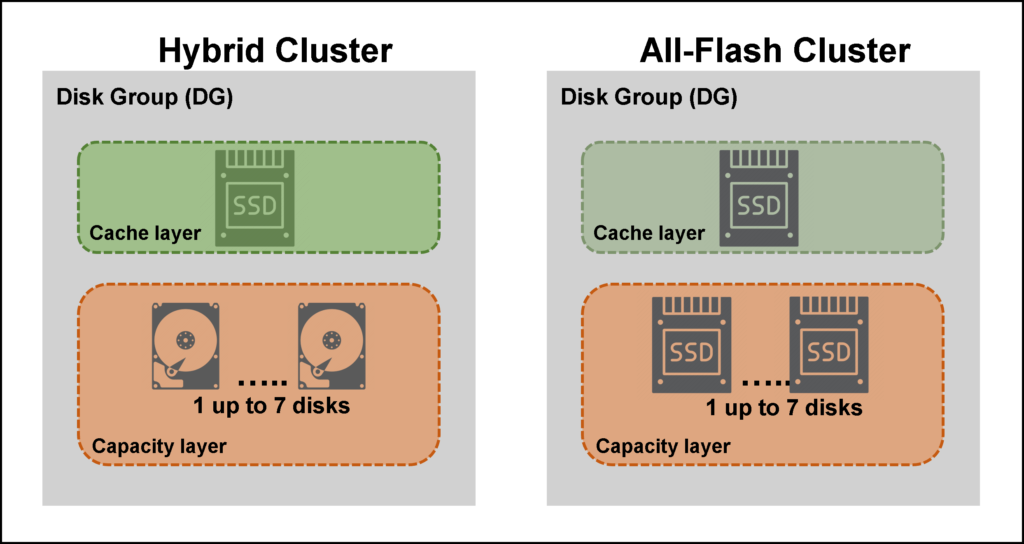
Note: The disk present in the cache layer is not used to store vSAN Objects. So, in this case, we don’t consider that in the size of raw data for the vSAN Datastore. Considering that we are using all Disk Groups in our ESXi host, we can have 35 disks to store vSAN Objects (5 disk groups x 7 disks per disk group in the capacity tier).
Again, I really recommended reading the VMware vSAN Design Guide to get more details about vSAN. Also, inside the VMware vSAN Design Guide, we have an Additional Links page that has a lot of interesting additional links. These links can be found here:
https://core.vmware.com/resource/vmware-vsan-design-guide#section11
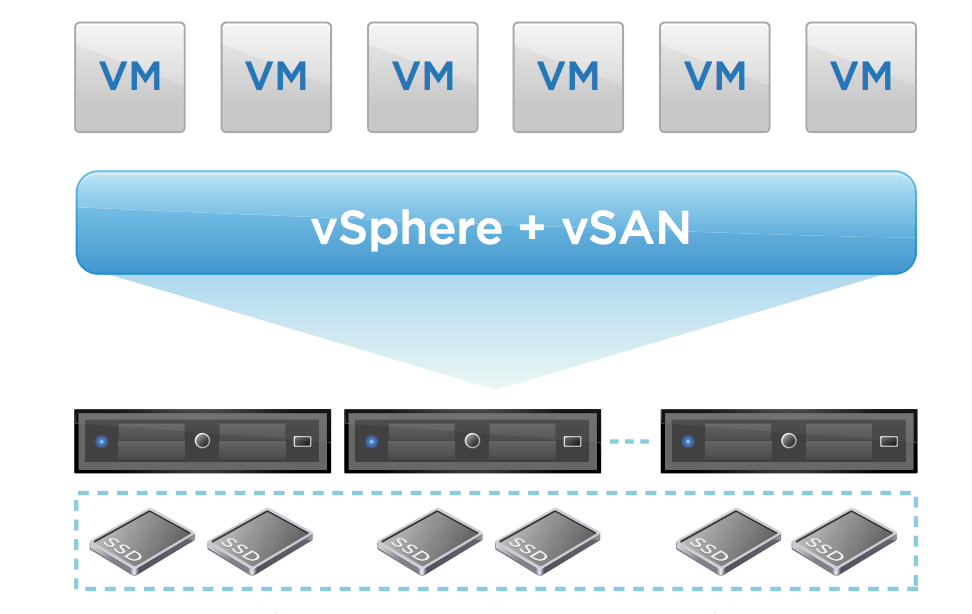
Another important thing that is vSAN runs at the Kernel of the ESXi host. So, we don’t need to install any additional software to use vSAN (also, is need to have the appropriate vSAN license for it). So, the vSAN has a heavy integration with the vSphere, and both work extremely fine together:
Install the vCenter Server
Firstly, it is necessary to install and configure the vCenter Server Appliance on our environment. We have an article to explain that in detail. So, if you prefer, you can check this article HERE. In this article, we were installing the vCenter Server Appliance on the VMware Workstation software. But, if you want to use another platform, I believe that the steps presented in this article can help you too.
Install the ESXi Host
Secondly, it is necessary to install and configure the ESXi host. In this article, we are considering three ESXi hosts to create our vSAN Cluster. Also, we have an article to explain that in detail. So, if you prefer, you can check this article HERE. In this article, we were installing the ESXi System on the VMware Workstation software. But, if you want to use another platform, I believe that the steps presented in this article can help you too.
After installing each ESXi host (3 in total), the disk layout for each ESXi host should be:
- 1 disk of 10 GB (ESXi OS)
- 1 disk of 10 GB (Host’s local datastore)
- 1 disk of 12 GB (for the Cache Layer of the vSAN)
- 1 disk of 32 GB (for the Capacity Layer of the vSAN)
Related to the network interfaces, we can use two or four network interfaces. In this article, we are using two network interfaces on each ESXi host.
Creating the Datacenter Object in the vCenter Server
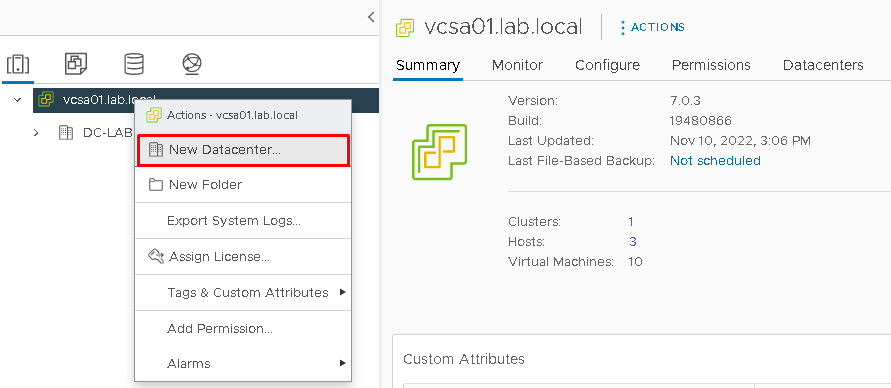
Access the vSphere Client and create the Datacenter Object. Click on the vCenter Server FQDN –> Right Click –> New Datacenter. On the Datacenter name, in our example, we put “DC-LAB.VSAN”:

Creating the Distributed Switch in the vCenter Server
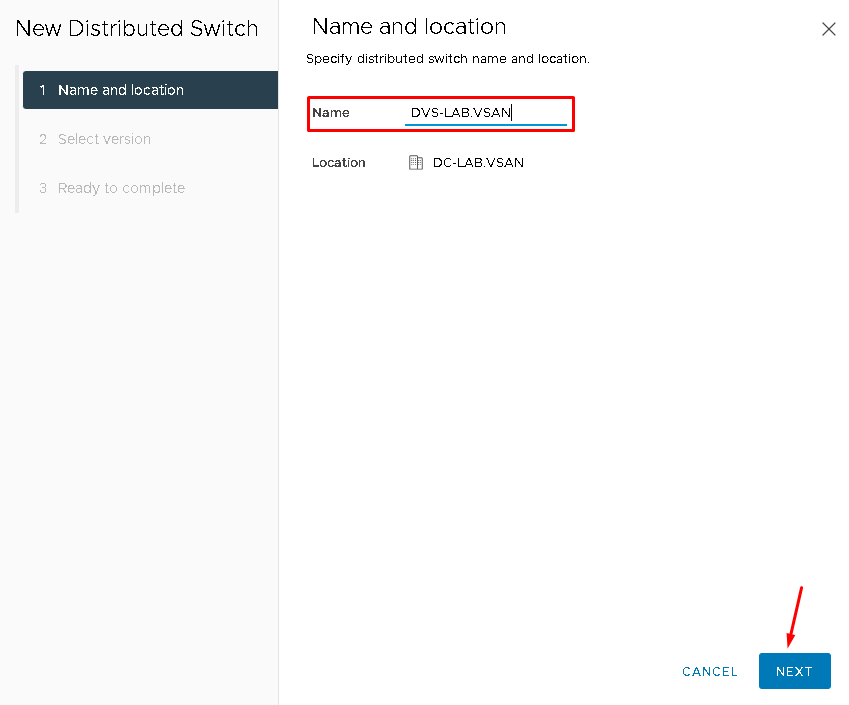
On the vSphere Client, access the Networking Menu, and select the Datacenter name that we created before –> Right Click –> Distributed Switch –> New Distributed Switch.
On the Name, we are using “DVS-LAB.VSAN”:
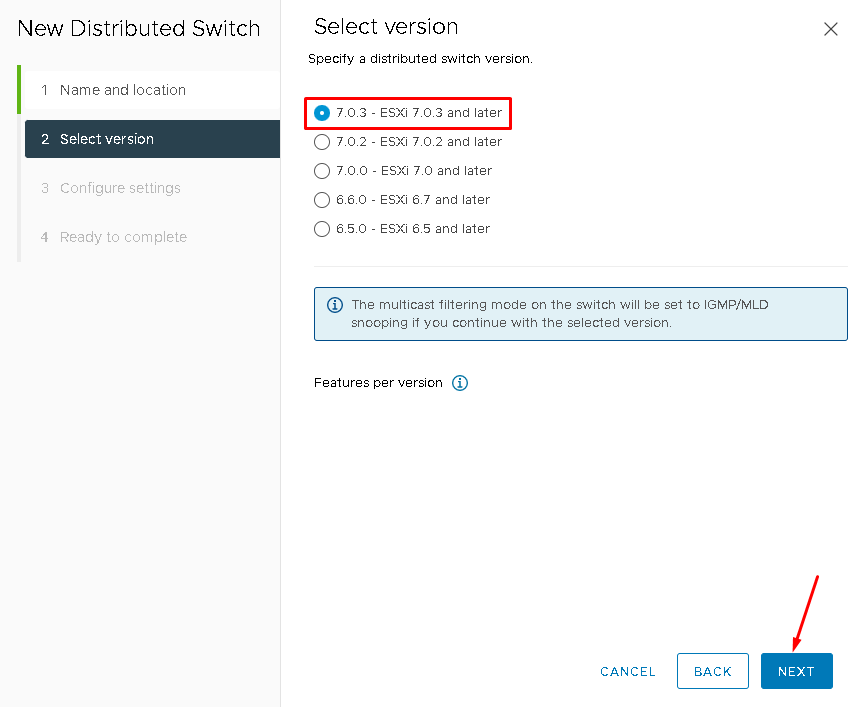
We are maintaining the distributed switch version as 7.0.3:
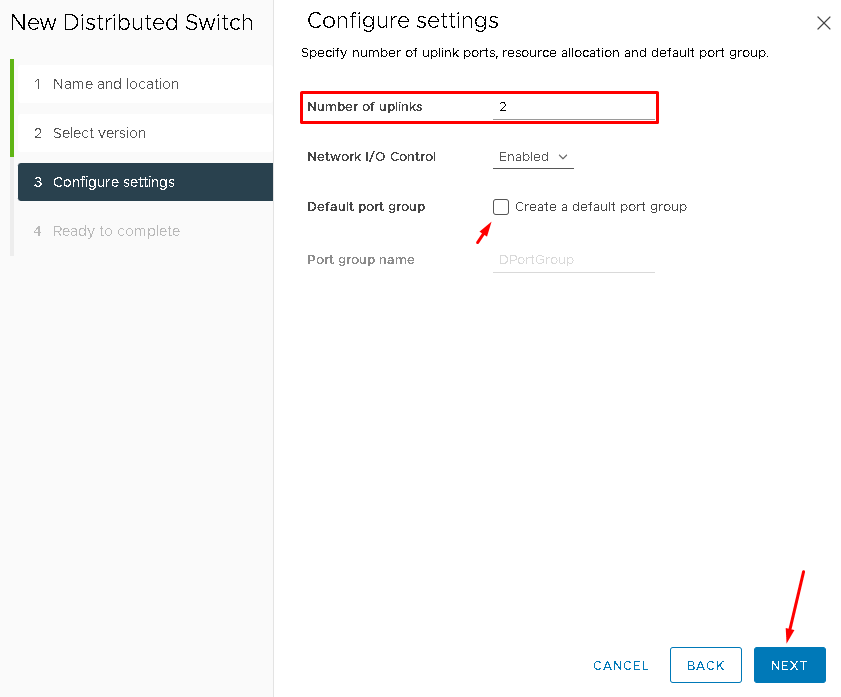
On the number of uplinks, set 2 (as we are using two network interfaces in each ESXi host).
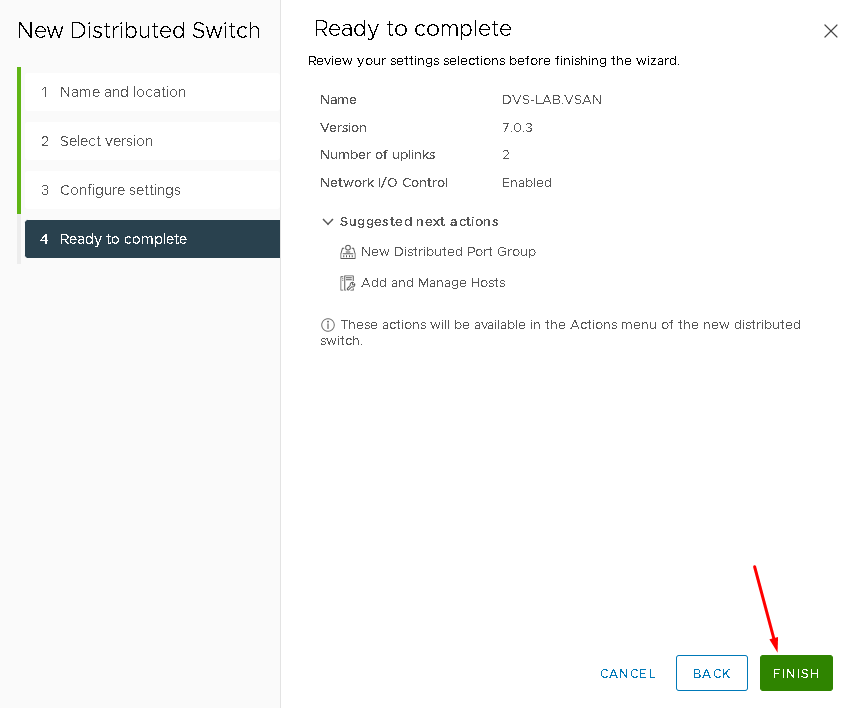
Also, deselect the option “Default port group” to avoid the default port group creation. In this case, we will create it manually as necessary:
Creating Port Groups in the Distributed Switch
We will create the following Port Groups for our vSAN Cluster:
- DPG-MGMT = Distributed Port Group for Management Traffic
- DPG-VSAN = Distributed Port Group for vSAN Traffic
- DPG-VMOTION = Distributed Port Group for vMotion Traffic
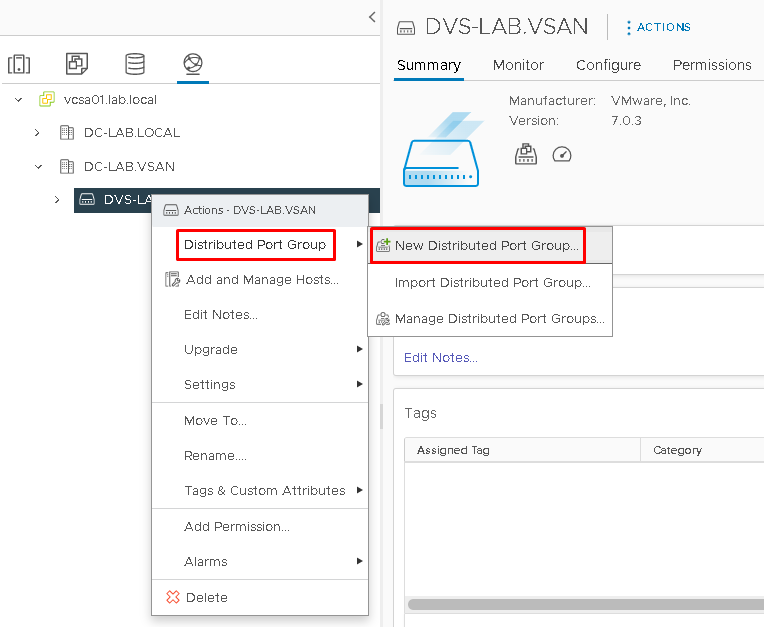
Select the Distributed Switch that we created before –> Right Click –> Distributed Port Group –> New Distributed Port Group:
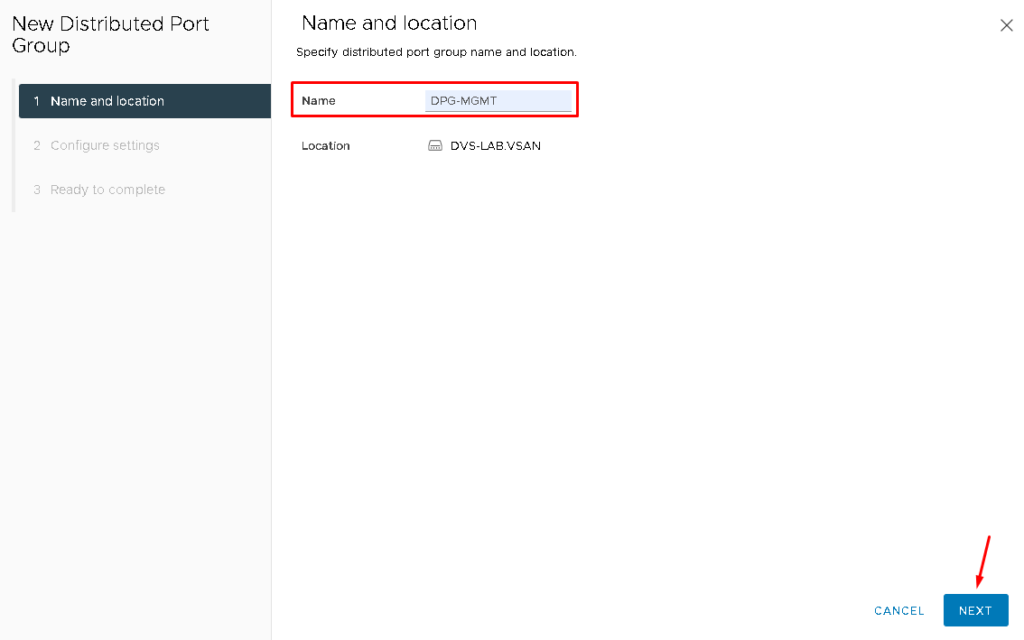
On the Name put “DPG-MGMT” for the Management Port Group:
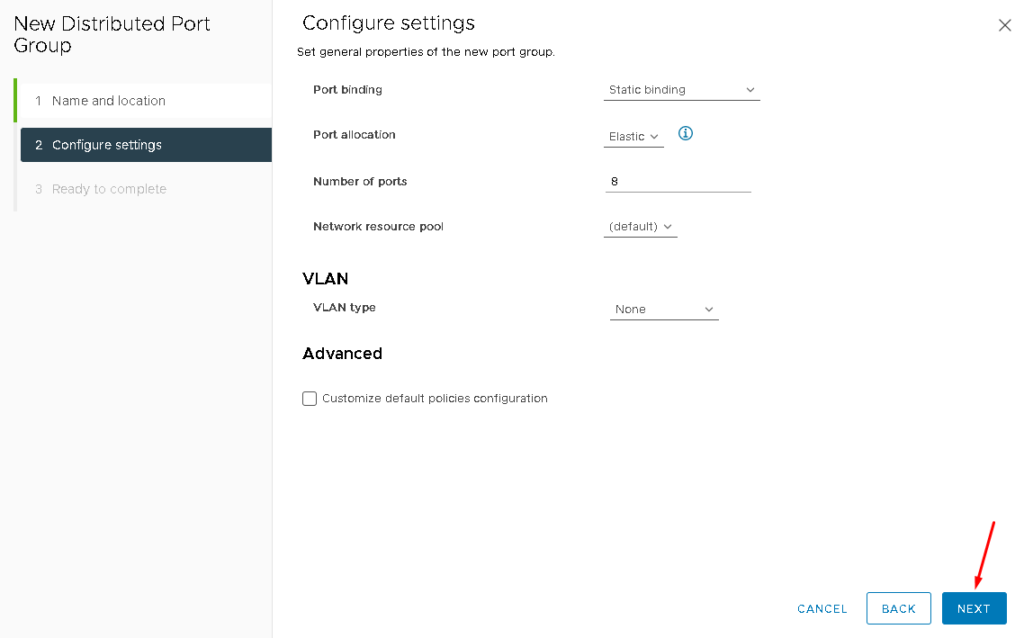
Here, it is not necessary to change anything. Click on NEXT to continue:
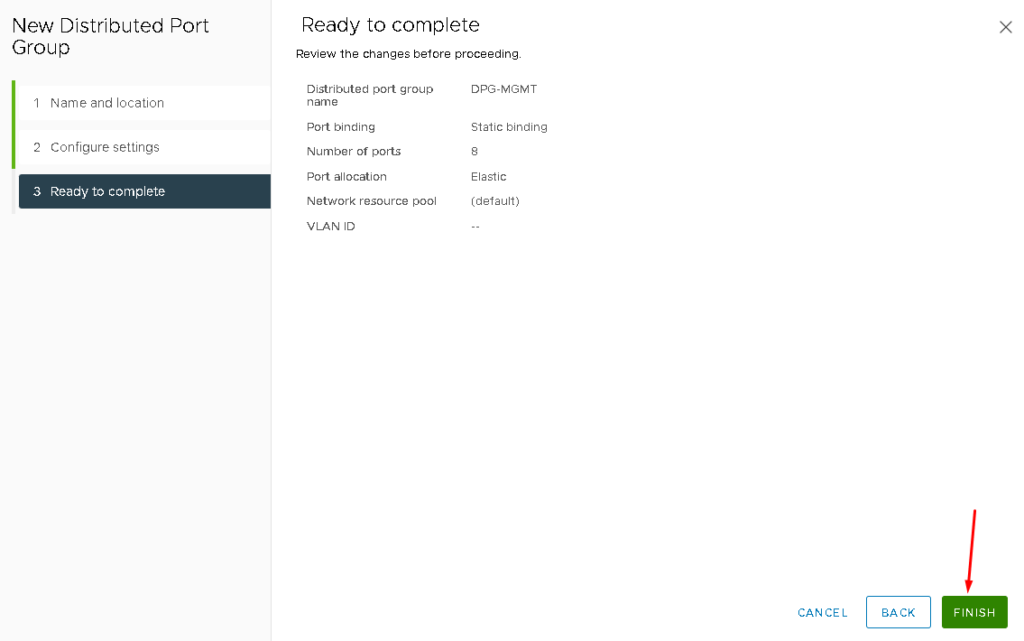
Click on FINISH to finish the port group creation wizard:
Note: Repeat the same steps to create the other distributed port groups for vSAN and vMotion traffic:
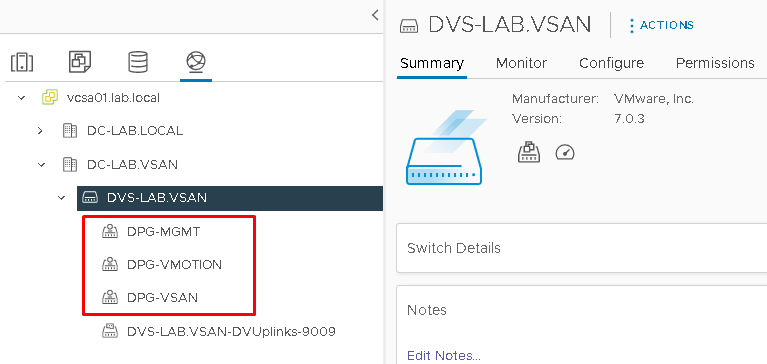
Changing the Teaming and Failover policy for each Port Group
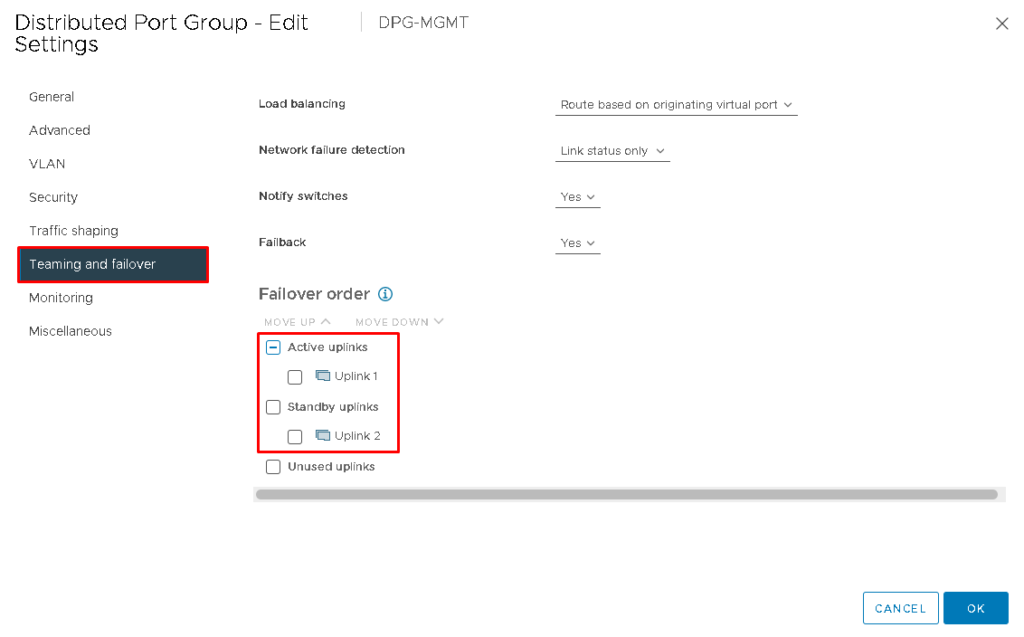
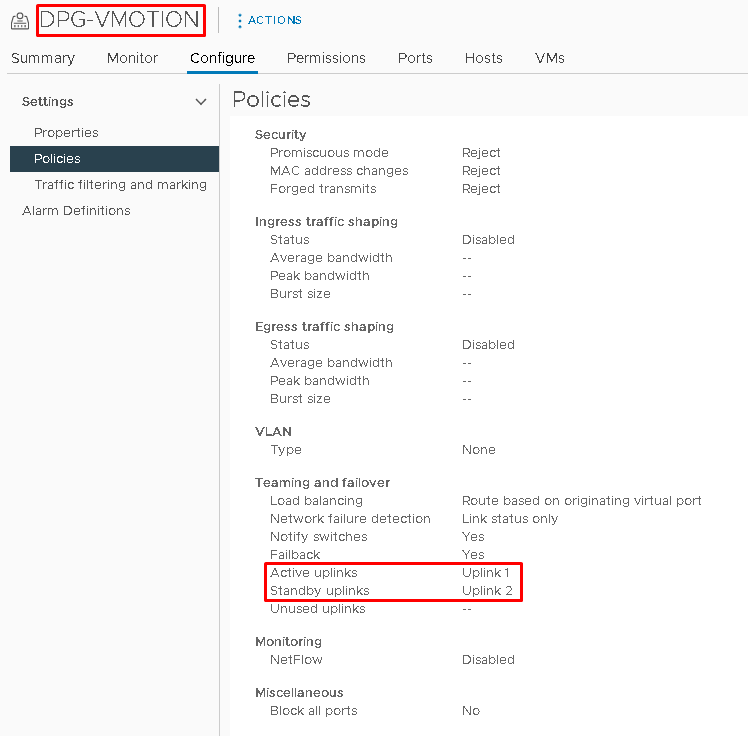
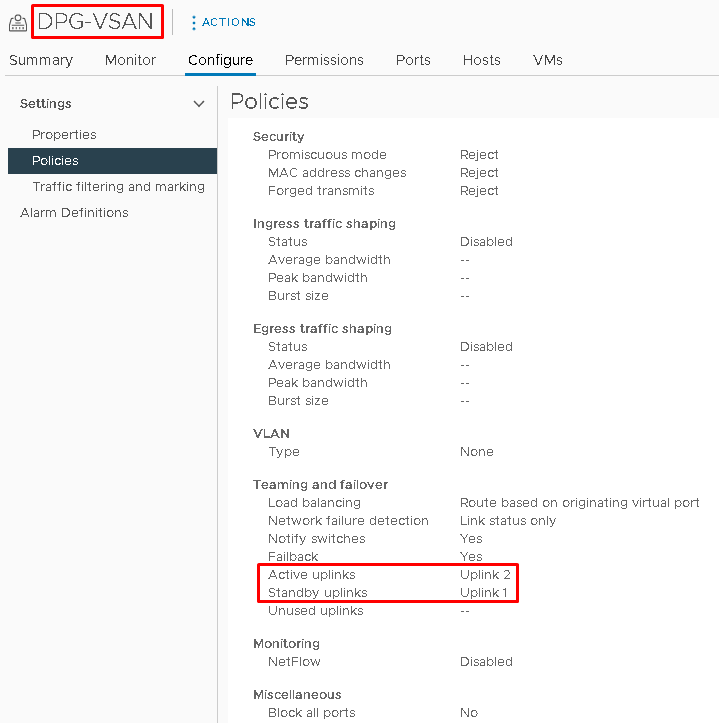
As each ESXi host has two network interfaces, one network interface will be used as Active and one network interface will be used as Standby (failover). We need to configure it on each Distributed Port Group. The table below shows how we should configure each port group:
| Distributed Port Group Name | Uplink as Active | Uplink as Standby |
| DPG-MGMT | Uplink 1 | Uplink 2 |
| DPG-VSAN | Uplink 2 | Uplink 1 |
| DPG-VMOTION | Uplink 1 | Uplink 2 |
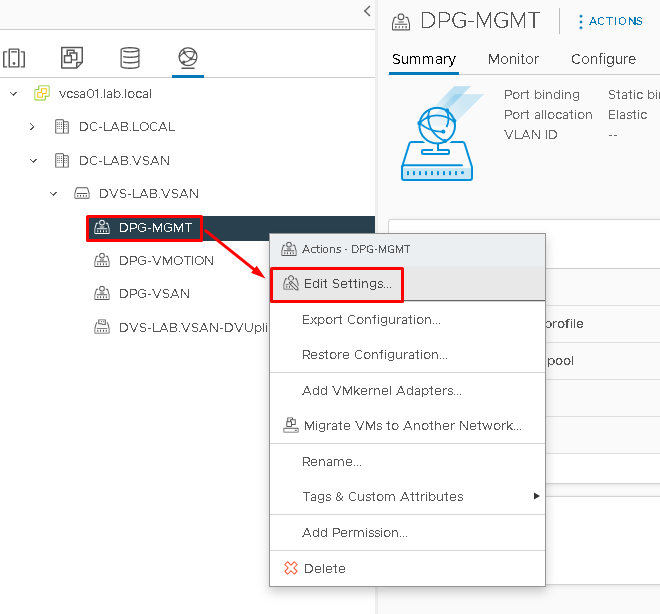
To configure it on the Distributed Port Group, select the Port Group –> Right Click –> Edit Settings. We are doing this in the Management Port Group first:
Click on “Teaming and failover” and change the Failover order as necessary. In our case, we are following the table that we saw before.
After that, click on OK to save the changes:
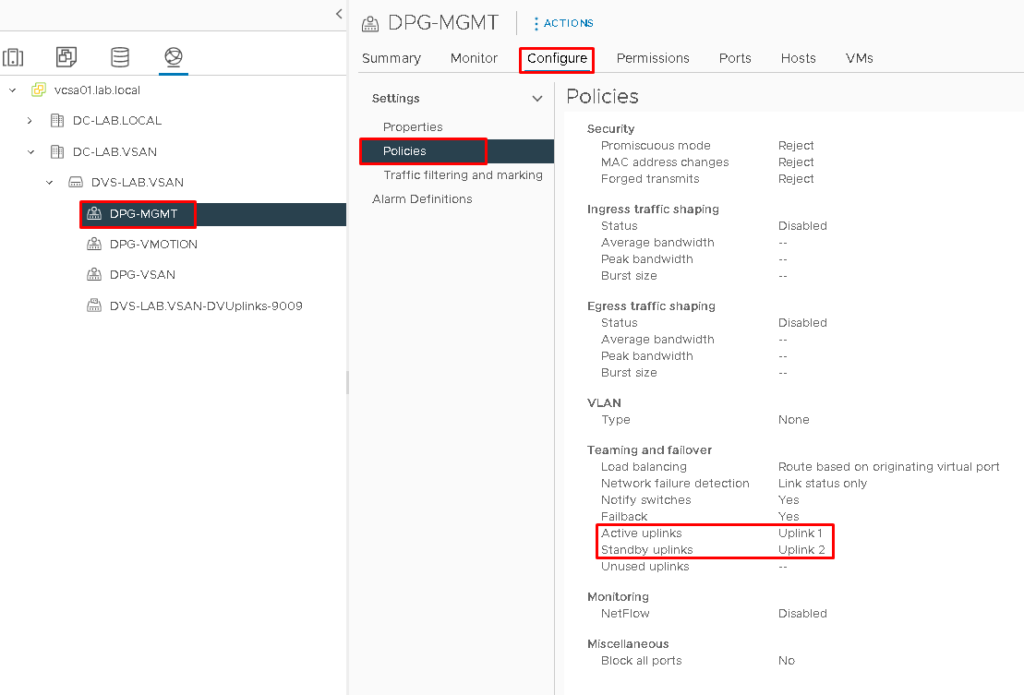
To confirm that the changes were saved, select the Port Group –> Click on Configure –> Policies and now it is possible to see the teaming and failover configuration:
Note: Repeat these steps for the vSAN and vMotion Port Groups:
Creating the Cluster Object and Adding ESXi hosts to the Cluster
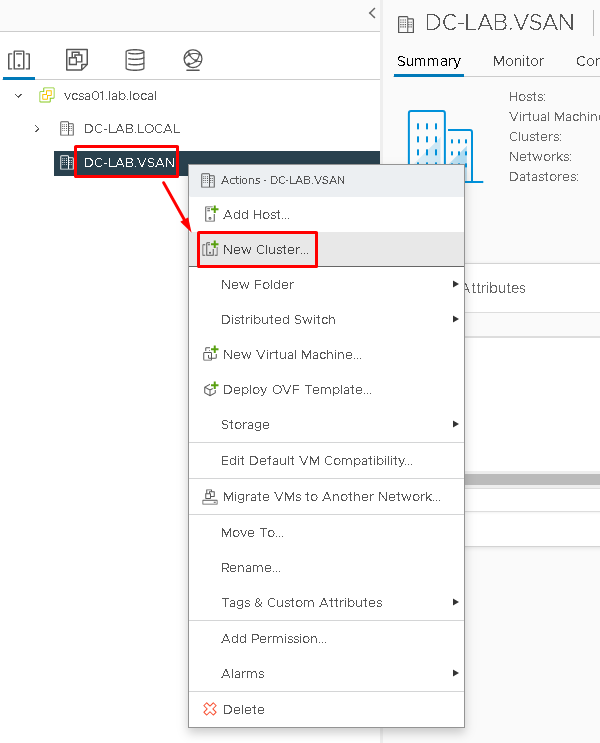
To create the Cluster Object, select the Datacenter that we created before –> Right Click –> New Cluster:
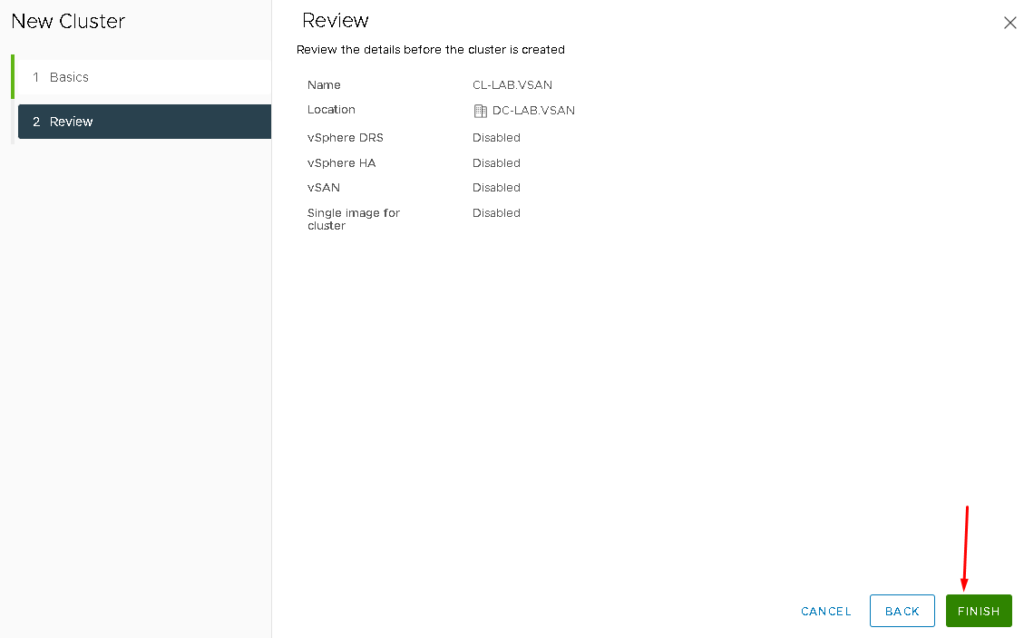
On the name, we put “CL-LAB.VSAN” and maintain the other options turned off at this point:
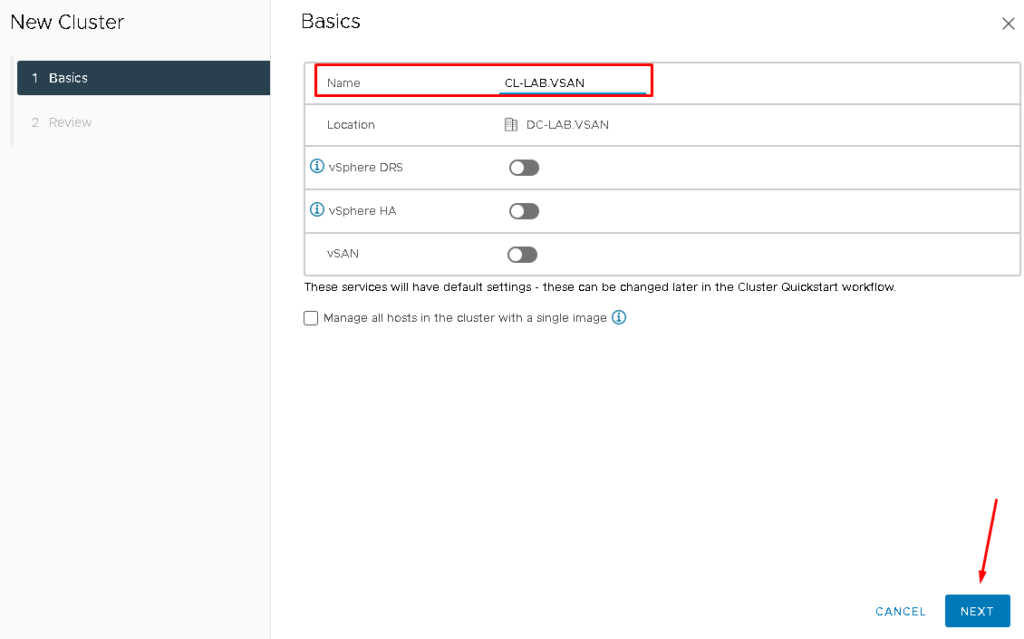
And then, click on FINISH to finish the cluster creation wizard:
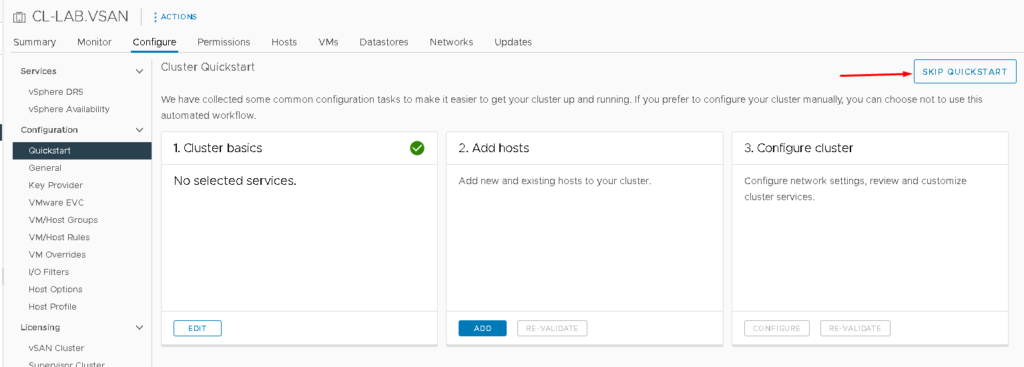
Select the cluster –> Configure –> Under Configuration, Quickstart –> Select SKIP QUICKSTART.
Basically, QuickStart is a Wizard that helps to configure the cluster. We will not use it to configure our cluster. We will configure the options as necessary manually:
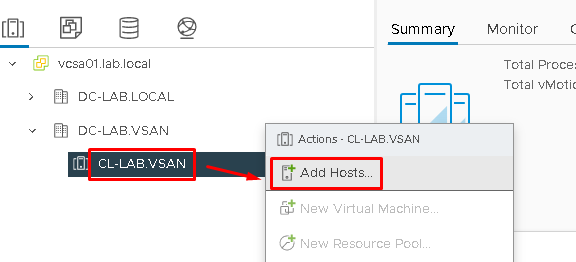
The next step is adding ESX hosts to the cluster.
Select the cluster that we created before –> Right Click –> Add Hosts:
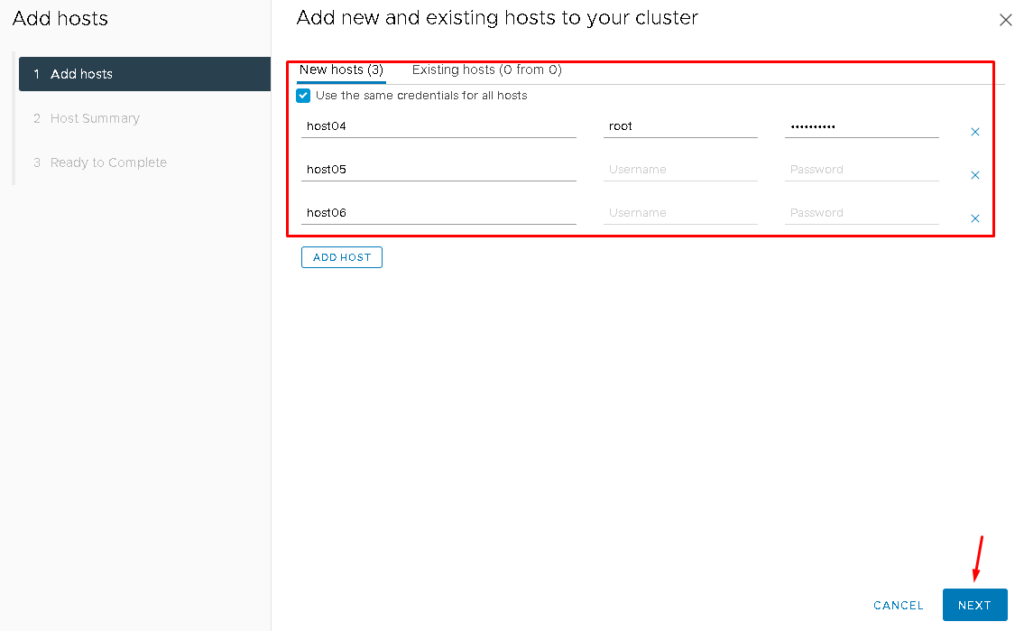
Put the hostname, FQDN, or IP address of each ESXi host that you want to add to this cluster.
In this example, we are adding three ESXi hosts using the hostname of each ESXi host. The option “Use the same credentials for all hosts” was marked due to the root credential being the same for all hosts.
Later, NEXT –> NEXT –> FINISH:
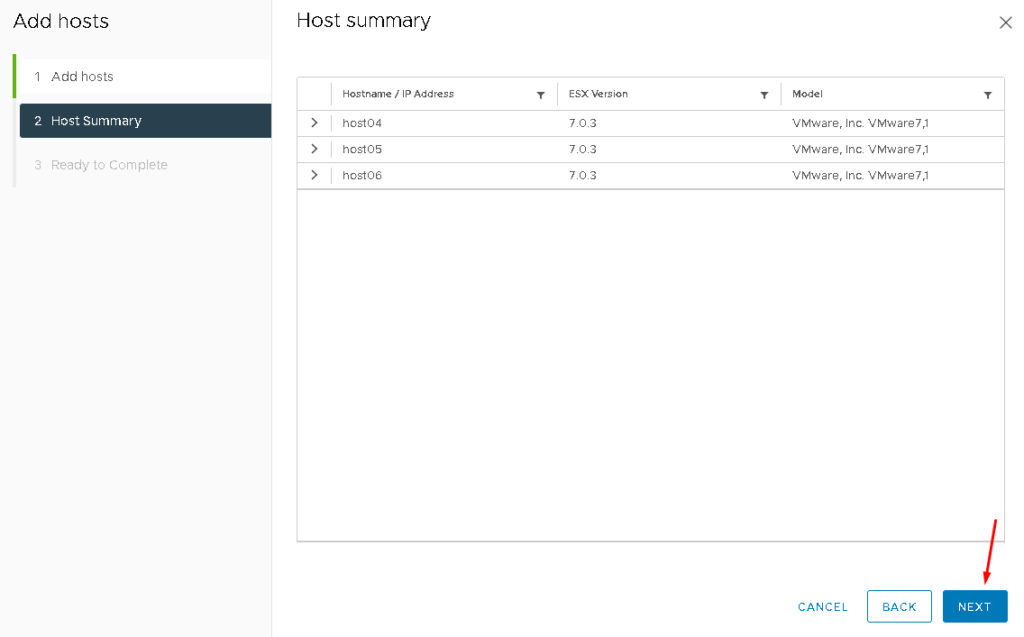
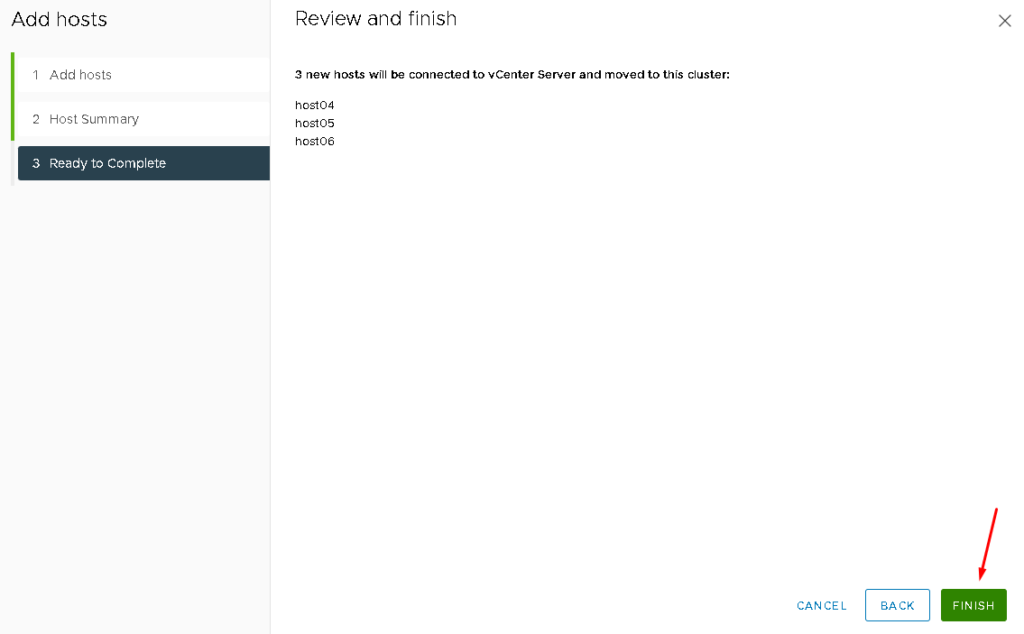
At this point, we have all ESXi hosts inside the Cluster:

Adding ESXi hosts to the Distributed Switch
By default after the ESXi installation, a Standard Switch (VSS) is created and the Management Port Group and VMkernel are associated with this Virtual Switch.
It is highly recommended to use a Distributed Switch on a vSAN Cluster. So, we will add each ESXi host to the Distributed Switch that we created before.
On the vSphere Client, select the Networking tab. Select the Distributed Switch –> Right Click –> Add and Manage Hosts:
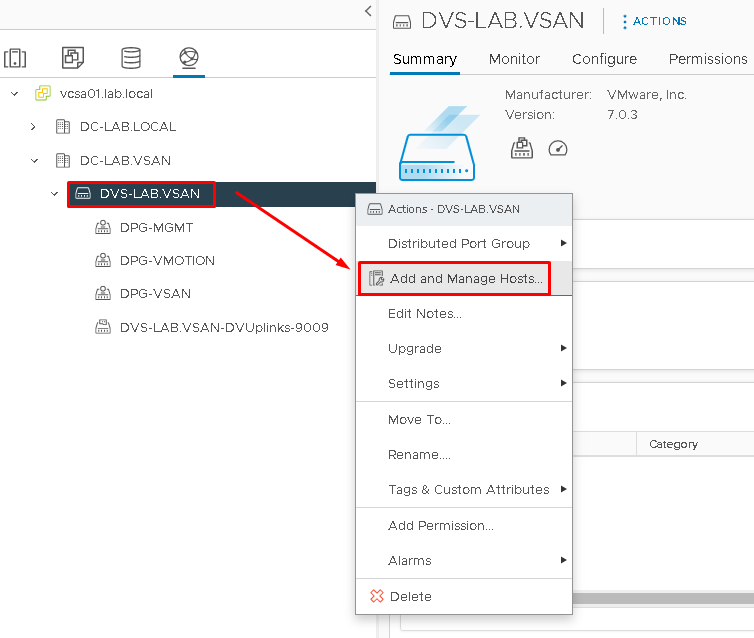
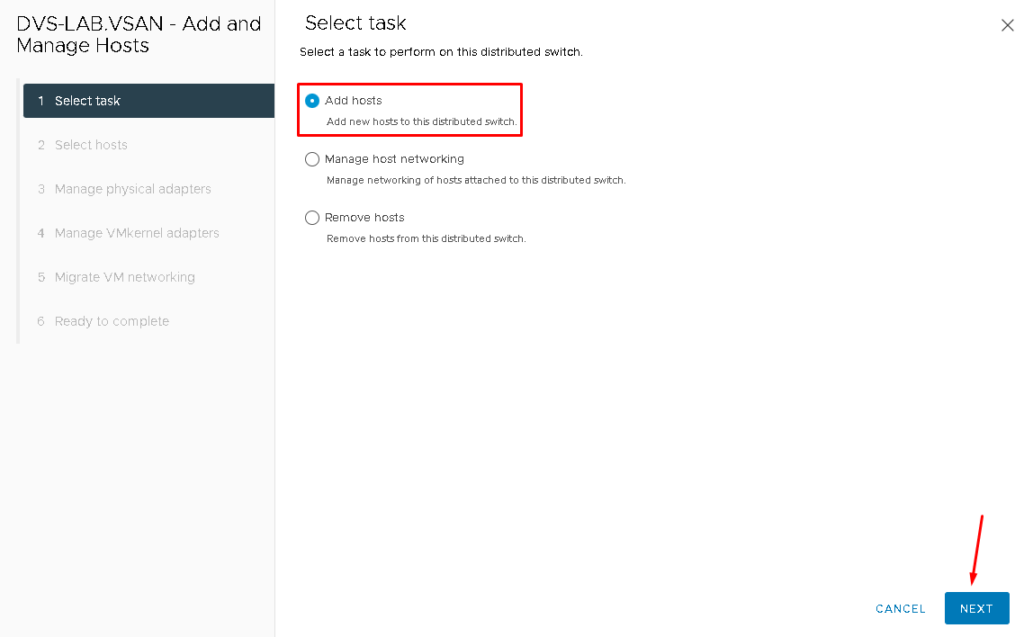
Click on “Add hosts” and NEXT:
Select all ESXi hosts available. In our case, there are three ESXi hosts:
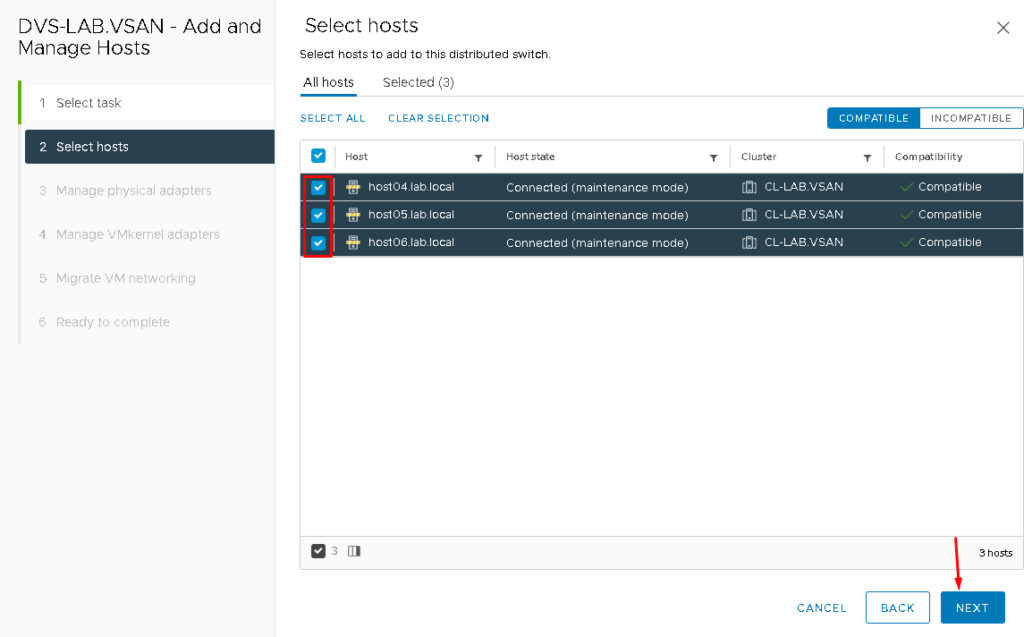
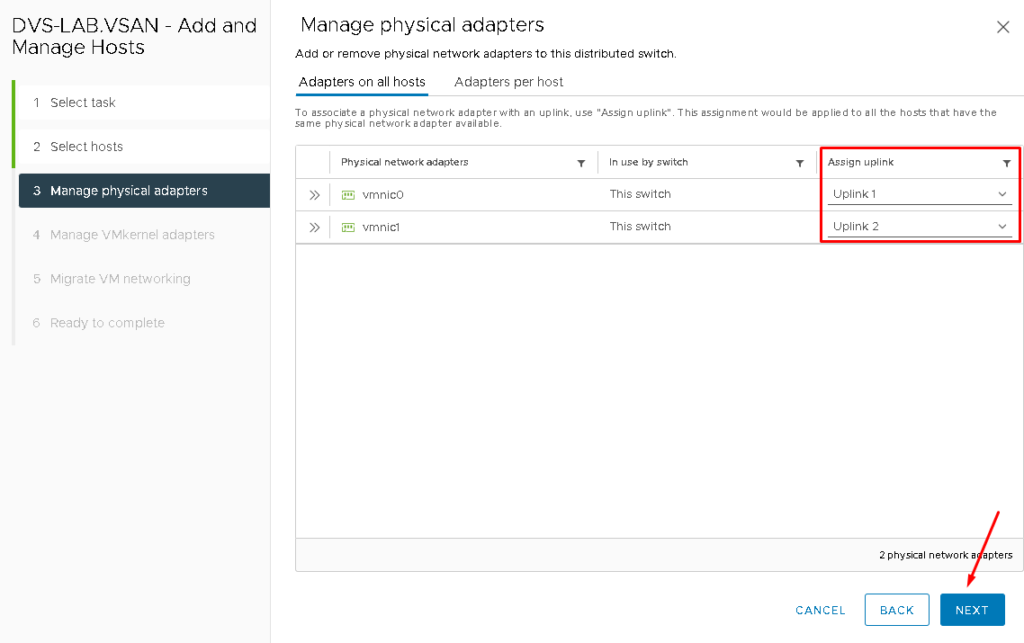
Here is an important step. We need to assign what vmnic (physical interface) interface will be assigned to what uplink of the distributed switch.
In our environment, the assignment is being realized such described below:
- vmnic0 –> Uplink 1
- vmnic1 –> Uplink 2
After that, click on NEXT to continue:
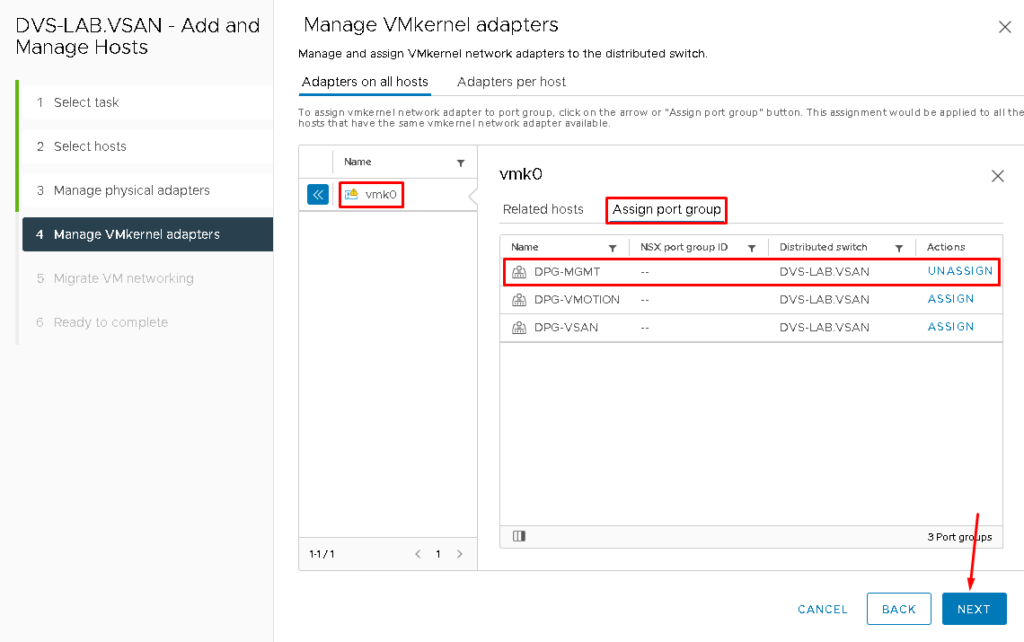
The next step is necessary to assign the Management VMkernel adapter to the new Port Group (in this case, the new Distributed Port Group is provided by the Distributed Switch).
Select the VMkernel “vmk0” –> Assign port group –> Under “DPG-MGMT” click on ASSIGN. After you do it, the action “UNASSIGN” will show, proving that the assignment has been done.
Click on NEXT to continue:
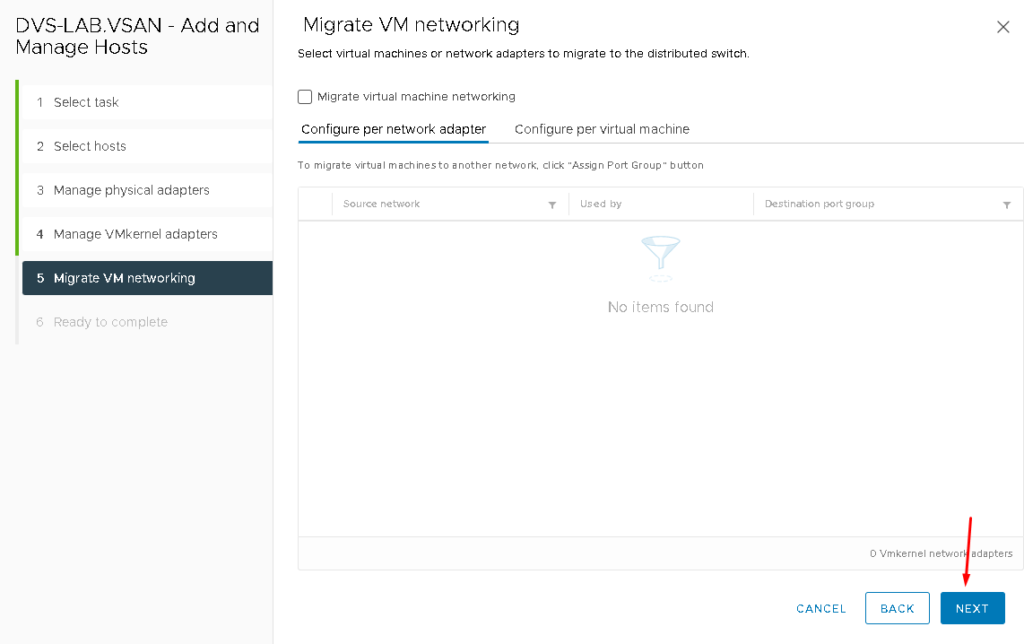
NEXT –> FINISH:
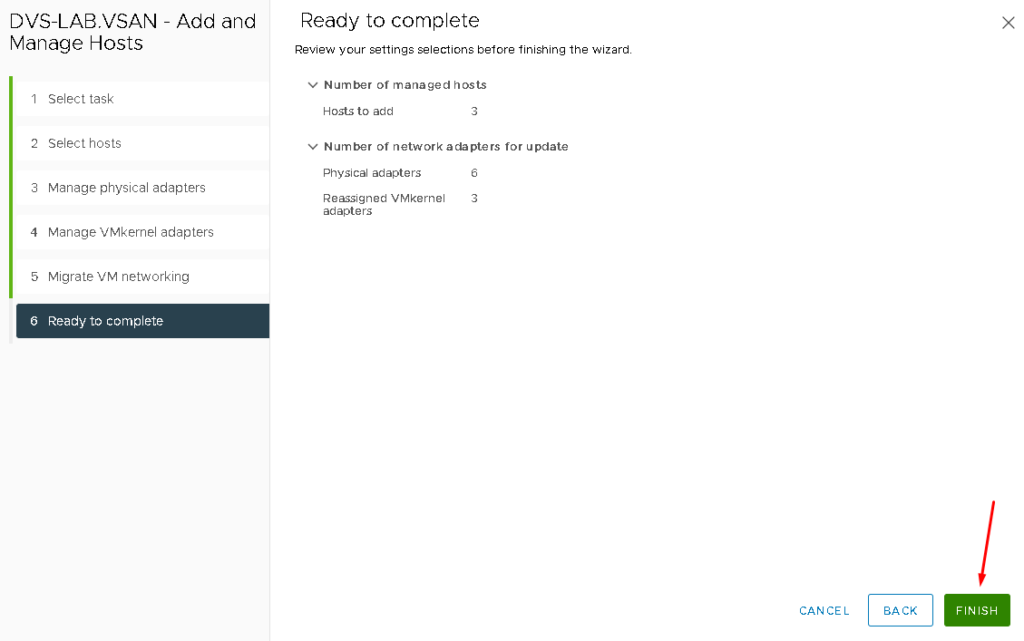
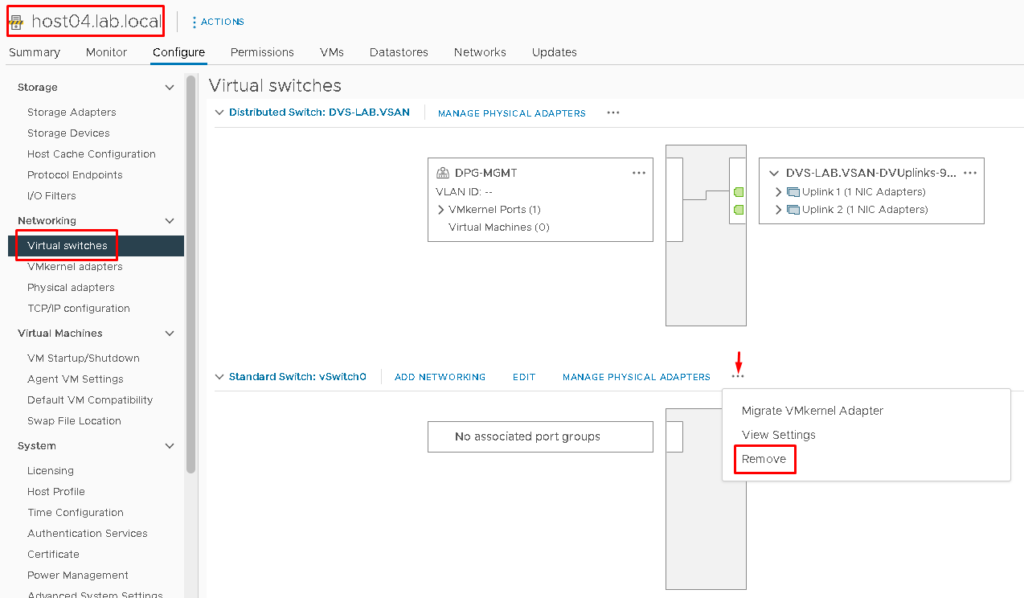
At this point, all ESXi hosts are part of the Distributed Switch. The Standard Switch called “vSwitch0” can be removed. To do it, click on the three dots –> Remove (do it on all ESXi hosts) under the vSwitch0:
Creating VMkernels Interfaces
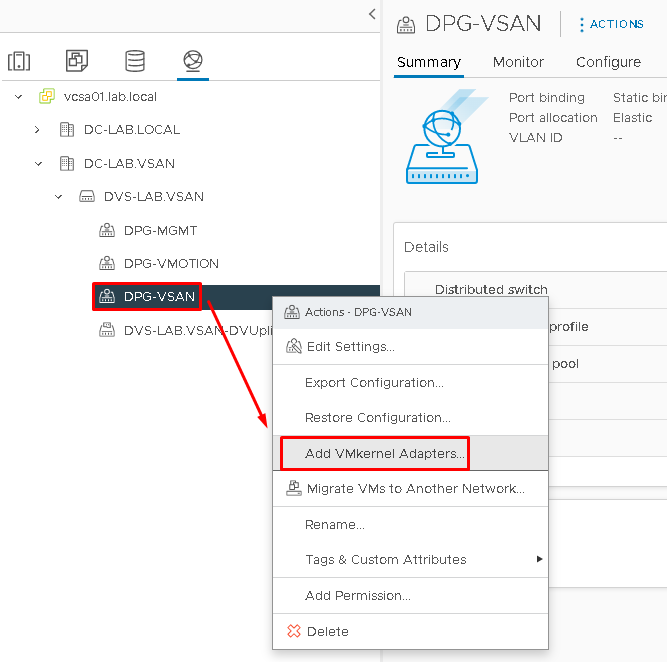
A VMkernel interface is a layer 3 interface that is used by the ESXi host. We need to create the vSAN VMkernel and vMotion VMkernel. To create the vSAN VMkernel interface, select the vSAN Distributed Port Group –> Right Click –> Add VMKernel Adapters:
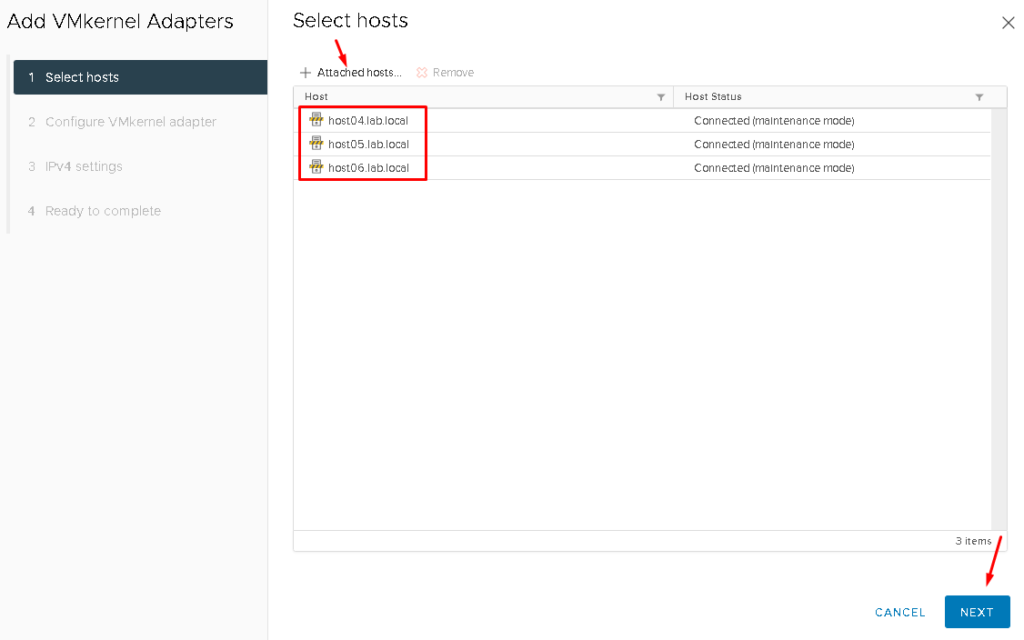
Attached hosts to add the VMkernel interface:
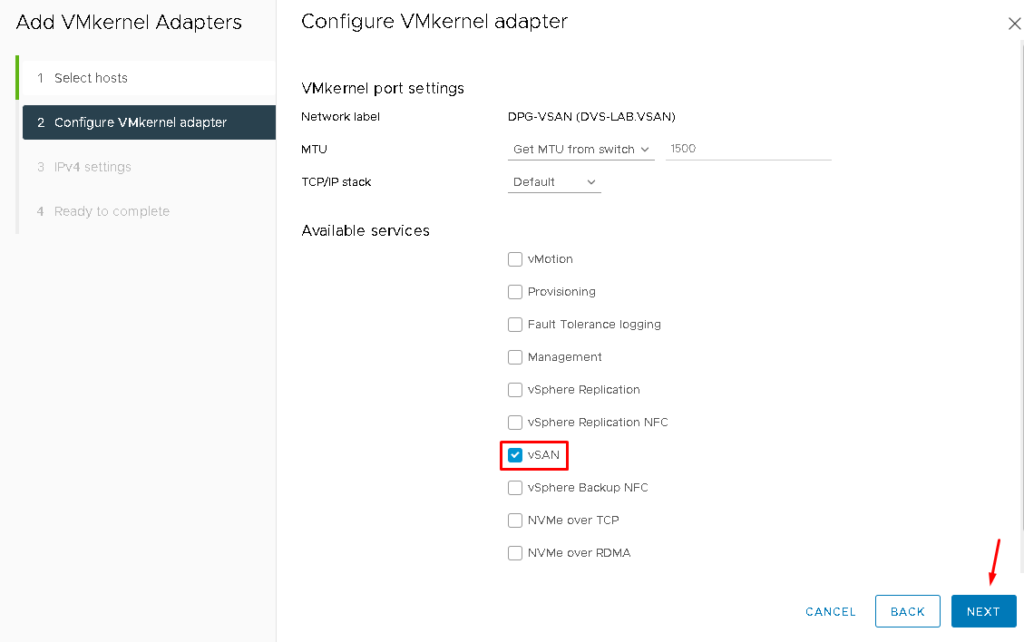
On the “Available services“, mark the service vSAN and click on NEXT to continue:
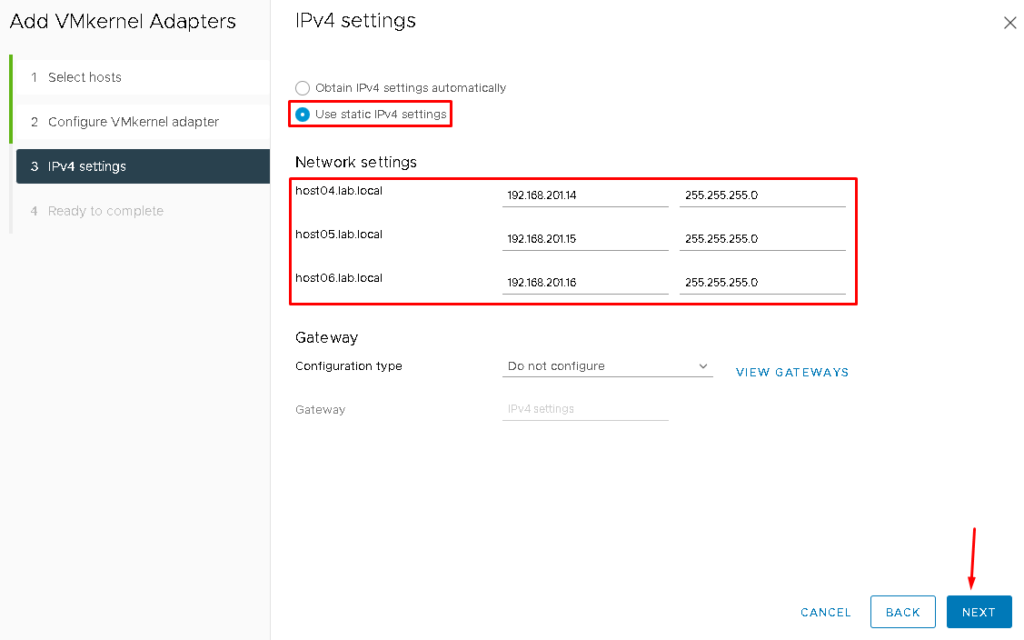
On IPv4 settings, mark the option “Use static IPv4 settings” and define the IP settings for each ESXi host to communicate on the vSAN network. After that, click on NEXT to continue:
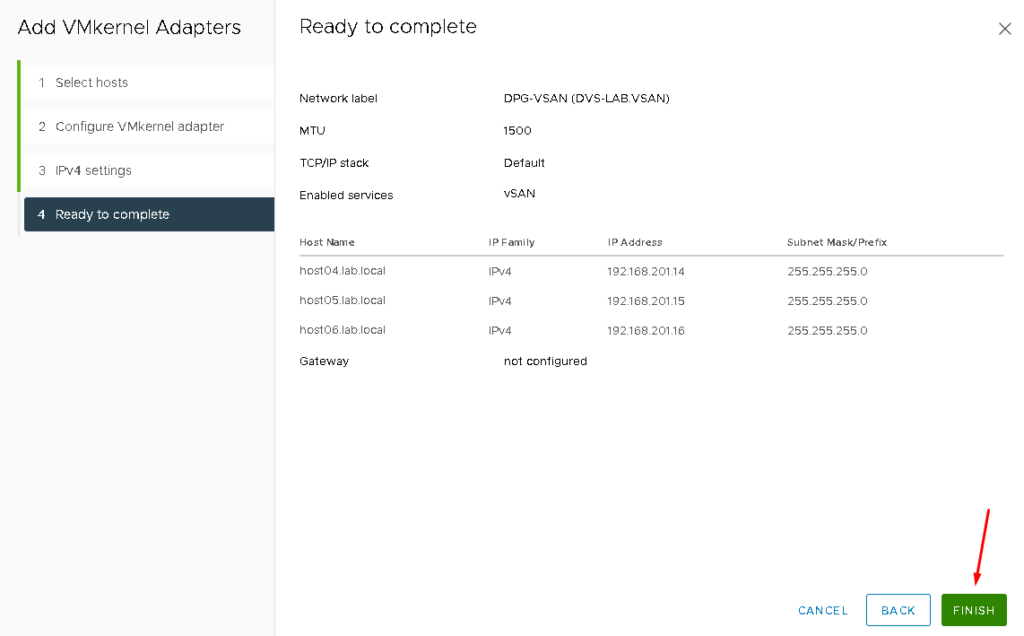
Click on FINISH to finish the VMkernel creation wizard:
To confirm if the vSAN VMKernel was created, select each ESXi host –> Configure –> Under Networking, select VMKernel adapters. The vmk1 is used in the vSAN network:

Note: Repeat the same steps to create the vMotion VMkernel. Obviously, for that VMkernel, it is necessary to use a different subnet and mark the vMotion service. The vmk2 is used in the vMotion network:

Testing the Communication between ESXi hosts in the vSAN Network
From the host’s console or SSH session, we can check the communication in the vSAN Network:
To list all VMkernel interfaces on the ESXi host:
esxcli network ip interface ipv4 get

To check the communication from this ESXi host to other hosts on the vSAN network:
vmkping -I vmk1 192.168.201.15 -s 1472 -d
vmkping -I vmk1 192.168.201.16 -s 1472 -d
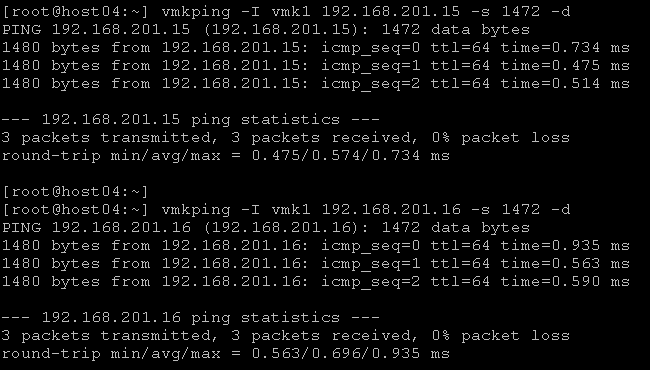
Where:
- 192.168.201.15 –> vSAN IP for the host05
- 192.168.201.16 –> vSAN IP for the host06
- vmkping -I vmk1 –> The source interface for ping packets
- -s 1472 –> Size of the packet
- -d –> Avoid packet fragmentation
Enabling the vSAN Service on the Cluster
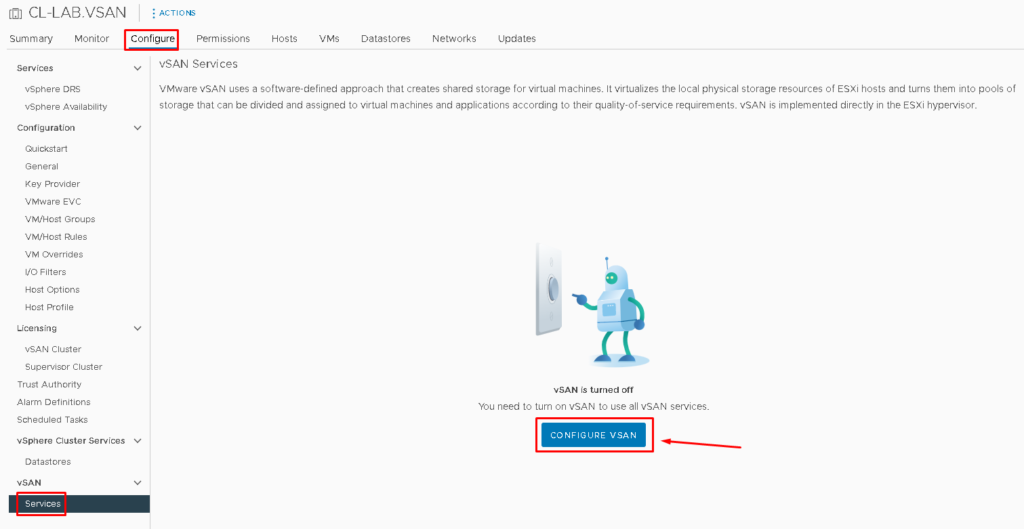
To enable the vSAN service, select the Cluster that we created before –> Configure –> Under vSAN, select Services –> CONFIGURE VSAN:
Now, it is necessary to select the type of the vSAN Cluster. In this case, we will use the “Single site cluster“. Click on NEXT to continue:

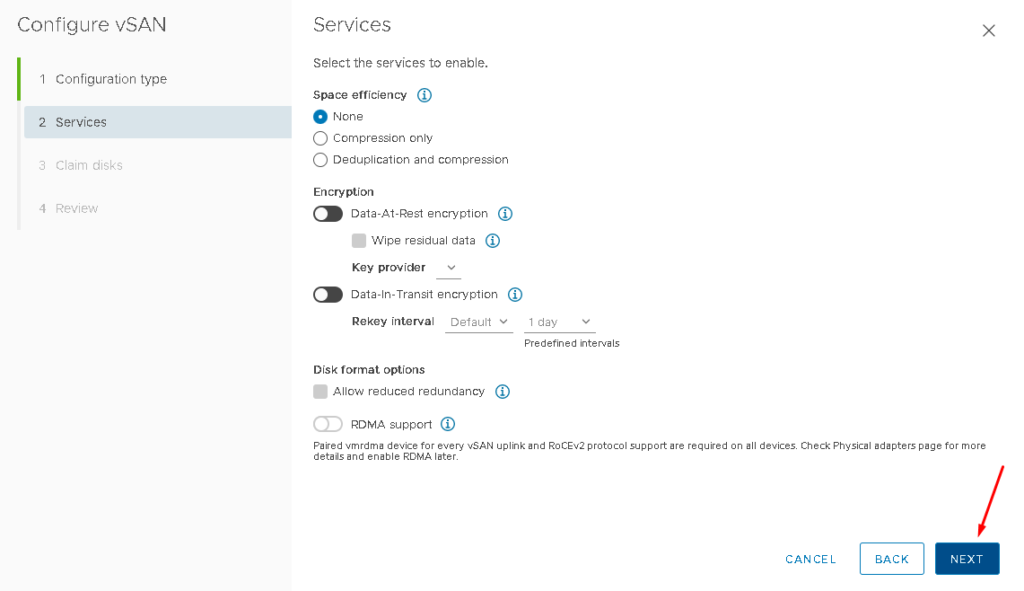
Under Services, it is not necessary to change anything now. So, click on NEXT to continue:
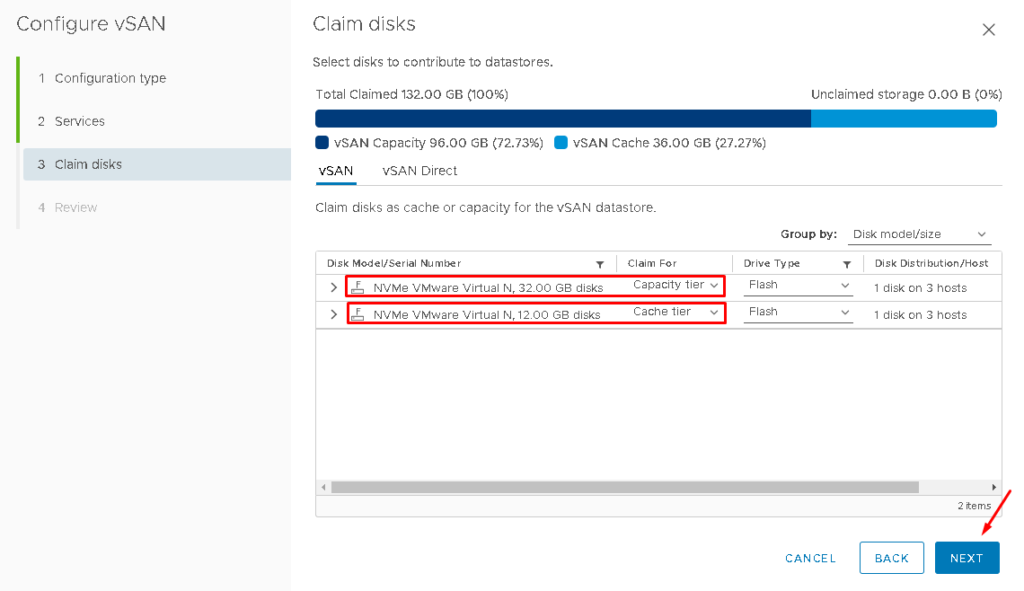
On Claim disks, we need to select what disk will be used for the cache layer and what disk will be used for the capacity layer. By default, the smaller disk is selected for the cache layer. Review that and adjust it if necessary. After that, click on NEXT to continue:
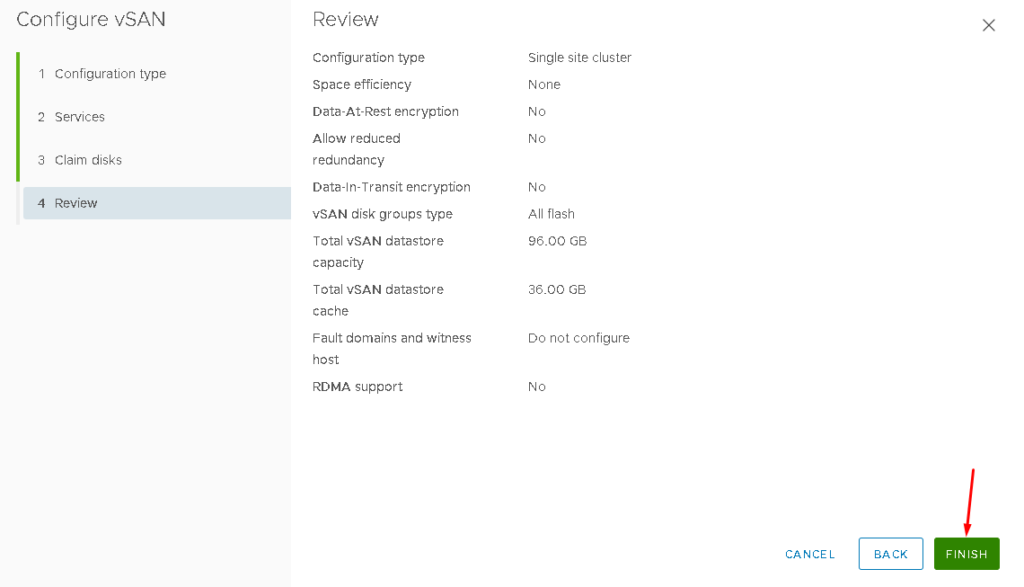
Click on FINISH to finish the vSAN service enabling wizard:
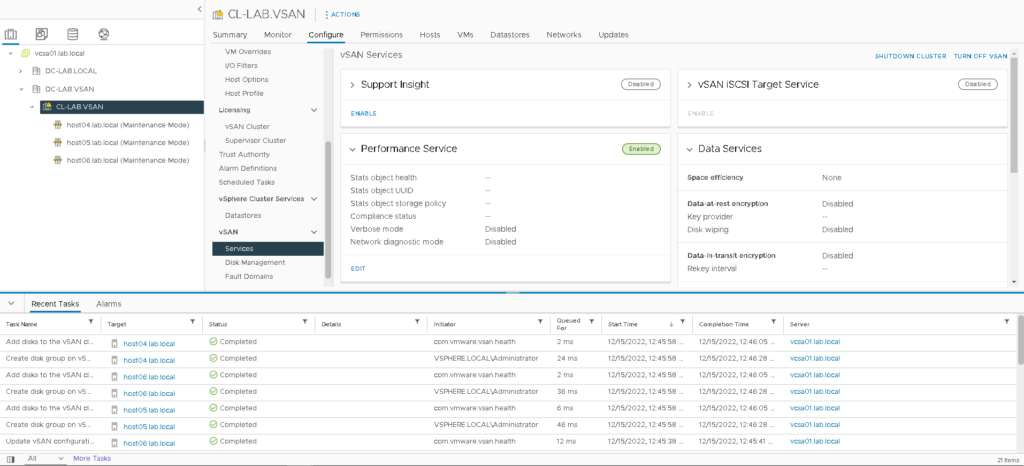
After a few minutes, on the Recent Tasks, it is possible to see that all tasks related to the vSAN enabling service were finished:
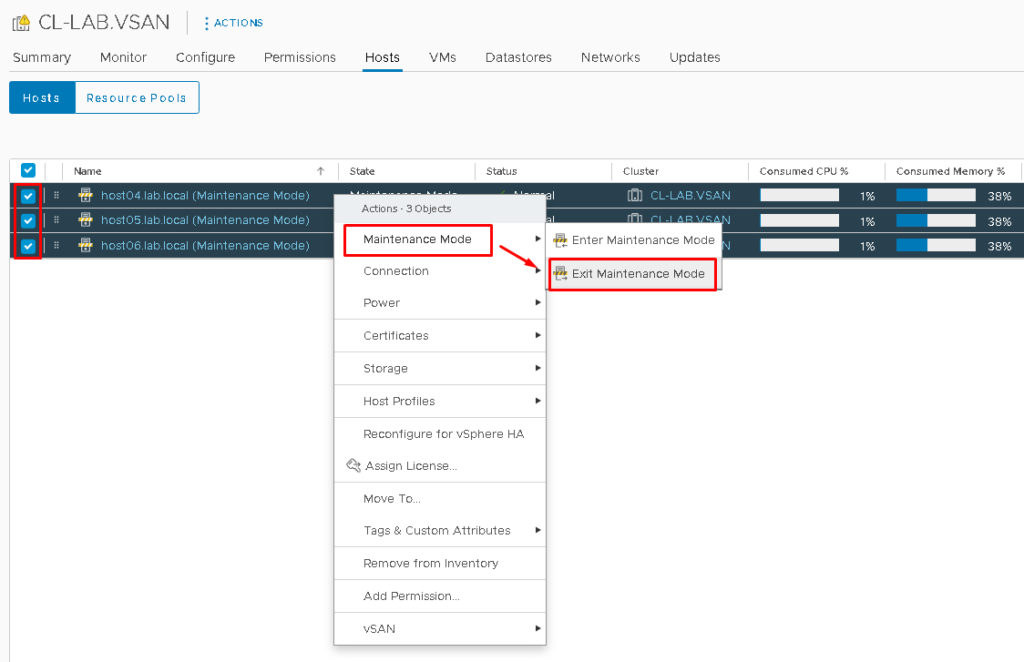
Select the Cluster –> Hosts and remove all ESXi hosts from Maintenance Mode:
To check if the vSAN service was enabled, select the Cluster –> Monitor –> Under vSAN, select Skyline Health –> And click on RETEST:
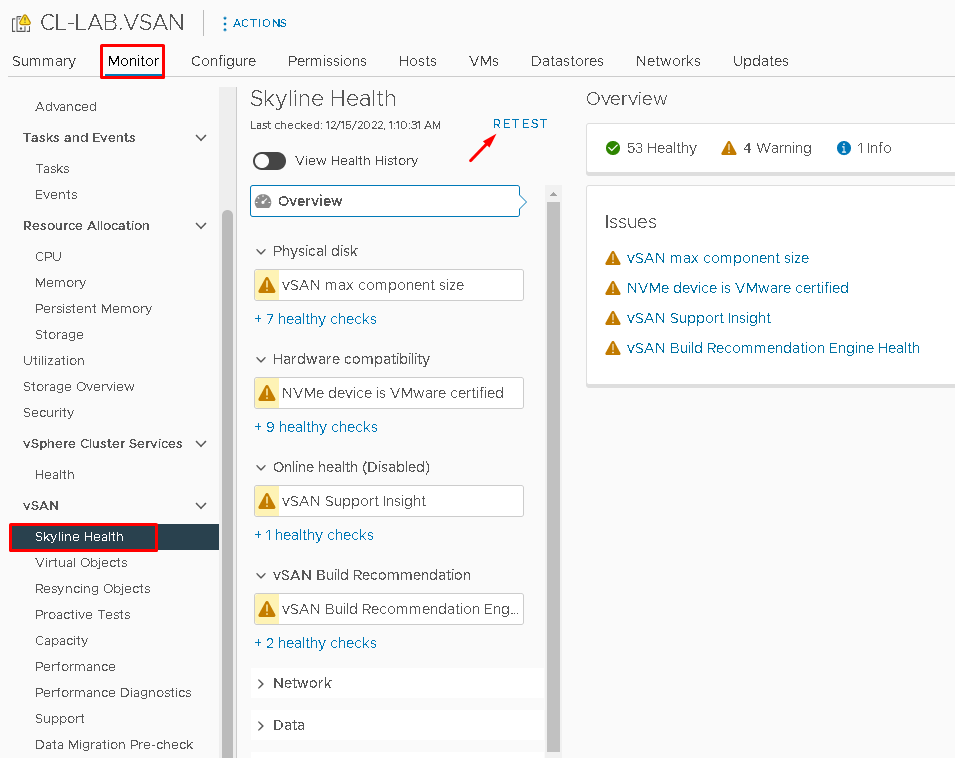
Note: The vSAN Skyline Health is a KEY tool to monitor the health of all vSAN Cluster. Definitely, it is the first point of checking the health of all vSAN components. In this case, we don’t have any failure or error alarms.
Under Capacity, we can see the vSAN Datastore Capacity:
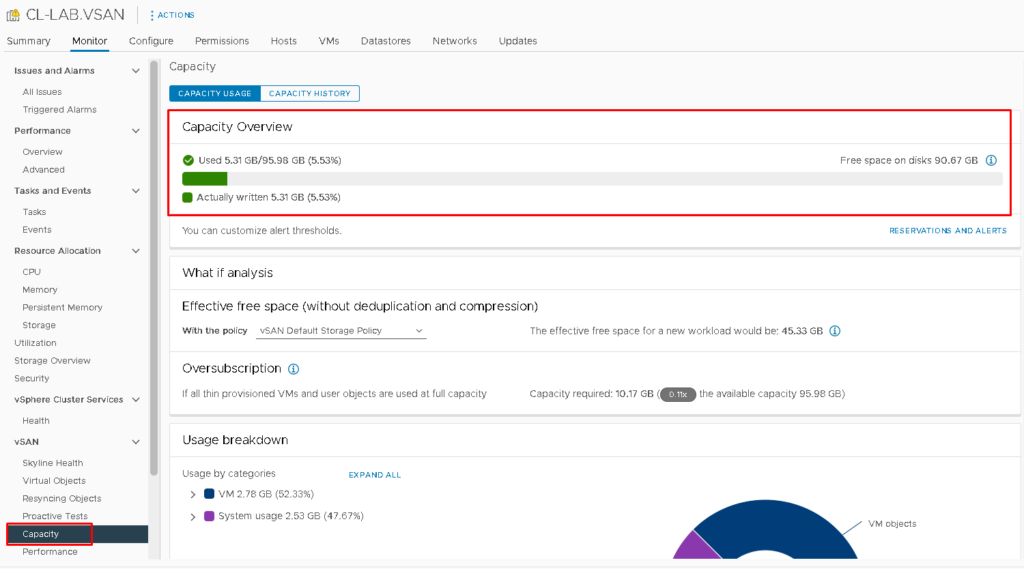
At this point, our vSAN datastore was created with success 🙂
We can create VMs and place their objects into the vSAN Datastore!