

This guide demonstrates how to install the Dell PowerFlex Storage Data Client (SDC) on a VMware ESXi host, connect it to a PowerFlex MDM cluster, map PowerFlex volumes, and create VMFS6 datastores from those volumes.
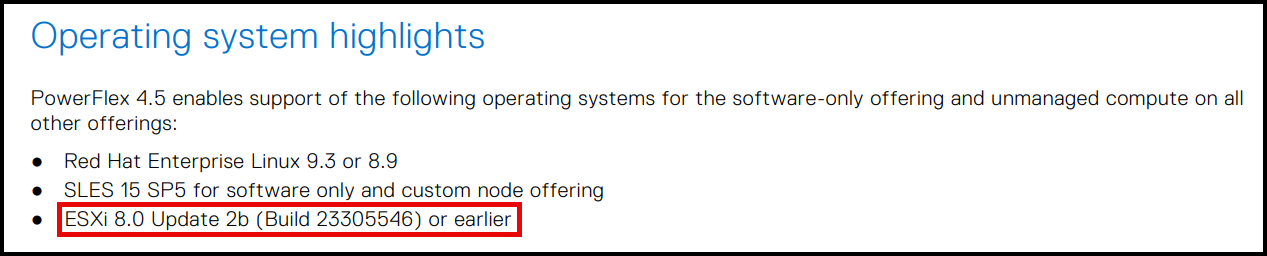
The procedure below reflects a nested lab, not a production design. The lab used PowerFlex 4.5.2 and ESXi 8.0.3, build 24022510. Before reproducing it, verify the exact ESXi build and SDC package against Dell’s current support matrix for the PowerFlex release. Broadcom lists PowerFlex 4.5.x with ESXi 8.x in its general compatibility article, but directs readers to Dell’s version-specific matrix for the supported combinations.
If you are new to the platform, see PowerFlex architecture and components. For a related PowerFlex 4.5.2 deployment walkthrough, see Deploying a New PowerFlex Cluster.
Lab Environment and Compatibility
The original lab used:
- PowerFlex core 4.5.2.
- VMware ESXi 8.0.3, build 24022510.
- Nested virtual machines for both the PowerFlex cluster and ESXi host.
- An SDC archive named
sdc-4.5.0.263-esx8.x.zip.
The archive name and the PowerFlex core version are separate version values. The example MDM output also reports the SDC’s loaded and installed version as 4.5.0. Do not infer from those values alone that this package is the correct SDC build for every PowerFlex 4.5.2 deployment. Confirm the exact package-to-core pairing and ESXi build in Dell’s release notes and compatibility matrix before using the configuration in production.
The release notes link below is the one cited by the original draft. Dell’s current public compatibility page also lists PowerFlex 4.5.x with ESXi 8.x, but instructs readers to check Dell’s release-specific support matrix for exact version support. The lab’s nested configuration should therefore be presented as a demonstration unless the exact build pair is confirmed in that matrix.
Installing the SDC “vib” on ESXi Host
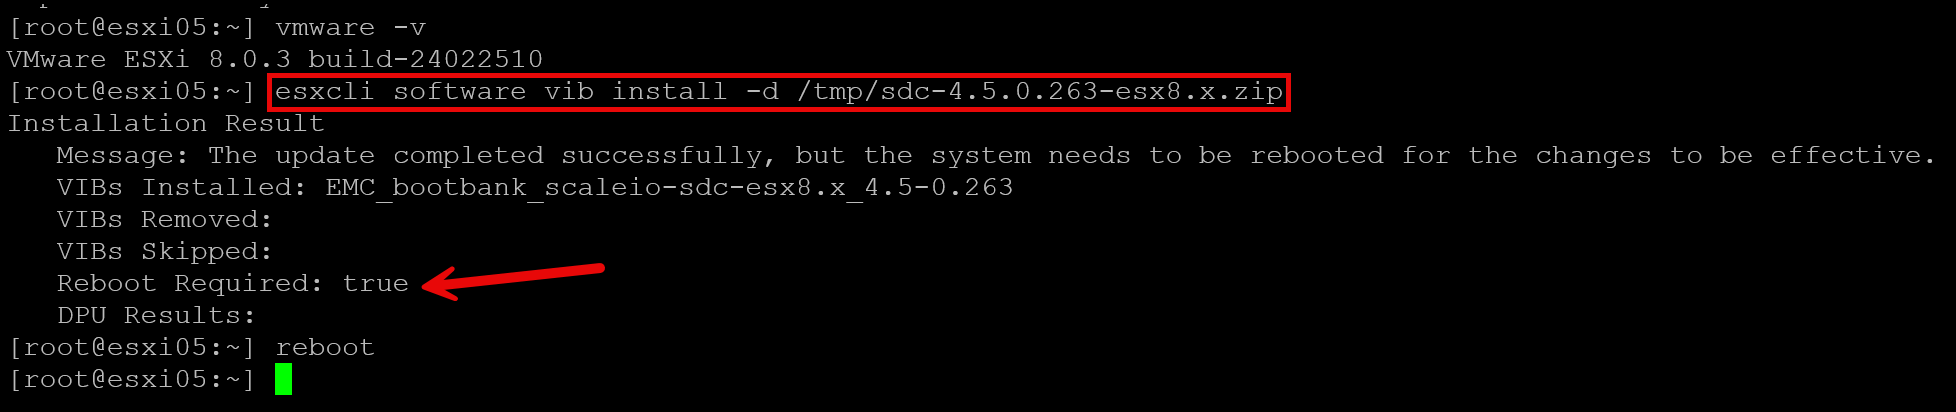
After downloading the SDC package for vSphere ESXi 8.0 from support.dell.com, access the desired ESXi host by SSH and check if the SDC vib is already installed:
esxcli software vib list | grep -i emcCopying the SDC vib from the local desktop to the ESXi host and installing it. After installing the vib, reboot the system:
# We are copying the ".zip" from a Windows client using PowerShell:
scp C:\Temp\sdc-4.5.0.263-esx8.x.zip root@192.168.255.15:/tmp
esxcli software vib install -d /tmp/sdc-4.5.0.263-esx8.x.zip
reboot
Note: If the ESXi host is a production host, before rebooting, put it first in maintenance mode and then reboot it:
Checking vib details after installation:
esxcli software vib list | grep -i emc
Connecting SDC to the MDM Cluster
After installing the SDC vib, we must configure it to connect to the MDM cluster.
Each SDC needs a unique GUID in OSF DCE 1.1 format. You can generate one in PowerShell:
[guid]::NewGuid()

Example:

PS C:\Users\tux000> [guid]::NewGuid()

Guid
----
f6afa69c-a9a9-48af-bbc6-356d57da909bNote: https://guidgenerator.com/ (another option to generate the GUID).
The GUID must be unique for each device!
Configuring the scini module (the module name used by the SDC) points to the MDM servers and passes the ESXi’s GUID. After doing it, reboot the system again:
esxcli system module parameters set -m scini -p "IoctlIniGuidStr=f6afa69c-a9a9-48af-bbc6-356d57da909b IoctlMdmIPStr=192.168.155.254+192.168.156.254"Where:
- IoctlIniGuidStr=f6afa69c-a9a9-48af-bbc6-356d57da909b –> GUID generated using the PowerShell;
- IoctlMdmIPStr=192.168.155.254+192.168.156.254 –> Since we have both virtual IPs, we need to specify them using the “+”.
Checking the SDC module configuration and confirming if the scini module was loaded:
esxcli system module parameters list -m scini | grep Ioctl
vmkload_mod --list | grep -i scini
If the scini module was loaded successfully, we could see a software adapter using the scini driver:
esxcli storage core adapter list
On the MDM primary, check the new SDC details (in this case, we are filtering by GUID the command output):
scli --login --management_system_ip 192.168.255.61 --username admin
scli --query_all_sdc | grep -i -A4 f6afa69c-a9a9-48af-bbc6-356d57da909b
Creating and Mapping Volumes to the new SDC
Creating two new volumes, “vSphere-Vol-03” and “vSphere-Vol-04”, both thin-provisioned and with 64GB each:
scli --add_volume --size_gb 64 --volume_name vSphere-Vol-03 --protection_domain_name PD01 --storage_pool_name SP01 --thin_provisioned

scli --add_volume --size_gb 64 --volume_name vSphere-Vol-04 --protection_domain_name PD01 --storage_pool_name SP01 --thin_provisioned
Mapping both volumes to the new SDC. In this case, for instance, we are mapping each volume to the SDC using the SDC GUID:
scli --map_volume_to_sdc --volume_name vSphere-Vol-03 --sdc_guid F6AFA69C-A9A9-48AF-BBC6-356D57DA909B --allow_multi_map

scli --map_volume_to_sdc --volume_name vSphere-Vol-04 --sdc_guid F6AFA69C-A9A9-48AF-BBC6-356D57DA909B --allow_multi_map
Checking what SDCs are mapped to each volume:
scli --query_volume --volume_name vSphere-Vol-03

>> Volume ID: 2902b2d500000010 Name: vSphere-Vol-03
   Provisioning: Thin
   Size: 64.0 GB (65536 MB)
   Total base user data: 0 Bytes
   Storage Pool 2714b2fe00000000 Name: SP01
   Protection Domain b187c36500000000 Name: PD01
   Creation time: 2024-12-19 08:59:32
   Class: default
   Reads:  0 IOPS 0 Bytes per second
   Writes: 0 IOPS 0 Bytes per second
   Data layout: Medium granularity
   Mapping:
      Host ID: 997fade30000000f Name: N/A Host Type: SDC IP: 192.168.156.211 Access Mode: READ_WRITE , Device is mapped to SDC
   No SCSI reservations
   No Nvme reservations
   Migration status: Not in migration
   Doesn't use RAM Read Cache
   Replication info:
      Replication state: Not being Replicated
   Volume NVMe Namespace ID: 17

==========

scli --query_volume --volume_name vSphere-Vol-04

>> Volume ID: 2902b2d600000011 Name: vSphere-Vol-04
   Provisioning: Thin
   Size: 64.0 GB (65536 MB)
   Total base user data: 0 Bytes
   Storage Pool 2714b2fe00000000 Name: SP01
   Protection Domain b187c36500000000 Name: PD01
   Creation time: 2024-12-19 08:59:38
   Class: default
   Reads:  0 IOPS 0 Bytes per second
   Writes: 0 IOPS 0 Bytes per second
   Data layout: Medium granularity
   Mapping:
      Host ID: 997fade30000000f Name: N/A Host Type: SDC IP: 192.168.156.211 Access Mode: READ_WRITE , Device is mapped to SDC
   No SCSI reservations
   No Nvme reservations
   Migration status: Not in migration
   Doesn't use RAM Read Cache
   Replication info:
      Replication state: Not being Replicated
   Volume NVMe Namespace ID: 18
As we can see in the output above, the new SDC (ESXi) has mapped both volumes correctly. The next step is to rename the SDC hostname:
-- BEFORE:
scli --query_all_sdc | grep -i -A4 F6AFA69C-A9A9-48AF-BBC6-356D57DA909B
SDC ID: 997fade30000000f Name: N/A IPs: 192.168.156.211,192.168.155.212 State: Connected GUID: F6AFA69C-A9A9-48AF-BBC6-356D57DA909B  OS Type: ESX Loaded Version: 4.5.0 Installed Version: 4.5.0
    Agent status: disabled MDM IP addresses: stale Reboot safe: no
    Reads:  0 IOPS 0 Bytes per second
    Writes: 0 IOPS 0 Bytes per second

-- RENAMING:
scli --rename_sdc --sdc_guid F6AFA69C-A9A9-48AF-BBC6-356D57DA909B --new_name ESXI05
Successfully renamed host SDC with GUID F6AFA69C-A9A9-48AF-BBC6-356D57DA909B to ESXI05

-- AFTER:
scli --query_all_sdc | grep -i -A4 F6AFA69C-A9A9-48AF-BBC6-356D57DA909B
SDC ID: 997fade30000000f Name: ESXI05 IPs: 192.168.156.211,192.168.155.212 State: Connected GUID: F6AFA69C-A9A9-48AF-BBC6-356D57DA909B  OS Type: ESX Loaded Version: 4.5.0 Installed Version: 4.5.0
    Agent status: disabled MDM IP addresses: stale Reboot safe: no
    Reads:  0 IOPS 0 Bytes per second
    Writes: 0 IOPS 0 Bytes per second
Listing and Using the PowerFlex Volumes on the ESXi
On the ESXi command line, we can list all devices provided by the PowerFlex:
esxcli storage core device list | grep -i -B7 "Vendor: EMC"

Example:

eui.8c40194f563e090f2902b2d600000011
   Display Name: EMC Fibre Channel Disk (eui.8c40194f563e090f2902b2d600000011)
   Has Settable Display Name: true
   Size: 65536
   Device Type: Direct-Access
   Multipath Plugin: NMP
   Devfs Path: /vmfs/devices/disks/eui.8c40194f563e090f2902b2d600000011
   Vendor: EMC
--
eui.8c40194f563e090f2902b2d500000010
   Display Name: EMC Fibre Channel Disk (eui.8c40194f563e090f2902b2d500000010)
   Has Settable Display Name: true
   Size: 65536
   Device Type: Direct-Access
   Multipath Plugin: NMP
   Devfs Path: /vmfs/devices/disks/eui.8c40194f563e090f2902b2d500000010
   Vendor: EMC
--
eui.8c40194f563e090f997fade30000000f
   Display Name: EMC Fibre Channel Disk (eui.8c40194f563e090f997fade30000000f)
   Has Settable Display Name: true
   Size: 0
   Device Type: Direct-Access
   Multipath Plugin: NMP
   Devfs Path: /vmfs/devices/disks/eui.8c40194f563e090f997fade30000000f
   Vendor: EMC
Creating datastores on the ESXi command line:
1- Checking the current filesystem before the datastore creation:
esxcli storage filesystem list

Example:

Mount Point                                           Volume Name                                 UUID                                    Mounted  Type            Size          Free
----------------------------------------------------  ------------------------------------------  --------------------------------------  -------  ------  ------------  ------------
/vmfs/volumes/670bfcd4-bd923ea8-aedf-000c29af4643     OSDATA-670bfcd4-bd923ea8-aedf-000c29af4643  670bfcd4-bd923ea8-aedf-000c29af4643        true  VMFSOS   19058917376   15767437312
/vmfs/volumes/d8d8e65f-944e99e0-f1be-cc6ddb33da14     BOOTBANK1                                   d8d8e65f-944e99e0-f1be-cc6ddb33da14        true  vfat      1073577984     790855680
/vmfs/volumes/7fcc6c4b-934b5543-d4ae-816dcfa848e9     BOOTBANK2                                   7fcc6c4b-934b5543-d4ae-816dcfa848e9        true  vfat      1073577984     791838720
/vmfs/volumes/vsan:52a469c557ab8a3f-6d6eb81eaa2b3c1d  vsanDatastore-ESA                           vsan:52a469c557ab8a3f-6d6eb81eaa2b3c1d     true  vsan    273720279040  124403733641
2- Grabbing both disk identifiers (esxcli storage core device list | grep -i -B7 “Vendor: EMC”):
eui.8c40194f563e090f2902b2d600000011
eui.8c40194f563e090f2902b2d500000010
3- Getting the disk path for both disks:
ls /vmfs/devices/disks/eui.*

/vmfs/devices/disks/eui.8c40194f563e090f2902b2d600000011
/vmfs/devices/disks/eui.8c40194f563e090f2902b2d500000010
4- Creating the disk partition:
partedUtil showGuids --> grabbing the GUID for the vmfs filesystem

Example:

partedUtil showGuids
 Partition Type       GUID
 vmfs                 AA31E02A400F11DB9590000C2911D1B8
 vmkDiagnostic        9D27538040AD11DBBF97000C2911D1B8
 vsan                 381CFCCC728811E092EE000C2911D0B2
 virsto               77719A0CA4A011E3A47E000C29745A24
 VMware Reserved      9198EFFC31C011DB8F78000C2911D1B8
 Basic Data           EBD0A0A2B9E5443387C068B6B72699C7
 Linux Swap           0657FD6DA4AB43C484E50933C84B4F4F
 Linux Lvm            E6D6D379F50744C2A23C238F2A3DF928
 Linux Raid           A19D880F05FC4D3BA006743F0F84911E
 Efi System           C12A7328F81F11D2BA4B00A0C93EC93B
 Microsoft Reserved   E3C9E3160B5C4DB8817DF92DF00215AE
 Unused Entry         00000000000000000000000000000000

# Creating an empty gpt partition on both disk devices:
partedUtil setptbl /vmfs/devices/disks/eui.8c40194f563e090f2902b2d500000010 gpt
partedUtil setptbl /vmfs/devices/disks/eui.8c40194f563e090f2902b2d600000011 gpt

# Getting the usable sectors from each gpt partition:
partedUtil getUsableSectors /vmfs/devices/disks/eui.8c40194f563e090f2902b2d500000010
partedUtil getUsableSectors /vmfs/devices/disks/eui.8c40194f563e090f2902b2d600000011

Example:

[root@esxi05:/dev/disks] partedUtil getUsableSectors /vmfs/devices/disks/eui.8c40194f563e090f2902b2d500000010
34 134217694

[root@esxi05:/dev/disks] partedUtil getUsableSectors /vmfs/devices/disks/eui.8c40194f563e090f2902b2d600000011
34 134217694

# Creating one partition with all usable sectors:
partedUtil setptbl /vmfs/devices/disks/eui.8c40194f563e090f2902b2d500000010 gpt "1 34 134217694 AA31E02A400F11DB9590000C2911D1B8 0"

partedUtil setptbl /vmfs/devices/disks/eui.8c40194f563e090f2902b2d600000011 gpt "1 34 134217694 AA31E02A400F11DB9590000C2911D1B8 0"
Where, in this case:
- “1 34 134217694 AA31E02A400F11DB9590000C2911D1B8 0”
- 1 = The first partition
- 34 = The first usable disk sector
- 134217694 = The last usable disk sector
- AA31E02A400F11DB9590000C2911D1B8 = GUID for the vmfs filesystem type
- 0 = flags (no special flag)
After creating the disk partition, we will create the VMFS datastores:
# Creating the VMFS datastore "PowerFlex-Vol-03" using the disk partition eui.8c40194f563e090f2902b2d500000010:1:
vmkfstools -C vmfs6 -S PowerFlex-Vol-03 /vmfs/devices/disks/eui.8c40194f563e090f2902b2d500000010:1

# Creating the VMFS datastore "PowerFlex-Vol-04" using the disk partition eui.8c40194f563e090f2902b2d600000011:1:
vmkfstools -C vmfs6 -S PowerFlex-Vol-04 /vmfs/devices/disks/eui.8c40194f563e090f2902b2d600000011:1
Checking current filesystem after the datastore creation:
esxcli storage filesystem list

Closing Thoughts
Installing the SDC makes PowerFlex volumes available to ESXi as block devices, but the installation is only complete after you verify the MDM connection, confirm the volume mappings, and check that the VMFS6 datastores are mounted as expected.
Before using this procedure outside a lab, confirm that the ESXi build and SDC package are supported for your PowerFlex release. Treat partition-table changes and VMFS formatting as destructive operations, and proceed only after verifying the target devices and confirming that they contain no data you need.
External References
- Dell — Install the SDC on an ESXi Server PowerFlex 4.5.x instructions for installing the ESXi SDC, setting `scini` module parameters, formatting the SDC GUID, selecting MDM IPs, backing up configuration, and verifying the loaded driver.
- Dell — Install the SDC on a VMware ESXi 8.x Server Release-specific ESXi 8.x installation procedure, including the PartnerSupported acceptance level, ZIP extraction, VIB installation, and required graceful reboots.
- Dell — PowerFlex 4.5.x Release Notes Release notes for PowerFlex 4.5.x. Check the release-specific compatibility information for the precise ESXi build and SDC package before treating a lab combination as supported.
- Broadcom — Dell PowerFlex with ESXi 8.x and 9.x Broadcom’s general compatibility article lists PowerFlex 4.5.x with ESXi 8.x and directs readers to Dell’s support matrix for exact release combinations.
- Dell — SCLI `add_volume` Command Documents the volume-creation options used in the example, including size, Protection Domain, Storage Pool, and thin provisioning.
- Dell — SCLI `query_volume` Command Shows how to query volume properties and verify provisioning details and SDC mappings.
- Dell — SCLI `map_volume_to_host` Command Provides the current command syntax for mapping a volume to an SDC by GUID and explains the multi-host mapping option.
- Dell — SCLI `rename_host` Command Documents the current PowerFlex CLI command for renaming a host or SDC by its GUID.
- Dell — SCLI `query_all_sdc` Command Provides the SDC inventory query used to confirm that the ESXi client is registered and connected to the PowerFlex system.
- Broadcom — Install Individual VIBs on an ESXi Host Describes maintenance mode, ZIP and VIB installation syntax, post-install verification, and the required host reboot for individual VIB installs.
- Broadcom — Using `partedUtil` on ESXi Explains how to inspect and modify ESXi disk partition tables, the VMFS partition GUID, the complete-list behavior of `setptbl`, and the data-loss and backup cautions.
- Broadcom — Create a VMFS Datastore Official vSphere Client workflow for creating VMFS datastores, checking device eligibility, choosing VMFS6, and understanding that using all device partitions destroys existing filesystems and data.
- Broadcom — Creating a VMFS Datastore with `vmkfstools` Documents the VMFS filesystem options for `vmkfstools`, including the datastore-label option used with filesystem creation.
