
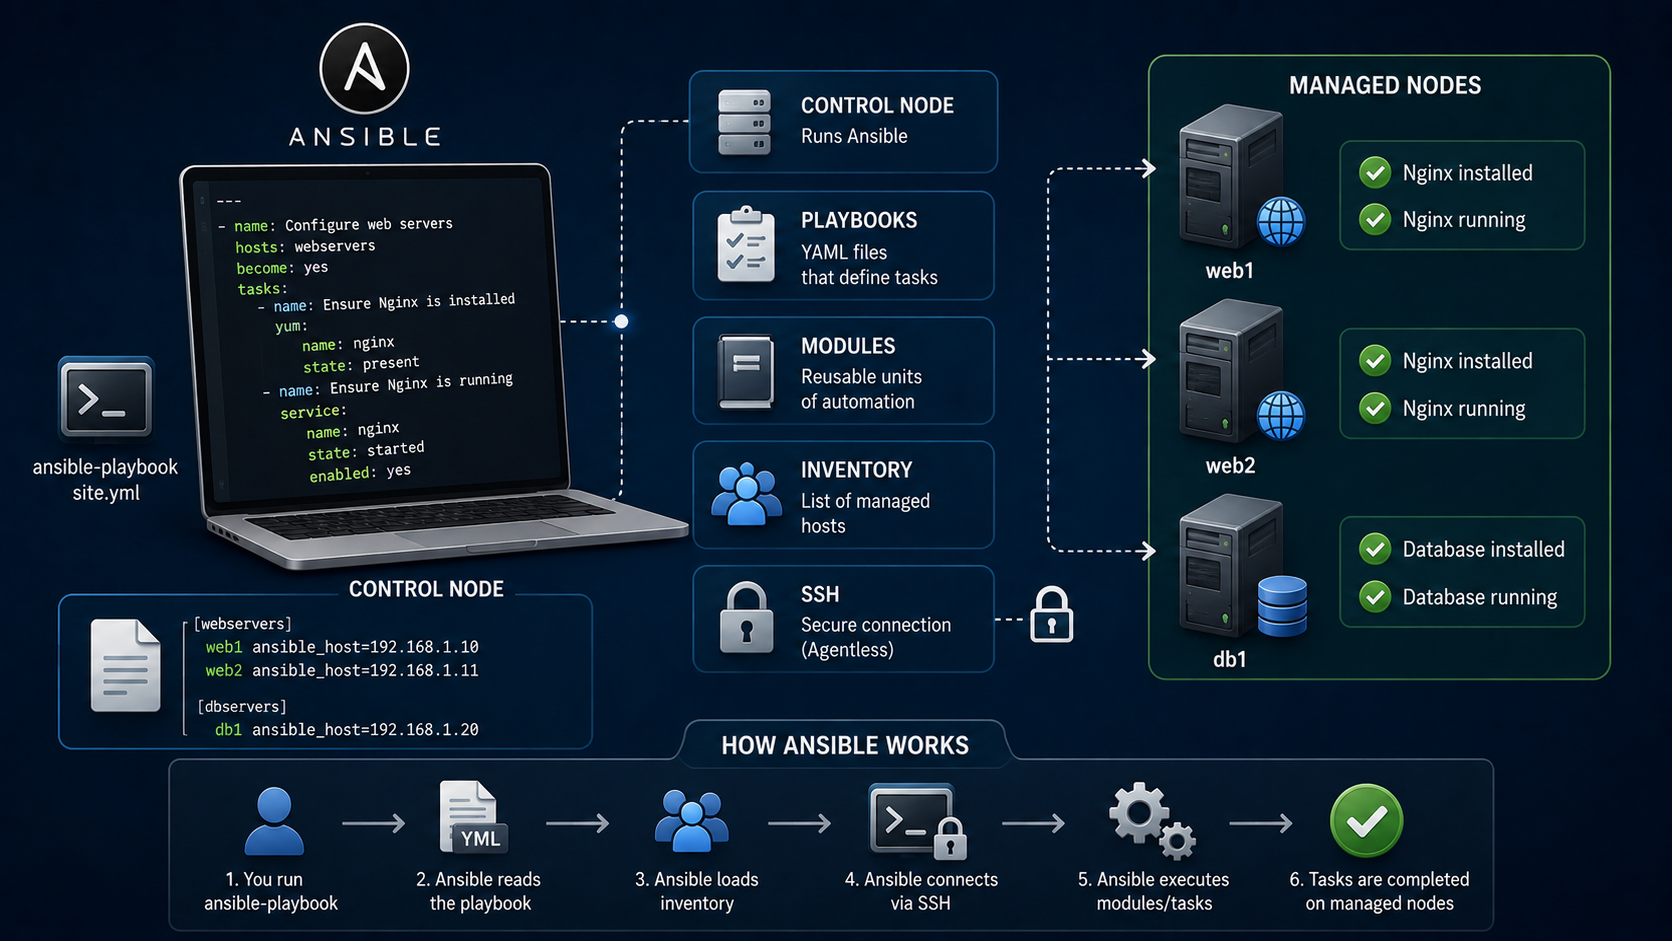
Ansible becomes much easier to understand when you stop looking at individual concepts and start using it to solve a real administrative task.
In this guide, I will use a lab environment to create and run a first Ansible playbook against multiple Linux servers. Instead of building a simple “Hello World” example, the playbook will perform an actual system administration task: ensure that the NFS client package is installed and that the required NFS client target is running on a group of HPC nodes.
The goal is not only to show the YAML syntax. We will build the inventory, validate connectivity, create the playbook, check it before execution, run it against multiple hosts, interpret the result, and verify the final state.
Lab Environment Used in This Guide
The environment used for this article consists of one Ansible control node and six Linux managed nodes.
The control node is the system where Ansible is installed and where all Ansible commands are executed. The managed nodes are the remote systems that Ansible connects to over SSH.
For this lab, I used:
- Control node: CentOS Stream 9
- Python: Python 3.9
- Ansible: ansible-core 2.14.18 in the original lab
- Managed nodes:
hpc2-node01throughhpc2-node06 - Connectivity: SSH key-based authentication
- Lab objective: install
nfs-utilsand startnfs-client.targeton all managed nodes
The Ansible version shown in the original lab is intentionally preserved because it documents the environment in which the procedure was tested. If you reproduce this lab with a newer Ansible release, some package versions or behavior may differ. Ansible maintains newer ansible-core branches today, so always check the current supported release before building a new environment:
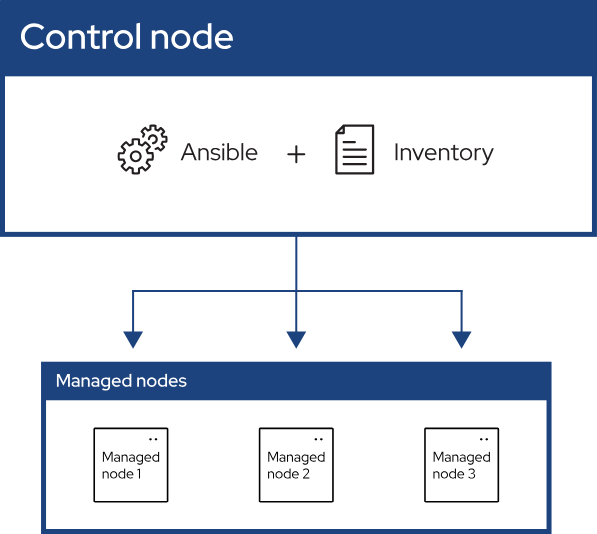
How Ansible Works in This Lab
For this example, we only need to understand five basic components:
- The control node is the machine where Ansible runs.
- The managed nodes are the Linux servers that Ansible will configure.
- The inventory tells Ansible which hosts exist and allows us to organize them into groups.
- A playbook is a YAML file describing the desired configuration.
- A task calls an Ansible module to perform a specific action, such as installing a package or starting a service.
Important: Ansible is agentless for this type of Linux management. We do not install an Ansible agent on each managed server. The control node connects to them remotely, normally using SSH.
Install Ansible on the Control Node
In my lab, Ansible was installed on a CentOS Stream 9 control node.
First, install the EPEL repository:
dnf install -y epel-releaseThen install Ansible:
dnf install -y ansibleConfirm the installation:
ansible --versionIn the original lab, the command returned ansible-core 2.14.18.
Your output may be different if you are reproducing this guide with a newer repository or Ansible release.
For current installation methods and supported packages, it is a good idea to compare your environment with the official Ansible installation documentation.
Configure SSH Access to the Managed Nodes
Before Ansible can manage the remote servers, the control node must be able to connect to them over SSH.
For this lab, SSH key-based authentication was configured between the Ansible control node and all six managed nodes.
For this lab, I use SSH key-based authentication instead of password-based automation, which provides a cleaner approach for repeatable administration.
Once the keys are configured, test a managed node directly:
ssh hpc2-node01The objective is to confirm that the control node can establish the SSH session using the configured key:
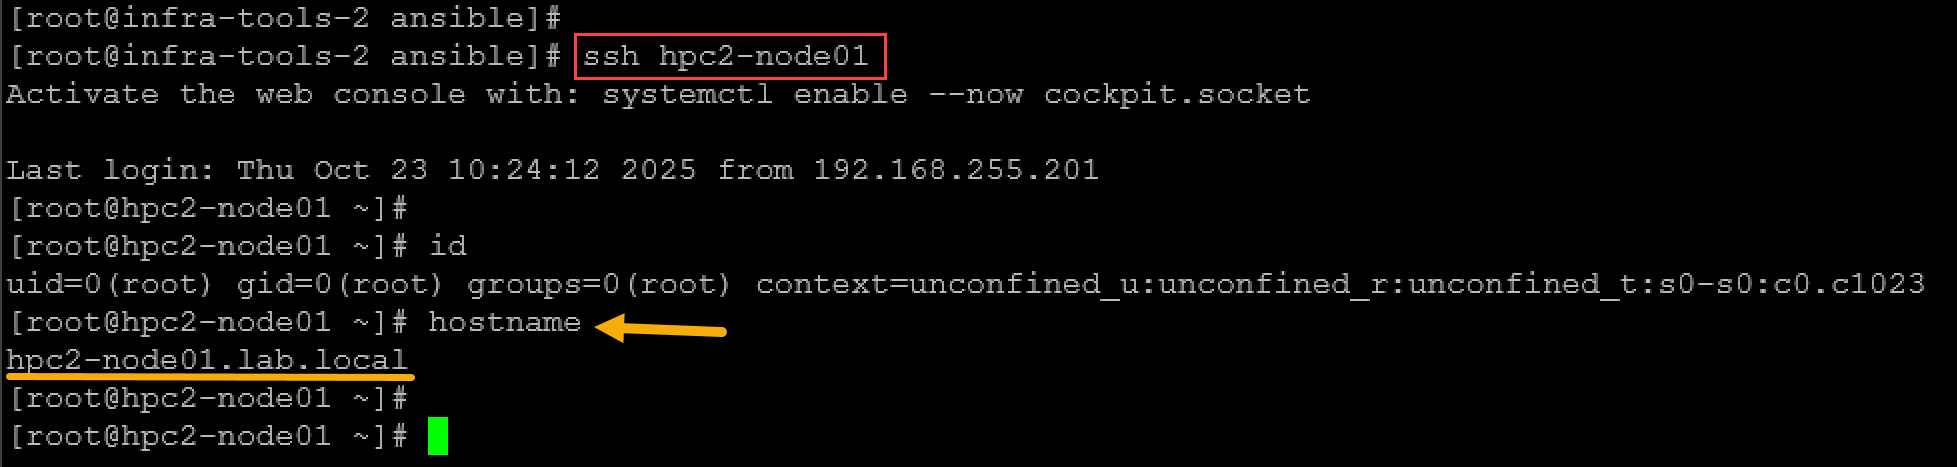
In this lab I used administrative access to simplify the environment. In production, consider using a dedicated automation account with controlled sudo privileges instead of relying on direct root access.
Create the Ansible Project Directories
I prefer to keep the inventory and playbooks separated.
Create the project structure:
mkdir -p /root/ansible/inventory
mkdir -p /root/ansible/playbooks
Move into the project directory:
cd /root/ansibleThe structure will look like this:
/root/ansible/
├── inventory/
│   └── hosts.ini
└── playbooks/
    └── install_nfs_client.yml
Create the Ansible Inventory
Create the inventory file:
touch inventory/hosts.iniAdd the six managed nodes:
[hpc_nodes]
hpc2-node01 ansible_host=192.168.255.121
hpc2-node02 ansible_host=192.168.255.122
hpc2-node03 ansible_host=192.168.255.123
hpc2-node04 ansible_host=192.168.255.124
hpc2-node05 ansible_host=192.168.255.125
hpc2-node06 ansible_host=192.168.255.126
The name between brackets:
[hpc_nodes]defines an inventory group.
Instead of targeting each server individually, we can now execute Ansible against the entire hpc_nodes group.
Validate the Inventory
Before creating a playbook, verify that Ansible can parse the inventory correctly.
Run:
ansible-inventory \
  -i inventory/hosts.ini \
  --graph
You should see the hpc_nodes group and its six members.
This is an important check because inventory naming mistakes can cause a perfectly valid playbook to run against zero hosts.
Test Ansible Connectivity
Now test communication with the entire group:
ansible \
  -i inventory/hosts.ini \
  hpc_nodes \
  -m ansible.builtin.ping
A successful response should return pong for each managed node:
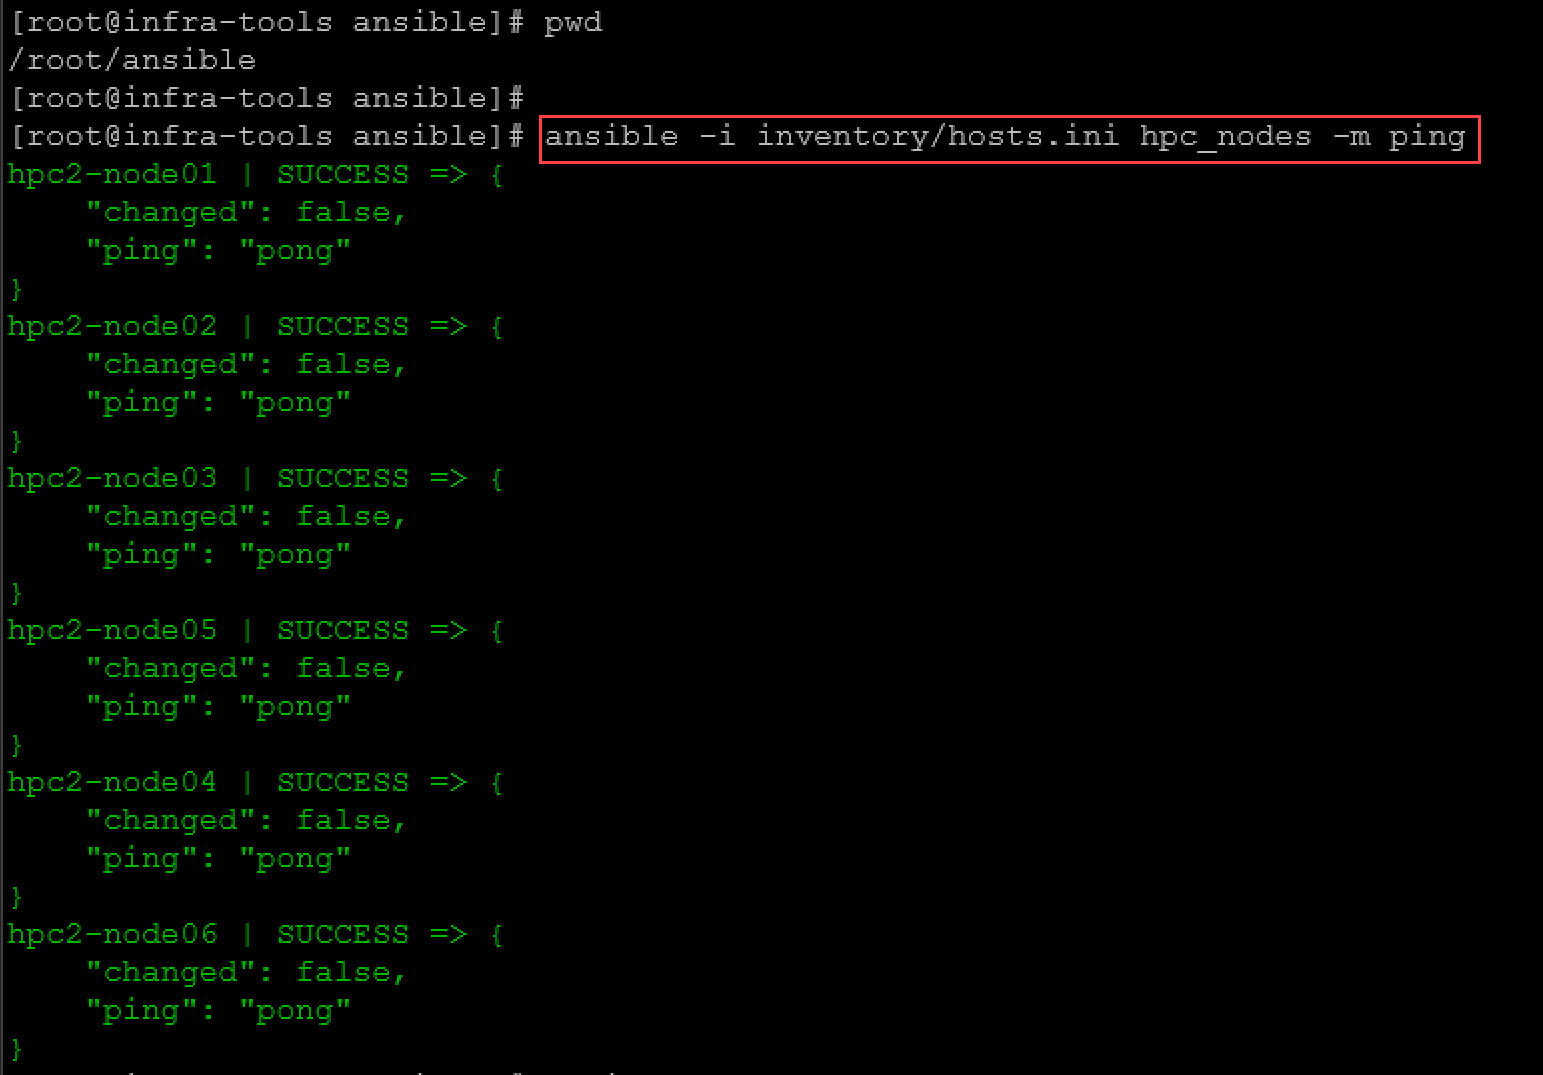
pong from all six managed nodes.The Ansible ping module is not the same as the operating system ping command.
It does not simply send ICMP packets. It verifies that Ansible can connect to the managed node and execute the module successfully.
If all six hosts return successfully, the control node, inventory, SSH authentication, and basic remote execution path are working.
Create Your First Ansible Playbook
Now we can create the actual playbook.
Create the file:
touch playbooks/install_nfs_client.ymlAdd the following content:
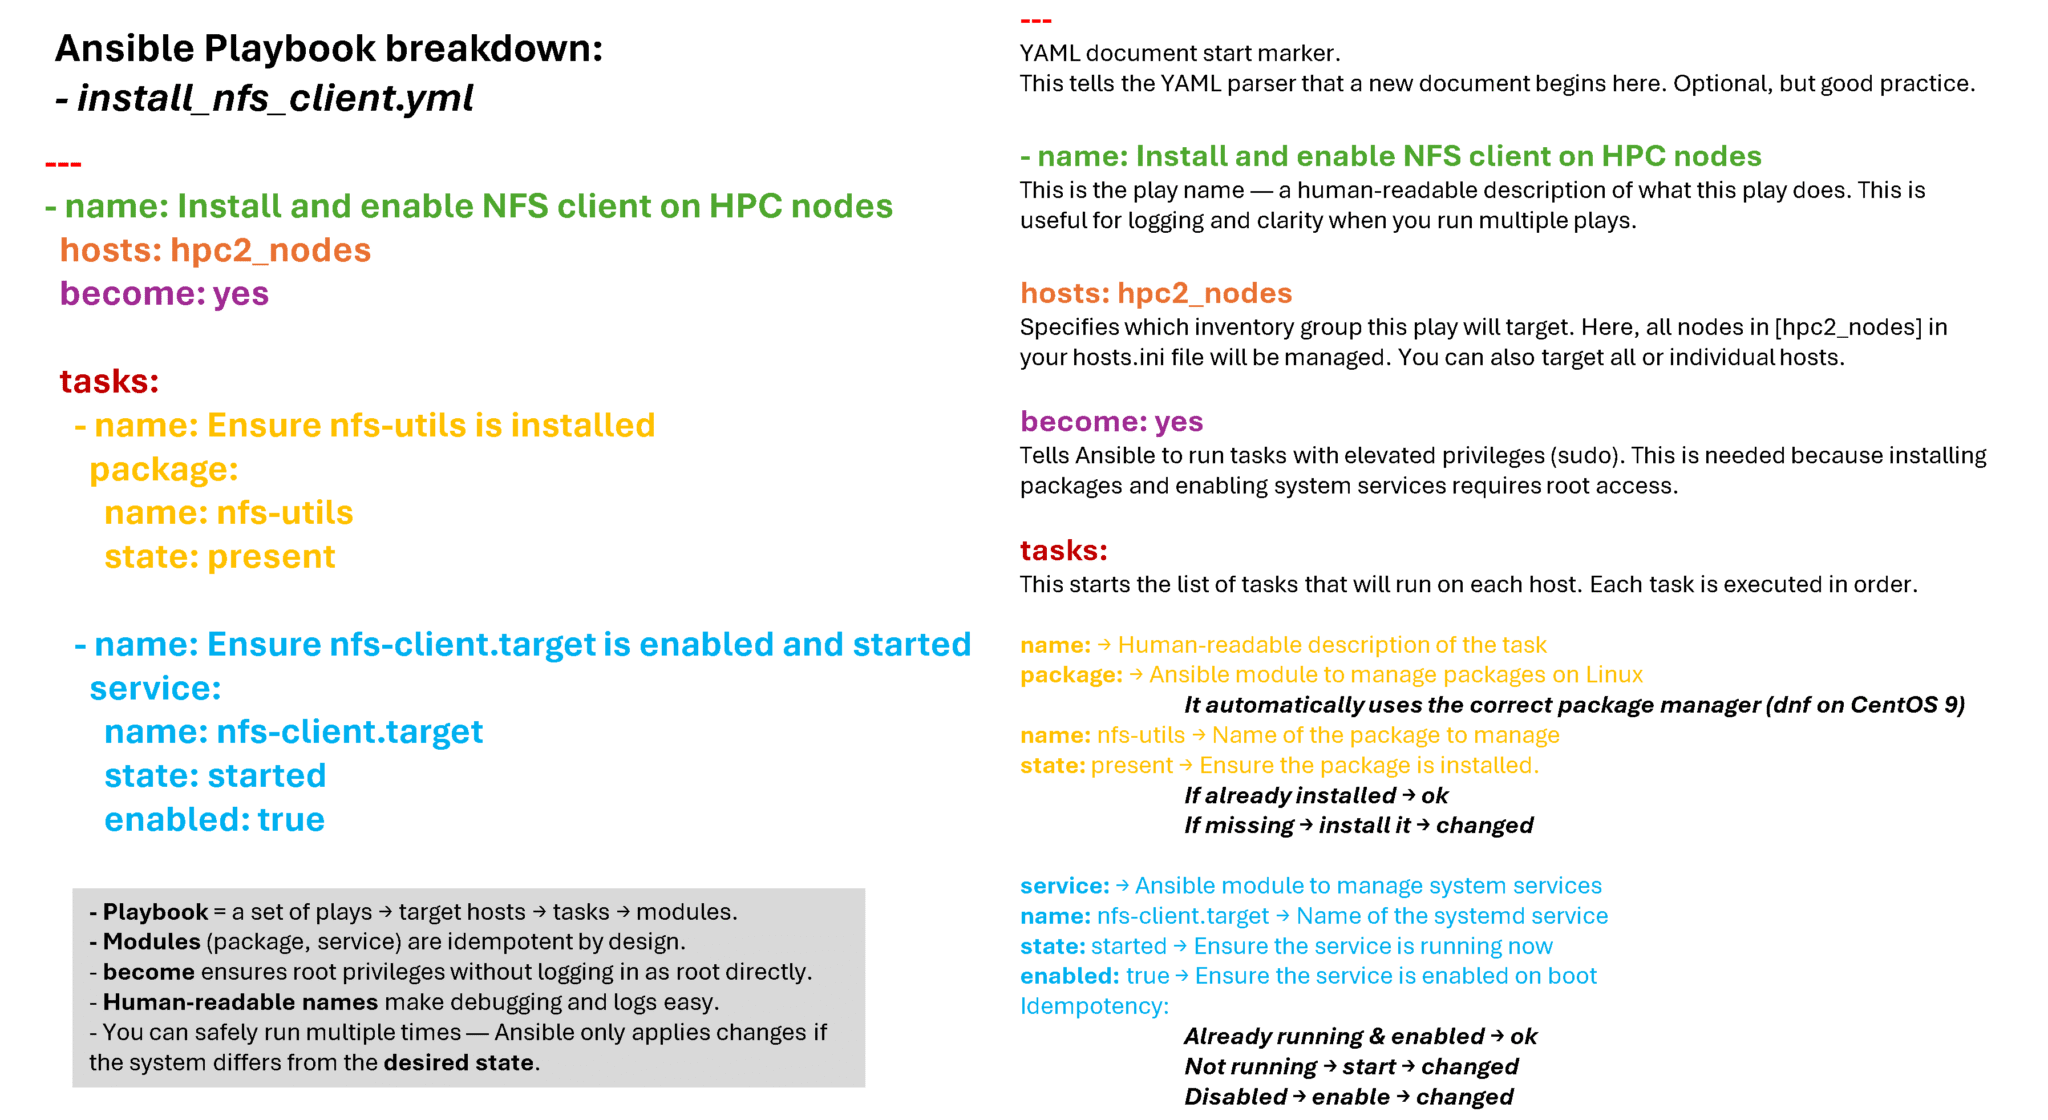
---
- name: Install and start NFS client components on HPC nodes
  hosts: hpc_nodes
  become: true

  tasks:

    - name: Ensure nfs-utils is installed
      ansible.builtin.package:
        name: nfs-utils
        state: present

    - name: Ensure nfs-client.target is started
      ansible.builtin.systemd_service:
        name: nfs-client.target
        state: started
There are a few important details here.
The line:
hosts: hpc_nodesmust match the inventory group exactly.
The following line:
become: trueallows tasks that require elevated privileges to execute using Ansible privilege escalation.
The first task ensures that the nfs-utils package exists.
The second task ensures that nfs-client.target is running in this lab environment.
I am using Fully Qualified Collection Names such as:
ansible.builtin.packageand:
ansible.builtin.systemd_servicebecause they make it explicit which collection provides the module and reduce ambiguity as automation projects grow. Ansible documentation similarly recommends FQCNs for clarity and avoiding naming conflicts.
One important detail: service and target behavior can vary between Linux distributions and versions. If you are reproducing this example outside the environment used here, verify how the NFS client is managed on that operating system.
Validate the Playbook Before Running It
Before making any changes to remote systems, check the YAML and playbook structure.
Run:
ansible-playbook \
  -i inventory/hosts.ini \
  playbooks/install_nfs_client.yml \
  --syntax-check
If there are no syntax errors, Ansible should identify the playbook successfully.
This catches common problems such as invalid YAML indentation or malformed playbook structure before you try to execute the tasks across multiple servers.
Preview the Changes with Check Mode
Ansible also provides check mode, which can be useful for previewing what supported tasks would change.
Run:
ansible-playbook \
  -i inventory/hosts.ini \
  playbooks/install_nfs_client.yml \
  --check
Check mode is a simulation rather than a guarantee of the final execution result. Modules that support check mode report what they expect to change, while modules that do not support it may not provide the same behavior.
I use it as an additional validation step, not as a replacement for testing and post-change verification.
Run the Playbook
Once the inventory, SSH connectivity, syntax, and expected changes look correct, execute the playbook:
ansible-playbook \
  -i inventory/hosts.ini \
  playbooks/install_nfs_client.yml
The playbook runs against all hosts in the hpc_nodes inventory group.
Ansible processes the tasks in order and then displays a PLAY RECAP for each managed node.
How to Read the Play Recap
A typical recap contains counters similar to:
ok=3
changed=0
unreachable=0
failed=0
These values are important when diagnosing an Ansible execution:
okindicates tasks that completed successfully or found the system already in the desired state.
changedindicates how many tasks actually changed something on the managed node.
unreachablenormally points to a communication problem such as SSH connectivity, DNS resolution, authentication, or routing.
failedindicates that Ansible reached the host but a task itself failed.
In my lab, nfs-utils was already installed and the NFS client target was already in the required state, so the execution returned:
changed=0That is useful information. Ansible inspected the systems but did not make unnecessary changes.
Verify the Result on the Managed Nodes
A successful play recap is important, but I also like to verify the final state directly.
Check the installed package across the group:
ansible \
  -i inventory/hosts.ini \
  hpc_nodes \
  -b \
  -m ansible.builtin.command \
  -a "rpm -q nfs-utils"
Then verify the NFS client target:
ansible \
  -i inventory/hosts.ini \
  hpc_nodes \
  -b \
  -m ansible.builtin.command \
  -a "systemctl is-active nfs-client.target"
This gives us an additional confirmation that the expected state exists on the managed nodes after the playbook execution.
The important workflow is:
Define
   ↓
Validate
   ↓
Preview
   ↓
Execute
   ↓
Verify
That pattern becomes much more valuable as playbooks start changing production systems instead of a small lab.
Understanding Idempotency
One of the most useful characteristics of configuration management is the ability to describe a desired state.
Consider the package task:
- name: Ensure nfs-utils is installed
  ansible.builtin.package:
    name: nfs-utils
    state: present
We are not telling Ansible:
Run an installation command every time.
We are telling it:
Make sure this package is present.
If the package is already installed, an idempotent module can determine that no change is necessary.
That is why a second execution can return:
changed=0when the systems already match the desired state.
However, it is important not to assume that every Ansible task is automatically idempotent. Idempotency depends on the module being used and on how the playbook is written.
For example, a task based on a raw shell command can behave very differently from a module specifically designed to manage a package, file, user, or service state.
Common Problems When Running a First Playbook
If Ansible reports:
UNREACHABLEcheck SSH connectivity, DNS or hostname resolution, SSH keys, network access, and the remote username.
If you receive:
no hosts matchedcompare the value in:
hosts:with the group name defined in the inventory.
For this article, both must use:
hpc_nodesIf privilege escalation fails, verify that the remote account has the required sudo permissions and that your Ansible privilege escalation configuration matches the environment.
If Ansible reports a YAML or syntax error, run:
ansible-playbook \
  -i inventory/hosts.ini \
  playbooks/install_nfs_client.yml \
  --syntax-check
before troubleshooting the remote nodes.
Where to Go Next
This lab covered the complete basic workflow required to start building useful Ansible automation:
Control node
      ↓
Inventory
      ↓
SSH connectivity
      ↓
Playbook
      ↓
Syntax validation
      ↓
Check mode
      ↓
Execution
      ↓
Verification
Once this workflow is familiar, the next step is not necessarily to learn dozens of additional Ansible concepts.
It is better to start applying the same workflow to real infrastructure tasks.
For example, on DPC Virtual Tips I also use Ansible in a VMware lab to automate virtual machine deployment. That provides a natural next step after understanding inventory, playbooks, modules, and remote execution.
Final Words
Creating a first Ansible playbook is more useful when the exercise solves a real administrative problem.
In this lab, we configured one Ansible control node to manage six Linux systems, created an inventory, validated SSH connectivity, built a playbook, checked its syntax, previewed the execution, ran it against the entire group, interpreted the play recap, and verified the final state.
The YAML itself is only one part of the process.
For infrastructure automation, the more important skill is building a predictable workflow where you can understand what will change, why it will change, which systems will be affected, and how to confirm the result afterward.
That is the same approach I use throughout the infrastructure and troubleshooting guides published on DPC Virtual Tips.
