
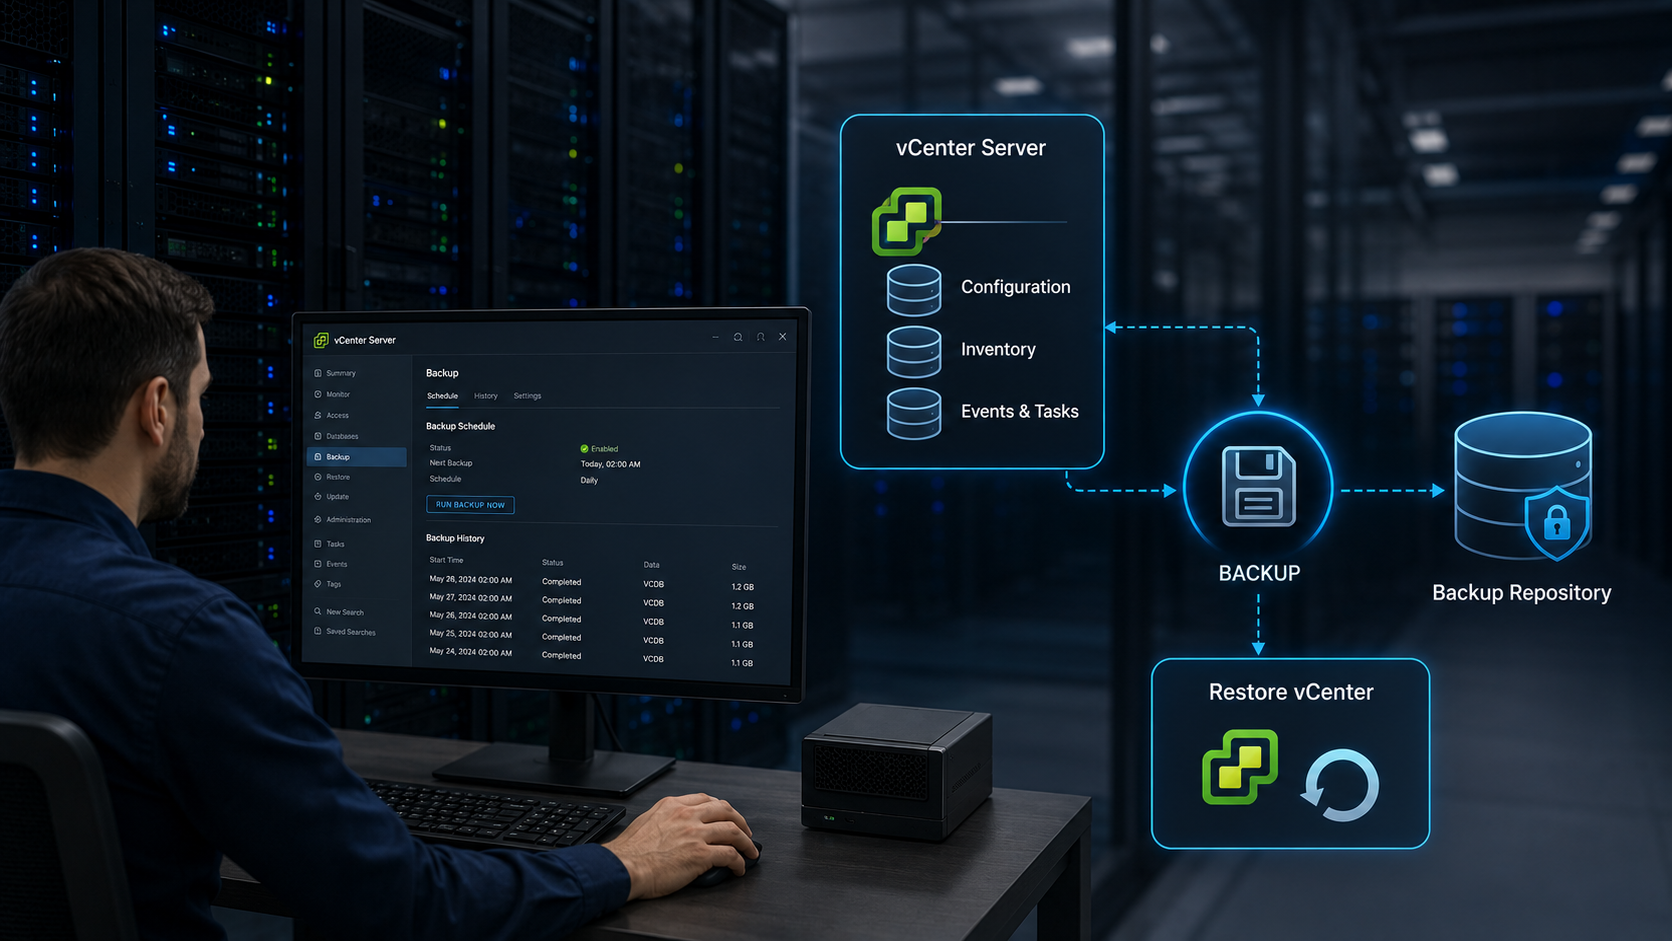
A vCenter Server backup only becomes valuable when it is created regularly, stored outside the appliance, and can actually be used during a recovery.
In this guide, I will configure a file-based backup of vCenter Server using the vCenter Server Management Interface (VAMI). In my lab, a TrueNAS server provides an NFS repository where the scheduled backups are stored.
We will configure the NFS destination, create a backup schedule, run a manual backup to validate the configuration, inspect the files on the backup server, and review the backup history from the VAMI.
The environment shown in this article was originally built with a vCenter Server 7 lab. File-based backup remains available in newer vCenter versions, but screens, supported protocols, and individual options may change. Always compare the procedure with the documentation for the version you are running.
Lab Environment
For this guide, I use:
- vCenter Server Appliance: vCenter Server 7 lab
- Backup method: File-based backup
- Backup repository: TrueNAS
- Protocol: NFS
- Repository network: Management network
- Administration interface: VAMI
The VAMI is available at:
https://<vcenter-fqdn>:5480In my lab:
https://vcenter7.lab.local:5480Port 5480 provides access to the vCenter Server Management Interface.
How vCenter File-Based Backup Works
A file-based backup exports the vCenter configuration and data to an external repository.
The important point is that the backup is stored outside the vCenter appliance.
The basic workflow is:
vCenter Server Appliance
        |
        | File-Based Backup
        |
        v
External Backup Repository
        |
        | NFS in this lab
        |
        v
      TrueNAS
If the appliance later needs to be rebuilt, the backup can be used during the restore workflow.
Broadcom currently documents the VAMI as the recommended interface for file-based backup and restore of the vCenter Server Appliance.
Prepare the NFS Backup Repository
In my lab, TrueNAS provides the NFS destination.
If you already have an NFS server with a writable export configured for vCenter, you can skip this section and continue with Configure the Backup Schedule in VAMI.
Create the ZFS Dataset
My TrueNAS system already has a ZFS pool named:
CLUSTER-LAB.LOCALI created a separate dataset for the vCenter backups:
VCSA_BACKUP
Type the name of the ZFS Dataset. For instance, our ZFS Dataset is “VCSA_BACKUP”. Click on “SUBMIT”:
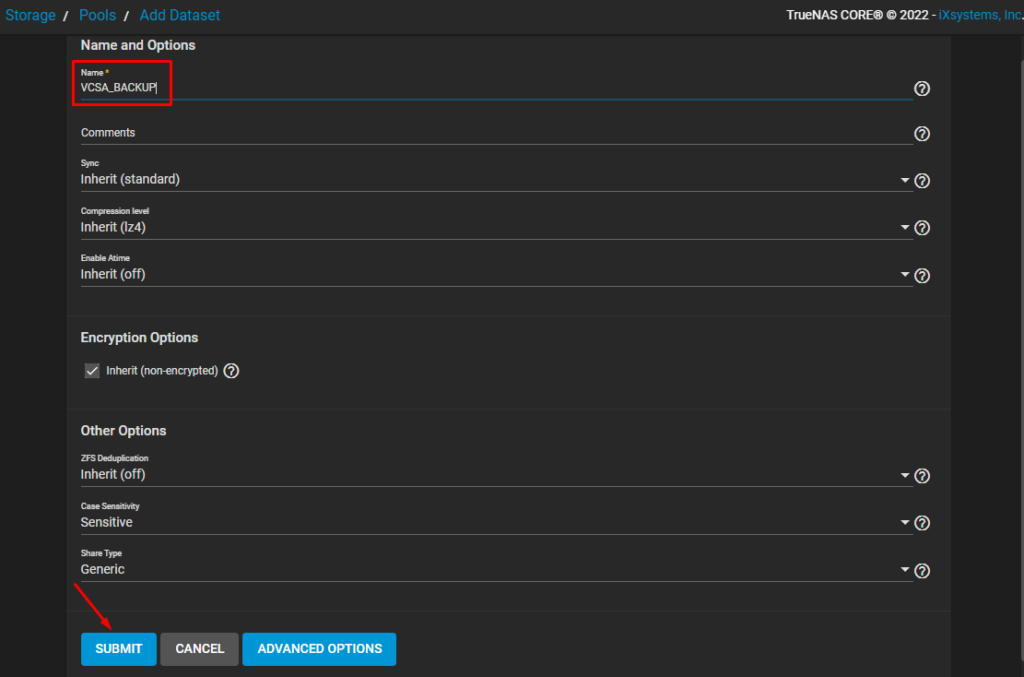
Keeping the vCenter backups in their own dataset makes it easier to manage capacity, permissions, retention, and monitoring separately from other data.
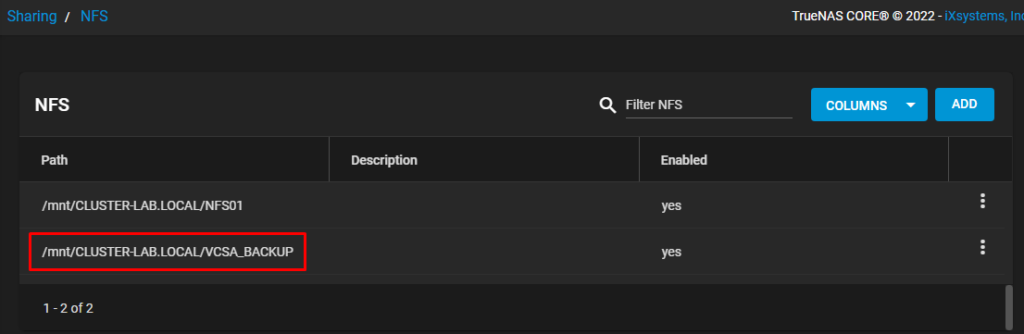
Create the NFS Share
Next, create an NFS share using the dataset created for the backups.
In this lab, the exported path is:
/mnt/CLUSTER-LAB.LOCAL/VCSA_BACKUP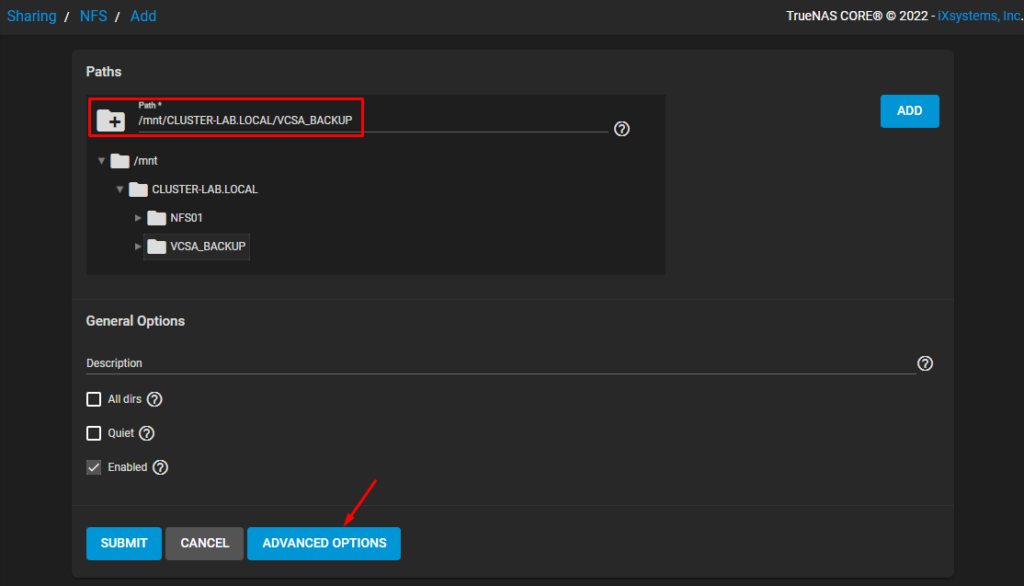
Restrict access to the systems that actually require the share.
In my lab, I authorized the management IP of the vCenter Server:
192.168.199.100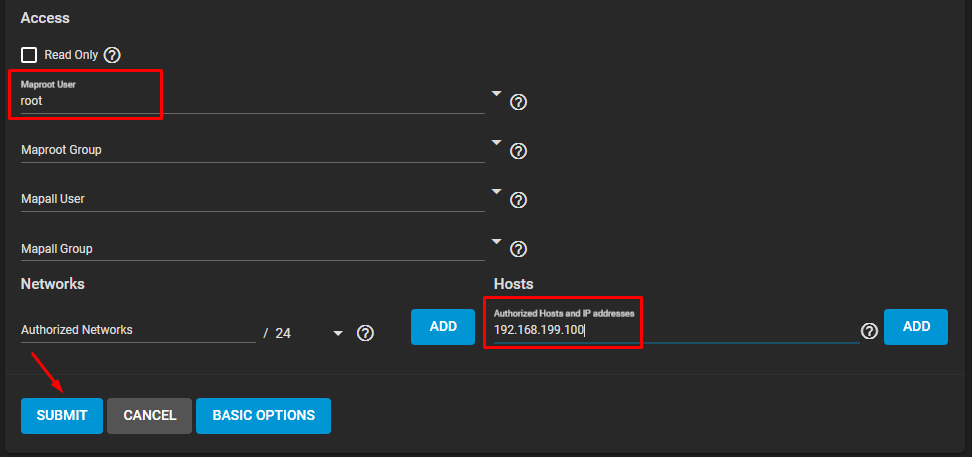
The important requirement is that the vCenter appliance must be able to reach and write to the backup repository.
The exact NFS permissions and identity mapping depend on your NFS server and security design. Avoid exposing a writable backup export to an unnecessarily broad network.
Once created, verify that the NFS share is available:
Configure the Backup Schedule in VAMI
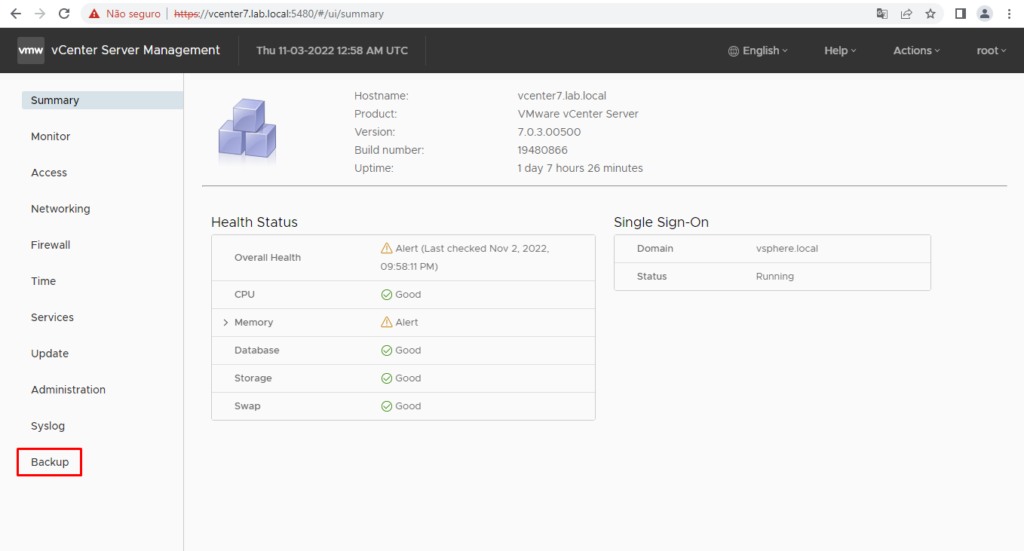
Open the vCenter Server Management Interface:
https://<vcenter-fqdn>:5480Authenticate with an account authorized to manage the appliance.
Select:
Backup
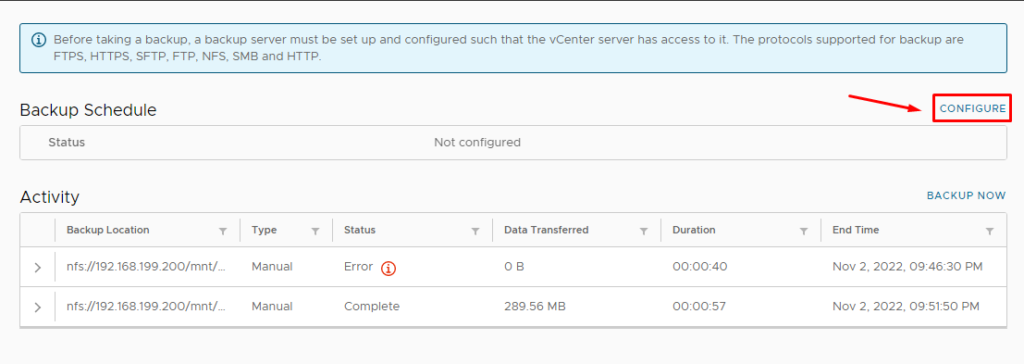
Under Backup Schedule, select:
Configure
The wizard allows you to define:
- Backup location
- Repository credentials
- Schedule
- Encryption password, when used
- Retention
- Data included in the backup
Configure the NFS Backup Location
For an NFS destination, the location follows this format:
nfs://<nfs-server>/<export-path>In my lab:
nfs://192.168.199.200/mnt/CLUSTER-LAB.LOCAL/VCSA_BACKUPWhere:
192.168.199.200is the TrueNAS server, and:
/mnt/CLUSTER-LAB.LOCAL/VCSA_BACKUPis the exported backup path.
In my original vCenter 7 lab, access to the NFS repository was controlled by the NFS export configuration rather than normal username/password authentication.
If your VAMI version displays credential fields for the selected protocol, follow the requirements for that version and repository instead of assuming the same behavior applies everywhere.
Current vCenter releases support multiple repository protocols, and the exact options depend on the release. Broadcom documents protocols such as HTTPS, FTPS, SFTP, NFS and SMB for file-based backup scenarios.
Configure the Backup Schedule
Choose when the backup should run.
The ideal schedule depends on how frequently your environment changes and how much configuration/data you are prepared to lose between backups.
You can also define how many backups should be retained.
For example:
Number of backups to retain: 7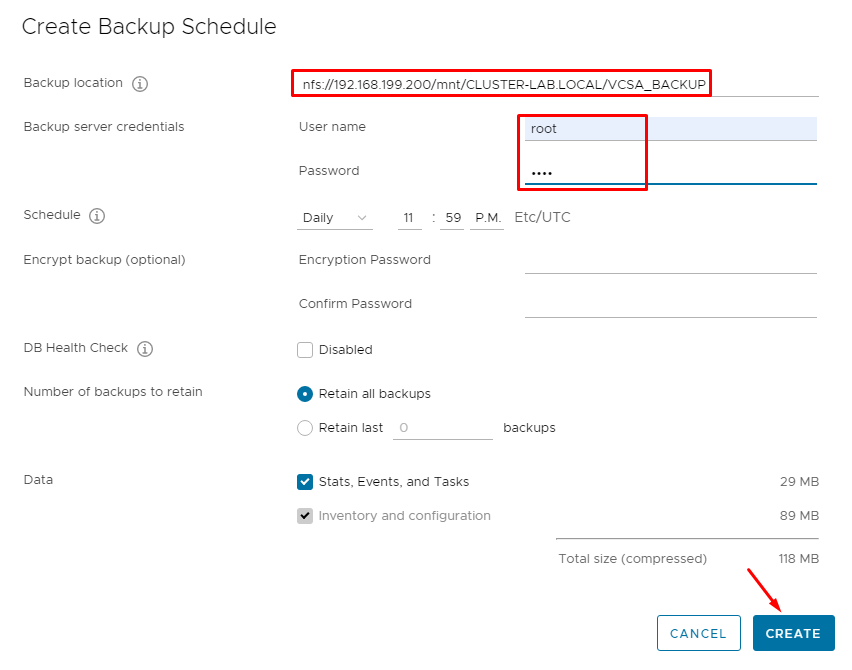
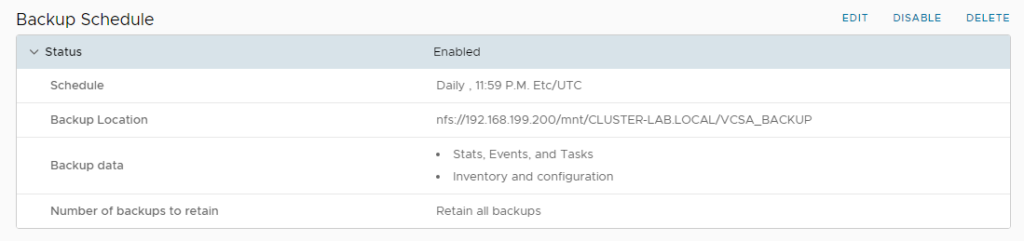
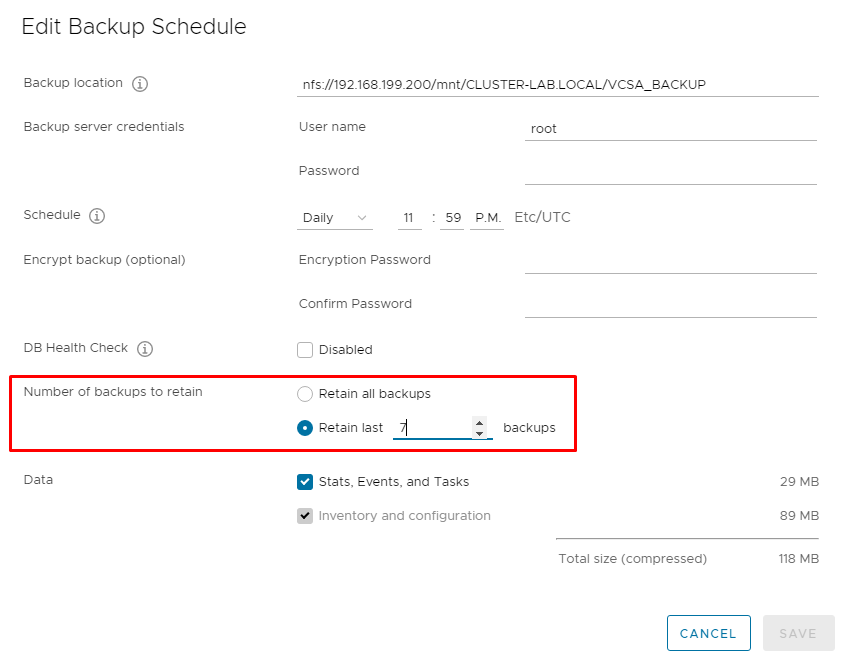
Retention is useful because without an appropriate policy, backup repositories can continue consuming storage over time.
Also consider the size and duration of the backup. Historical Stats, Events, and Tasks data can substantially increase the amount of data transferred. Current Broadcom guidance notes that excluding these components can reduce the backup payload when necessary.
Run a Manual Backup
From the VAMI Backup page, select:
Backup Now
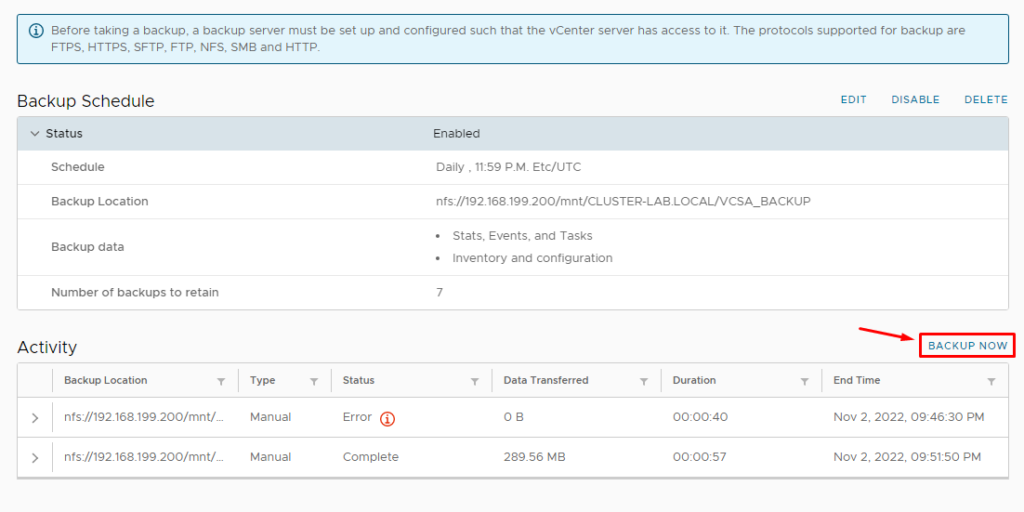
Use the location already configured in the backup schedule:
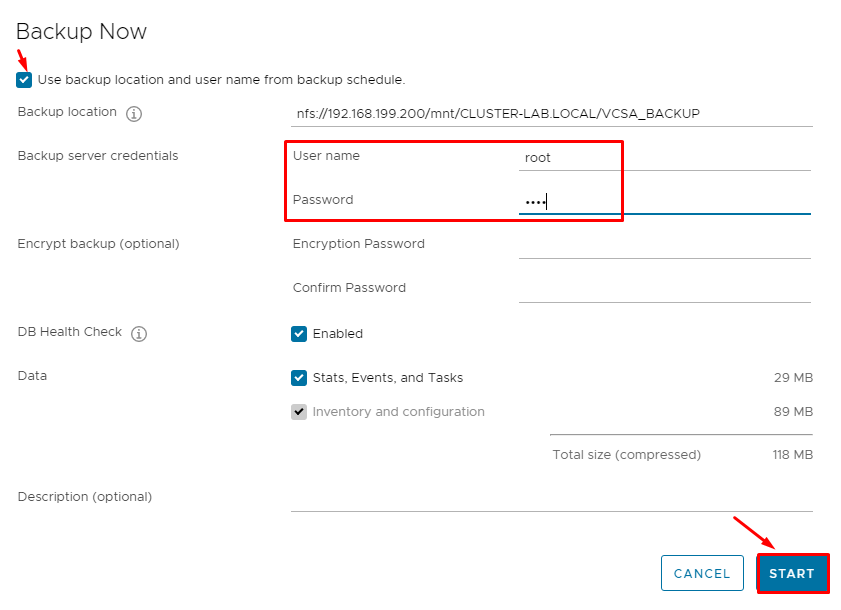
Start the backup.
During the operation, the appliance prepares the database and the other components included in the backup. Then the transfer to the backup repository begins:
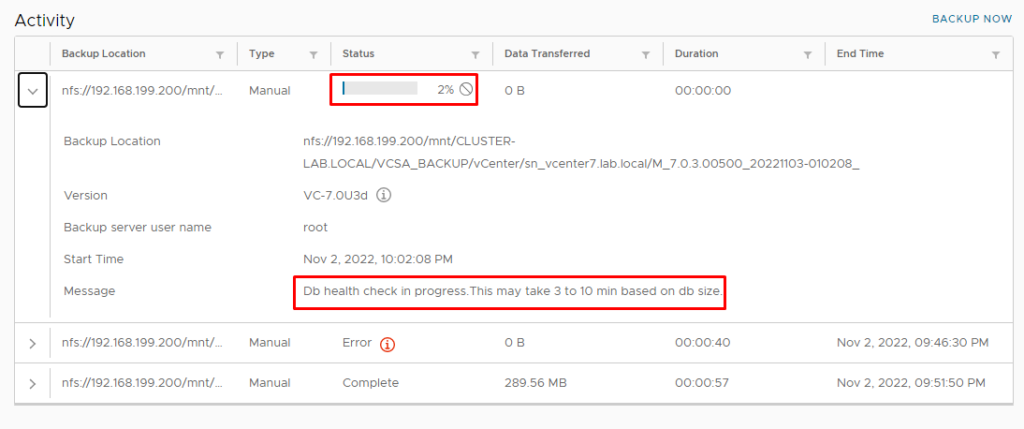
Depending on the size of the vCenter database, repository performance, and network throughput, the backup may take some time.
Avoid scheduling large backup transfers at the same time as known network-intensive activities. Broadcom documents situations where NFS backups can time out when the appliance is experiencing network bottlenecks.
Verify That the Backup Completed
Once the operation finishes, confirm that the VAMI reports a successful status:
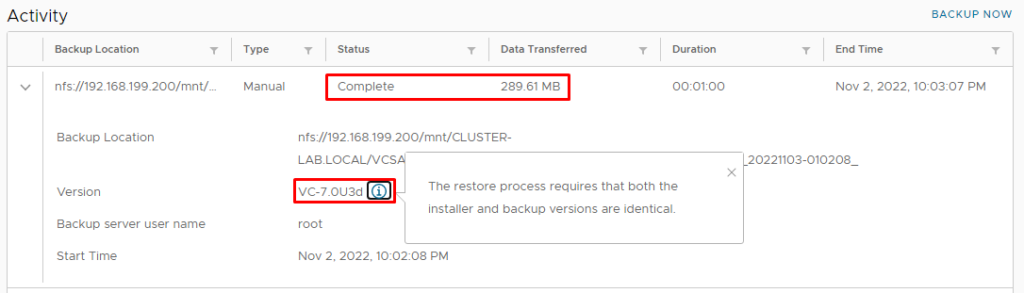
Do not stop at the green status in the interface.
I also recommend checking that the backup files actually exist on the destination server.
Verify the Backup on TrueNAS
Connect to the TrueNAS system.
In my lab, I can verify the filesystem with:
df -ThThe dataset used for the backups is:
/mnt/CLUSTER-LAB.LOCAL/VCSA_BACKUP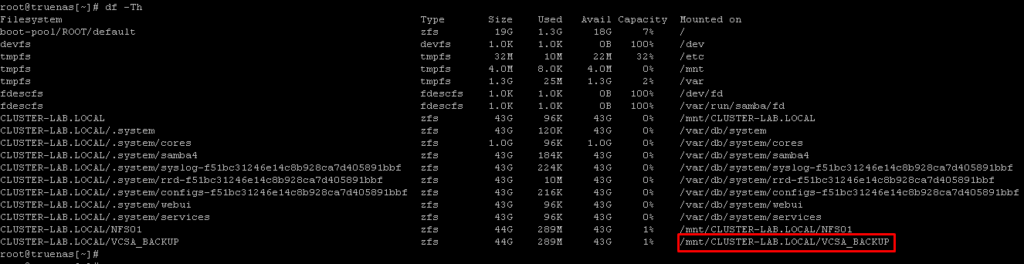
Then inspect the backup directory:
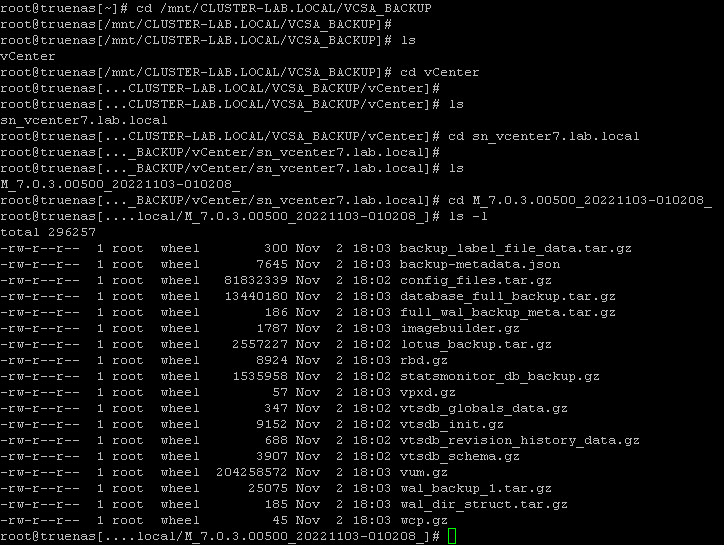
This provides a second validation point:
VAMI reports Success
        +
Backup files exist on repository
        =
Backup destination validated
For production operations, you should also monitor repository capacity and the success of subsequent scheduled jobs.
Check the Backup History
The VAMI keeps an activity history for file-based backups.
On the Backup page, review the Activity section:
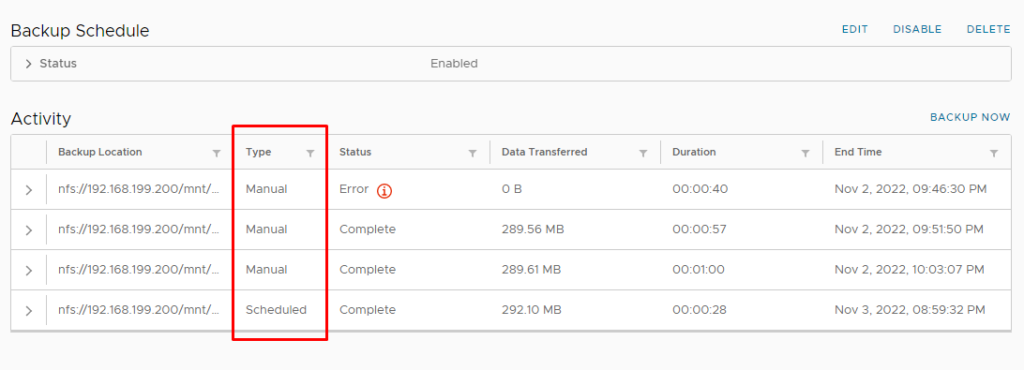
The history allows you to distinguish between manually initiated and scheduled backup jobs.
Typical types include:
- Manual – initiated by an administrator
- Scheduled – triggered automatically by the configured schedule
Review this history periodically rather than assuming that the absence of an alert means backups are succeeding.
Important: Backup and Installer Versions
One detail is especially important for recovery.
When restoring a file-based vCenter backup, the installer used for the restore must match the version associated with the backup.
The current VAMI explicitly reminds administrators that the restore process requires matching installer and backup versions.
For that reason, document at least:
- vCenter version
- vCenter build
- Backup date
- Repository location
- Encryption password location, if encryption is used
- Required credentials
- Location of compatible installation media
Do not wait for a disaster to discover that the installer required for a backup is no longer immediately available.
Test the Restore Procedure
A successful backup is important, but it does not prove that your recovery process is understood.
I strongly recommend testing the restore workflow in a lab.
On DPC Virtual Tips, I documented that procedure separately in Restoring vCenter Server from a File-Based Backup.
That guide covers deployment of a new appliance, importing the backup, Enhanced Linked Mode considerations, and post-restore validation.
A backup strategy is more complete when you have tested both sides:
BACKUP
   ↓
Validate repository
   ↓
Monitor scheduled jobs
   ↓
RESTORE TEST
   ↓
Validate recovered environment
Troubleshooting Failed Backups
If a backup fails, start by checking the status in VAMI.
For more detail, review:
/var/log/vmware/applmgmt/backup.logThis log commonly contains information about repository connectivity, mounting failures, timeouts, and component backup errors. Broadcom uses this log extensively in its current VAMI backup troubleshooting documentation.
Check Repository Connectivity
For NFS failures, verify:
- DNS or IP reachability
- Routing
- Firewall rules
- NFS export path
- Export permissions
- Repository availability
Depending on the environment, NFS communication may require ports such as 111 and 2049. Broadcom maintains a current table of VAMI backup protocol ports and recommends validating the requirements for the version and protocol being used.
Check Repository Capacity
Verify that the destination has enough free space.
A full repository can make a perfectly healthy vCenter backup schedule useless.
Check for Old or Failed Backup Data
Scheduled backups can sometimes fail because stale or incompatible metadata remains on the destination after previous failed jobs or upgrades.
Broadcom documents cases where manual backups succeed but scheduled backups fail because of old metadata at the backup destination.
When troubleshooting, do not delete backup data blindly. First identify which directories belong to valid recovery points.
Security Considerations
The backup repository contains data required to reconstruct the vCenter environment, so it should be treated as infrastructure-sensitive data.
At minimum:
- Restrict network access to the repository.
- Limit administrative access.
- Protect backup credentials.
- Consider encryption when supported and appropriate.
- Monitor failed backup attempts.
- Keep the repository separate from the vCenter appliance.
- Protect the backup server itself.
Broadcom also provides guidance for enabling stricter certificate or SSH validation when secure transfer protocols are used for file-based backup and restore.
Final Thoughts
Configuring a vCenter backup schedule is simple.
Building a backup process that you can trust requires more:
Create repository
       ↓
Configure VAMI
       ↓
Run manual backup
       ↓
Verify repository files
       ↓
Monitor scheduled jobs
       ↓
Document version and credentials
       ↓
Test restoration
In this lab, TrueNAS and NFS provide the external repository, but the most important principle is independent of the protocol:
- a backup should be external, monitored, validated, and recoverable.
Creating the backup is only half of the job. Knowing how to restore it is what turns the backup into an actual recovery strategy.
External References
- Overview of Backup and Restore Options in vCenter Server Broadcom overview of supported file-based and image-based backup and restore methods for vCenter Server.
- Manually Create a vCenter File-Based Backup from VAMI Broadcom procedure for creating and validating a manual file-based vCenter Server backup.
- Common Ports for Protocols Used in VAMI Backups Reference for network ports used by vCenter file-based backup protocols including NFS, HTTPS, SFTP and SMB.
- Enabling Secure Backup and Restore in vCenter Server Appliance Broadcom guidance for certificate and SSH host validation when using secure backup and restore protocols.
- Troubleshooting vCenter Server Appliance File-Based Backups Broadcom troubleshooting reference for common VAMI backup failures and repository problems.
