

This guide describes a lab deployment of the Dell PowerFlex Management Platform (PFMP) on Linux. It covers the temporary installer VM, the configuration file, the three-node management cluster, and initial access to the web interface.
The original lab was built with a PFMP2-4.5.2.0-173.tgz installer archive and a CentOS 9-based installer VM. Treat those as the versions used in that lab, not as a current support recommendation. Dell’s PowerFlex 4.5.x guide lists different operating systems for Linux management deployment, and Dell’s later guide pairs PowerFlex 4.5.2 and later with PowerFlex Manager 4.6.x. Before reproducing these steps, confirm the supported PowerFlex core, management-platform release, installer bundle, and operating system in the documentation for the exact release you plan to deploy.
For an introduction to the platform, see Getting Started with Dell PowerFlex: Architecture and Key Components. After the management platform is ready, continue with Deploying a New PowerFlex Cluster for a PowerFlex 4.5.2 lab cluster walkthrough.
What Is the PowerFlex Management Platform?
The PowerFlex Management Platform provides the management interface and services used to deploy and operate PowerFlex. In the release covered by this lab, the management platform is deployed as a three-node cluster that runs Kubernetes-based services.
This is separate from older deployment workflows that use the PowerFlex Gateway and Presentation Server. Do not mix procedures or package versions from those workflows with the management-platform installer. Use the installation guide that matches the specific PowerFlex release.
Lab Architecture
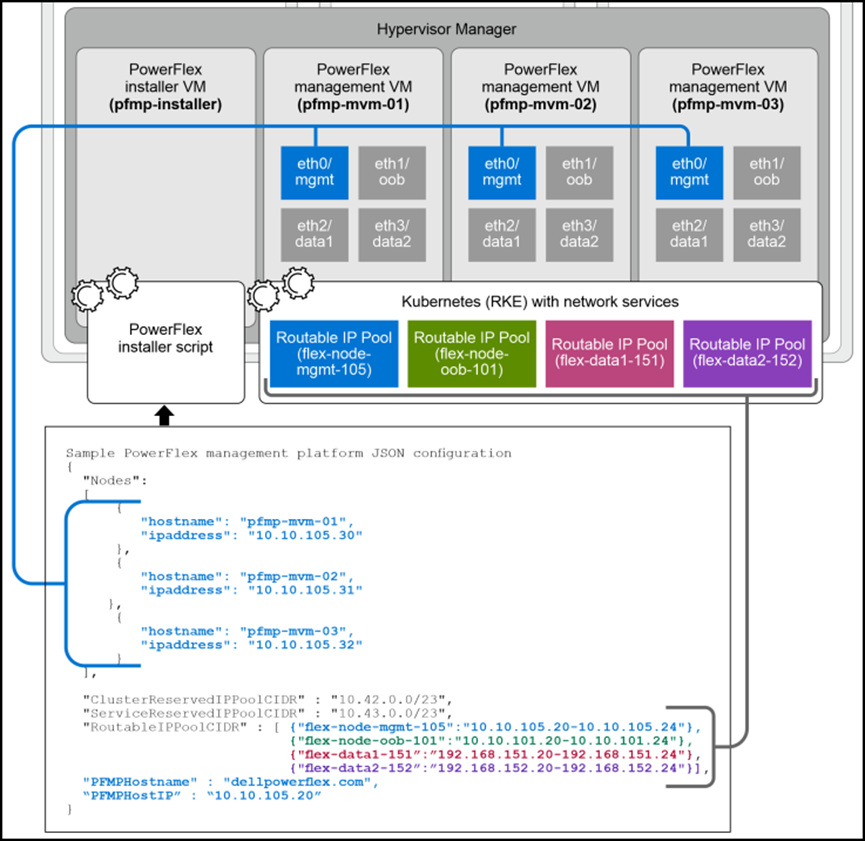
The deployment uses a temporary installer VM to prepare and deploy three management nodes. The installer VM is not one of the three long-running management nodes. The management cluster’s hostnames, node IP addresses, reserved service networks, routable IP pools, FQDN, and web-interface address are provided in PFMP_Config.json.
Version and support note: The original lab uses CentOS 9. Dell’s PowerFlex 4.5.x Linux-management prerequisite page lists RHEL 7.9, RHEL 8.6, RHEL 8.8, SLES 15 SP3, SLES 15 SP4, and CentOS 7.9. It does not list CentOS 9. Do not present CentOS 9 as a vendor-supported installer operating system for this deployment unless Dell’s compatibility information for the exact release confirms it.
The Dell guide also requires synchronized clocks and a configured default route. The hostnames and PowerFlex Manager FQDN must match the configuration file and resolve through DNS. Use lowercase names where required by the release guide.
Temporary Installer VM
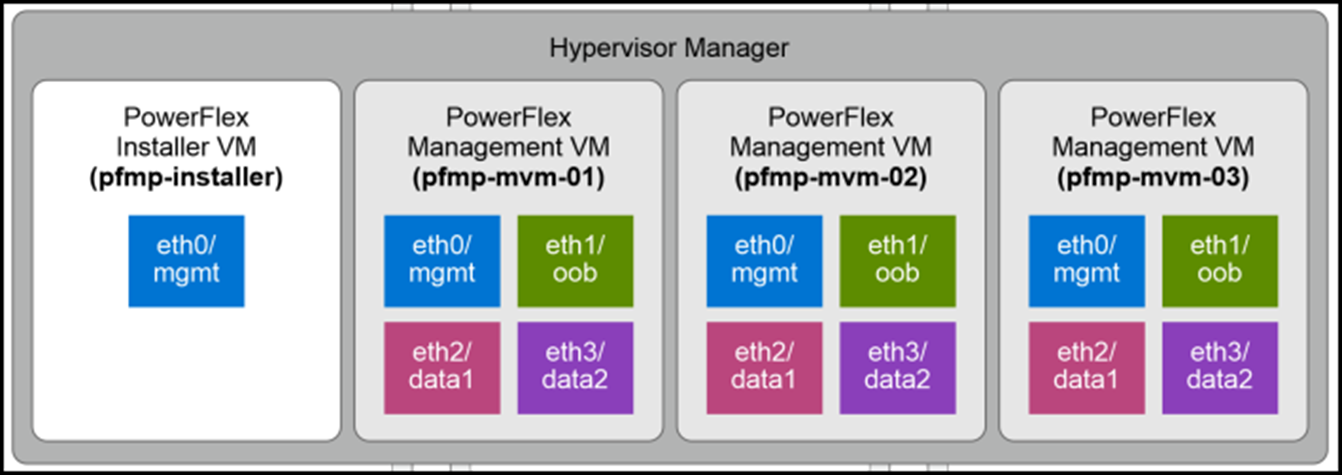
A temporary Installer VM is needed to deploy and configure the PowerFlex Management platform on a Linux environment. This PowerFlex management platform installer VM is used to deploy the containerized services required for the PowerFlex management platform.
The following figure shows that the PowerFlex management platform consists of three nodes:
In our lab, the temporary installer VM is a CentOS9-based Linux. We will talk about its configuration:
1- Network configuration:
Our management network interface is ens192 and has the IP address 192.168.255.50. We are using the “nmcli” tool to configure the network interface. The system automatically saves all commands:
nmcli connection modify ens192 ipv4.method manual ipv4.address 192.168.255.50/24
nmcli connection modify ens192 ipv4.gateway 192.168.255.1
nmcli con mod ens192 ipv4.dns 192.168.255.3"ipv4.dns-search lab.local
nmcli connection up ens192Note: Applying a connection profile can interrupt an SSH session. Use console access or another recovery path when changing the interface through which you are connected.
2- NTP configuration:
Set up all devices using the same NTP server. On CentOS, we have the chronyd daemon responsible for syncing the date and time through an NTP server:
dnf install -y chrony
vi /etc/chrony.conf # Under “server” add the NTP Server IP address
systemctl enable --now chronyd
chronyc tracking
chronyc sources
3- Install all the necessary packages (the installer VM needs to have Internet access):
dnf install -y python3 python3-pip httpd-tools libselinux-python3 sshpass java-11-openjdk-headless jq haproxy keepalived lvm2 skopeo numactl libaio wget apr python3 python3-rpm python3-cryptography yum-utils bash-completion binutils java-11-openjdk-headless smartmontools binutils sg3_utils hdparm pciutils ndctl jq daxio libpmemNote: The exact repositories and package names depend on the operating-system release. Do not copy this command to an unsupported distribution without validating every package and dependency.
4- Create a working directory to extract all PowerFlex Manager installation files:
Download the ‘PFMP2-4.5.2.0-173.tgz’ file from support.dell.com in the PowerFlex section:
mkdir -p /var/lib/pfmp_installer
cd /var/lib/pfmp_installer
tar -zxvf PFMP2-4.5.2.0-173.tgz
5- Prepare the Container Runtime (Install the podman-docker):
The setup_installer.sh script uses docker to extract an image from a tar file and then run this image as a container. Red Hat decided from RHEL 8 onwards not to use docker but instead to use postman. The good news is that a podman-docker package converts any docker command to a podman command. Each Docker command issues a warning, but you can suppress these by creating the /etc/containers/nodocker file:
dnf install -y podman podman-docker
touch /etc/containers/nodocker
6- Solve a clash related to the network containers:
There is a clash/conflict between the network plugin used by the container to create the cluster and the Kubernetes cluster’s network plugin.
The container runs fine, creating a network called pfmp_installer_nw. The bad news is that when the Kubernetes cluster deploys, it somehow tries to grab this network and falls over in a heap. The good news is that with podman version 4, there is a new network option called netavark (https://www.redhat.com/sysadmin/podman-new-network-stack) eliminating this ‘clash’.
It is necessary to install it and then set it as the default network_backend for podman (interestingly, with RHEL 9.2, netavark was installed automatically with podman):
dnf install -y netavark
mkdir -p /etc/containers/containers.conf.d
echo "[network]" > /etc/containers/containers.conf.d/pfmp.conf
echo 'network_backend = "netavark"' >> /etc/containers/containers.conf.d/pfmp.conf
7- Create a podman firewall service:
The deployment of the PowerFlex Manager Kubernetes cluster opens several firewall ports and performs firewall resets. This has a catastrophic effect on podman networks.
To fix it, create a file “/etc/systemd/system/podman-firewalld-reload.service” and add the following content:
vi /etc/systemd/system/podman-firewalld-reload.service

# /etc/systemd/system/podman-firewalld-reload.service
[Unit]
Description=Redo podman NAT rules after firewalld starts or reloads
Wants=dbus.service
After=dbus.service

[Service]
Type=simple
Environment=LC_CTYPE=C.utf8
ExecStart=/bin/bash -c "dbus-monitor --profile --system 'type=signal,sender=org.freedesktop.DBus,path=/org/freedesktop/DBus,interface=org.freedesktop.DBus,member=NameAcquired,arg0=org.fedoraproject.FirewallD1' 'type=signal,path=/org/fedoraproject/FirewallD1,interface=org.fedoraproject.FirewallD1,member=Reloaded' | sed -u '/^#/d' | while read -r type timestamp serial sender destination path interface member _junk; do if [[ $type = '#'* ]]; then continue; elif [[ $interface = org.freedesktop.DBus && $member = NameAcquired ]]; then echo 'firewalld started'; podman network reload --all; elif [[ $interface = org.fedoraproject.FirewallD1 && $member = Reloaded ]]; then echo 'firewalld reloaded'; podman network reload --all; fi; done"
Restart=always

[Install]
WantedBy=multi-user.target
8- Enable the new service created on the step before:
systemctl daemon-reload
systemctl enable --now podman-firewalld-reload.service
9- Disable the firewall service:
systemctl stop firewalld
systemctl disable firewalld
10- Create the “PMPF_Config.json” (we will discuss it later).
11- Create the installation container:
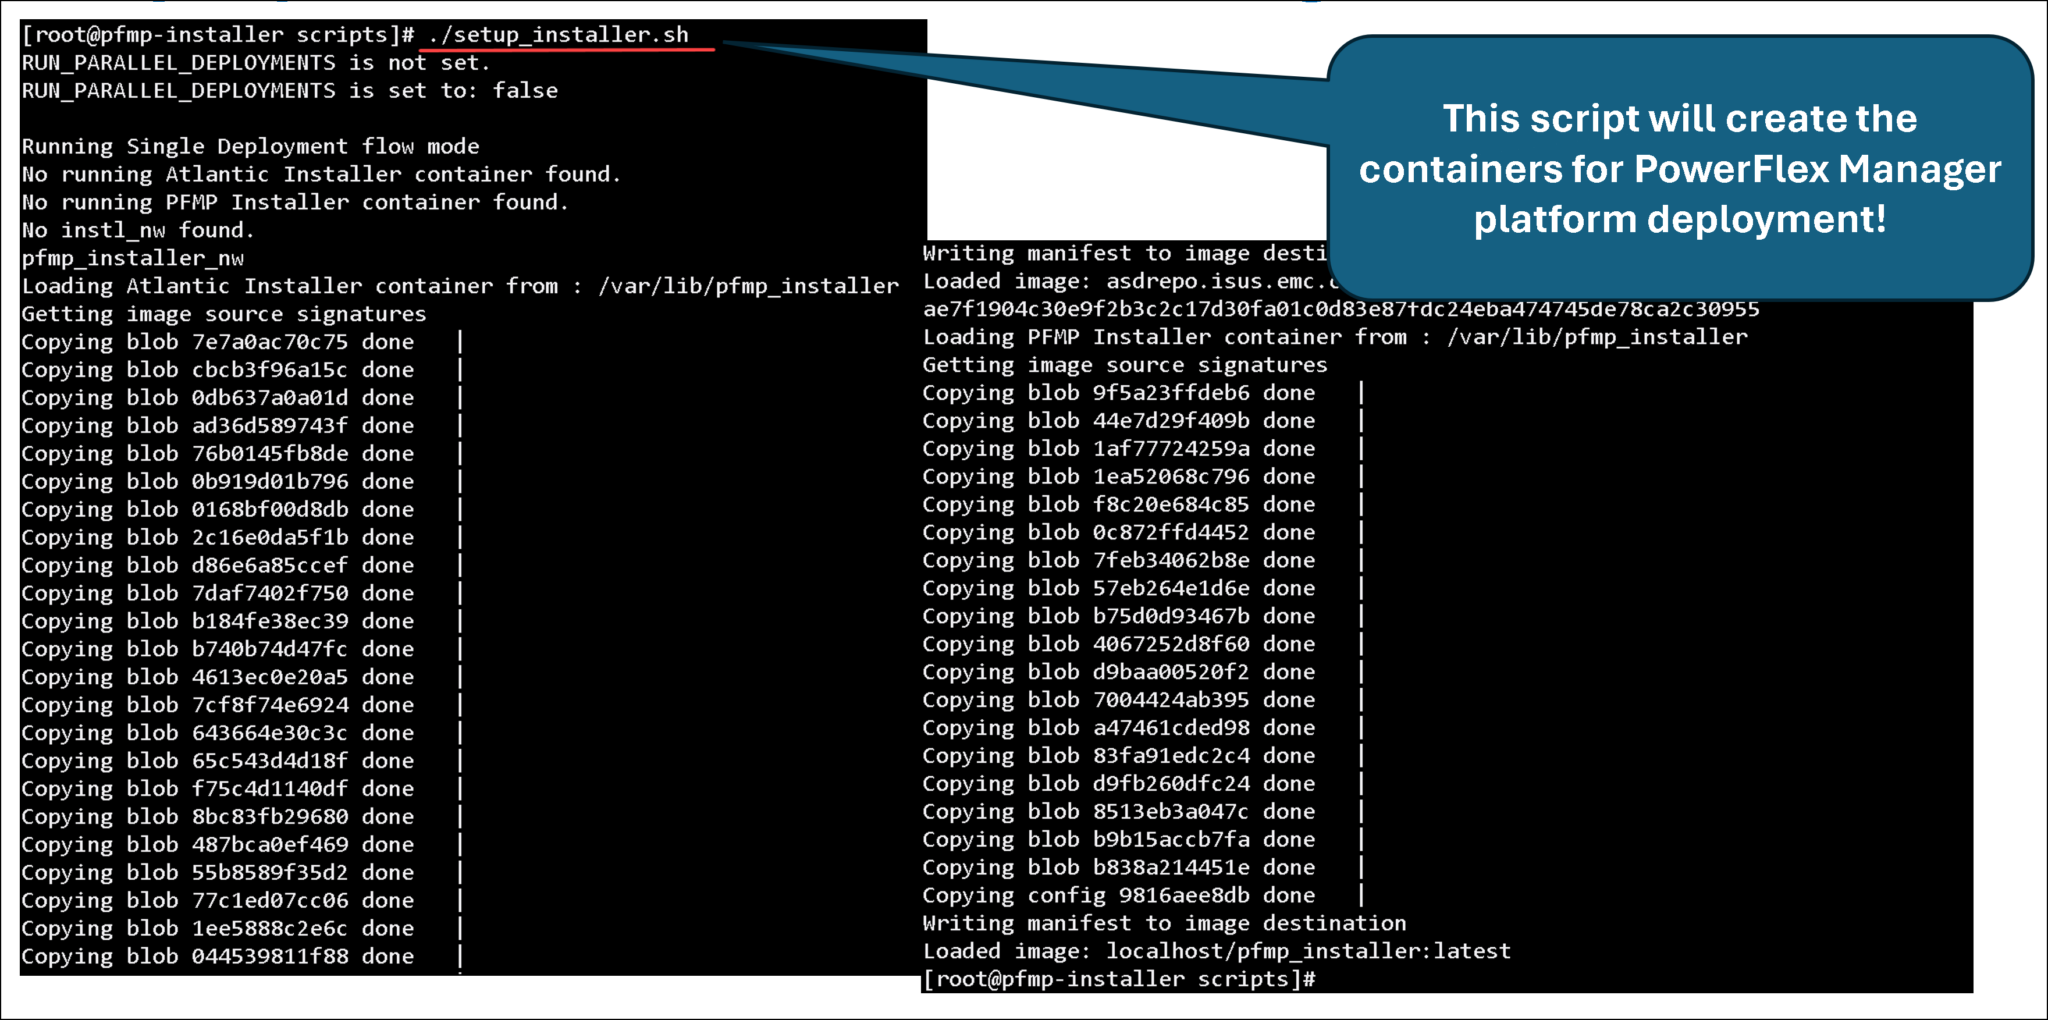
Execute the “setup_installer.sh” to create the container responsible for performing the PowerFlex Manager deployment:
cd /var/lib/pfmp_installer/PFMP_Installer/scripts
./setup_installer.sh
Note: I’ve used “podman” instead of “docker ” based on an excellent article. Click here to read it!
Configure PFMP_Config.json
The installer bundle contains a configuration directory and scripts. Locate the supplied PFMP_Config.json template, make a backup, and edit a copy for the lab. In the release-specific Dell guide, the configuration includes three node hostnames and IP addresses, cluster and service reserved IP pools, routable address pools, and the management-platform FQDN and ingress IP.
Use a sanitized configuration when publishing screenshots. Replace real DNS domains, hostnames, IP addresses, credentials, private key material, and other environment-specific values with examples. Verify that IP ranges are unused, routed where required, and do not overlap with existing networks.
The FQDN must resolve in DNS to the configured ingress address. Dell’s example uses lowercase hostnames and FQDNs. Ensure the chosen ingress address belongs to the management routable pool specified in the JSON file.
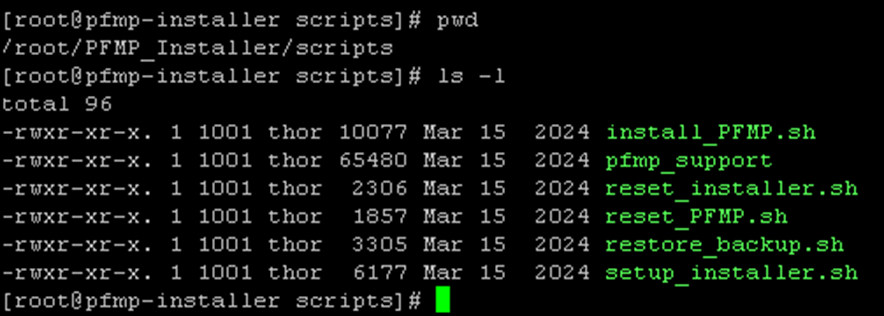
The temporary VM uses this JSON file, along with other scripts, to deploy and configure the cluster. Under the “scripts” directory, for instance, we can see all available scripts:
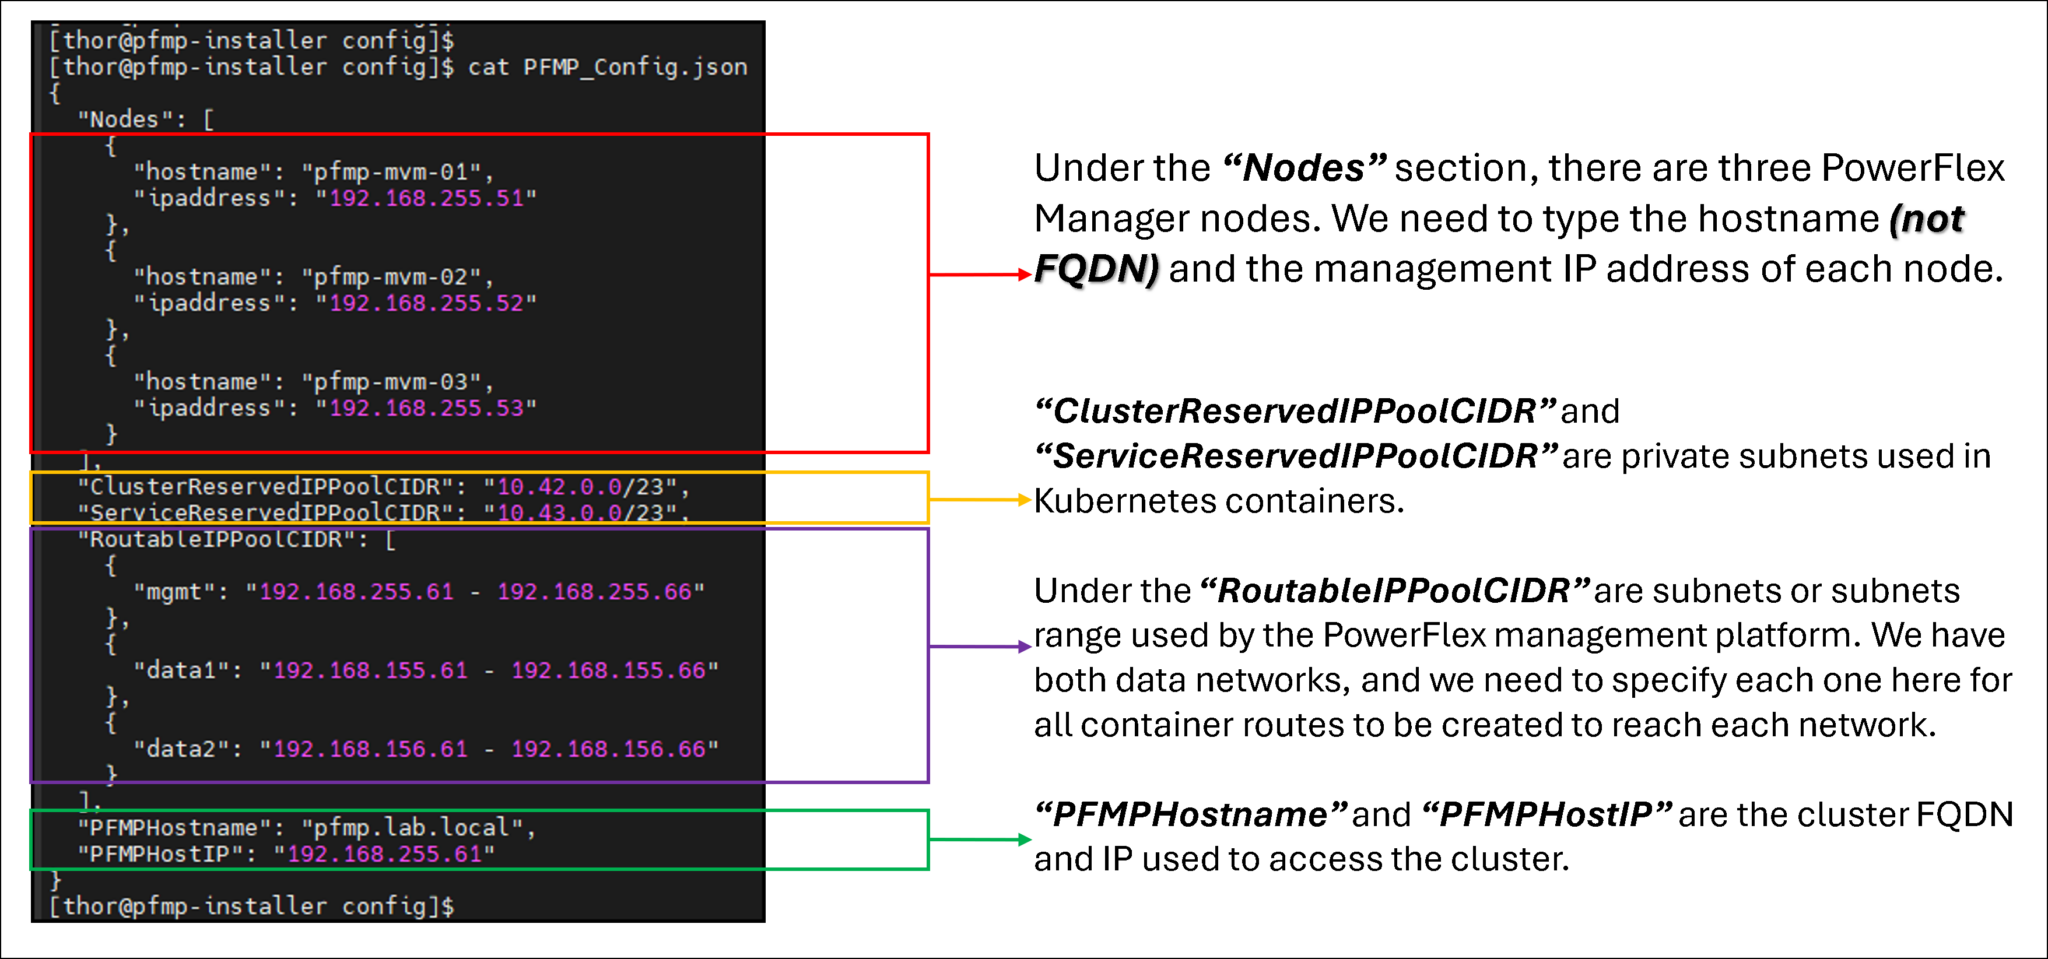
The JSON file is under the “config” directory!
In the following picture, we can see an example of our configuration file, filled out with details about our lab environment:
Deployment of PowerFlex Management Platform Cluster
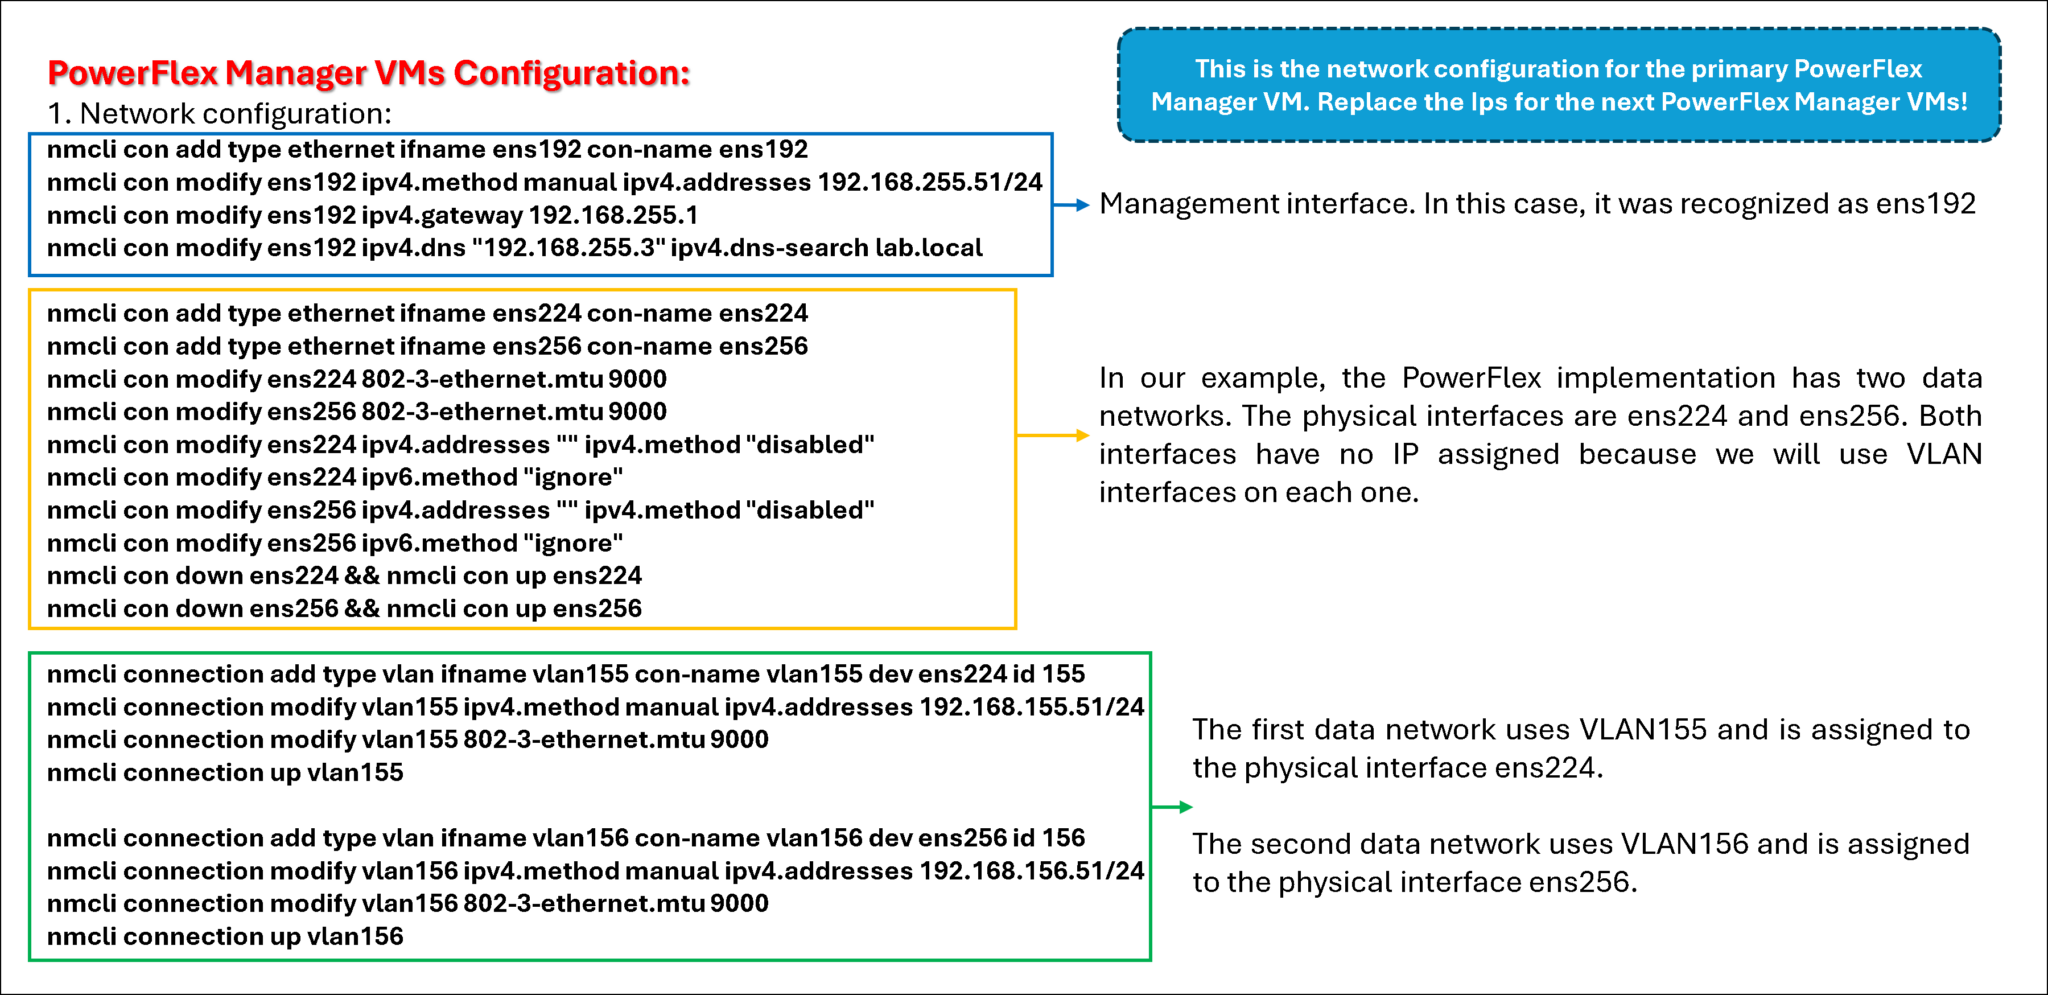
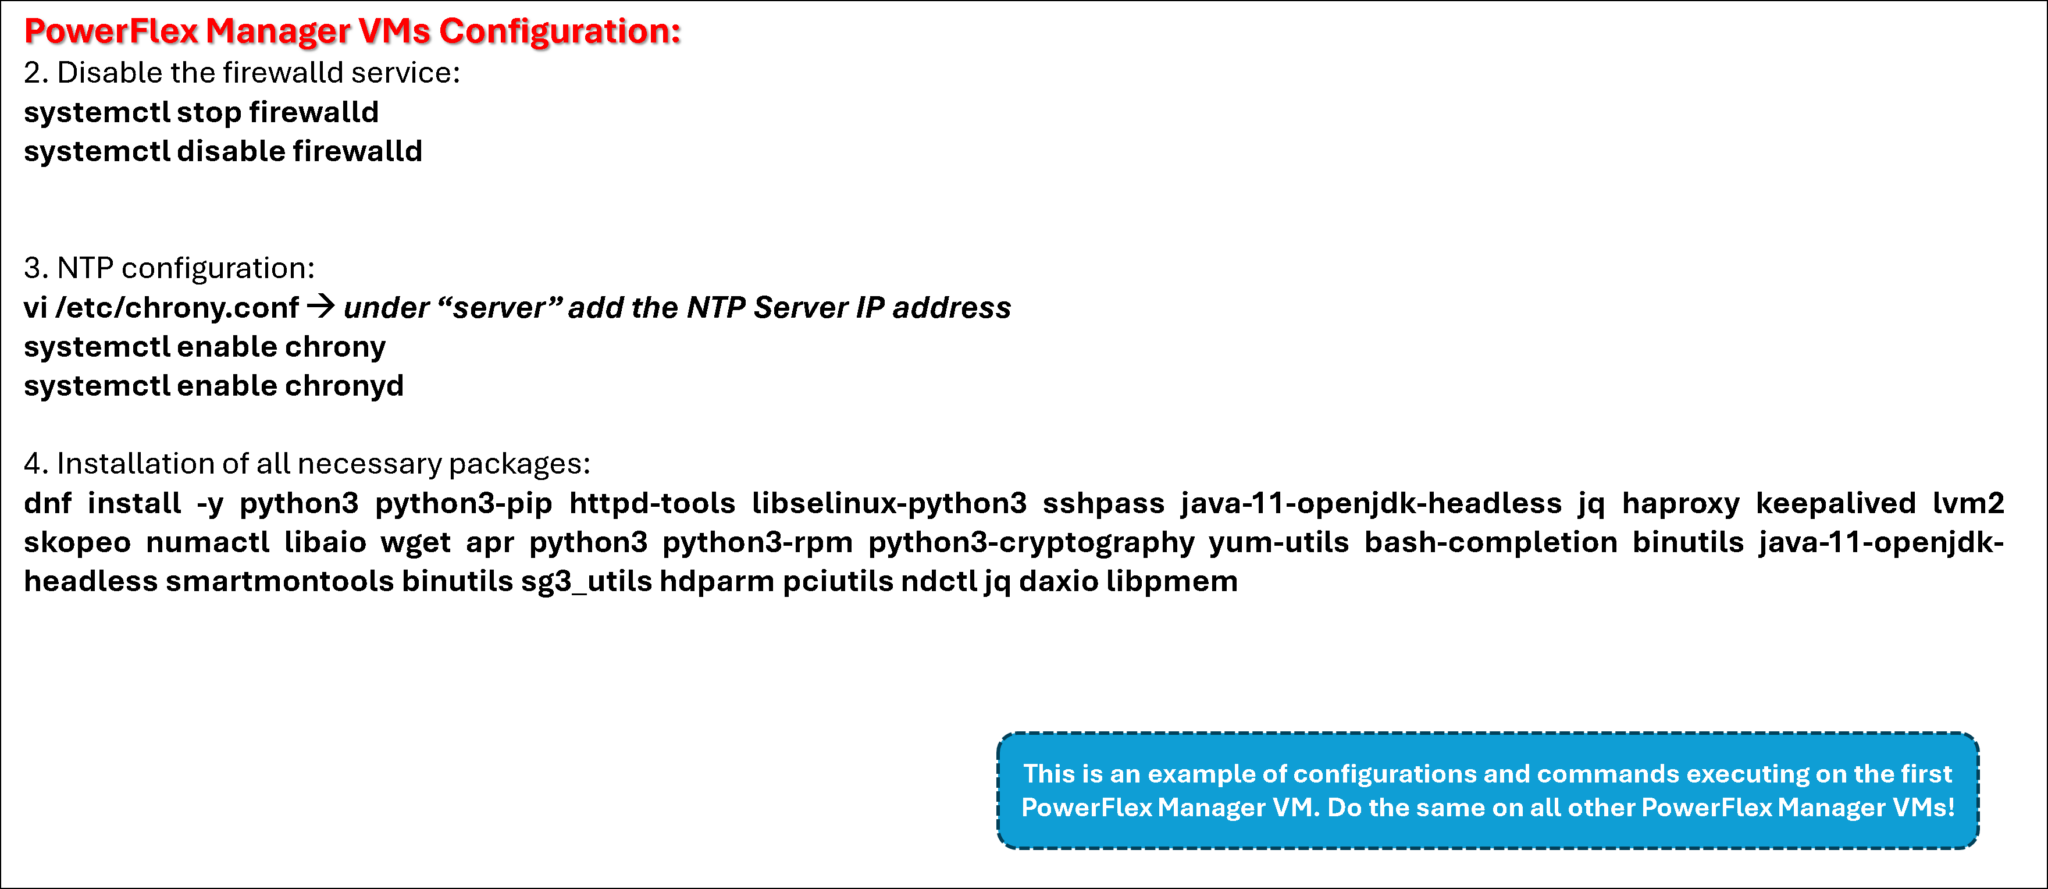
The following step configures the three VMs that will be part of the PowerFlex Manager cluster.
I used the Dell PowerFlex Install and Upgrade guide to get details of the hardware configuration for those VMs:
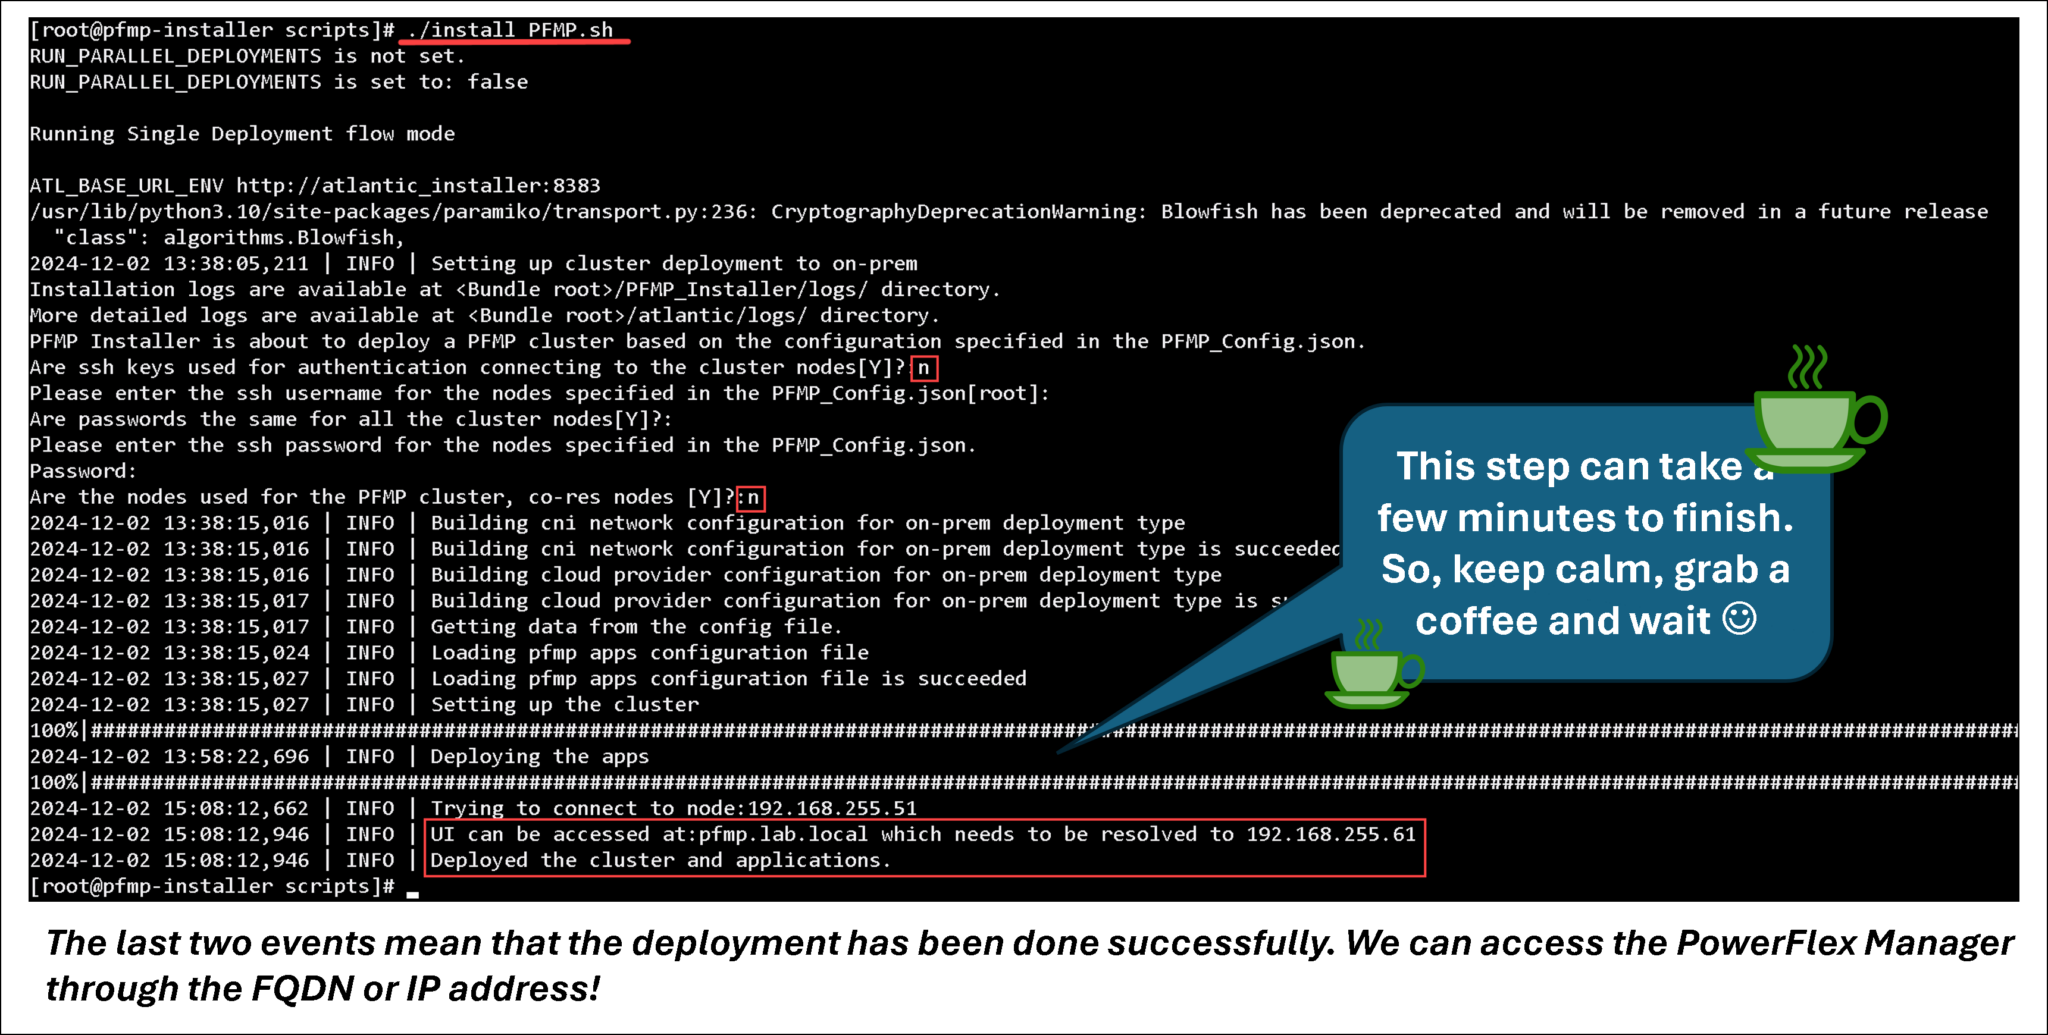
The script “install_PFMP.sh” will deploy the PowerFlex Management Cluster:
The service rke2-ingress-nginx-controller displays the details of the LoadBalancer ingress IP and the VM assigned to the LoadBalancer IP (in this example, the node pfmp-mvm-03):
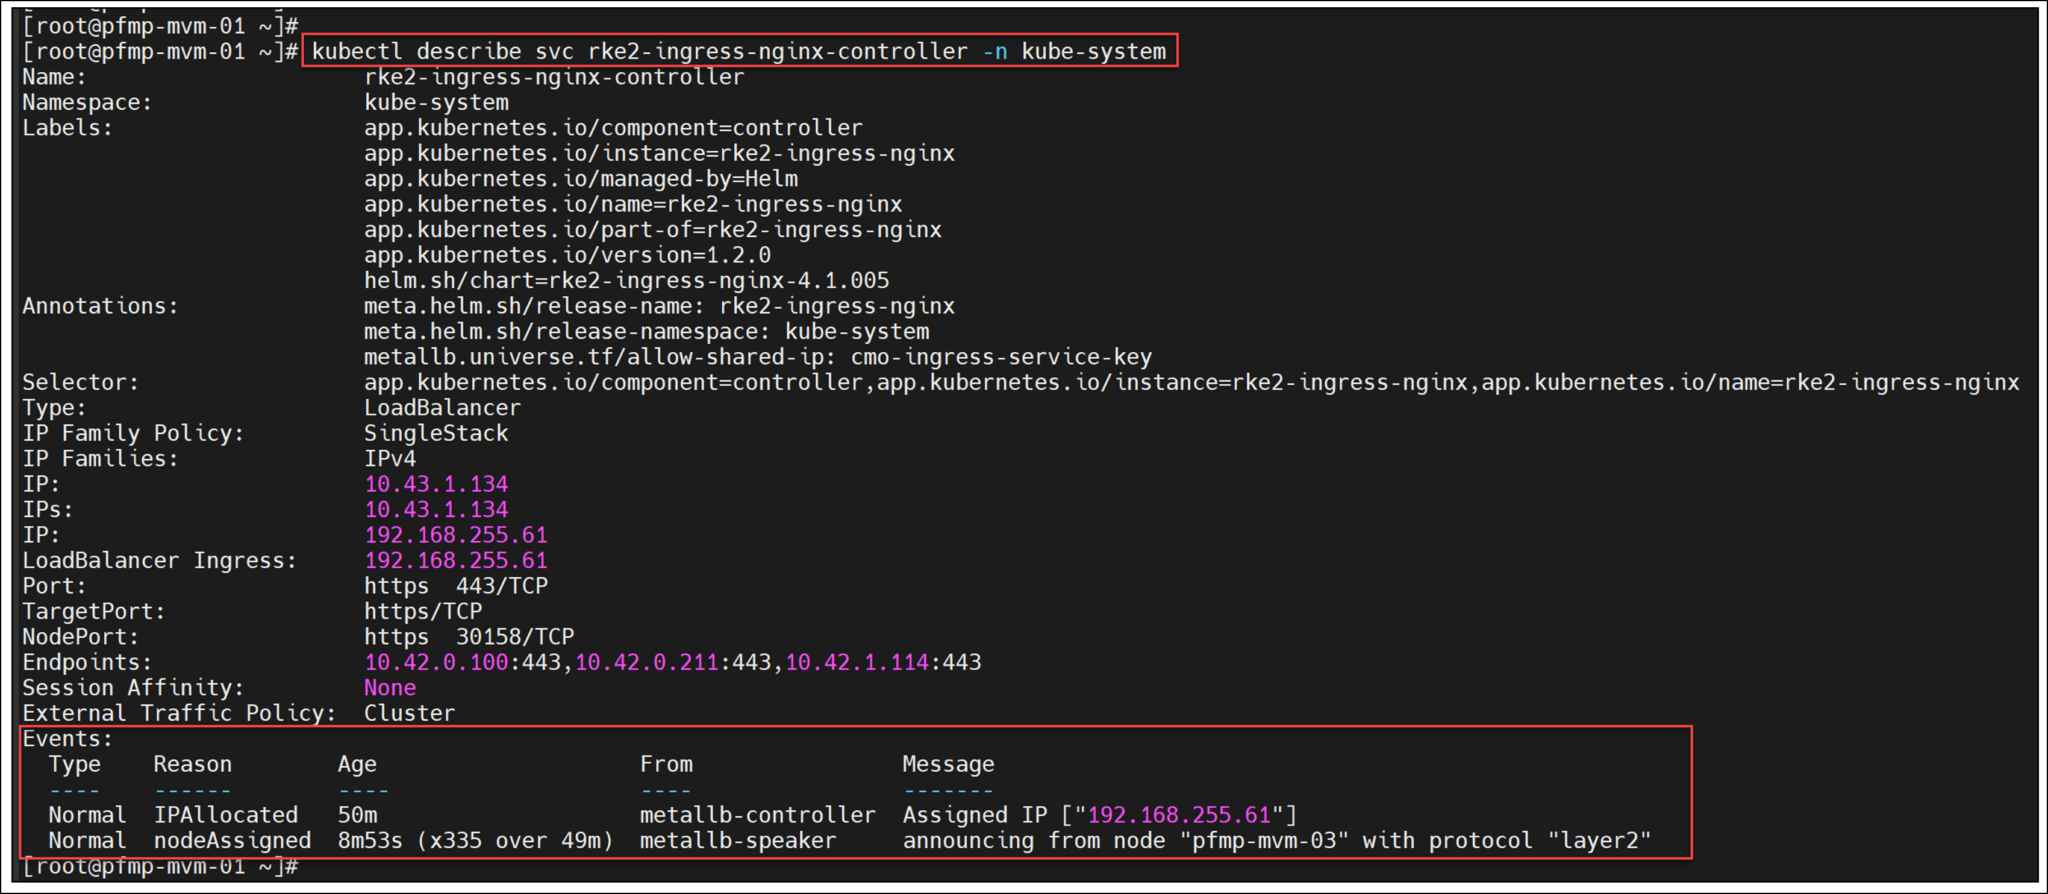
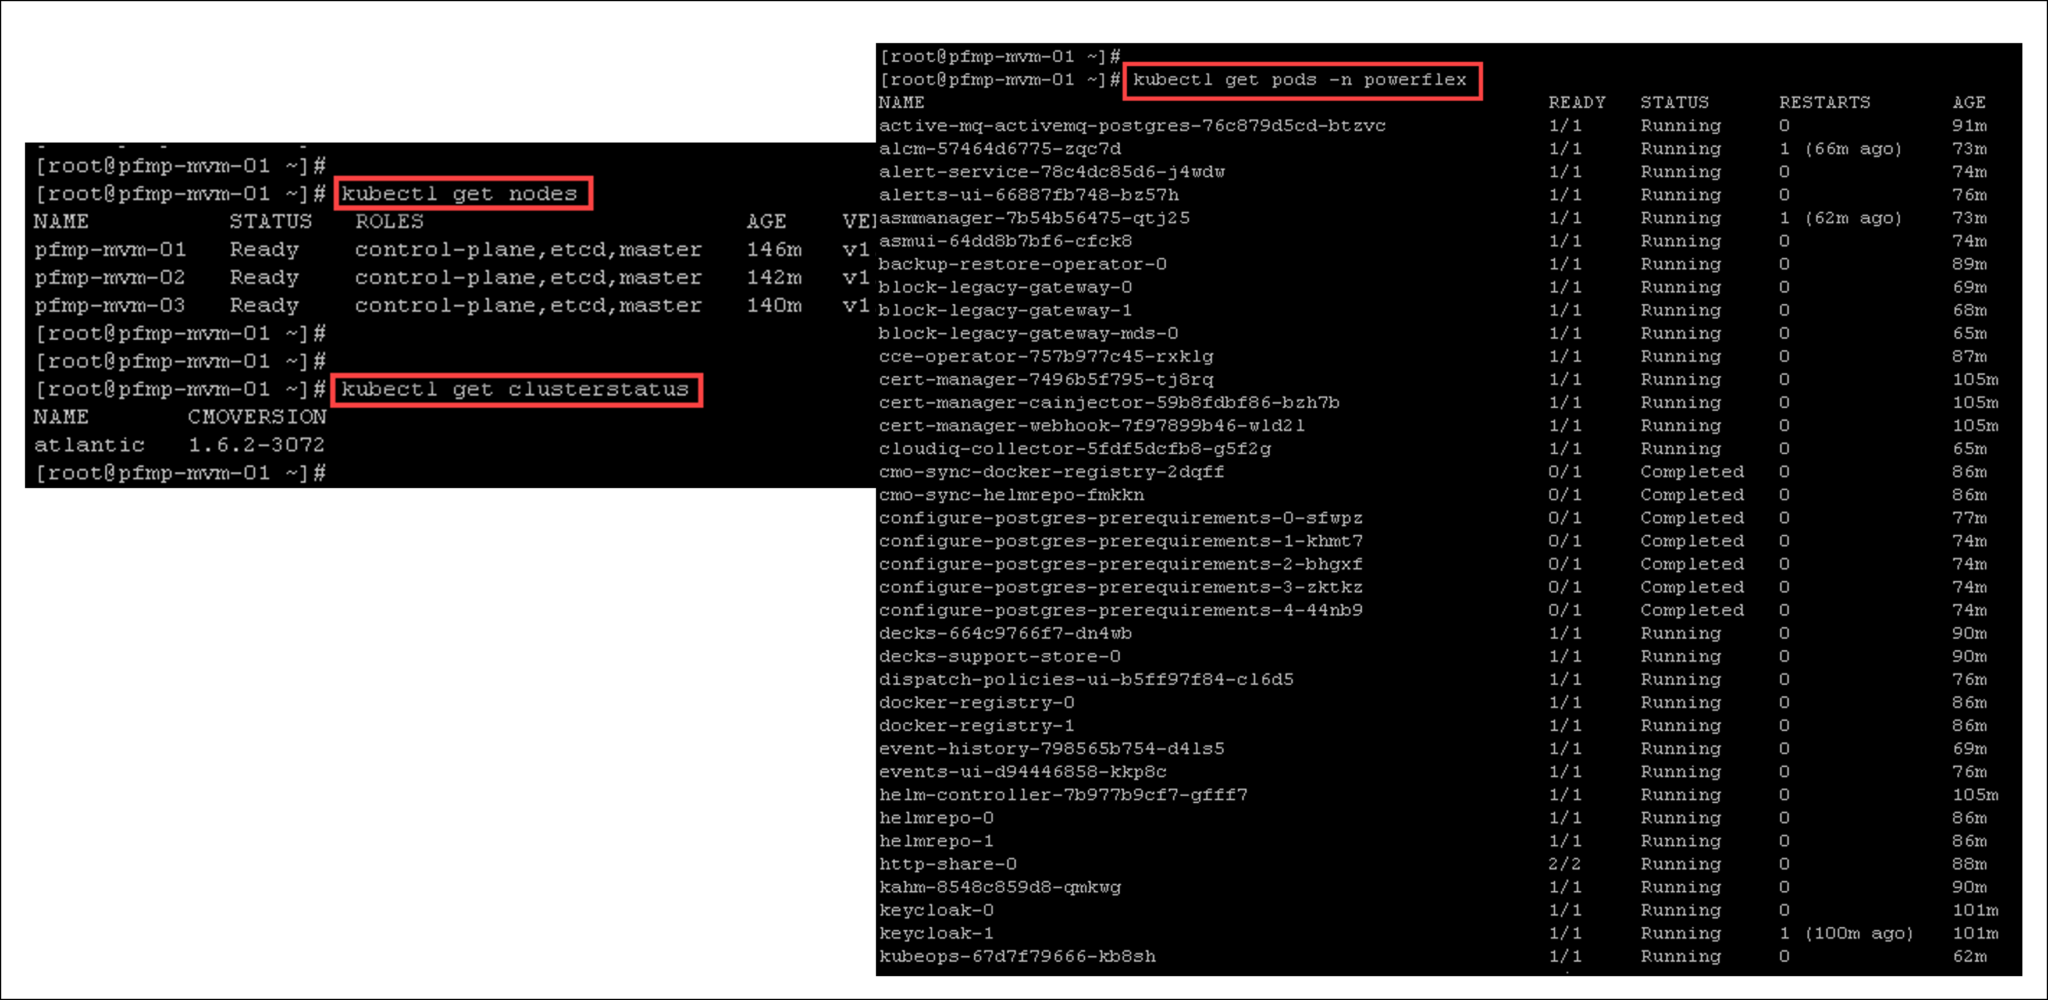
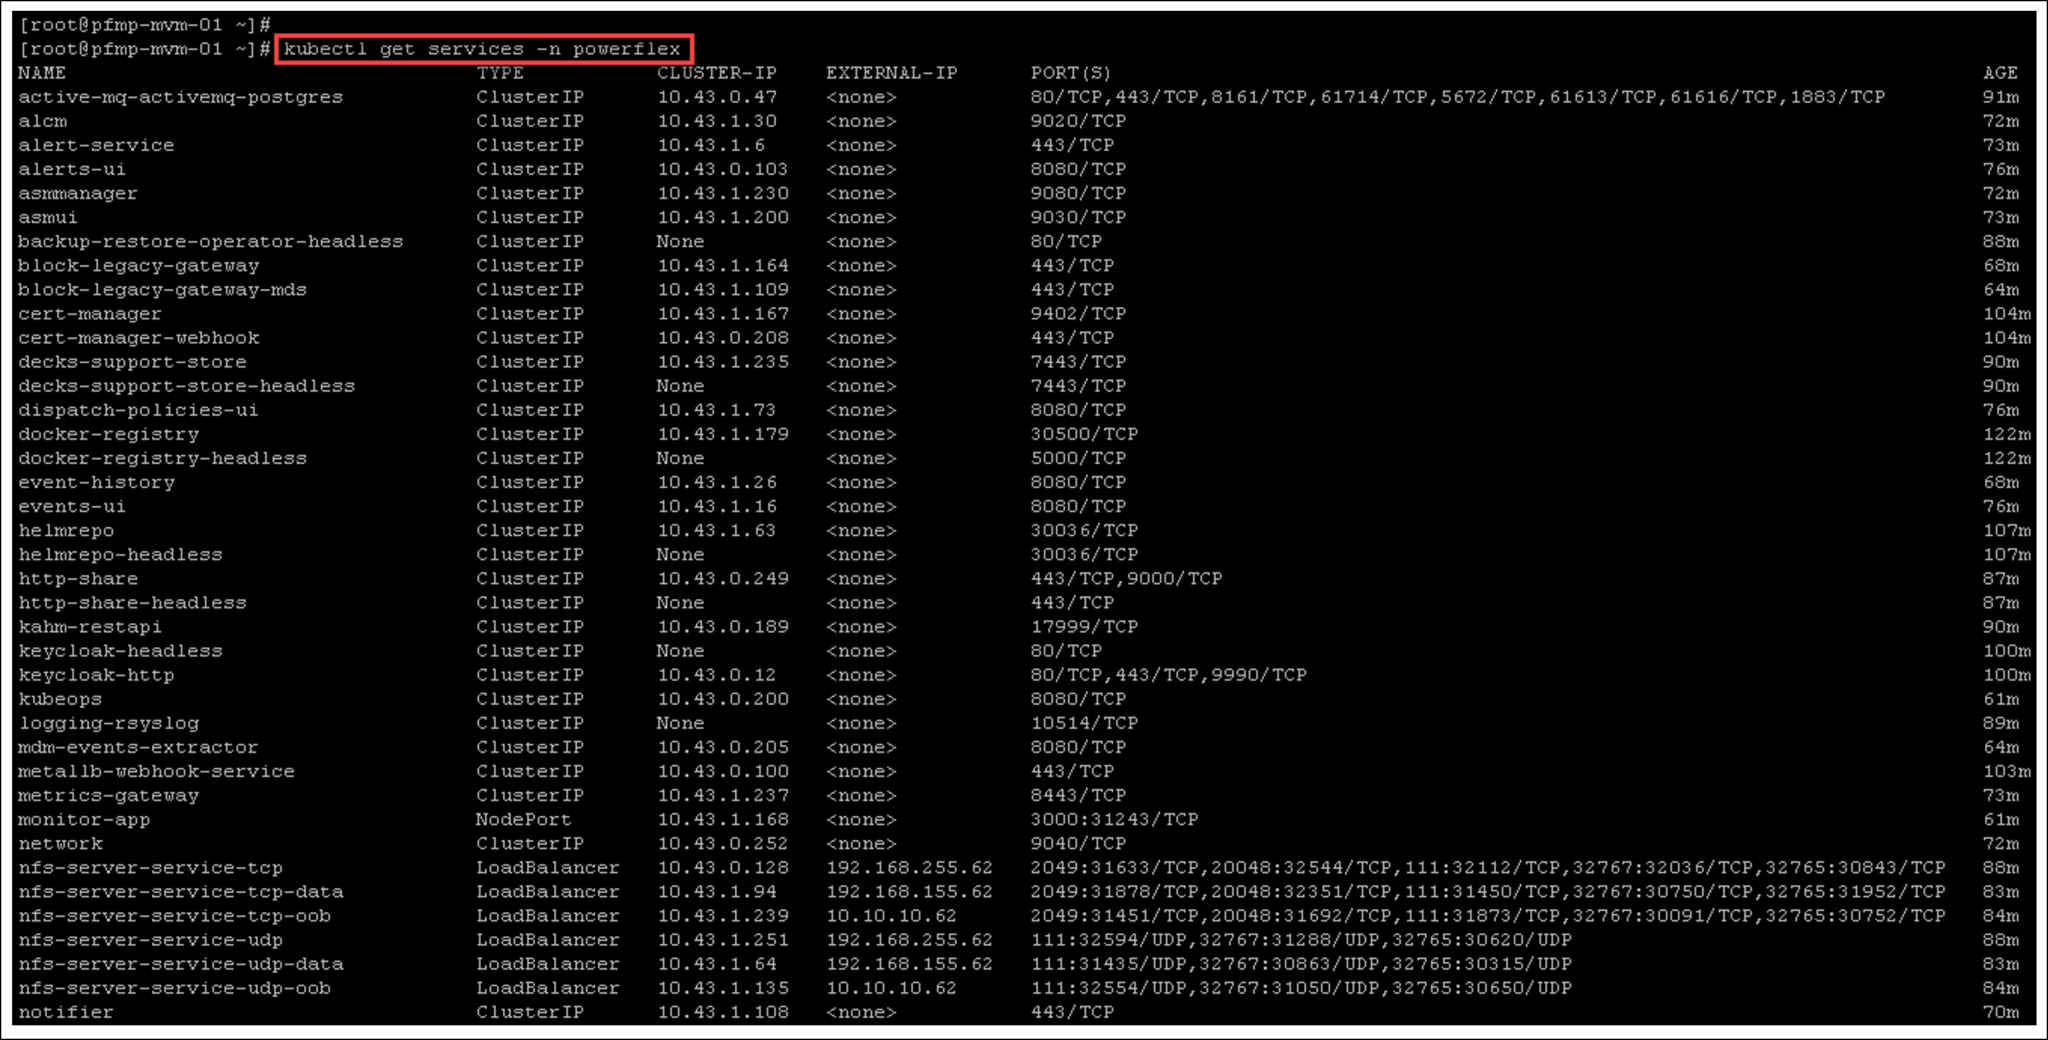
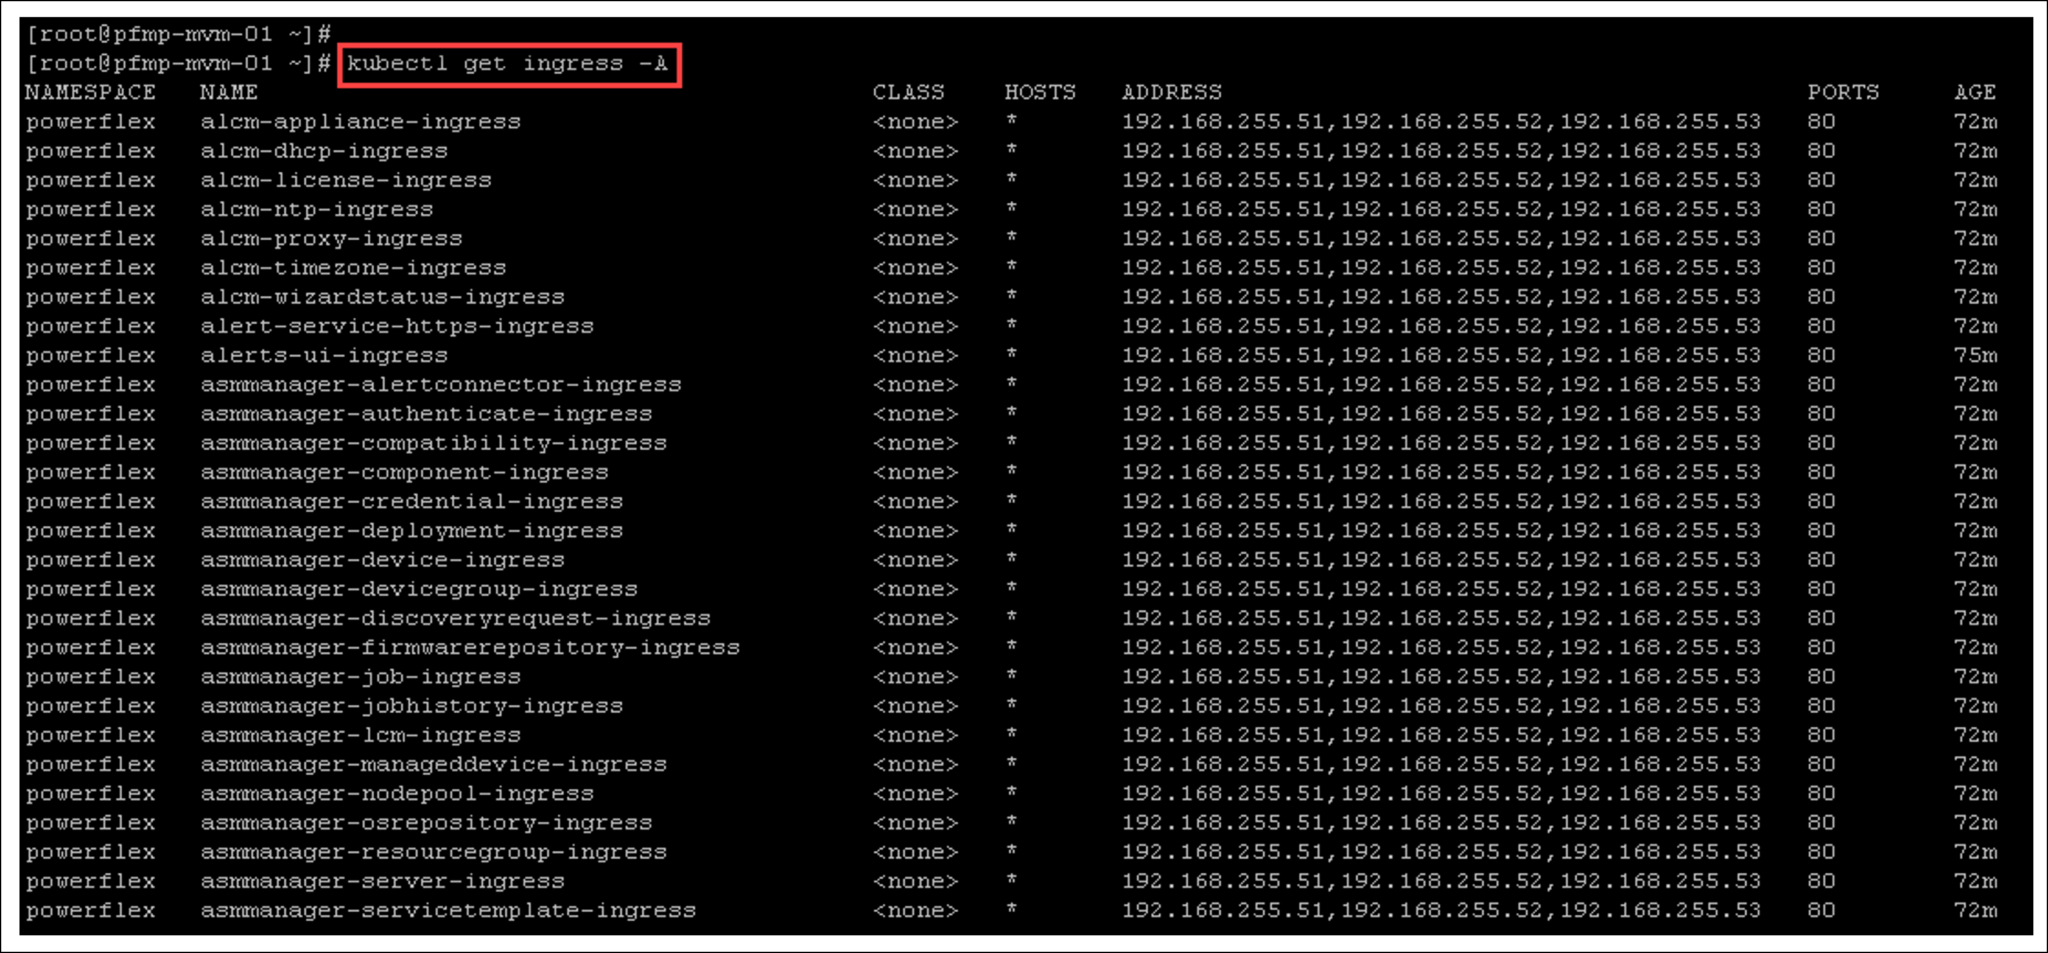
Below, there are more valuable “kubectl” commands to inspect details of the cluster:
Opening the PowerFlex Manager UI
In our lab, we can access the PowerFlex Manager UI using:
- FQDN: pfmp.lab.local
- IP address: 192.168.255.61
Use this “virtual address” to access the PowerFlex Manager UI:
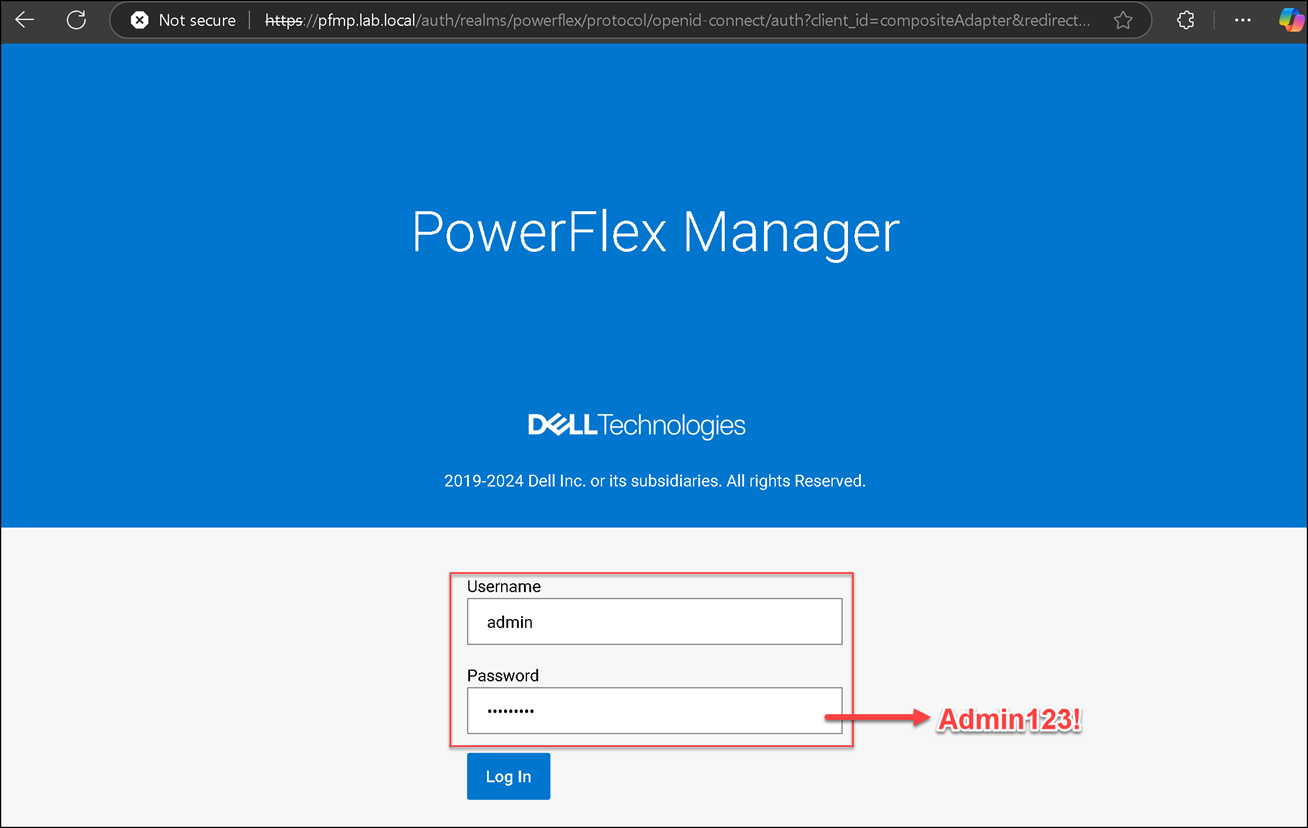
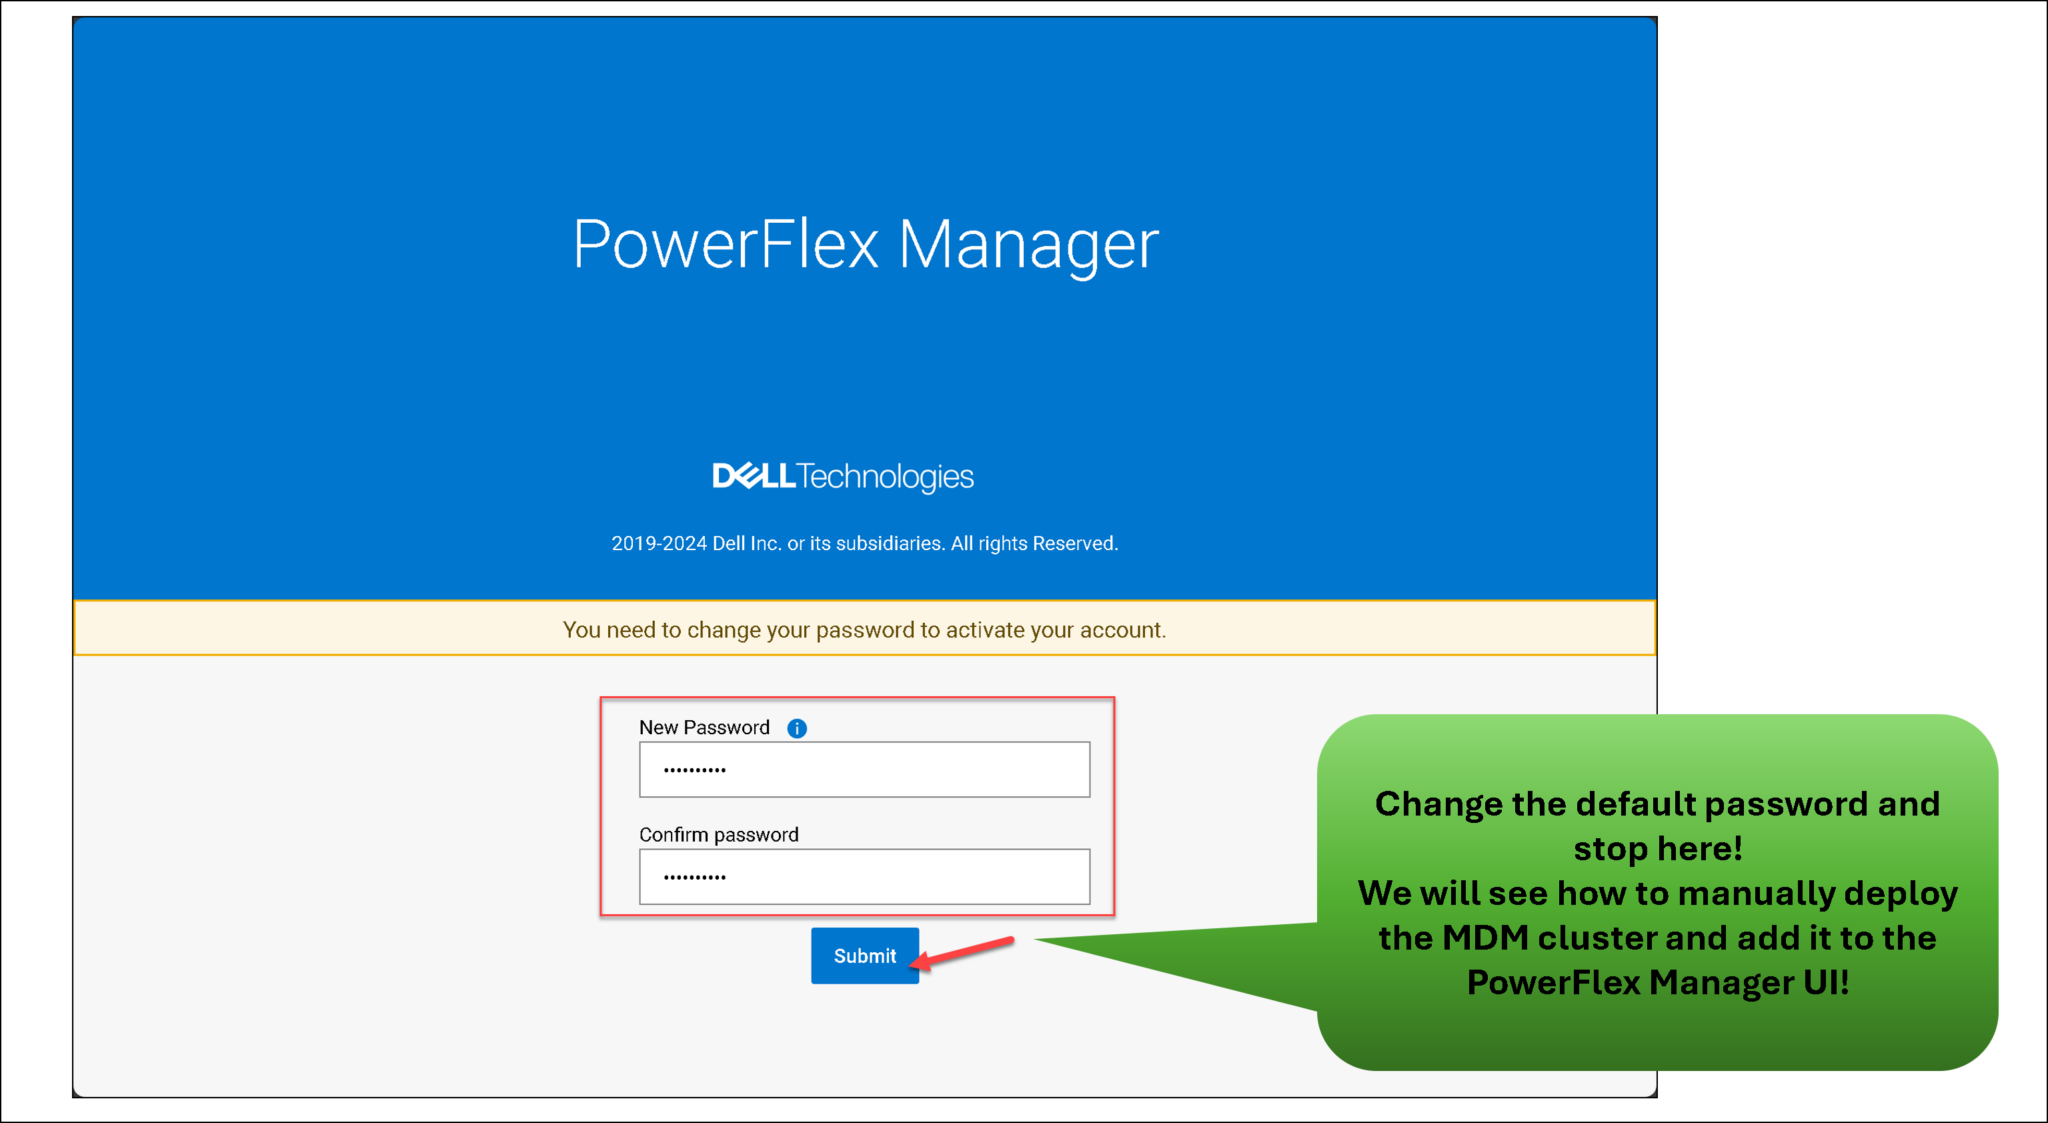
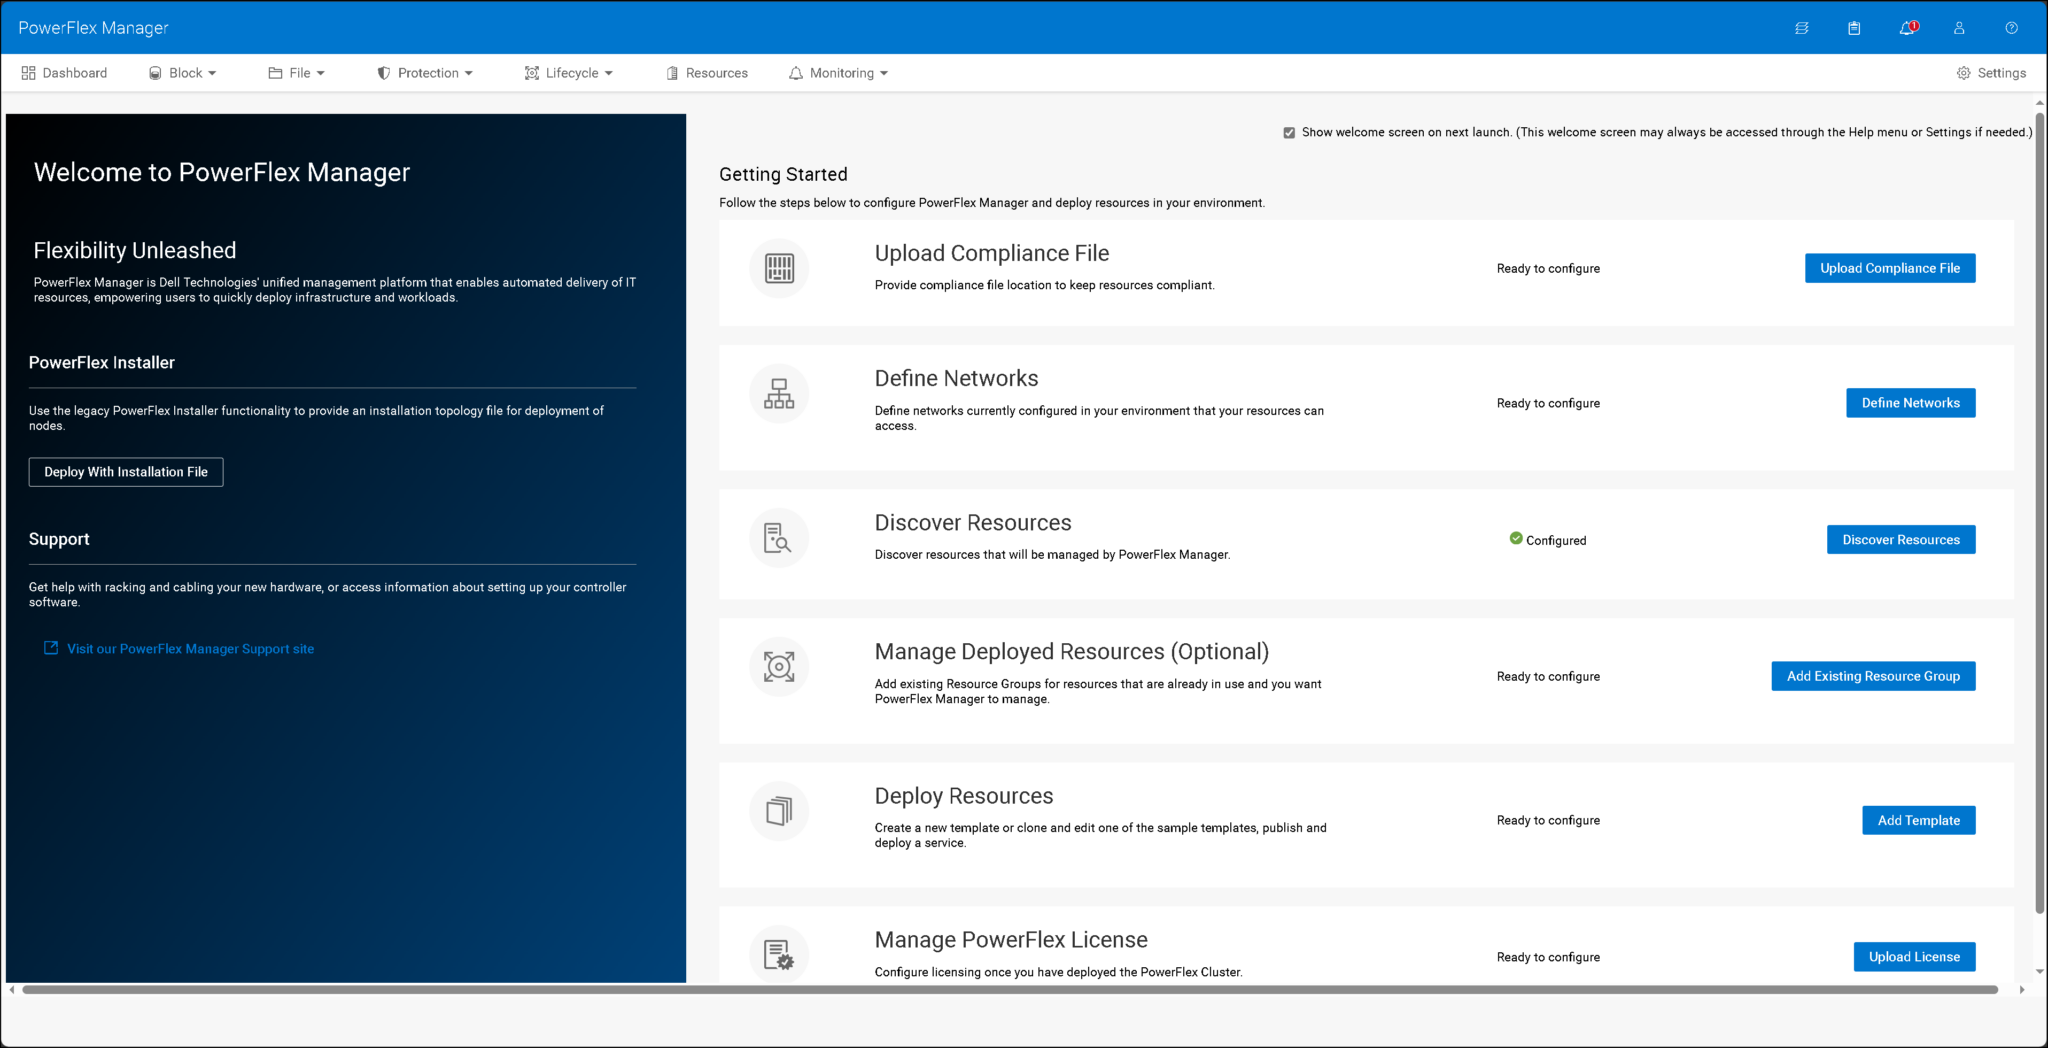
Once the interface loads, confirm that the management platform reports healthy services before using it to deploy PowerFlex. The next step is the cluster deployment procedure in Deploying a New PowerFlex Cluster.
Final Thoughts
Deploying PowerFlex Manager on Linux involves more than starting the installer script. The management nodes need supported operating systems, synchronized time, working DNS and routing, non-overlapping IP pools, and a configuration file that matches the lab network. The container-runtime and firewall adjustments in the original environment are lab-specific and should not be treated as universal requirements.
For a repeatable deployment, pin the PowerFlex core and management-platform versions, follow the matching Dell installation guide, and verify the support matrix before preparing the installer VM. Once the three-node management cluster is healthy and its FQDN resolves to the correct ingress address, PowerFlex Manager is ready for the next stage: deploying the storage cluster.
External References
- Dell — Linux Management Deployment Prerequisites Lists the operating systems and package dependencies supported for PowerFlex 4.5.x Linux management deployment, and identifies requirements for synchronized time and a configured default route.
- Dell — Deploy the PowerFlex Management Platform Cluster Documents the `PFMP_Config.json` parameters, three-node management topology, installer scripts, prompts, and log locations.
- Dell — Download PowerFlex Installation Packages Describes which installation bundle to download for a bare-metal Linux deployment and what the PowerFlex Manager installer archive contains.
- Dell — PowerFlex 4.5.2 and PowerFlex Manager 4.6.x Install and Upgrade Guide Clarifies the release pairing used by Dell’s later guide: PowerFlex 4.5.2 and above with PowerFlex Manager 4.6.x.
- Dell — Verify the Network Time Protocol Setup States that all PowerFlex nodes and management virtual machines must use a functioning time source and be synchronized before installation.
- Red Hat — Configuring Time Synchronization in RHEL 9 Explains the Chrony package, the `chronyd` service, and commands such as `chronyc tracking` and `chronyc sources` for checking synchronization.
- Red Hat — Setting Container Network Modes in RHEL 9 Describes Podman network backends, Netavark, and how to configure and verify the selected backend.
- Podman — Reload Container Network Configuration Documents `podman network reload`, which can restore container connectivity after firewall rules are removed by a firewall reload.
