
Using iPerf3 on an ESXi host is a practical way to measure network throughput between virtualization endpoints and verify whether a specific network path is delivering the performance expected from the infrastructure.
In this lab, I will use the iPerf3 utility available on ESXi to test traffic between two ESXi hosts and between an ESXi host and a virtual machine. This can be useful when troubleshooting low throughput on networks used by services such as vSAN, vMotion, management, or other VMkernel-based traffic.
The most important part of an iPerf test is making sure that the traffic uses the network path you actually want to validate. On ESXi hosts with multiple VMkernel adapters, simply connecting to an IP address without binding the test to the correct source and destination interfaces can produce a result from a completely different network.
In this guide, I will show how to locate and run iPerf3 on ESXi, bind the test to specific VMkernel IP addresses, deal with the ESXi 8 appDom restriction when necessary, and interpret the throughput results without treating a single test as proof of the entire network capacity.
Basically, what is iperf/iperf3?
Based on the website https://iperf.fr/, iPerf3 is a tool for active measurements of the maximum achievable bandwidth on IP networks. It supports tuning various parameters related to timing, buffers, and protocols (TCP, UDP, SCTP with IPv4 and IPv6). For each network test, it reports the bandwidth, loss, and other parameters.
The tool iperf or iperf3 can be used in a lot of operational systems. In this case, the Vmware ESXi has support for the iperf by default. In other words, we do not need to download and install iperf on the ESXi host.
Performance impact: iPerf3 is designed to generate network traffic and can consume a significant portion of the available bandwidth. Running aggressive or parallel tests on a production network can affect virtual machines, storage, replication, vMotion, or other workloads sharing the same physical path.

Run throughput tests during an appropriate maintenance or troubleshooting window and understand which services share the tested uplinks.
Locate iPerf3 on the ESXi Host
The ESXi installation includes the iPerf utility used by VMware for network testing under:
cd /usr/lib/vmware/vsan/binCheck which binaries are available:
ls -l iperf*Depending on the ESXi version, the executable may be named iperf3 or iperf. Broadcom documents that ESXi versions prior to 7.0 Update 3 could require creating a copy of the binary before executing it directly.
For older releases where that workaround is required:
cp /usr/lib/vmware/vsan/bin/iperf3 \
   /usr/lib/vmware/vsan/bin/iperf3.copy
For current ESXi releases, use the installed executable directly unless the applicable Broadcom procedure says otherwise.
In this example, our goal is to measure the achievable bandwidth between two ESXi hosts (HOST-01 and HOST-02). In this case, “HOST-01” will be as a Server, and “HOST-02” will be as a Client.
Commands from HOST-01 (Iperf Server):
cp /usr/lib/vmware/vsan/bin/iperf3 /usr/lib/vmware/vsan/bin/iperf3.copy
/usr/lib/vmware/vsan/bin/iperf3.copy -s
Commands from HOST-02 (Iperf Client):
/usr/lib/vmware/vsan/bin/iperf3 -n 1G -c 192.168.200.11Where:
- -n 1G = amount of data that is sending to the iperf server
- -c = using iperf as a client
- 192.168.200.11 = IP address of the iperf server

Note: In this example, we received a timeout message. This connection timeout can be due to the hosts’ firewalls being active. We can temporarily disable the host’s firewall on both ESXi hosts with the below command.
Important: The Broadcom troubleshooting procedure may require temporarily disabling the ESXi firewall so that the iPerf3 listener on TCP 5201 can accept connections. Disabling the ESXi firewall affects the host globally and should only be done during a controlled troubleshooting window:
esxcli network firewall set --enabled falseAfter that, we can run iperf again on both ESXi hosts:
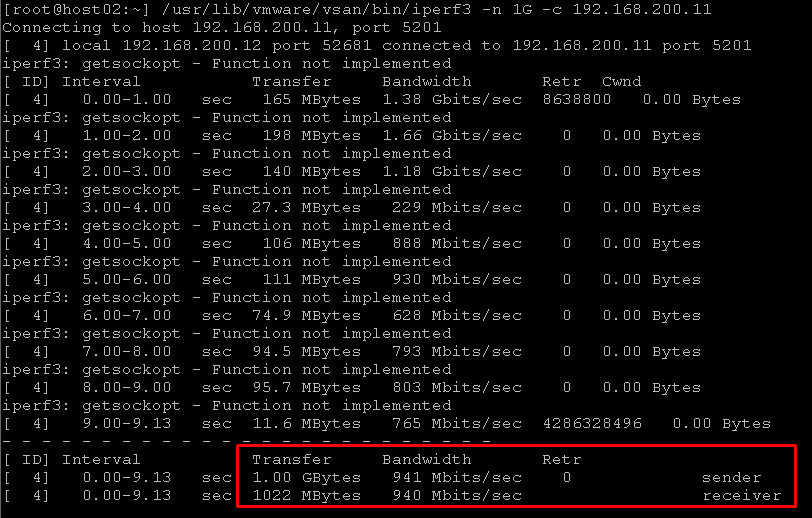
So, in this example:
- We transferred 1 GB of data from HOST-02 to HOST-01.
- In this test, the single TCP stream achieved approximately 941 Mbit/s between the two endpoints.
After the test, if you want to enable the firewall again:
esxcli network firewall set --enabled trueNote: If you need to get the IP address of a specific vmkernel of the ESXi host, you can execute the below command to achieve it:
esxcli network IP interface ipv4 get
If you are running ESXi 8.x
On VMware ESXi 8.0.0 build-20513097, if we need to use the tool Iperf3 to perform some network tests, we can receive the below error:
[root@esxi8-01:/usr/lib/vmware/vsan/bin] /usr/lib/vmware/vsan/bin/iperf3 -s
iperf3: error - unable to start listener for connections: Operation not permitted
iperf3: exiting
On the same ESXi host, the vmkernel.log logged an entry about this event:
2023-04-25T15:08:36.061Z In(182) vmkernel: cpu2:6469331)VmkAccess: 194: iperf3: running in appDom(27): ipAddr = ::, port = 5201: Access denied by vmkernel access control policyThis behavior is probably related to the enforcement level configured on Security Domains on the ESXi host. The below VMware KB explains a little about that:
WE ONLY RECOMMEND DOING THAT DURING THE IPERF TEST. AFTER THAT, RETURN THE CONFIGURATION TO DEFAULT, AS WE WILL SHOW:
1- Access the ESXi host by SSH, and check the enforcement level of all Domains:
localcli system secpolicy domain list
2- Based on the vmkernel.log, the domain that handles the iperf3 execution is called “appDom”. So, we can check the enforcement level for this Domain with the below command:
[root@esxi8-01:/usr/lib/vmware/vsan/bin] localcli system secpolicy domain list | grep appDom
appDom                   enforcing
In this case, the enforcement level is “enforcing”.
3- Change the appDom enforcement level temporarily from enforcing to disabled:
localcli system secpolicy domain set -n appDom -l disabledWarning: Do not leave appDom disabled after the test. The change should exist only for the duration of the controlled troubleshooting activity.
4- After that, we can run the iperf3 as a server normally:
[root@esxi8-01:/usr/lib/vmware/vsan/bin] ./iperf3 -s -B 10.237.180.156
-----------------------------------------------------------
Server listening on 5201 (test #1)
-----------------------------------------------------------
5- After executed the iperf tests, back the “appDom” enforcement level to the default value (enforcing):
localcli system secpolicy domain set -n appDom -l enforcingTest Between ESXi and a Virtual Machine
As we mentioned before, we can test the network between an ESXi host and a specific VM. In this example, we will download and run iperf on a Windows Server VM.
To download the iperf package for Windows, click here.
After that, we can start the iperf as a Client on a Windows Server VM:
cd C:\Users\Administrator\Desktop\iperf-3.1.3-win64\iperf-3.1.3-win64
iperf3.exe -n 500M -c 192.168.200.11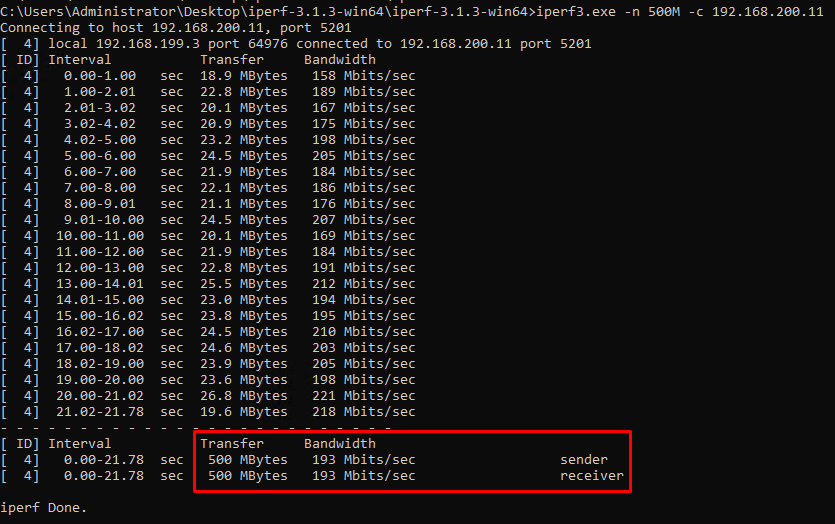
So, in this example:
- We transferred 500 MB of data from the Windows Server VM to HOST-01.
- The achievable bandwidth was 193 Mbits/sec.
What a Low iPerf3 Result Does – and Does Not – Prove
A low iPerf3 result confirms that the tested TCP flow is not achieving the expected throughput, but it does not identify the root cause by itself.
Possible causes include:
- physical NIC or switch-port limitations;
- incorrect source VMkernel selection;
- link negotiation problems;
- congestion;
- routing;
- packet loss or TCP retransmissions;
- MTU inconsistencies;
- QoS or firewall inspection;
- CPU limitations at either endpoint;
- a single TCP stream being unable to use the full path capacity.
Compare results in both directions and, when appropriate, compare single-stream and multi-stream tests before concluding that the physical network is the bottleneck.
If the throughput test is lower than expected and you need to determine whether packets are being dropped inside the ESXi network stack, see “How to Troubleshoot Packet Drops on an ESXi Host“.
Using iPerf3 as Part of an ESXi Network Investigation
iPerf3 is most useful when the test is designed around the network path you actually want to measure.
On an ESXi host with multiple VMkernel adapters, binding both endpoints to the intended IP addresses is essential. Without that control, a successful throughput test may be measuring the Management Network while the actual problem exists on vSAN, replication, or another VMkernel network.
A single throughput number should also not be treated as a complete network diagnosis. Compare both traffic directions, repeat the test, and use parallel streams only when they represent the workload being investigated.
After testing, restore any temporary ESXi firewall or appDom changes immediately and continue with packet-drop, MTU, switching, or physical-network troubleshooting if the measured throughput remains below expectations.
External References
-
Using iPerf for Testing vSAN Network Performance
Official Broadcom procedure for locating and running
iperf3on ESXi, binding the server to a VMkernel IP address, handling ESXi firewall requirements, and temporarily changing the ESXi 8appDomsecurity policy when necessary. -
Network Performance Test Reporting Health Status as Failed
Broadcom vSAN troubleshooting example using manual
iperf3testing between ESXi VMkernel interfaces when the proactive network performance test reports a failure. - Using iPerf to Test Network Bandwidth from an ESXi Host Broadcom guidance covering VMkernel network selection, source binding, TCP port 5201, parallel iPerf streams, test duration, and the potential performance impact of throughput testing on production networks.
-
iPerf3 Command-Line Documentation
Official ESnet reference for iPerf3 client and server
operation, address binding with
-B, reverse tests with-R, parallel streams with-P, duration, bitrate, and other throughput-test parameters. - iPerf3 FAQ Official ESnet guidance covering iPerf3 platform support, single-stream and parallel-stream performance considerations, CPU limitations, and troubleshooting behavior.
