
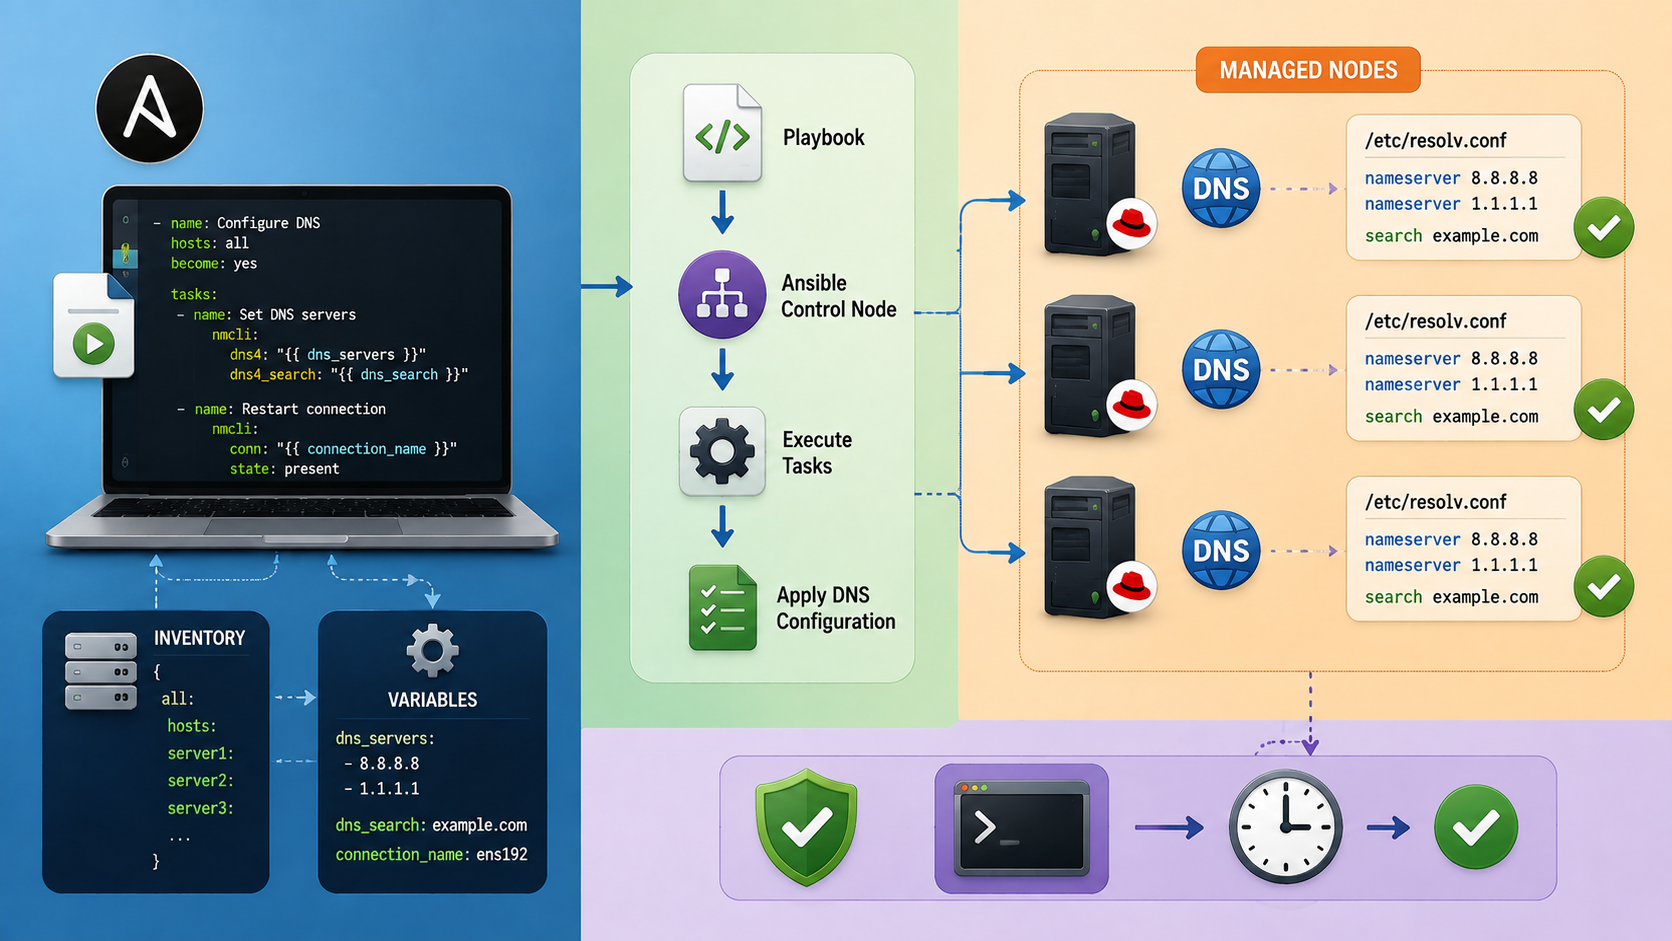
Creating an Ansible DNS playbook is a practical way to automate DNS client configuration across multiple Linux servers. Maintaining consistent DNS settings helps ensure reliable network communication and simplifies administration in environments with many managed hosts.
On Red Hat Enterprise Linux systems, NetworkManager is responsible for managing network connections and can dynamically update DNS settings in the /etc/resolv.conf file. By using Ansible, administrators can define the desired DNS configuration and apply it consistently across all managed nodes.
In this guide, we will create an Ansible playbook to configure DNS settings through NetworkManager. You will learn how to build the inventory, define the playbook tasks, apply DNS changes, and validate the final configuration on managed servers.
If you are new to Ansible, start with “Creating Your First Ansible Playbook: A Practical Lab Guide“ to review inventory, SSH connectivity, playbook execution, and validation before continuing.
By default, NetworkManager dynamically updates the /etc/resolv.conf file with the DNS settings from the active NetworkManager connection profiles
What is NetworkManager?
In some Linux distributions, the default networking service is provided by NetworkManager, which is a dynamic network control and configuration daemon to keep network devices and connections up and active when they are available. The traditional ifcfg type configuration files are still supported.
NetworkManager is installed by default on Red Hat Enterprise Linux. So, in our case, since we’re using a Linux distribution that has it by default, we’ll not install anything to use NetworkManager.
So, let’s get started and create an Ansible playbook to keep the DNS configuration consistent on all hosts.
Creating the Inventory
Before going forward, our environment is composed of:
- One Control VM (A CentOS 9 VM that runs Ansible).
- Six Managed VMs (Red Hat 8 VMs that Ansible manages).
So, Ansible needs to know which hosts to handle. Let’s create a directory to store the inventory file:
mkdir -p /root/ansible/inventoryCreate the hosts.ini file:
touch /root/ansible/inventory/hosts.iniAnd then, add the hosts to hosts.ini. In this case, for instance, our inventory file has some groups
[hpc2_login_nodes]    # This is a group
hpc2-login

[hpc2_head_nodes]     # This is a group
hpc2-head

[hpc2_compute_nodes]   # This is a group
hpc2-node[01:06]

[all:vars]             # This is a variable section
ansible_user=root      # This is a variable applies to all hosts
Creating the Playbook
This playbook uses the community.general.nmcli module. Verify that the collection is available on the Ansible control node:
ansible-galaxy collection list community.generalIf it is not installed:
ansible-galaxy collection install community.generalLet’s create a directory to store the playbook files:
mkdir -p /root/ansible/playbooksInside the playbooks directory, generate the playbook file dns.yml:
touch /root/ansible/playbooks/dns.ymlBefore using the playbook, identify the active NetworkManager connection profile associated with the interface:
nmcli -t -f NAME,DEVICE connection show --activeIn this lab, the connection profile and interface are both named ens192. If your connection profile uses a different name, replace ens192 in conn_name with the actual profile name.
And then, add the following content:
---
- name: Ensure DNS settings using NetworkManager
  hosts: all
  become: yes
  tasks:
    - name: Set DNS on interface
      community.general.nmcli:
        conn_name: "ens192"
        type: ethernet
        dns4:
          - "192.168.255.3"
        dns4_search:
          - "lab.local"
        state: present
      notify: Reactivate connection to apply DNS changes

  handlers:
    - name: Reactivate connection to apply DNS changes
command: nmcli connection up ens192Notes:
- In our case, for instance, all managed nodes have an interface “ens192”.
- Our DNS server IP is “192.168.255.3”.
- Our DNS domain name is “lab.local”.
Important: Reactivating a NetworkManager connection can briefly interrupt network connectivity. When changing the same interface used by Ansible over SSH, test the procedure in a lab before applying it to production systems.
Running the Playbook
To run the playbook:
ansible-playbook -i inventory/hosts.ini playbooks/dns.ymlOutput’s example – Considering that all managed hosts are in the desired state (no change):
PLAY [Ensure DNS settings using NetworkManager] *****************************************************************************************************************************

TASK [Gathering Facts] ******************************************************************************************************************************************************
ok: [hpc2-login]
ok: [hpc2-node03]
ok: [hpc2-node01]
ok: [hpc2-node02]
ok: [hpc2-head]
ok: [hpc2-node04]
ok: [hpc2-node05]
ok: [hpc2-node06]

TASK [Set DNS on interface] *************************************************************************************************************************************************
ok: [hpc2-head]
ok: [hpc2-login]
ok: [hpc2-node01]
ok: [hpc2-node02]
ok: [hpc2-node03]
ok: [hpc2-node04]
ok: [hpc2-node05]
ok: [hpc2-node06]

PLAY RECAP ******************************************************************************************************************************************************************
hpc2-head                  :ok=2 changed=0    unreachable=0    failed=0    skipped=0    rescued=0    ignored=0
hpc2-login                 :ok=2 changed=0    unreachable=0    failed=0    skipped=0    rescued=0    ignored=0
hpc2-node01                :ok=2 changed=0    unreachable=0    failed=0    skipped=0    rescued=0    ignored=0
hpc2-node02                :ok=2 changed=0    unreachable=0    failed=0    skipped=0    rescued=0    ignored=0
hpc2-node03                :ok=2 changed=0    unreachable=0    failed=0    skipped=0    rescued=0    ignored=0
hpc2-node04                :ok=2 changed=0    unreachable=0    failed=0    skipped=0    rescued=0    ignored=0
hpc2-node05                :ok=2 changed=0    unreachable=0    failed=0    skipped=0    rescued=0    ignored=0
hpc2-node06                : ok=2    changed=0    unreachable=0    failed=0    skipped=0    rescued=0    ignored=0
If we access one managed node and inspect the DNS configuration, we can confirm that it is correct:
[root@hpc2-node01 ~]# cat /etc/resolv.conf
# Generated by NetworkManager
search lab.local
nameserver 192.168.255.3
Supposing that you have a demand to change the DNS IP from 192.168.255.3 to 10.10.10.10 on all managed hosts, you just need to change the IP in the Playbook and rerun it:
PLAY [Ensure DNS settings using NetworkManager] *****************************************************************************************************************************

TASK [Gathering Facts] ******************************************************************************************************************************************************
ok: [hpc2-node02]
ok: [hpc2-login]
ok: [hpc2-node01]
ok: [hpc2-node03]
ok: [hpc2-head]
ok: [hpc2-node04]
ok: [hpc2-node06]
ok: [hpc2-node05]

TASK [Set DNS on interface] *************************************************************************************************************************************************
changed: [hpc2-node02]
changed: [hpc2-node01]
changed: [hpc2-node03]
changed: [hpc2-login]
changed: [hpc2-head]
changed: [hpc2-node04]
changed: [hpc2-node05]
changed: [hpc2-node06]

RUNNING HANDLER [Reactivate connection to apply DNS changes] ****************************************************************************************************************
changed: [hpc2-login]
changed: [hpc2-node01]
changed: [hpc2-head]
changed: [hpc2-node02]
changed: [hpc2-node03]
changed: [hpc2-node04]
changed: [hpc2-node05]
changed: [hpc2-node06]

PLAY RECAP ******************************************************************************************************************************************************************
hpc2-head                  :ok=3changed=2 unreachable=0    failed=0    skipped=0    rescued=0    ignored=0
hpc2-login                 :ok=3changed=2 unreachable=0    failed=0    skipped=0    rescued=0    ignored=0
hpc2-node01                :ok=3changed=2 unreachable=0    failed=0    skipped=0    rescued=0    ignored=0
hpc2-node02                :ok=3changed=2 unreachable=0    failed=0    skipped=0    rescued=0    ignored=0
hpc2-node03                :ok=3changed=2 unreachable=0    failed=0    skipped=0    rescued=0    ignored=0
hpc2-node04                :ok=3changed=2 unreachable=0    failed=0    skipped=0    rescued=0    ignored=0
hpc2-node05                :ok=3changed=2 unreachable=0    failed=0    skipped=0    rescued=0    ignored=0
hpc2-node06                :ok=3changed=2 unreachable=0    failed=0    skipped=0    rescued=0    ignored=0
And inspecting the managed host again, we can confirm the change:
[root@hpc2-node01 ~]# cat /etc/resolv.conf
# Generated by NetworkManager
search lab.local
nameserver 10.10.10.10
External References
-
Ansible community.general.nmcli Module
Official Ansible documentation for managing NetworkManager
connection profiles, interfaces, DNS servers, search domains,
automatic DNS behavior, and connection state with
community.general.nmcli. -
Ansible Community General Collection
Official reference for the
community.generalcollection that provides thenmclimodule used by this playbook. -
NetworkManager nmcli Settings Reference
Official NetworkManager reference for connection-profile
properties including
ipv4.dns,ipv4.dns-search, andipv4.ignore-auto-dns. - NetworkManager Reference Manual Official documentation covering NetworkManager architecture, connection profiles, devices, activation, DNS configuration, and network-management behavior on Linux systems.
