


firewalld on RHEL 8 is the default firewall management service used to control network traffic and improve system security. It provides a flexible way to define rules, allowing administrators to manage incoming and outgoing connections based on different network requirements.
Unlike directly managing low-level firewall rules, firewalld provides an abstraction layer based on zones, services, ports, and interfaces. This approach simplifies firewall administration while maintaining the flexibility required in enterprise Linux environments.
In this article, we will explore the main concepts of firewalld on RHEL 8, including how zones work, how to check the firewall status, and how to configure rules using the firewall-cmd command-line utility.
First and foremost: What is a firewall?
There are various definitions of what a firewall is, and there are many types of firewalls. In simple terms, a firewall is a system (software) responsible for preventing unwanted traffic from the outside network from reaching your system.
A firewall system can be based on hardware (a dedicated appliance to run the firewall software) or on software (a system installed on supported hardware to perform firewall decisions).
In general, firewalls have rules to decide which traffic to allow in or out (it can filter the traffic based on its rules). In this context, Red Hat Enterprise Linux (and most Linux flavors) has a firewall working as a daemon, responsible for providing this level of security.
What is firewalld?
The “firewalld” is the default dynamic firewall manager on RHEL and its derivatives. It abstracts low-level iptables/ip6tables/ebtables rules into zones, services, and rich rules, making firewall administration more intuitive and script-friendly. It is a firewall service that provides a host-based customizable firewall via the D-bus interface.
Core concepts of firewalld:
- Zones: Predefined trust levels (e.g.,
public,internal,trusted) that group interfaces/connections. - Services: Named bundles of ports/protocols (e.g.,
http,ssh). - Ports: Individual TCP/UDP port numbers (e.g.,
8080/tcp, 53/udp). - Sources: IP addresses or networks (e.g.,
192.168.1.0/24). - Interfaces: Network interfaces (e.g.,
eth0) assigned to zones. - Runtime vs. Permanent: Runtime changes apply immediately but don’t survive a reload; permanent changes do.
To check the firewalld status:
systemctl status firewalldTo confirm if firewalld is configured to start at the system boot:
systemctl is-enabled firewalld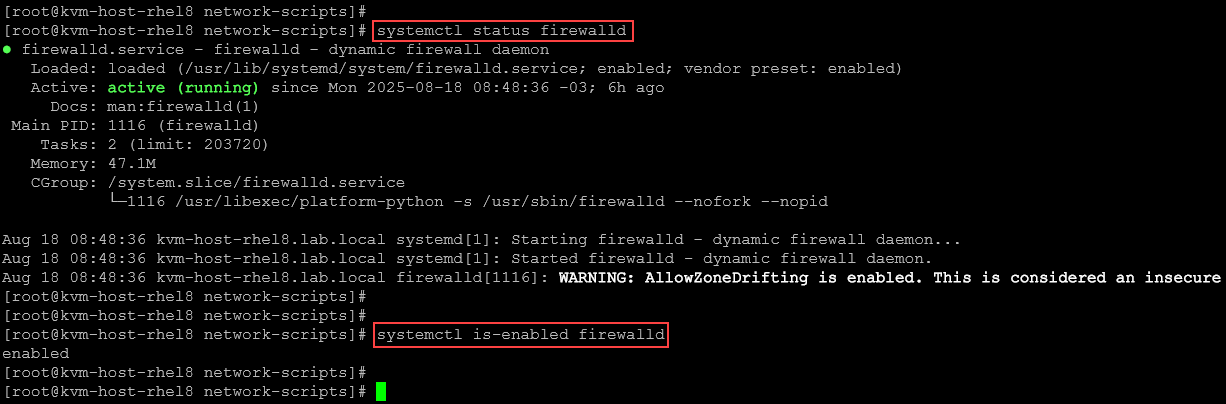
We can also use the following command to verify if firewalld is running:
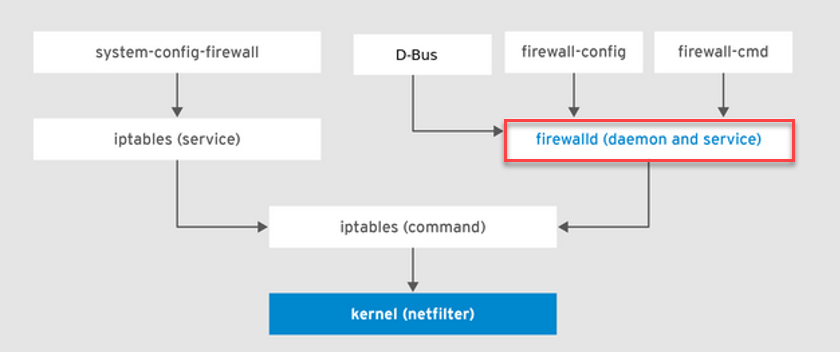
firewall-cmd --stateNote: If you run “iptables -L”, for instance, you probably will see a lot of firewall rules. As we told you before, the firewalld is like a “front-end” for iptables and is responsible for managing all firewall rules.
The following picture shows where the firewalld resides and how it interacts with other related components:
Some firewalld Utilities
There are some firewalld utilities. They are:
| Utility | Purpose |
|---|---|
| firewall-cmd | Primary CLI for runtime & permanent changes |
| firewall-offline-cmd | Configure files offline (before firewalld starts) |
| firewall-config | GTK GUI for graphical rule management |
| firewall-applet | System tray applet for quick zone/service toggling |
Firewall Zones
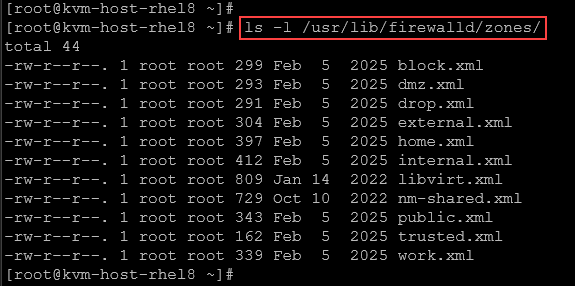
The firewalld service uses a concept of zones. We can assign network interfaces to these zones and decide which kind of traffic can be filtered (what traffic can enter or not enter the host). We can use Network Manager to assign interfaces to particular zones using the firewall-cmd. The default zones are stored under the /usr/lib/firewalld/zones/ directory:
Each zone defines a default policy for incoming traffic. Let’s explore some of the pre-defined zones:
| Zone | Trust Level | Typical Use |
|---|---|---|
| drop | Highest block | Block all incoming, no reply |
| block | Block but reply ICMP | Block and send “host unreachable” |
| public | Moderate, default | General public-facing servers |
| external | For routers/firewalls | Masquerade and forward traffic |
| internal | More trusted LAN | Internal networks |
| home | High trust | Home/office networks |
| work | High trust | Corporate networks |
| trusted | All traffic allowed | Fully trusted environment |
| dmz | Limited internal connections | Expose services to Internet with minimal internal access |
Note: One of these zones can be set as the default per the user’s needs. After the installation, the public zone is set as the default, which we can change later.
To list details of the default zone:
firewall-cmd --list-all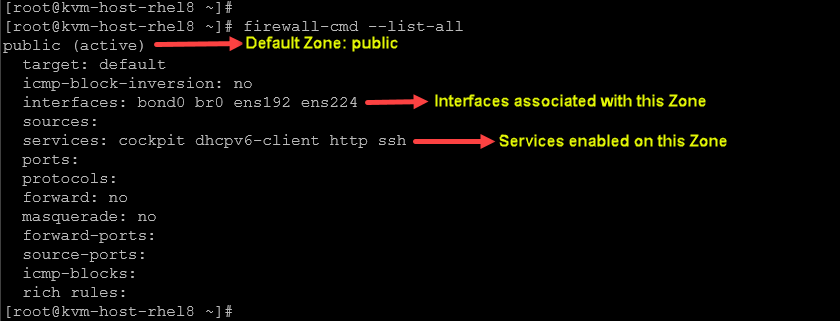
We can also use the following command to get the default zone:
firewall-cmd --get-default-zoneA zone configuration can exist, but cannot be active. To get only the active zones:
firewall-cmd --get-active-zonesExample:
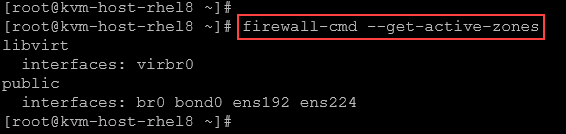
To get all zones (active and not active):
firewall-cmd --get-zonesExample:

If you wanna change the default zone, the syntax is:
firewall-cmd --set-default-zone=<zone> # Replace <zone> by the name of the zoneTo list all zones with their configurations:
firewall-cmd --list-all-zonesExample:
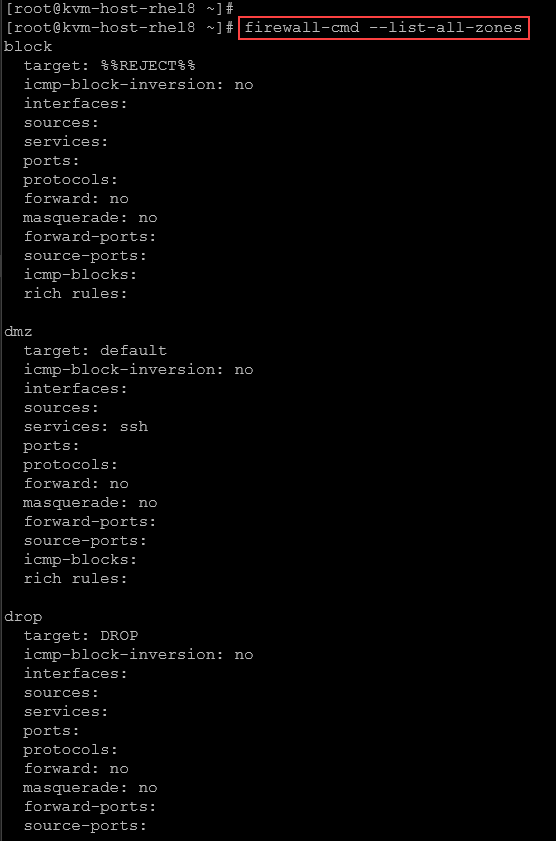
So, to get all configurations for the default zone, we can:
1- Get the default zone:
firewall-cmd --get-default-zone2- Check if the default zone is active:
firewall-cmd --get-active-zone3- Get details of the default zone. In this case, for instance, the default zone is “public”:
firewall-cmd --list-all --zone=public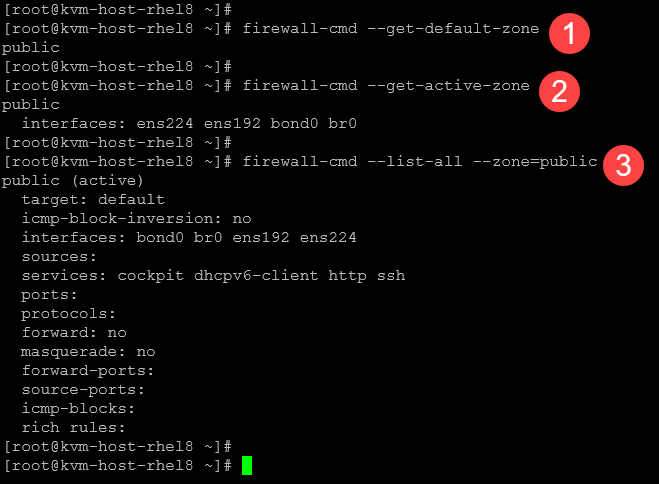
To add a new custom zone:
firewall-cmd --permanent --new-zone=MyZone # "MyZone" is the zone nameAfter adding the new zone, reload the firewalld and inspect the zones:
firewall-cmd --reload
firewall-cmd --get-zones
By default, the new zone has no interfaces, services, or protocols:
firewall-cmd --list-all --zone=MyZone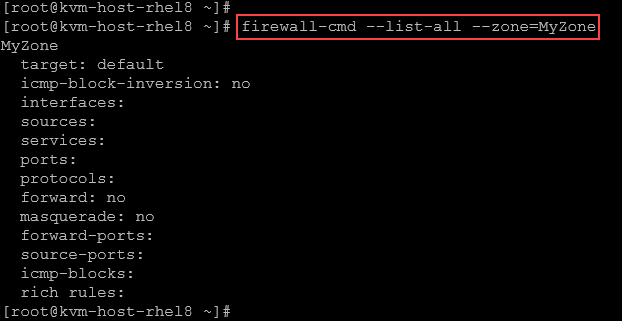
To assign an interface to a zone:
# Permanent assignment
sudo firewall-cmd --permanent --zone=MyZone --change-interface=eth0

# Runtime assignment
sudo firewall-cmd --zone=MyZone --add-interface=eth0
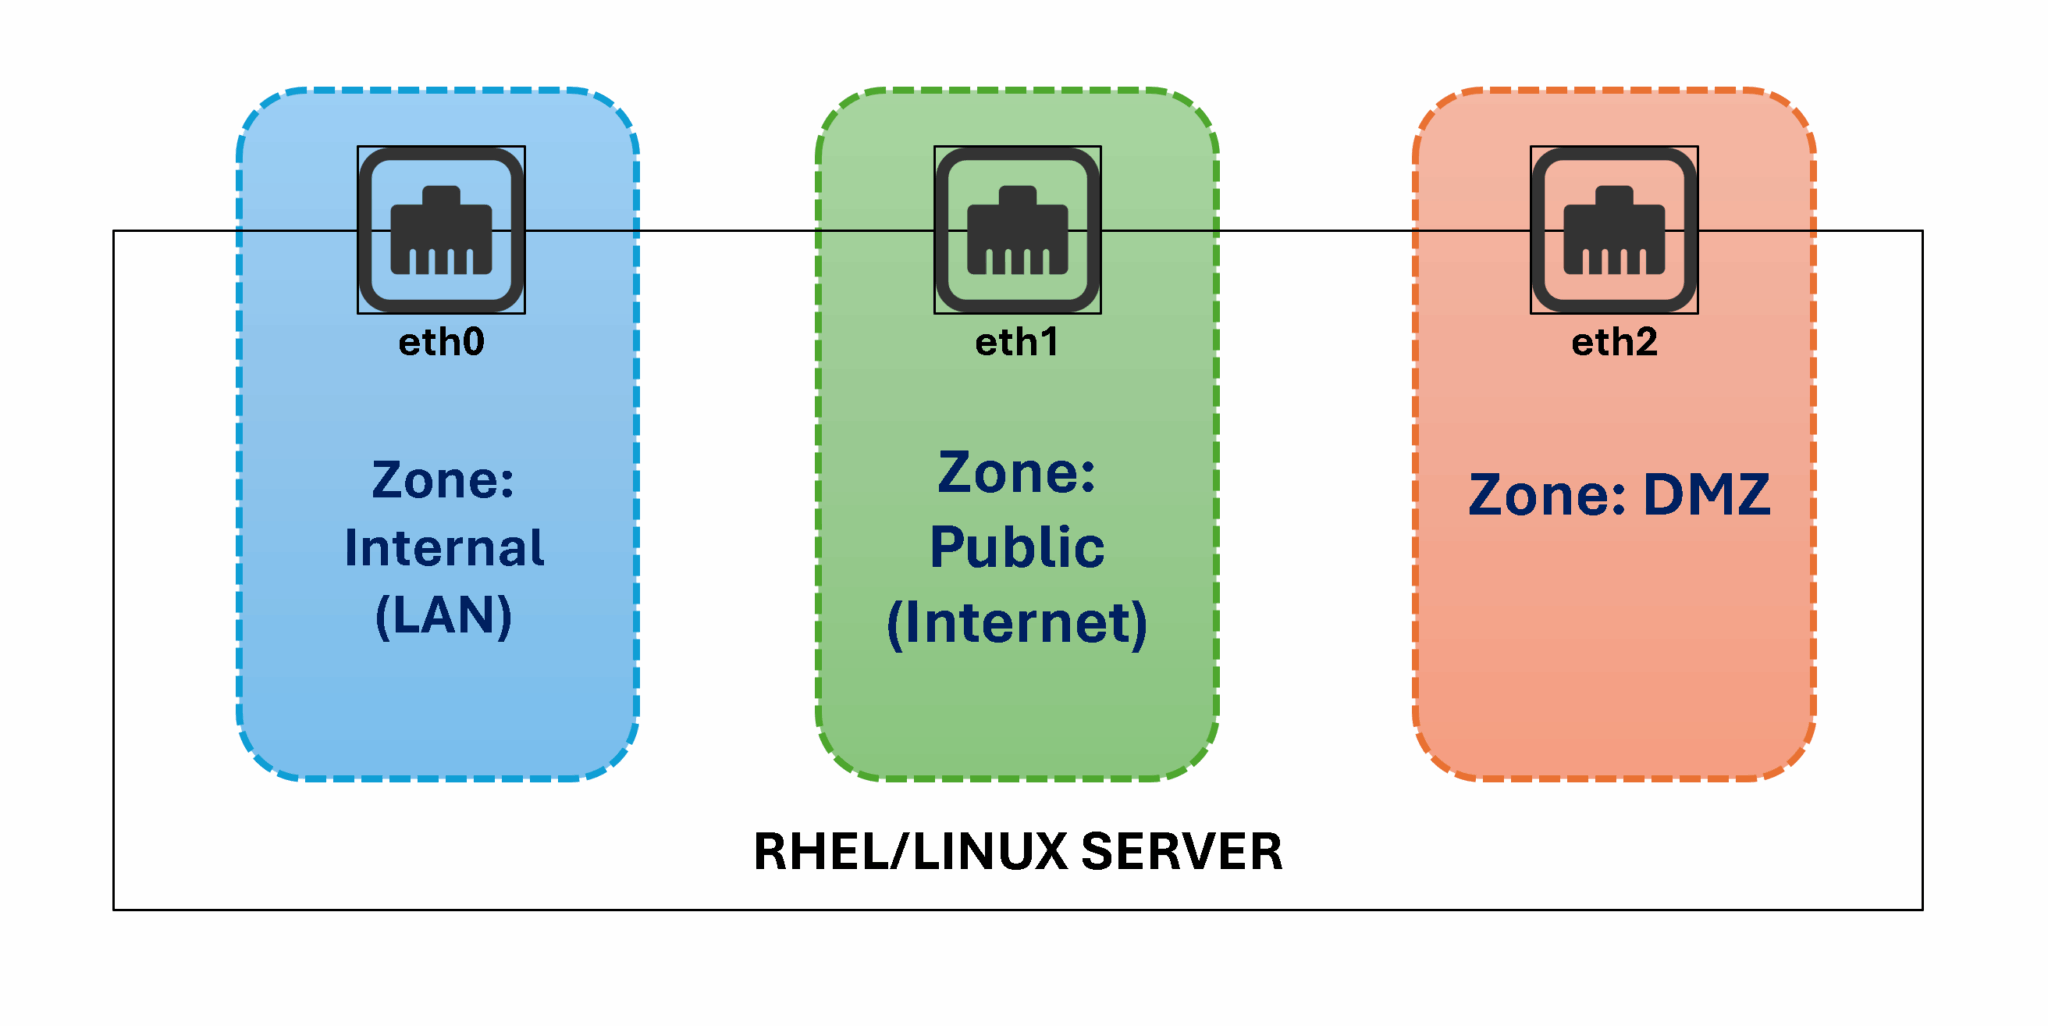
To wrap this up, imagine a Linux server with three Ethernet interfaces:
- One interface can be used for the internal traffic (also known as LAN traffic).
- One interface dedicated to Internet connection (WAN traffic).
- And the last one used by DMZ traffic.
- Each interface can be placed in a specific Zone:
- Zone Internet –> eth0
- Zone Public –> eth1
- Zone DMZ –> eth2
- In this approach, we can control what services and ports will be allowed on each Zone:
Services, Ports, Sources, Interfaces
Services are pre-defined configuration that specifies what TCP/UDP ports are used for a specific service. For example, HTTP uses the TCP protocol on port 80. HTTPS uses the TCP protocol on port 443, etc.
To list all built-in services:
firewall-cmd --get-servicesExample:

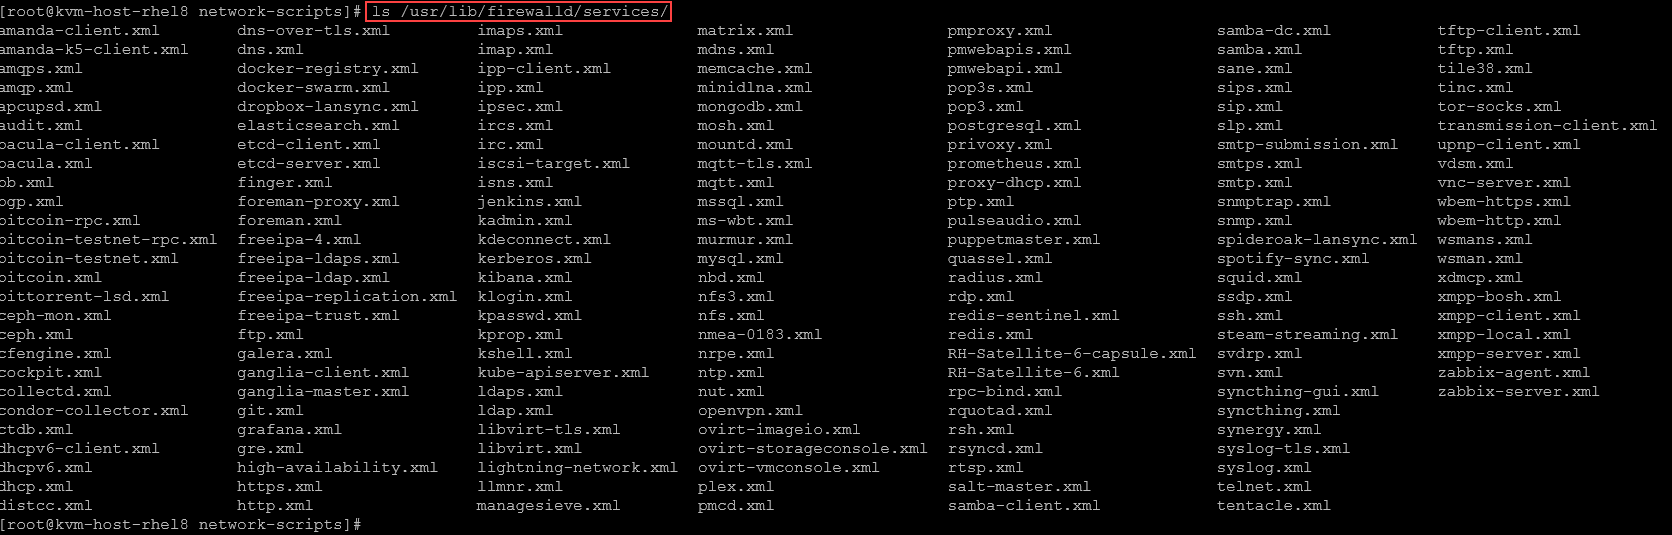
Each built-in service has its configuration file under /usr/lib/firewalld/services:
As we have seen, the default zone has some allowed services:
firewall-cmd --list-all --zone=public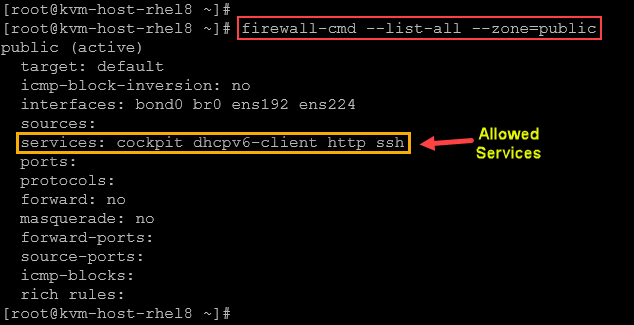
To allow a new service (https, for instance):
1- Confirm the service name:
firewall-cmd --get-services | grep -i https2- Allow the service:
firewall-cmd --zone=public --add-service=https
3- Inspect the zone details to confirm if the new service was added successfully:
firewall-cmd --list-all --zone=public | grep services
Notes:
- The service was added to the firewalld “runtime”. It means that this configuration is not permanent and will be lost if you restart the firewalld service or reboot the system.
4- To make the allowed service permanent:
firewall-cmd --zone=public --add-service=https --permanent
firewall-cmd --reload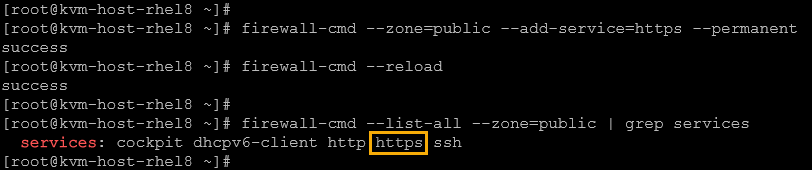
In addition to service, we can open a logical port. For example:
firewall-cmd --zone=public --add-port=8080/tcpIn this example, we’re opening the TCP port 8080:
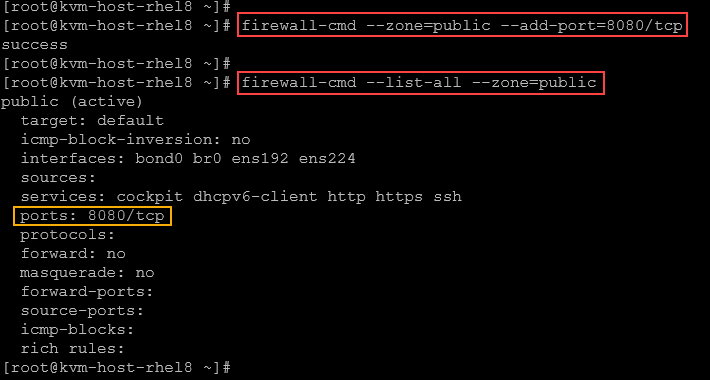
Specifying a logical port is a way to allow a TCP/UDP port for custom services (not built-in services), for example.
Note: To make this configuration permanent:
firewall-cmd --permanent --zone=public --add-port=8080/tcp
firewall-cmd --reload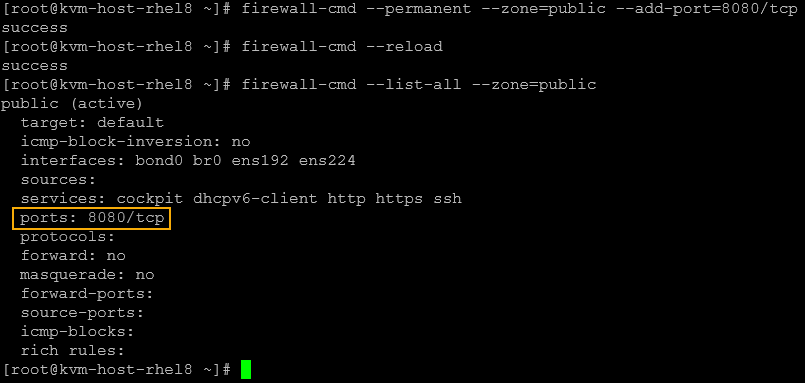
To allow source (CIDR):
firewall-cmd --zone=public --add-source=10.0.0.0/24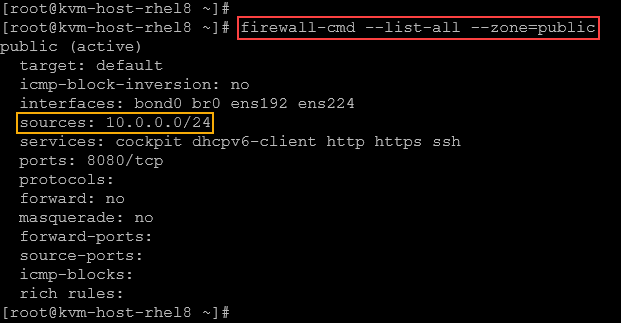
Note: Any packet originating from 10.0.0.0/24 is also evaluated against the public zone, even if it arrives on an unassigned interface – it simply adds that network to the zone in addition to the listed interfaces. It means that all packages from the network 10.0.0.0/24 are also evaluated against the public zone, even if they arrive on an unassigned interface!
Runtime vs. Permanent Configuration
As we told you before, every configuration made with “firewall-cmd” without the parameter “permanent” will be lost if we reload the firewalld configuration or reboot the system. It means that the configuration is only available at the runtime (memory) space.
Always pair runtime and permanent changes when prepping production. Examples:
1- Runtime only (lost on reload):
firewall-cmd --zone=public --add-port=22/tcp2- Permanent only (won’t apply until reload):
firewall-cmd --permanent --zone=public --add-port=22/tcp
firewall-cmd --reload
Important Notes:
- The first example, the TCP port 22 will be opened immediately. However, if the firewalld rules are reloaded, this configuration is not permanent and the port will be closed (because it is not in the firewalld rules configuration).
- The second example, TCP port 22, will be opened in the configuration file only, and not in the runtime environment. To effectively open the port, we need to reload the firewall rules.
3- To commit both (add the port on the runtime and make it permanent):
firewall-cmd --zone=public --add-port=22/tcp
firewall-cmd --permanent --zone=public --add-port=22/tcp
firewall-cmd --reload
Rich Language & Direct Rules
Rich rules provide fine-grained control beyond services/ports.
Suppose that you want to block all traffic from the network 203.0.113.0/24 to the local system:
firewall-cmd --zone=public --add-rich-rule='rule family="ipv4" source address="203.0.113.0/24" drop'As we can see, the rich rule was added to the public zone’s configuration:
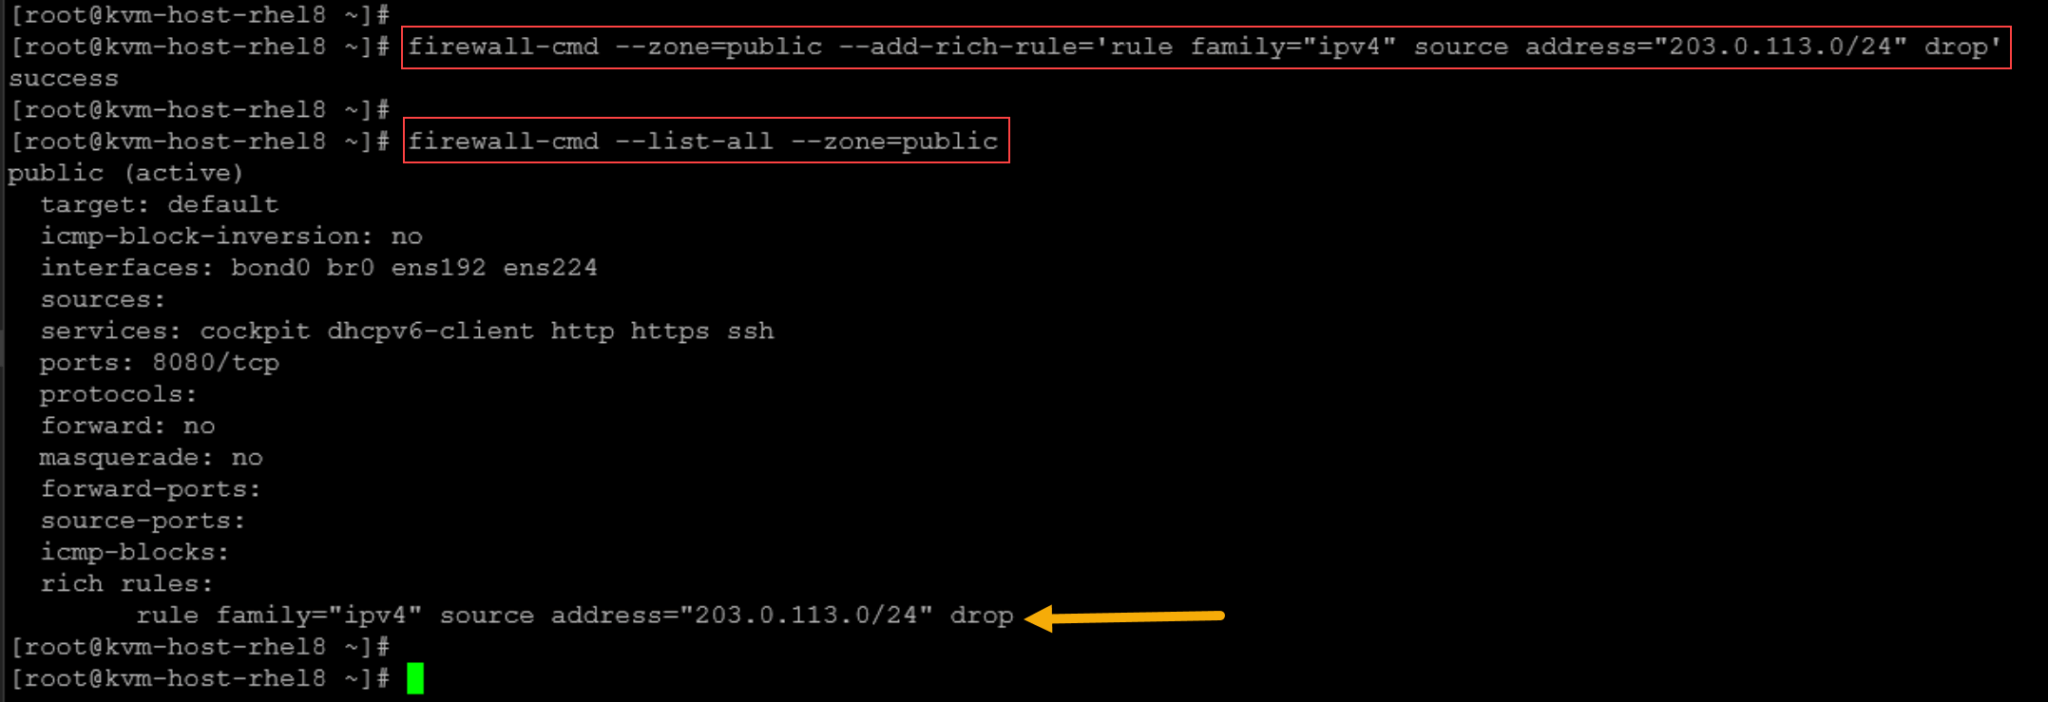
Note: Remember that this rule will not be permanent. Reloading the firewalld rules, this configuration is lost:
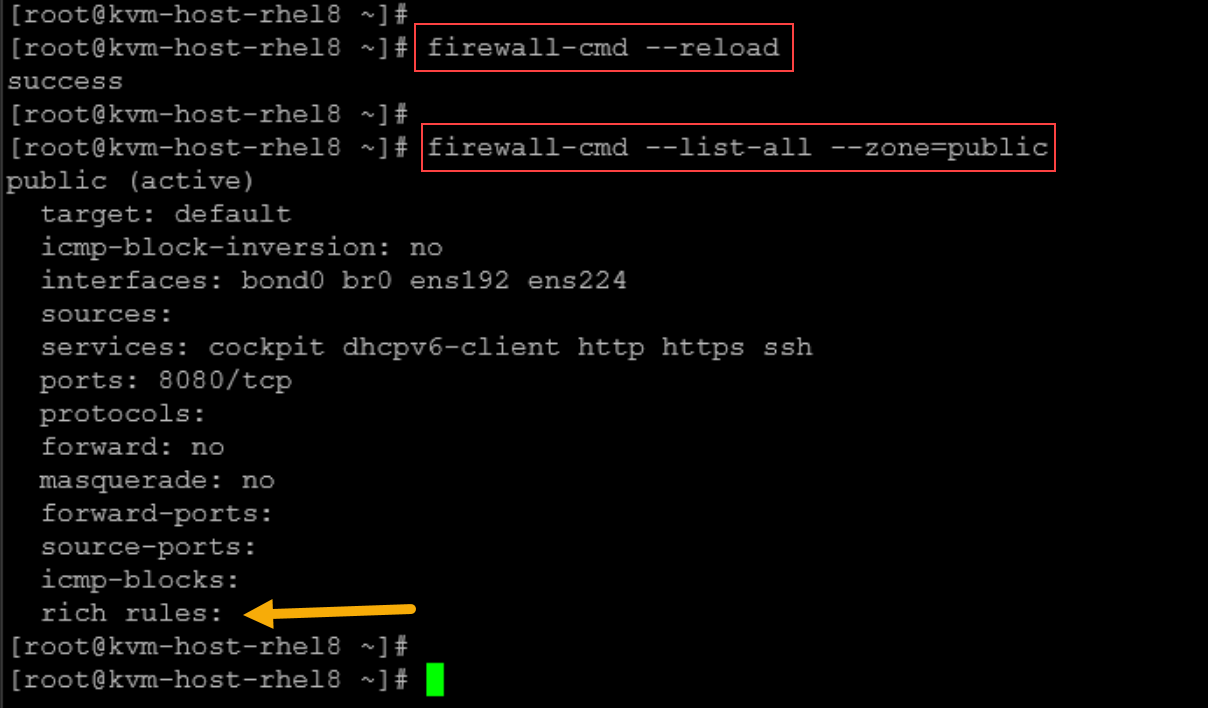
Direct rules let you inject raw iptables/ebtables. For example:
firewall-cmd --direct --add-rule ipv4 filter INPUT 0 -p tcp --dport 6666 -j ACCEPTIn this rule:
- We’re injecting an iptables rule using firewall-cmd.
- The rule is placed in the iptables OUTPUT chain, allowing the TCP traffic on the destination port 6666.
- Don’t forget: This rule is in the runtime environment. If the firewalld rules are reloaded, they will be lost.
IPSets
IPsets are a group of IP addresses. Use IPSets to manage large sets of IP addresses efficiently. For example:
# Create an ipset
firewall-cmd --permanent --new-ipset=blacklist --type=hash:ip

# Add addresses
firewall-cmd --permanent --ipset=blacklist --add-entry=198.51.100.23
firewall-cmd --permanent --ipset=blacklist --add-entry=11.51.200.59

# Block that set
firewall-cmd --permanent --zone=public --add-rich-rule='rule source ipset="blacklist" drop'

# Reload the rules to apply
firewall-cmd --reload
To wrap this up, let’s provide one more practical example of using firewalld:
1- On the server, run a simple Python3 HTTP server on TCP port 8000:
python3 -m http.server 8000
2- On the client, try to access this service. By default, this TCP port is blocked on the server side:
curl http://192.168.255.168:8000
3- On the server, open the TCP port 8000:
firewall-cmd --zone=public --add-port=8000/tcp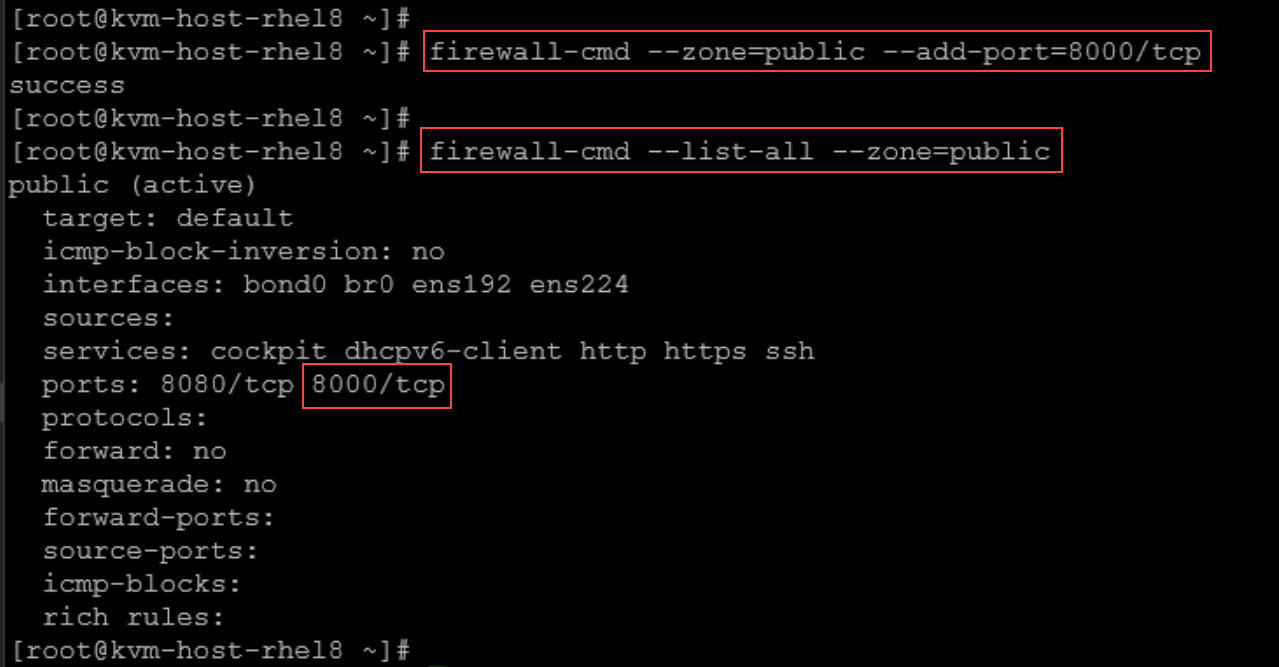
4- On the client, try to reaccess the service on port TCP 8000. Now we can see that the connection works:
curl http://192.168.255.168:8000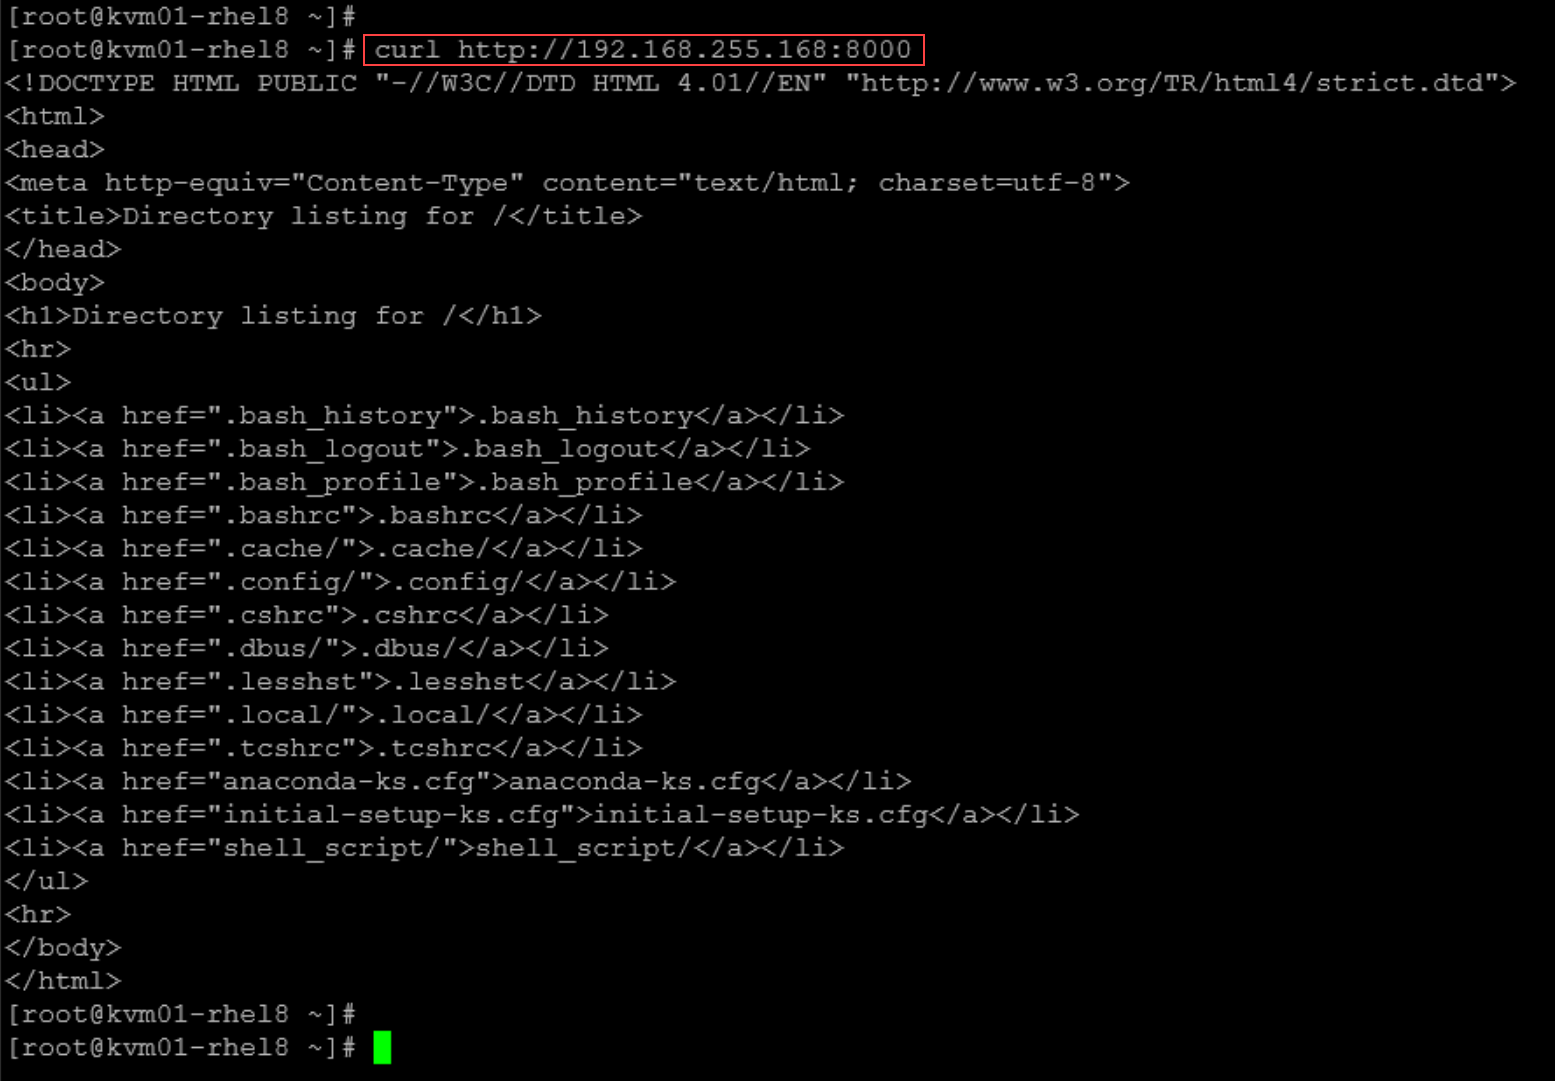
Again, remember that this configuration is not permanent. To make it permanent:
firewall-cmd --permanent --zone=public --add-port=8000/tcp
firewall-cmd --reload
That’s it for now 🙂
As a reminder, we showed an introduction to firewalld. However, it can be a starting point to know about this powerful tool!
