

Lustre is a parallel file system designed for workloads that need shared access to large datasets and high aggregate throughput. It is widely used in high-performance computing (HPC), where many clients may access data across multiple storage targets.
Unlike a conventional local file system, Lustre separates file metadata from file data. Metadata services manage names, directories, permissions, and file layouts. Storage services provide the file contents, and clients can access data directly from the servers hosting the relevant targets. This separation enables parallel I/O, but performance depends on the workload, network, client configuration, and storage hardware.
This article explains the main Lustre components—MGS/MGT, MDS/MDT, OSS/OST, clients, and LNet—and shows how file layouts and striping affect data placement. It is an architecture overview, not an installation guide; see the official Lustre Quick Start Guide for a minimal deployment walkthrough.
Lustre is one example of the storage layer used in some HPC environments. For a broader overview of how compute, networking, storage, and workload scheduling fit together, read Inside an HPC Cluster: How Slurm Powers Parallel Computing.
Where Lustre Fits in HPC Workloads
Lustre is designed for environments where multiple compute clients need shared access to large datasets. Examples include scientific simulations, data-intensive research, rendering, and some AI or machine-learning workflows. These examples describe common use cases, not a guarantee that Lustre will improve every workload.
The benefit depends on how an application accesses data. Large files or concurrent access to shared files may benefit from parallel I/O across multiple storage targets. Workloads dominated by small files or metadata operations may be limited by different parts of the system. Benchmark with representative data and application behavior before changing a production layout.
Main Components of Lustre File System
The Lustre file system is built from three main server roles + clients. Let’s discuss some details of each server role and the client role:
MGS – Management Server:
- The MGS provides configuration information for the Lustre filesystem. Its persistent configuration information is stored on a Management Target (MGT).
MDS – Metadata Server:
- The MDS provides metadata services for the filesystem using one or more Metadata Targets (MDTs).
- The Metadata Server (MDS) does not store the actual file data. It manages metadata and file layout information, while clients communicate directly with the OSSs for file data I/O.
Important: "file data" and "file metadata" aren't the same thing (they're fundamentally different, especially in distributed systems like Lustre).

File data:
-- The actual contents of the file.
-- What users/applications read and write.
-- Examples:
Text inside a .txt file;
Pixels in an image;
Bytes of a database file.

File metadata:
-- Describes the file, not its content.
-- Examples:
File name;
Size;
Permissions (rwx);
Owner/group;
Timestamps (created, modified);
FID (in Lustre);
Striping layout (which OSTs hold the data).

----- Make sure to understand this point before going ahead! -----
OSS – Object Storage Server:
- This server role is responsible for handling actual file data (and not file metadata).
- Provides file I/O services and handles networking requests for one or more local OSTs:
- The OSS uses an Object Storage Target (OST) to store the file data.
- The user file data can be split (or cannot) into multiple objects/chunks, and each one can be stored on OSTs.
- Each OSS usually manages multiple OSTs.
- So, this is why Lustre file system is fast:
- Multiple servers read/write in parallel.
Clients:
- The Lustre clients run the Lustre client software.
- They mount the Lustre file system to use it:
- Afterward, they use the file system like a normal directory. For example:
- cd /mnt/lustre
- Afterward, they use the file system like a normal directory. For example:
The following picture shows, in a simple way, the Lustre file system architecture and all the components that we’ve seen before:
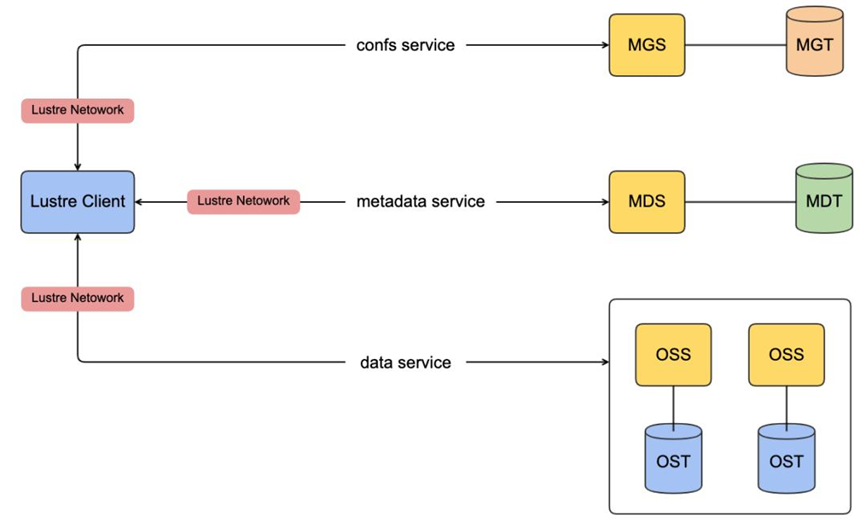
Lustre Networking (LNet):
- LNet is a custom networking API that provides the communication infrastructure for handling metadata and file I/O for the Lustre servers and clients.
Summary of the Main Components of Lustre
| COMPONENT | ROLE |
| MGS (Management Server) | Cluster/filesystem configuration |
| MGT (Management Target) | Storage unit inside MGS |
| MDS (Metadata Server) | File Metadata (names, directories, permissions, file layout) |
| MDT (Metadata Target) | Storage unit inside MDS |
| OSS (Object Storage Server) | File data |
| OST (Object Storage Target) | Storage units inside OSS |
| Clients | Access the Lustre filesystem |
Lustre Cluster
At scale, a Lustre file system cluster can include hundreds of OSSs and thousands of clients. As we can see in the following picture, more than one network type can be used:
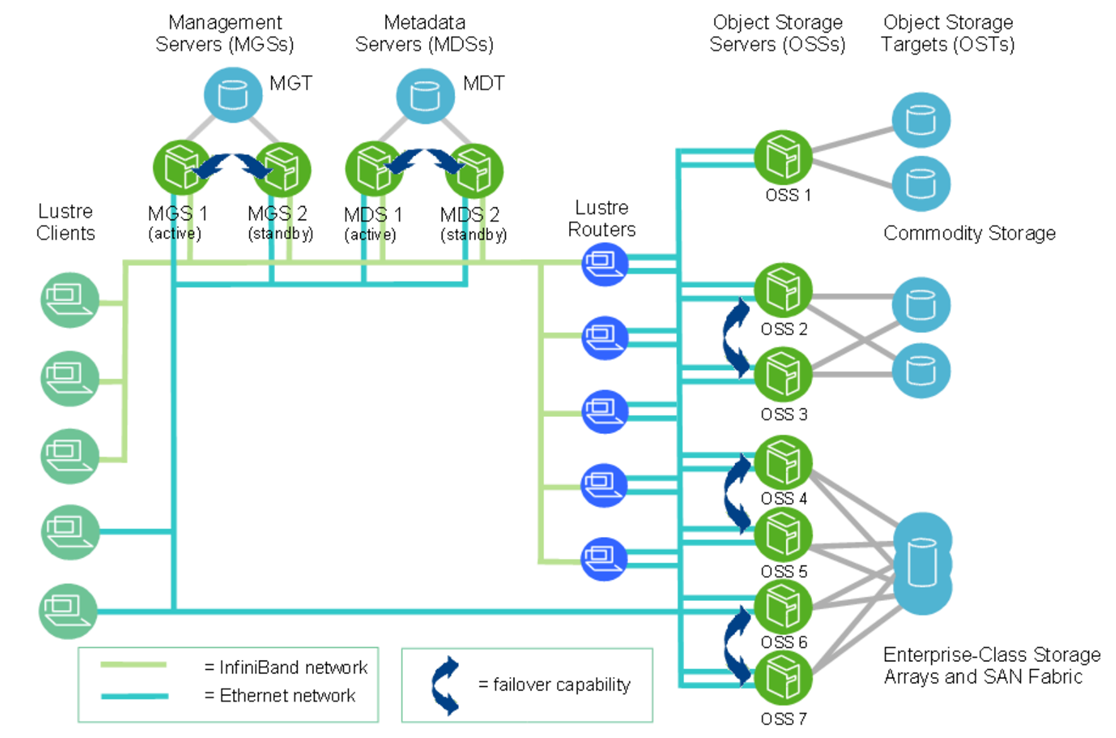
Note: This picture is from Lustre documentation (https://doc.lustre.org/lustre_manual.pdf).
Lustre File System Storage and I/O
What is a FID (File Identifier)?
A FID is a unique internal identifier for files/objects in Lustre (like an inode in local filesystems).
It is 128-bit, composed of:
- SEQ (64-bit) – unique across the entire filesystem.
- — OID (32-bit) – object ID.
- — Version (32-bit).
Why are FIDs important?
Ensure global uniqueness across all MDTs and OSTs. Then, it avoids conflicts from underlying filesystem inode duplication. The SEQ helps map a file/object to a specific MDT or OST.
Where the file data location is stored:
Stored in an extended attribute called layout EA (on MDT).
Layout EA:
Points to object(s) on OST(s) that contain file data. Behavior:
- 1 object –> Entire file stored on one OST.
- Multiple objects –> File is striped (RAID 0) across multiple OSTs.
LFSCK (Consistency Tool): Lustre uses LFSCK to verify and repair metadata. Checks FID in directory entries and rebuilds if missing/invalid.
Verifies linkEA (extended attribute):
- Stores file name + parent ID.
- Can reconstruct the full file path from the FID alone.
The following picture shows an example of those components:
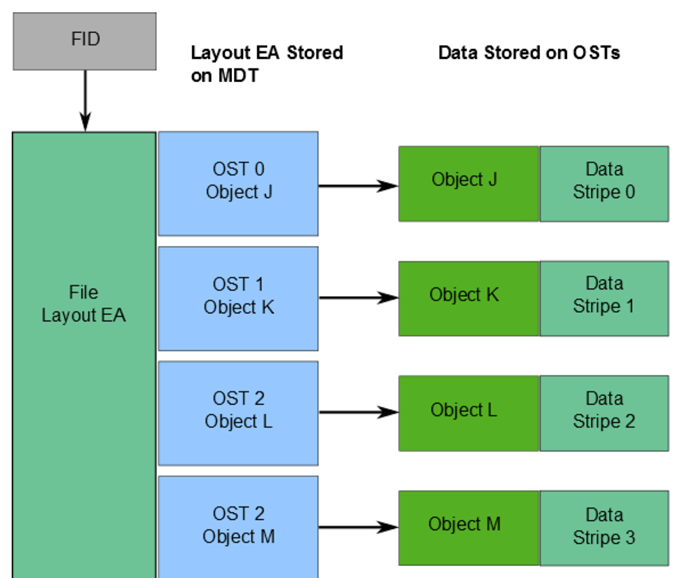
Lustre File Striping
Striping distributes a file’s data across the OSTs named in its layout. The stripe_count indicates how many OSTs participate in that layout. The stripe_size indicates how much data is written to one stripe before the layout advances to the next OST. Striping can increase the aggregate bandwidth available to a large file, but a wider layout is not automatically better for every workload.[2]
The effective layout can come from the file system, a parent directory, or an explicit setting on the file. Defaults therefore depend on the configuration of the Lustre environment. Inspect the actual default for a directory with:
lfs getstripe -d /lustreInspect the layout of an existing file with:
lfs getstripe /lustre/testfileWhy striping is useful:
- Considering high performance, multiple OSTs can be accessed in parallel, increasing the total bandwidth.
- Given better capacity, a file can span multiple OSTs if a single OST doesn’t have enough space.
How striping works:
- A file is divided into chunks (called stripes).
- Each chunk is stored in a different object on an OST.
- Key behavior: When the data written exceeds the “stripe_size”, the next chunk goes to the next OST. This continues in a round-robin cycle.
Key configuration parameters:
- stripe_count: The number of OSTs used in the specific file or directory.
- stripe_size: The size of each chunk before moving to the next OST.
Customization: Users can configure striping:
- Per file.
- Per directory.
This is done using tools like: lfssetstripe.
Examples:
File A:
-- stripe_count= 3 --> The “file a” spreads across 3 OSTs.

File B & C:
-- stripe_count= 1 --> stored on a single OST.

File C:
-- Larger stripe_size --> More data per chunk is used before switching to another OST.
The following picture shows the details of the previous example:
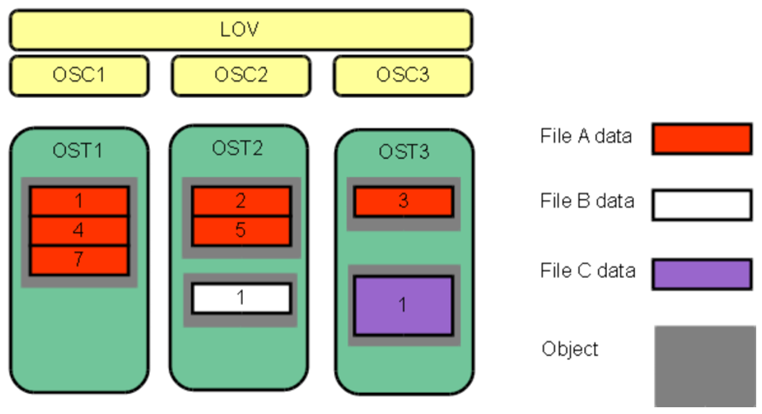
Important:
LOV = Logical Object Volume
OSC = Object Storage Client

A logical object volume (LOV) aggregates the OSCs to provide transparent access across all the OSTs.
Let’s provide an example:
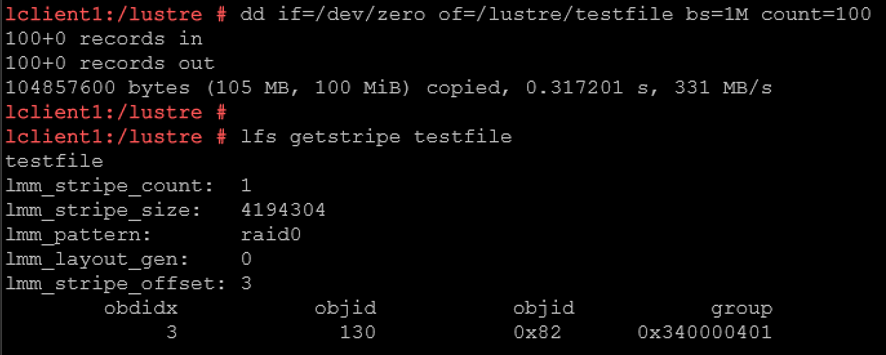
The command:
dd if=/dev/zero of=/lustre/testfile bs=1M count=100…. creates a 100 MiB file with ~331 MB/s write speed.
The “lfs getstripe” command means:
lmm_stripe_count: 1
— The entire 100 MiB file is stored on a single OST.
— No parallelism here.
lmm_stripe_size: 4194304
— Data is written in chunks of 4 MB.
— But since stripe_count= 1 → all chunks go to the SAME OST.
lmm_pattern: raid0
— This is striping mode (RAID0 style).
— No redundancy.
— Pure performance distribution.
lmm_stripe_offset: 3
— First OST used. OST index 3 (So the file is stored on OST0003).
obdidx: 3 –> OST index 3.
objid: 130 –> internal object ID inside that OST.
To recap:
Default Lustre Stripe size is 1M, and Stripe count is 1:
— Each file is written to 1 OST with a stripe size of 1M.
— When multiple files are created and written, the Metadata Server (MDS) will do best effort to distribute the load across all available Object Storage Targets (OSTs).
The default stripe size and count can be changed:
— Smallest stripe size is 64K and can be increased by 64K, and the stripe count can be increased to include all OSTs.
— Changing the stripe count to all OSTs indicates each file will be created using all OSTs. Increasing the stripe count can help when a large file needs bandwidth beyond what a single OST can provide, or when many clients access the same file concurrently. It is not a universal performance setting: a wide layout can add overhead, especially for small files. Test striping choices with the application’s workload and the filesystem’s configuration.
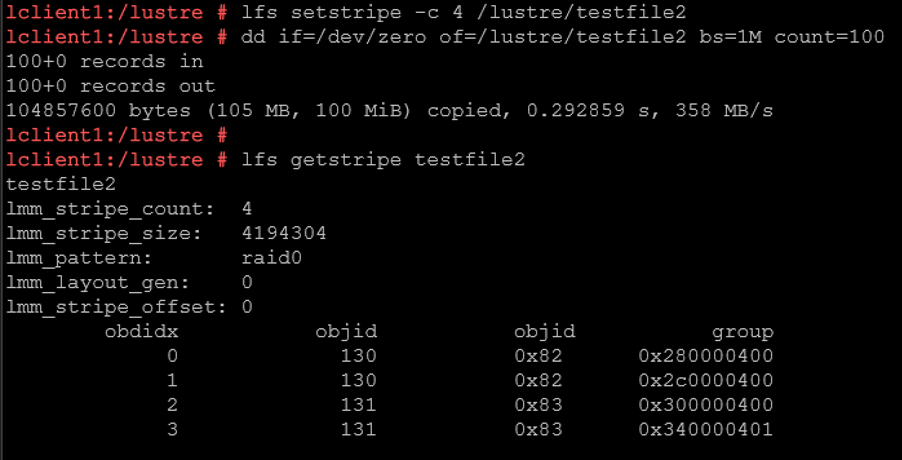
For example:
lfs setstripe -c 4 /lustre/testfile2
dd if=/dev/zero of=/lustre/testfile2 bs=1M count=100
lfs getstripe /lustre/testfile2
— The “testfile” will be split across 4 OSTs.
— Striping the file across four OSTs can increase aggregate throughput by allowing multiple storage targets to participate in the I/O operation. The actual performance gain depends on the workload, clients, network, OSSs, OSTs, and underlying storage.
— The file is distributed across ALL 4 OSTs.
Lustre Striping: Write-Path
A simplified write operation has two distinct parts:
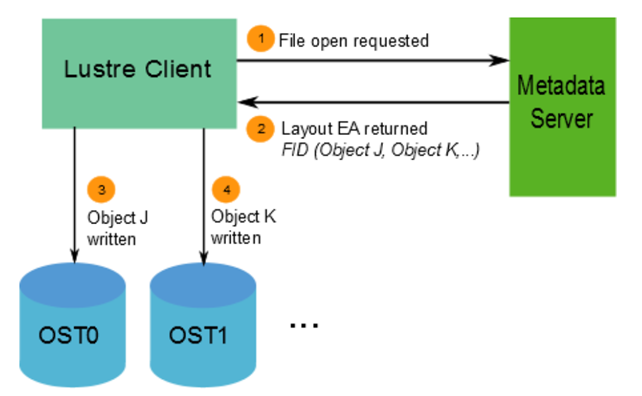
- Metadata and layout lookup: The client contacts the MDS for the file operation and obtains the layout that identifies the OSTs used by the file.
- File-data I/O: The client sends file data directly to the OSSs that serve those OSTs. If the file is striped across multiple OSTs, the client can issue I/O to multiple OSSs according to the layout.
The MDS manages metadata operations, but it is not in the bulk file-data path. The exact sequence of metadata operations depends on the operation and file-system state, so avoid presenting a simplified “final update” to the MDS as a universal last step.
⚡ Why this is powerful (important for HPC):
-- Parallel writes = 🚀 high throughput.
-- Multiple disks are used simultaneously.
-- Bottleneck avoided on a single disk.
Lustre Striping: Read-Path
For a read, the client first obtains the required file metadata and layout from the MDS. The layout identifies the OST objects that contain the file’s data. The client then reads directly from the OSSs serving those OSTs. When the layout spans multiple OSTs, the client can read from multiple storage targets according to that layout.[1]
This separation keeps the MDS responsible for metadata services while the OSSs handle bulk file-data I/O. Details such as timestamps and other metadata updates depend on file-system configuration and the operation, so they should not be reduced to a blanket “no metadata update” statement.
Keep in mind:

👉 Write path = client pushes data to OSTs
Client → MDS → Client → OSS/OST (parallel) → ACK → MDS (finalize)

👉 Read path = client pulls data from OSTs
Client → MDS → Client → OSS/OST (parallel reads)
From Lustre Architecture to Administration
Lustre separates management, metadata, and file-data services so that clients can access data from the OSSs that serve the file’s OST layout. Striping can let a single file use multiple targets, but the right layout depends on the workload and the file system’s effective configuration. Use lfs getstripe to inspect layouts, and benchmark representative workloads before applying tuning changes.
After learning how the Lustre components and file layouts fit together, continue with Lustre Filesystem Commands: A Practical Admin Guide for commands to inspect mounts, capacity, file layouts, targets, and LNet connectivity.
External References
- Lustre Software Release 2.x — Operations Manual Official Lustre administration reference covering filesystem architecture, servers and targets, client operation, file layouts, striping, LNet, administration, recovery, and troubleshooting.
- Lustre Architecture for Administrators Overview of Lustre components including MGS, MDS, OSS, MGT, MDT, OST, clients, and the path used for metadata and parallel file data I/O.
- Lustre Networking (LNet) Overview Official introduction to the Lustre networking layer, including Ethernet, InfiniBand, RDMA, LNet drivers, routing, and communication between Lustre clients and servers.
-
Configuring Lustre File Striping
Lustre documentation explaining stripe count, stripe size,
OST selection, directory defaults,
lfs getstripe,lfs setstripe, and Progressive File Layouts. - Understanding Lustre Internals Technical reference covering Lustre file layouts, FIDs, metadata, OST objects, LOV and OSC concepts, and internal read and write behavior.
- Lustre File System Checker (LFSCK) Official Lustre documentation for checking and repairing MDT, OST, FID, LinkEA, and cross-reference consistency within a Lustre filesystem.
- Lustre Quick Start Guide Practical Lustre reference covering basic server targets, client mounting, filesystem verification, and common administration commands.
