


This article explains what shell scripting is and provides some examples of usage. We’re using Red Hat Enterprise Linux, but all commands work in any Linux flavor.
First and foremost: What is Shell Scripting?
In Linux, a shell script is simply a text file containing commands you would normally type in the terminal, but saved so they can be run together as a program.
To run these commands, we need a command interpreter. The most used command interpreter is the bash (Bourne Again Shell).
Example of a simple shell script:
#!/bin/bash
echo "Hello, World!"
The first script line “#!/bin/bash” is known as a shebang line. This line tells the system to use bash to run the script. So, each shell script must have this line, indicating what command interpreter the system must use to execute the script.
Another essential characteristic: Each shell script must have the “.sh” extension. Independent of whether Linux can handle or not file extensions, it is a good practice to specify the “.sh” extension on each shell script file 😉
Creating and Running Your First Script
1- Create a file using your preferred text editor. In this case, for instance, we’re using the “vi”:
vi hello.sh2- Add the following content to the script file:
#!/bin/bash
echo "Hello, World from RHEL 8!"
3- Make the script file executable, assigning the execution permission to the file (we’ve written an article about Linux permissions. Click here to access this article):
chmod u+x hello.sh4- Execute the script:
./hello.shThe expected result is:

Variables & Printing Output
A variable is just a name that stores a value (like a box with a label).
Rules for variables in bash:
- Variable names usually use uppercase by convention (but it’s not mandatory).
- Do not use $ when defining a variable, but you must use $ when reading a variable.
- Do not use a space in a variable name. Example: VAR_A is accepted; VAR A is not accepted.
Example:
NAME="Thor"       # assign a value to the variable NAME
echo $NAME        # read the value of the variable NAME
To print output, the command “echo” is the simplest way to show text or variable values:

We can use:
- echo -n –> no newline at the end.
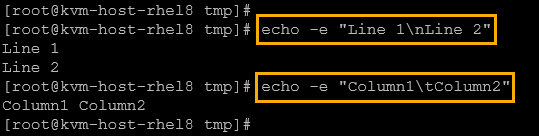
- echo -e –> interpret escape characters like \n (new line) or \t (tab).
Example:
Let’s create a script using some variables:
1- Create a script file:
vi lesson1.sh2- Add the following content to the file:
#!/bin/bash
# Lesson 1 - Variables and Printing Output

NAME="Thor"
CITY="Sao Paulo"

echo "Hello, my name is $NAME"
echo "I live in $CITY"
echo -e "Nice to meet you!\nWelcome to Shell Scripting."
3- Assign execution permission to the script file:
chmod u+x lesson1.sh4- Run the script:
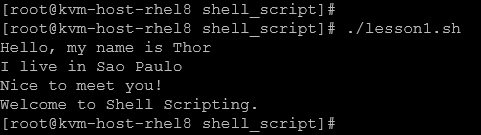
./lesson1.shThe expected output is:
Let’s create one more script, reading variables from the user:
1- Create a script file:
vi lesson1_user_input.sh2- Add the following content:
#!/bin/bash
# Ask user for name and city

read -p "Enter your name: " NAME
read -p "Enter your city: " CITY

echo "Hello, $NAME from $CITY!"
3- Make it executable:
chmod u+x lesson1_user_input.sh4- Run it:
./lesson1_user_input.shThe expected output is:
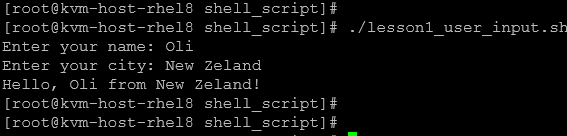
Note: In this case, as we can see, the script asked the user to enter the values and saved them into variables!
Command-Line Arguments
Sometimes, instead of asking the user with “read”, we’ll want to pass values directly when running the script – this option is perfect for automation 🙂
When working with arguments, we need to learn about some special variables:
- $0 –> it means the script file name
- $1 –> it means the first script argument
- $2 –> it means the second script argument
- $3 –> it means the third script argument
- $@ –> it means all script arguments (print all passed arguments)
- $# –> it means the number of arguments passed (print the number of specified arguments)
Let’s provide an example:
1- Create a script file:
vi lesson2.sh2- Add the following content:
#!/bin/bash
echo "First argument: $1"
echo "Second argument: $2"
echo "All arguments: $@"
echo "Number of arguments: $#"
3- Assign execution permission:
chmod u+x lesson2.sh4- Using arguments, run the script:
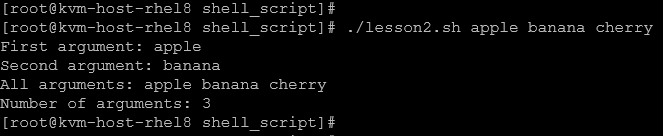
./lesson2.sh apple banana cherryLook at the output:
So, let’s provide one more exercise about using arguments in a script:
1- Create a script:
vi greetings.sh2- Add the following content:
#!/bin/bash
# Lesson 2 - Command-line Arguments

NAME=$1
CITY=$2
BANNER=$3

echo "$BANNER, $NAME from $CITY!"
echo "The number of used arguments were: $#"
3- Mark the script executable:
chmod u+x greetings.sh4- Using arguments, execute the script:
./greetings.sh Thor LA Welcome
Using script arguments, we can check if arguments are missing using “if”. For example:
#!/bin/bash
if [ $# -lt 2 ]; then
    echo "Usage: $0 <name> <city>"
    exit 1
fi

echo "Hello, $1 from $2!"
In the above example, if the total number of arguments is less than 2, an informative message will show, guiding how to use the script!
To create a script to sum two numbers entered by the user:
#!/bin/bash

if [ $# -lt 2 ]; then
 echo "Providing two numeric arguments!"
 exit 1
fi

echo -n "The sum of arguments is: "
echo $(($1+$2))
The user must enter two numbers as arguments. The script handles it and sums the numbers, providing the result on the output:

Making Decisions with Conditionals (if, else, elif)
In a shell script, “if” statements allow us to run different commands depending on a specific condition.
Basic syntax:
if [ condition ]; then
    commands_if_true
fi
Example:
#!/bin/bash
AGE=18

if [ $AGE -ge 18 ]; then
    echo "You are an adult."
fi
Adding “else”:
if [ condition ]; then
    commands_if_true
else
    commands_if_false
fi
Example:
#!/bin/bash
read -p "Enter your age: " AGE

if [ $AGE -ge 18 ]; then
    echo "You can vote."
else
    echo "You are too young to vote."
fi
Adding “elif”:
if [ condition1 ]; then
    commands_if_true
elif [ condition2 ]; then
    commands_if_condition2_true
else
    commands_if_all_false
fi
Example:
#!/bin/bash
read -p "Enter a number: " NUM

if [ $NUM -gt 0 ]; then
    echo "Positive number"
elif [ $NUM -lt 0 ]; then
    echo "Negative number"
else
    echo "Zero"
fi
As we could see, the conditions are vital for the “if” structure.
Inside the conditions, there are many operators that we can use. They are:
For String Comparisons:
| Operator | Meaning |
|---|---|
= | equal |
!= | not equal |
-z | check if a string is empty |
-n | check if a string is not empty |
Example:
NAME="John"
if [ "$NAME" = "John" ]; then
    echo "That's your name!"
fi
For Number Comparisons:
| Operator | Meaning |
|---|---|
-eq | equal |
-ne | not equal |
-gt | greater than |
-lt | less than |
-ge | greater than or equal to |
-le | less than or equal |
Example:
NUM=10
if [ $NUM -gt 5 ]; then
    echo "Greater than 5"
fi
Let’s provide another example. Create a script that:
- Reads a directory path from the user. The script must ask the user to enter a directory path.
- Uses “du -sh” to get its size.
- If the size is greater than 1 GB, print a message “Warning: Directory is large!”.
- Otherwise, print a message “Directory size is OK.”
1- Create the script file:
vi check_dir_size.sh2- Add the script content:
#!/bin/bash
# Check if a directory is larger than 1G

read -p "Enter the directory to check its size: " DIR_TO_CHECK

# Check if dir exists
if [ ! -d "$DIR_TO_CHECK" ]; then
 echo "Error: '$DIR_TO_CHECK' is not a valid directory!"
 exit 1
fi

# Get the dir size in human-readable format (e.g. 2.3G, 15M)
DIR_SIZE_HR=$(du -sh $DIR_TO_CHECK 2>/dev/null | awk '{print $1}')

# Get the dir size in kilobytes for numeric comparison
DIR_SIZE_KB=$(du -sk $DIR_TO_CHECK 2>/dev/null | awk '{print $1}')

# 1G in KB:
# echo $((1 * 1024 * 1024))
# 1048576

if [ "$DIR_SIZE_KB" -gt 1048576 ]; then
 echo "Warning: Directory is large! ($DIR_SIZE_HR)"
else
 echo "Directory size is OK. ($DIR_SIZE_HR)"
fi
3- Make it executable:
chmod u+x check_dir_size.sh4- Run the script and enter the desired path to check:
./check_dir_size.shIn the first example, we ran using the /tmp directory:

In the second example, we ran using the / directory:

Working with Loops (for, while, until)
In general, loops are structures that let us repeat commands without retying them – perfect for automation.
FOR loops:
The “for” loop runs a command block for each item in a list. Examples:
Simple List:
#!/bin/bash
for fruit in apple banana cherry; do
    echo "I like $fruit"
done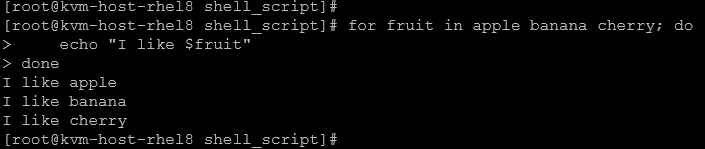
Looping Over Files:
for file in /etc/*.conf; do
    echo "File: $file"
done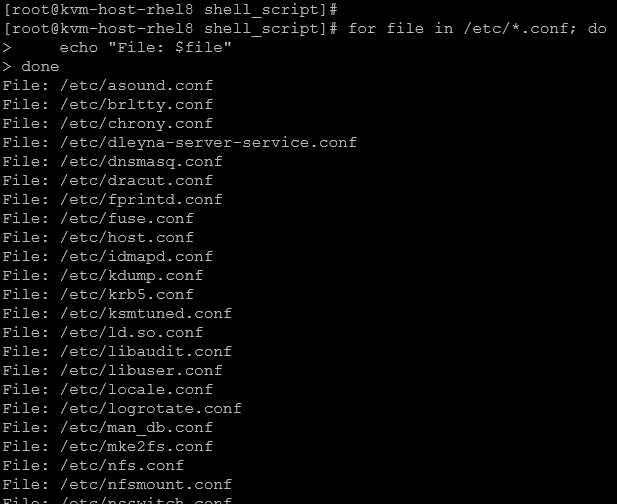
Reading each line of a file:
for file in `cat source_file.txt`; do
    echo "File: $file"
done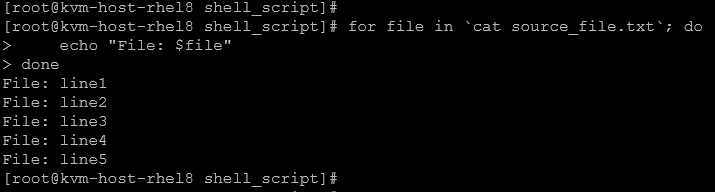
WHILE loops:
The “while” loop runs while a condition is true.
Example – Counting:
#!/bin/bash
count=1
while [ $count -le 5 ]; do
    echo "Count: $count"
    count=$((count + 1))
done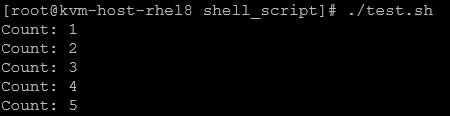
UNTIL loops:
The “until” is the opposite of “while” – it runs until the condition becomes true.
Example – Wait for a file to appear:
#!/bin/bash
until [ -f /tmp/ready.txt ]; do
    echo "Waiting for /tmp/ready.txt..."
    sleep 2
done
echo "File found!"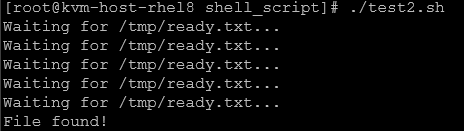
Looping with Command Output
We can feed command results into a loop using:
- `command`
- $(command)
Examples – List Users from /etc/passwd using both methods.
Using backticks `…`:
#!/bin/bash
for user in `cut -d: -f1 /etc/passwd`; do
    echo "User: $user"
done
Using $(…):
#!/bin/bash
for user in $(cut -d: -f1 /etc/passwd); do
    echo "User: $user"
done
Let’s provide a more advanced example using the “for” loop:
1- Create the script file:
vi check_multi-dir_size.sh2- Add the script’s content:
#!/bin/bash
# Check the size of multiple directories

read -p "Enter directories (space-separated): " DIRS

# 500M in KB = 512000
LIMIT_KB=512000

for DIR in $DIRS; do
    if [ ! -d "$DIR" ]; then
        echo "$DIR - Error: Not a valid directory."
        continue
    fi

    SIZE_HR=$(du -sh "$DIR" 2>/dev/null | awk '{print $1}')
    SIZE_KB=$(du -sk "$DIR" 2>/dev/null | awk '{print $1}')

    if [ "$SIZE_KB" -gt "$LIMIT_KB" ]; then
        echo "$DIR - Warning: Large! ($SIZE_HR)"
    else
        echo "$DIR - Size OK ($SIZE_HR)"
    fi
done
3- Make it executable:
chmod u+x check_multi-dir_size.sh4- Run the script and enter some directory paths. For example:
./check_multi-dir_size.sh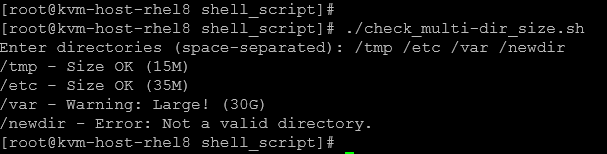
How it works:
- The read -p asks for multiple directories in one line (space-separated).
- for DIR in $DIRS loops through each one.
- Checks if it’s a valid directory with
[ ! -d "$DIR" ]. - Uses:
du -shfor human-readable size (e.g.,1.2G,500M)du -skfor numeric size in KB (needed for numeric comparison).
- Compares against
512000 KB(500 MB).
Functions in Bash
Functions let us group commands together so we can reuse them in multiple places within the script.
This makes scripts cleaner, easier to maintain, and avoids repeating/duplicating code.
Basic Function Syntax:
function say_hello() {
    echo "Hello!"
}
Where:
say_hello() –> function name
Note: We can define a function without the “function” keyword. Example:
say_hello() {
    echo "Hello!"
}
After defining a function, we need to “call” the function. If we do not “call” the function, the code block inside the function will not be executed automatically during the script execution. Based on the previous examples, to call the function:
say_helloInside a function, we can also work with arguments:
- $1 –> first argument
- $2 –> second argument
- $@ –> all arguments
Example:
greet() {
    echo "Hello, $1 from $2"
}

greet "John" "California"
Functions return exit code with return (0 = success, non-zero = failure), but to return actual text, we usually echo it. Example:
get_date() {
    echo "$(date +%Y-%m-%d)"
}

TODAY=$(get_date)
echo "Today is $TODAY"
Let’s create a script using a function:
1- Create the script file:
vi check_multi-dir_size-v2.sh2- Add the script’s content:
#!/bin/bash
# Check the size of multiple directories using a function

LIMIT_KB=512000  # 500M in KB

check_size() {
    local DIR=$1
    if [ ! -d "$DIR" ]; then
        echo "$DIR - Error: Not a valid directory."
        return
    fi

    local SIZE_HR=$(du -sh "$DIR" 2>/dev/null | awk '{print $1}')
    local SIZE_KB=$(du -sk "$DIR" 2>/dev/null | awk '{print $1}')

    if [ "$SIZE_KB" -gt "$LIMIT_KB" ]; then
        echo "$DIR - Warning: Large! ($SIZE_HR)"
    else
        echo "$DIR - Size OK ($SIZE_HR)"
    fi
}

read -p "Enter directories (space-separated): " DIRS

# Calling the function inside a for loop:
for DIR in $DIRS; do
    check_size "$DIR"
done
3- Make it executable:
chmod u+x check_multi-dir_size-v2.sh4- Run the script:
./check_multi-dir_size-v2.shError Handling & Exit Codes
Every command in Linux finishes with a status code:
0→ Success (no error)- non-zero → Failure (error)
We can check the exit code of the last command with:
echo $?Example:
ls /etc       # valid command
echo $?       # outputs 0

ls /fakepath  # invalid command
echo $?       # outputs non-zero (usually 2)
In this context, we can use “if” to decide actions based on the exit code status. Let’s give an example:
#!/bin/bash
ping -c 1 google.com > /dev/null 2>&1

if [ $? -eq 0 ]; then
    echo "Internet is working"
else
    echo "No internet connection"
fi
Practical Example: Safe File Copy
1- Create the script file:
vi safe_file_copy.sh2- Add the script’s content:
#!/bin/bash
SRC=$1
DST=$2

if [ ! -f "$SRC" ]; then
    echo "Error: Source file does not exist."
    exit 1
fi

cp "$SRC" "$DST" 2>/dev/null

if [ $? -ne 0 ]; then
    echo "Error: Could not copy file."
    exit 2
fi

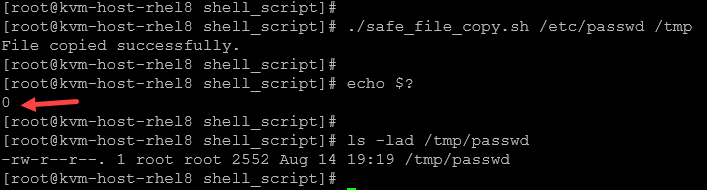
echo "File copied successfully."
exit 0
3- Make it executable:
chmod u+x safe_file_copy.sh4- Run the script:
./safe_file_copy.shIf we run the script without the required arguments, we’ll receive an error, and the exit code will be 1:

If we run the script correctly (with all the necessary arguments and it runs fine), we’ll receive an exit code 0:
Practical Examples
1- Shell Script for ping some hosts from a source file:
1.1- Create a source file with all hosts and IP addresses:
vi source_hosts.txtAdd the content, for example:
8.8.8.8
8.8.4.4
1.1.1.1
www.google.com
www.dell.com
www.terra.com.br
www.abc.com
1.0.1.0
www.uol.com.br
www.ml.com.br
1.2- Create a script file:
vi ping_hosts.shAdd the script’s content:
#!/bin/bash

read -p "Enter the path for the source file: " SOURCE_FILE

for i in $(cat "$SOURCE_FILE"); do
 ping -c 2 $i > /dev/null 2>&1

 if [ "$?" -eq 0 ]; then
  echo "✅ Host $i is reachable"
 else
  echo "❌ Host $i is unreachable"
 fi

doneNotes:
- The script asks for the source file. The user must enter the path to the source file.
- After entering the file path, it will be saved in a variable.
- A “for” loop is used to read each line of the source file and use it to ping.
- All ping output is redirected to /dev/null (stdout and stderr).
- After each ping test, the exit code is checked – if “0” means success; if different from “0” means fail.
1.3- Make the script executable:
chmod u+x ping_hosts.sh1.4- Run the script:
./ping_hosts.sh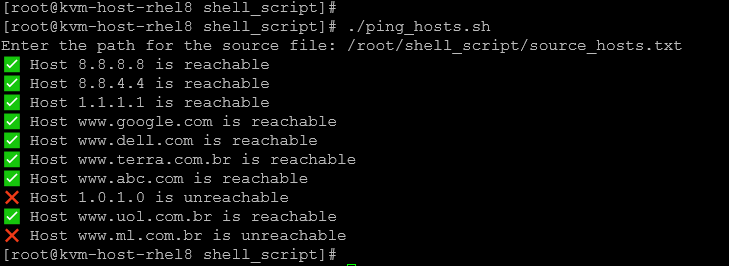
2- Shell Script for testing a TCP port for some hosts from a source file:
2.1- In this case, for instance, we’ll use the same source file:
# cat source_hosts.txt
8.8.8.8
8.8.4.4
1.1.1.1
www.google.com
www.dell.com
www.terra.com.br
www.abc.com
1.0.1.0
www.uol.com.br
www.ml.com.br
2.2- Create a script file:
vi test_ports.shAdd the script’s content:
#!/bin/bash

read -p "Enter the source file: " SOURCE_FILE
read -p "Enter the TCP ports to check (e.g. 80 443): " PORTS_TO_CHECK

for host in $(cat "$SOURCE_FILE"); do
 for port in $PORTS_TO_CHECK; do
  nc -zu -w 3 $host $port

  if [ "$?" -eq 0 ]; then
   echo "✅ Port $port is open on $host"
  else
   echo "❌ Port $port is not open on $host"
  fi

 done
done
Notes:
- The script uses “nc” (netcat) to check if a TCP or UDP port is open and listening.
- By default, “nc” works with TCP. However, we can specify the option “-u” to work with UDP ports – but sometimes it does not work as expected. For this reason, we’ll only focus on TCP tests.
- Unlike TCP, UDP is connectionless, so there’s no guarantee of a clear “open/closed” result.
- If a UDP service doesn’t respond,
ncmight just wait and timeout instead of saying “closed”. - Sometimes the only way to confirm UDP is working is if the service sends back a response (e.g., a DNS server replying to a query).
- The user must enter the source file with the hosts or IPs to check.
- The user must enter the TCP/UDP ports (e.g. 80 443).
2.3- Make it executable:
chmod u+x test_ports.sh2.4- Run the script:
./test_ports.sh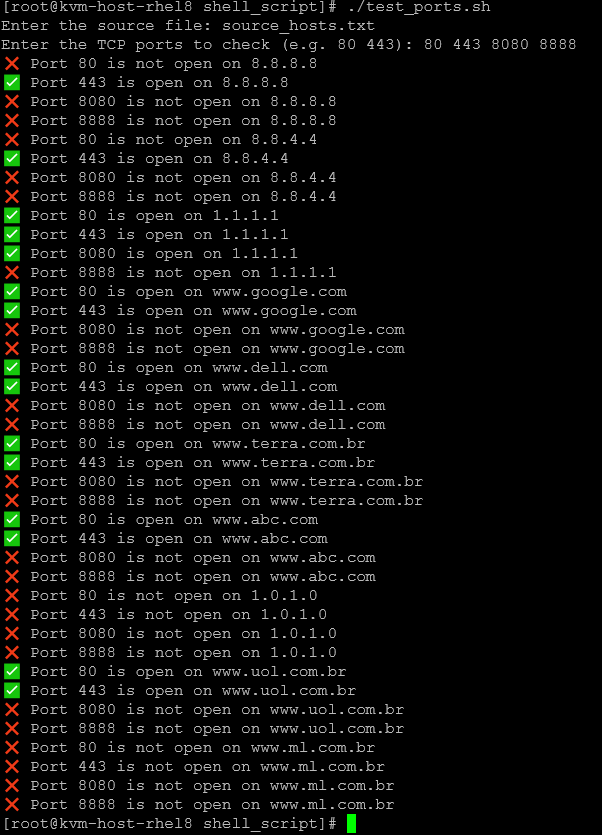
3- Shell Script for testing a TCP port for some hosts from a source file – v2:
Let’s improve the previous TCP test script, making the results more straightforward:
3.1- Create the script file:
vi test_ports-v2.shAdd the script’s content:
#!/bin/bash

read -p "Enter the source file: " SOURCE_FILE
read -p "Enter the TCP ports to check (e.g. 80 443): " PORTS_TO_CHECK

# Determine max host length
MAXLEN_HOST=0
while read -r host; do
    [ ${#host} -gt $MAXLEN_HOST ] && MAXLEN_HOST=${#host}
done < "$SOURCE_FILE"

# Fixed width for each port result (adjust if you want more/less space)
PORT_COL_WIDTH=25

while read -r host; do
    # Print host first
    printf "%-${MAXLEN_HOST}s - " "$host"

    # Then each port result in a fixed-width column
    for port in $PORTS_TO_CHECK; do
        nc -z -w 3 "$host" "$port" > /dev/null 2>&1
        if [ $? -eq 0 ]; then
            printf "%-${PORT_COL_WIDTH}s" "✅ port $port open"
        else
            printf "%-${PORT_COL_WIDTH}s" "❌ port $port closed"
        fi
    done
    echo  # New line after each host
done < "$SOURCE_FILE"
3.2- Make it executable:
chmod u+x test_ports-v2.sh3.3- Run the script:
./test_ports-v2.sh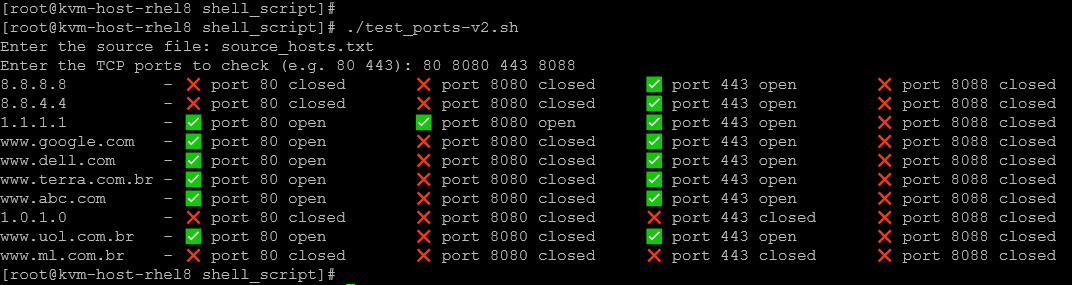
That’s it for now 🙂
