

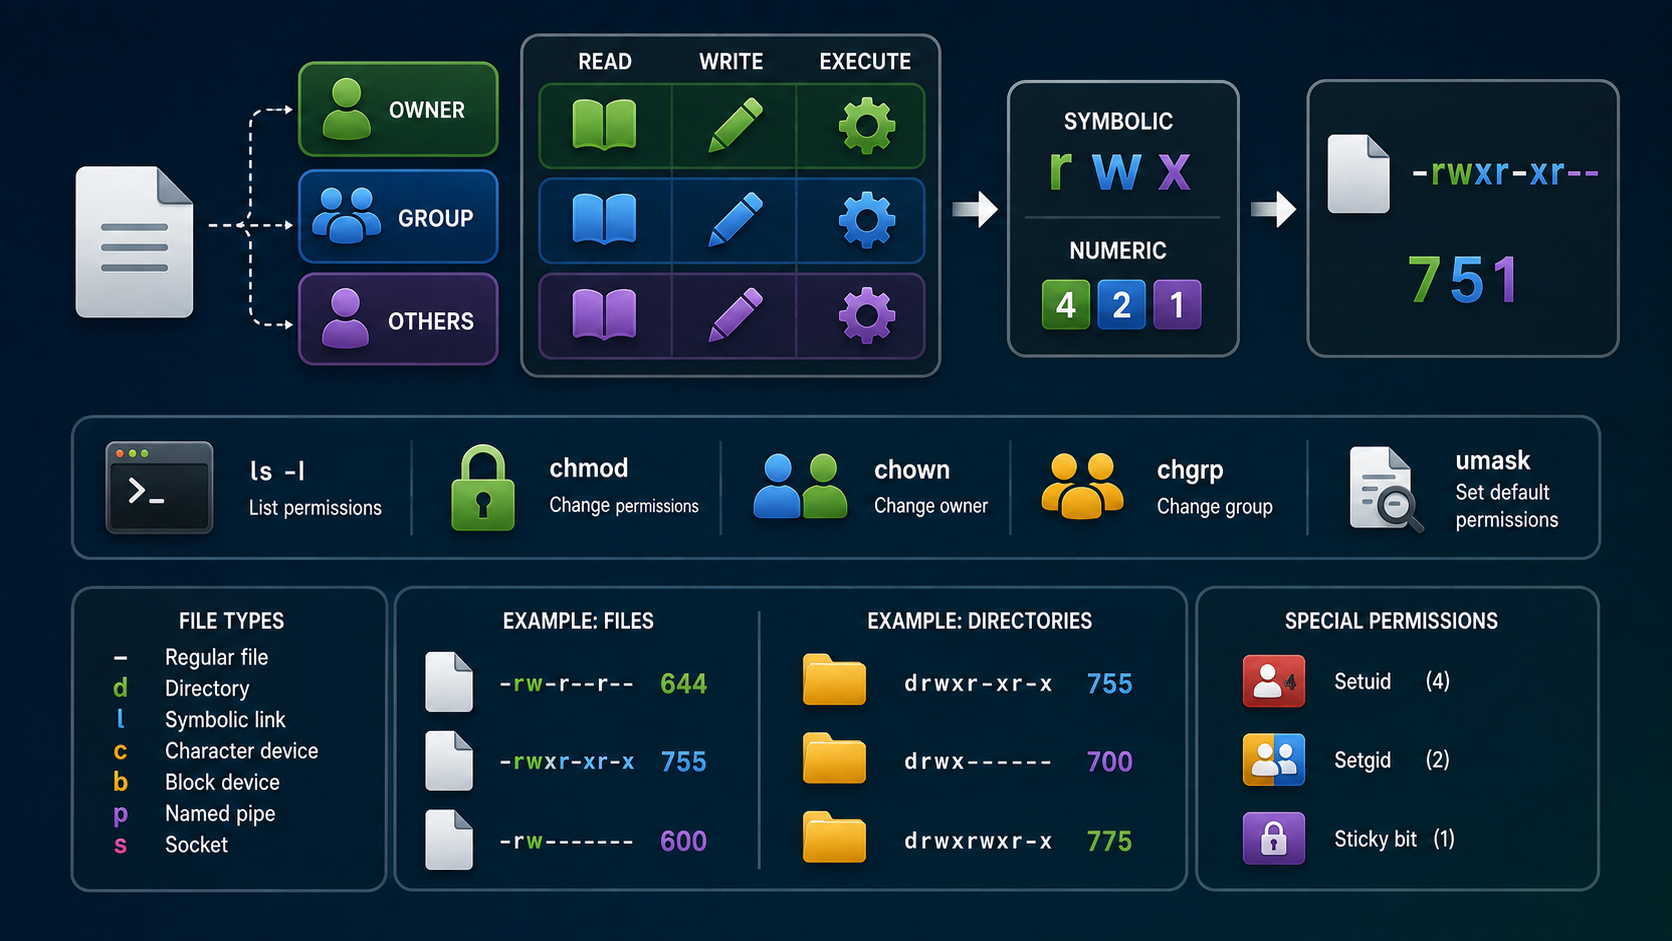
Overview of Linux Permissions on RHEL 8 provides numerous examples of how to work with permissions in Linux. We’re using Red Hat Enterprise Linux 8; however, all the examples apply to any Linux distribution.
Standard Permissions (User, Group, Others) – UGO
Linux files and directories have three permission classes:
- User (owner)
- Group
- and Others.
Each permission class can have read (r), write (w), and execute (x) permissions.
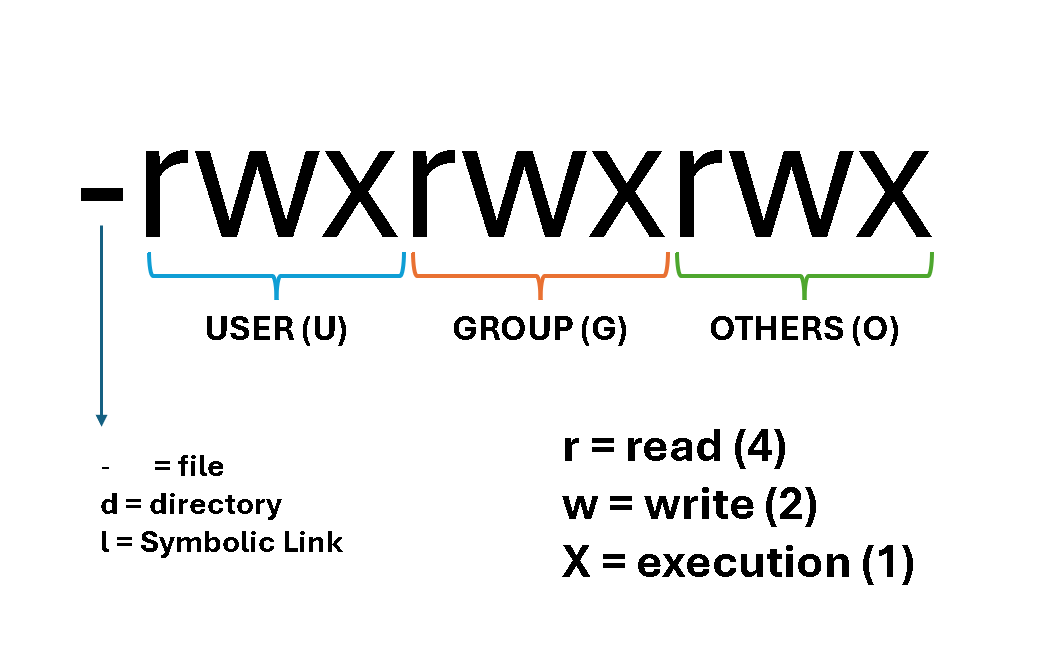
Permissions appear in the command ls -l output as ten characters, for example:
-rw-r--r--The first character indicates the file type (- for file, d for directory). The following nine characters break into three triplets: user (owner), group, and others:
Symbolic vs. Numeric Notation
Symbolic uses letters and operators, e.g., chmod u=rwx,g=rx,o=r file.
Numeric uses octal digits, each bit summing to 0–7:
- read=4
- write=2
- execute=1
We can use the command “chmod” to change the permissions of files and directories.
Examples:
chmod 644 document.txt → owner rw- (6), group r– (4), others r– (4)
chmod 755 script.sh → owner rwx (7), group r-x (5), others r-x (5)
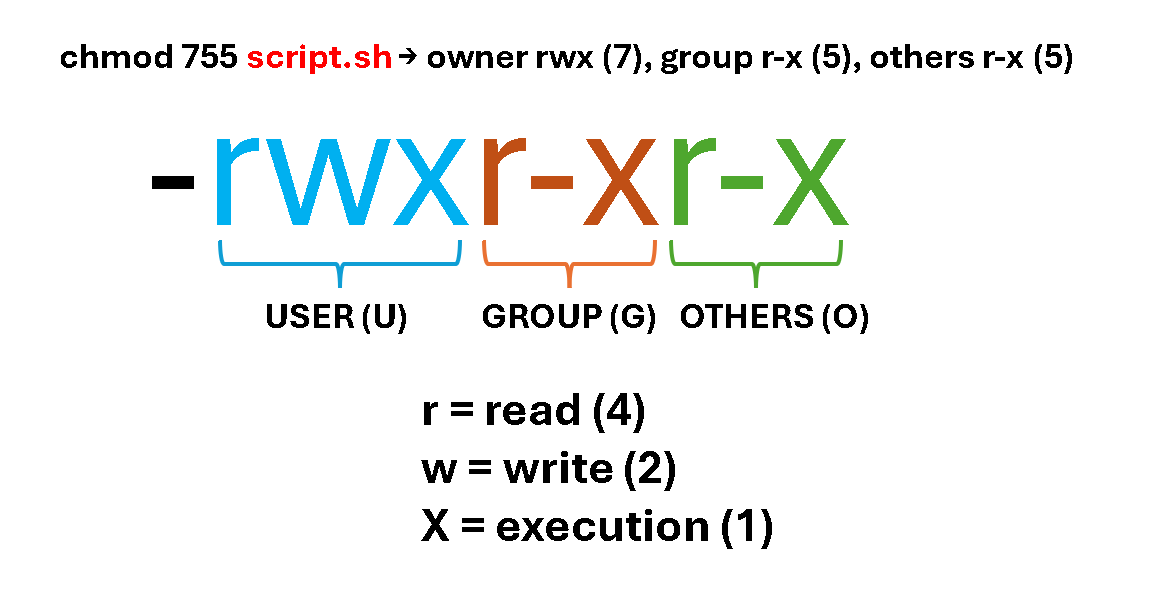
In the above example, we’re defining the following permissions for the file “script.sh”:
- The file owner will have read, write, and execute permissions.
- The file group owner will have read and execute permissions.
- And the other users will have read and execute permissions.
Changing Ownership and Permissions
chown – change file owner and group:chown user:group file – changes the owner and group.
chmod – change file mode bits (permissions):chmod [ugoa][+-=][rwx] file – adjusts specific bits.
Combining numeric and symbolic forms allows fine-grained control.
Let’s provide some examples:
1- Create a file “test.txt” and inspect its permissions:
touch test.txt
ls -ld test.txt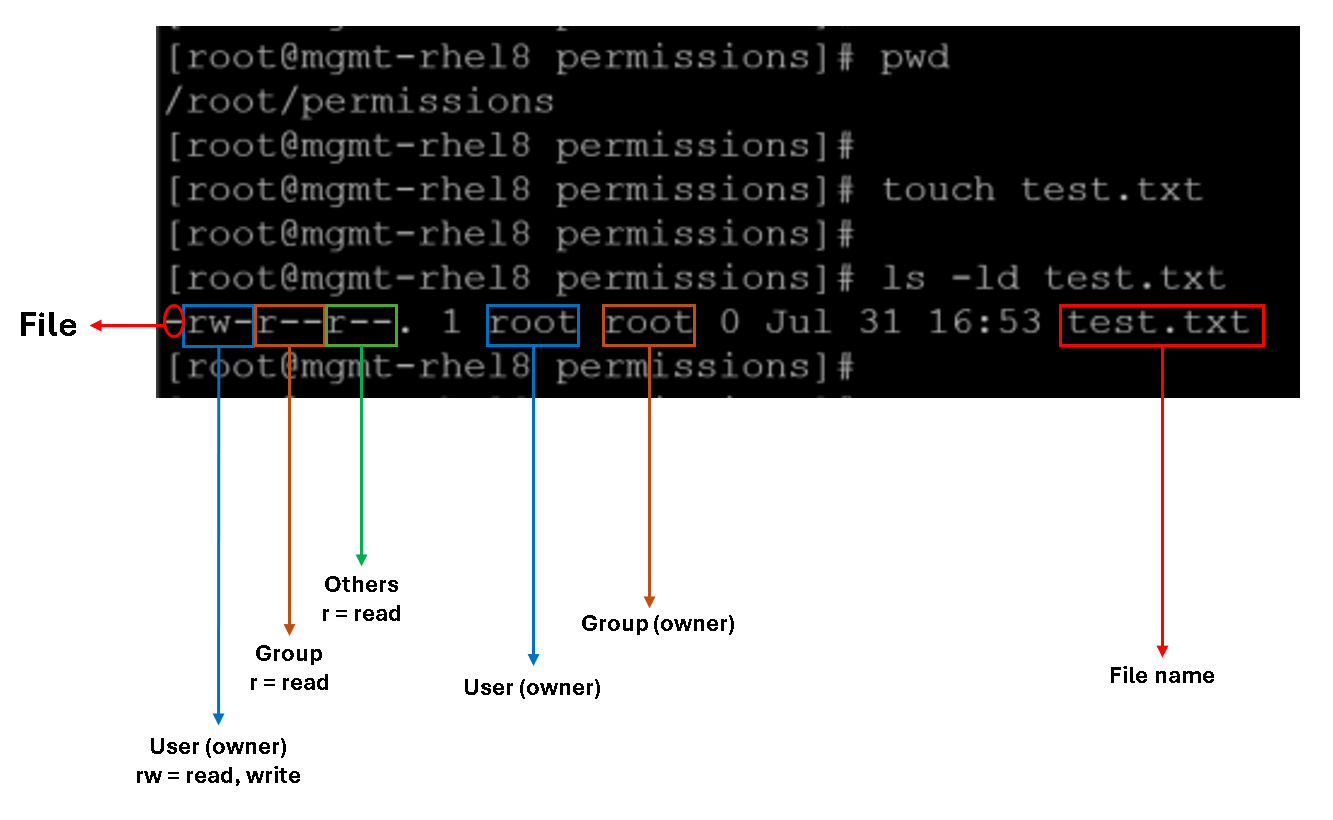
2- To change the file owner from root to user1:
chown user1:root test.txt
3- To change the file group owner from root to group1:
chown user1:group1 test.txt
4- To add the execution permission for the user owner:
chmod u+x test.txt
5- To add the execution permission for the group owner (using the numeric form):
chmod 754 test.txt
Note:
- The numeric permissions mean:
- 7 = read (4), write (2), execute (1) for the user owner | 4 + 2 +1 = 7
- 5 = read (4), execute (1) for the group owner | 4 +1 = 5
- 4 = read (4) for others.
6- To remove all permissions for the others:
chmod o-rwx test.txt
7- To add read and execution permissions for the others:
chmod o=rx test.txt
Linux Standard Permissions: File vs. Directories
We need to consider the permissions from the files and directories’ perspectives:
📄 Permissions on Files:
| Permission | Effect |
|---|---|
| Read (r) | Allows viewing the file’s contents (e.g., cat, less) |
| Write (w) | Allows modifying or overwriting the file |
| Execute (x) | Allows running the file as a program or script |
📁 Permissions on Directories:
Directories behave differently because they contain file entries, not file content:
| Permission | Effect |
|---|---|
| Read (r) | Allows listing the directory’s contents (ls) |
| Write (w) | Allows creating, deleting, or renaming files inside the directory |
| Execute (x) | Allows entering the directory (cd) and accessing files within it |
Important: To access a file inside a directory, you need execute permission on the directory—even if you have read permission on the file itself.
In summary:
| Permission | On Files | On Directories |
|---|---|---|
| Read (r) | View file contents | List directory contents (ls) |
| Write (w) | Modify file contents | Add/remove/rename files in the directory |
| Execute (x) | Run the file as a program | Enter the directory (cd) and access files |
Special Permissions: SUID, SGID, and Sticky Bit
Linux adds three special bits that alter execution and inheritance:
| Bit | Symbolic | Octal Prefix | Effect |
|---|---|---|---|
| SUID | u+s | 4 | File runs with the file’s group ID; Directories inherit group ownership |
| SGID | g+s | 2 | File runs with file’s group ID; Directories inherit group ownership |
| Sticky Bit | o+t | 1 | Process runs with the file owner’s user ID |
Set-User-ID (SUID)
When applied to an executable, SUID allows any user running the file to execute it with the file owner’s privileges.
Let’s provide an example:
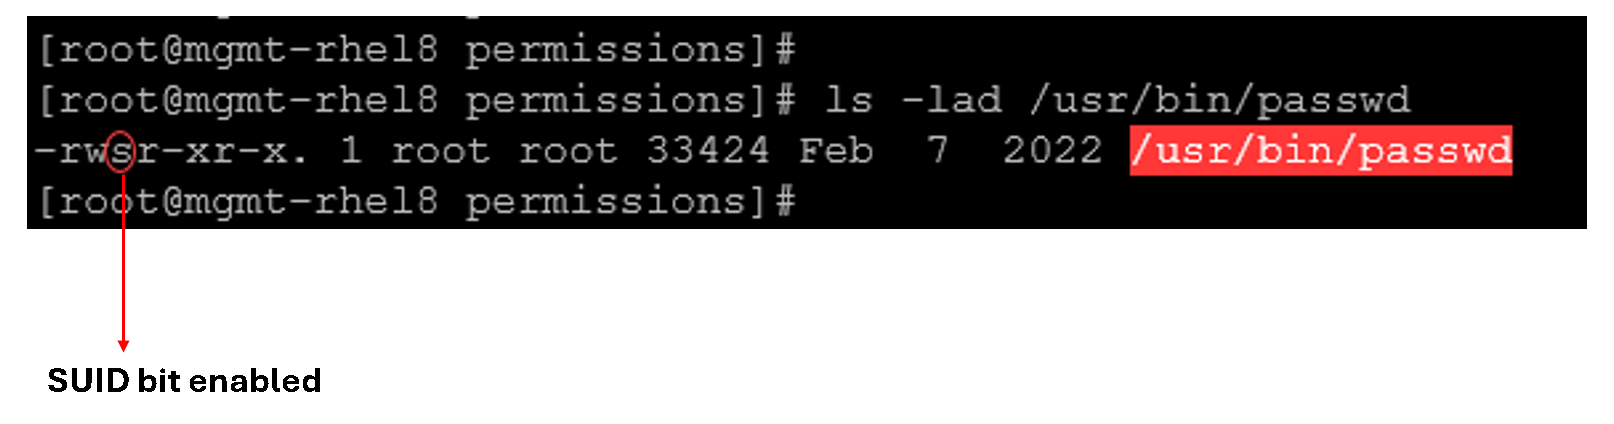
The passwd runs with root permissions, letting users change their passwords without root shell access.
Set-Group-ID (SGID)
On files: running the file grants the process the file’s group permissions.
On directories: new files and subdirectories inherit the parent directory’s group, ensuring collaborative ownership.
Let’s provide an example:
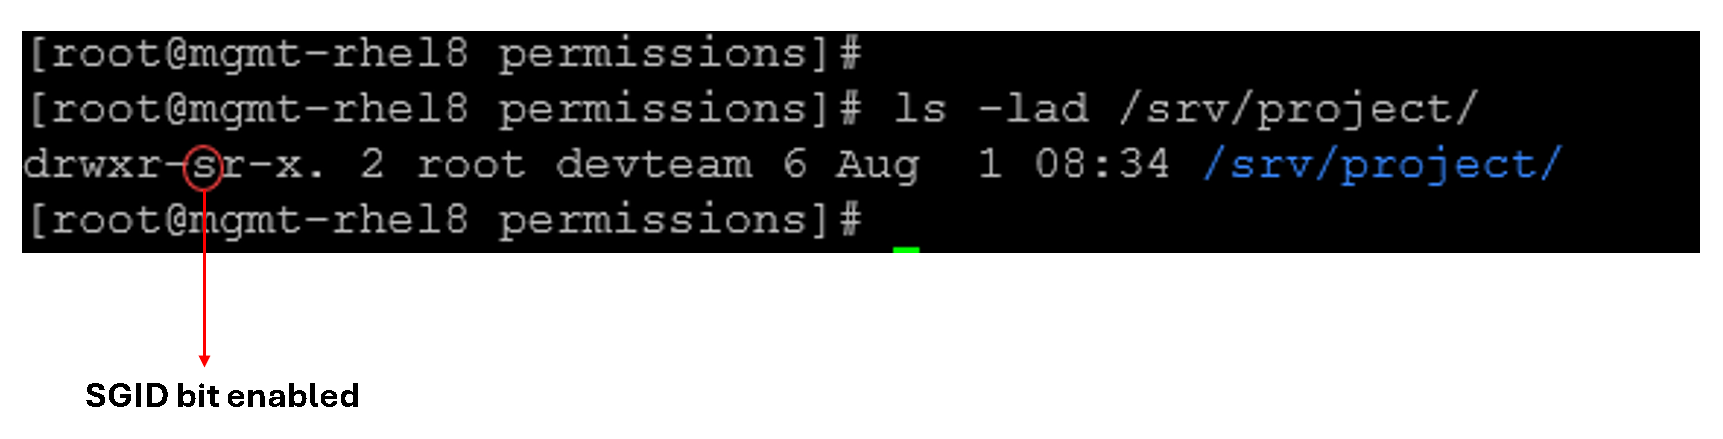
All items created inside /srv/project will belong to devteam.
Sticky Bit
Primarily used on world-writable directories (e.g., /tmp) to prevent users from deleting or renaming files they do not own.
Let’s provide an example:
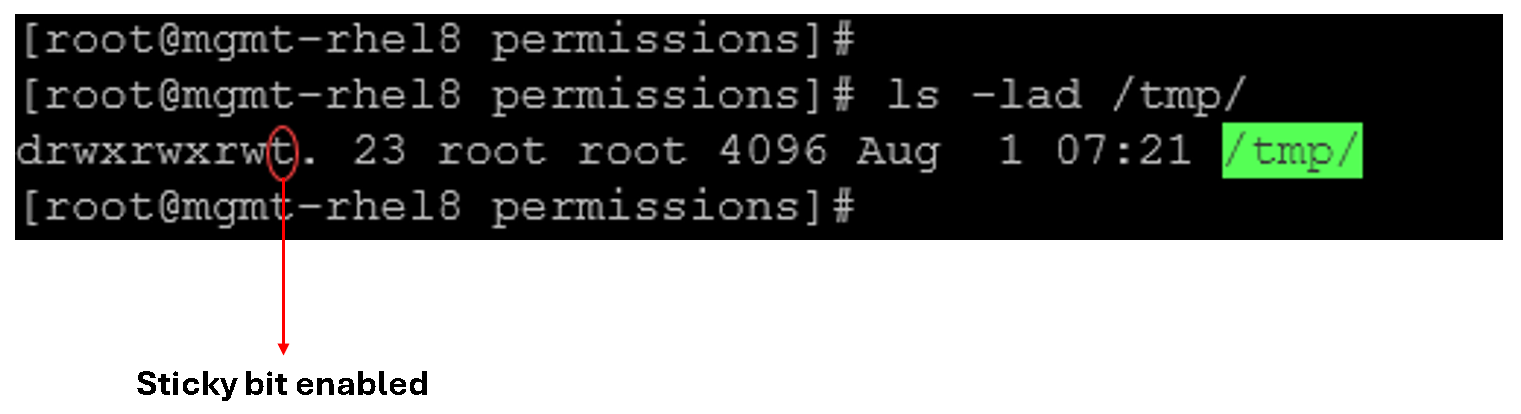
Files in /tmp remain protected from removal by other users despite being writable.
Configuring an SGID Collaboration Folder
Let’s provide a practical example of SGID usage:
1- Create a group for your project and two users:
groupadd devteam
useradd -G devteam oli
useradd -G devteam mariaNote: the “useradd -G” allows us to add users to supplementary groups. By default, when a user is created, a group with the same name is created, and this group is the “primary” group for the user.
Let’s inspect the groups for the users “oli” and “maria”:
id oli
id maria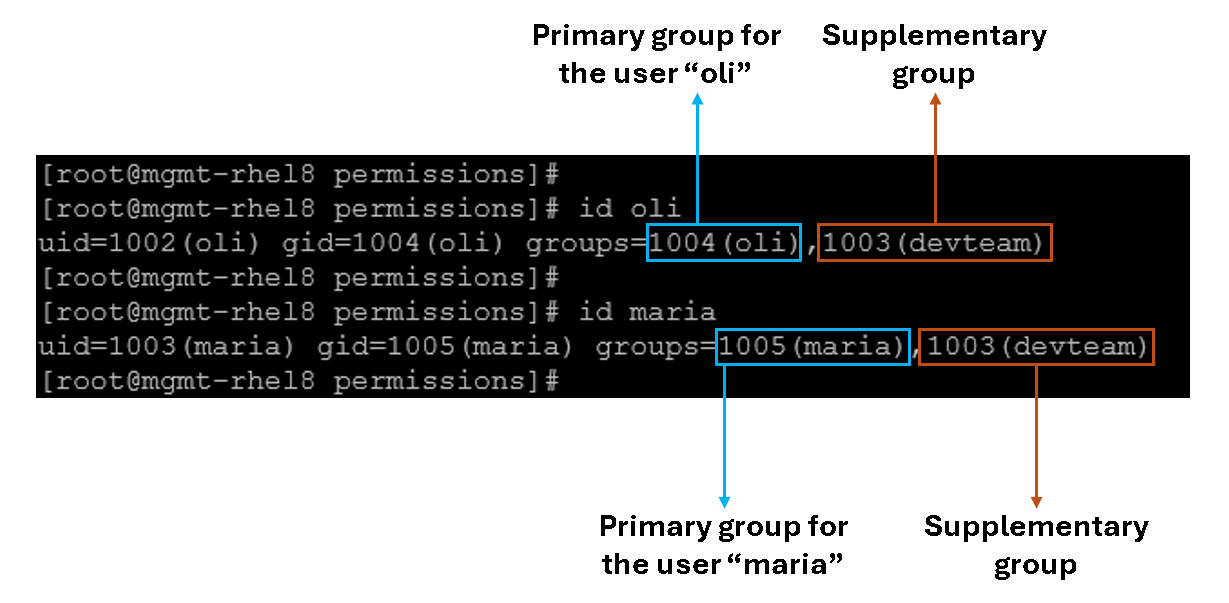
2- Create the shared directory and assign group ownership:
mkdir /srv/collab
chgrp devteam /srv/collab
Inspect the directory permissions:
ls -lad /srv/collab/
3- Set the SGID bit and apply default permissions:
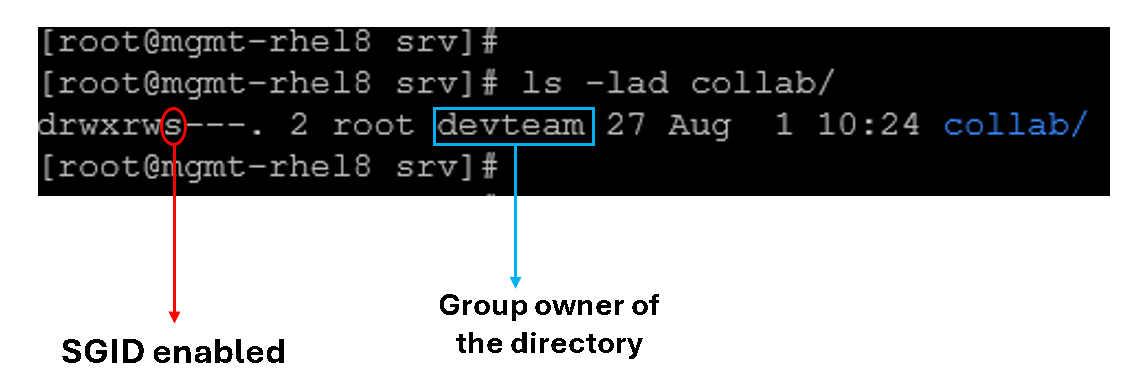
chmod 2770 /srv/collabTo remember, we can set up the SGID bit in a symbolic way or in an octal/numeric way. In this case, we set up using the octal/numeric way.
After adjusting the permissions:
4- Verify behavior by having “oli” and “maria” create files:
su - oli -c "touch /srv/collab/oli_file"
su - maria -c "touch /srv/collab/maria_file"
ls -l /srv/collab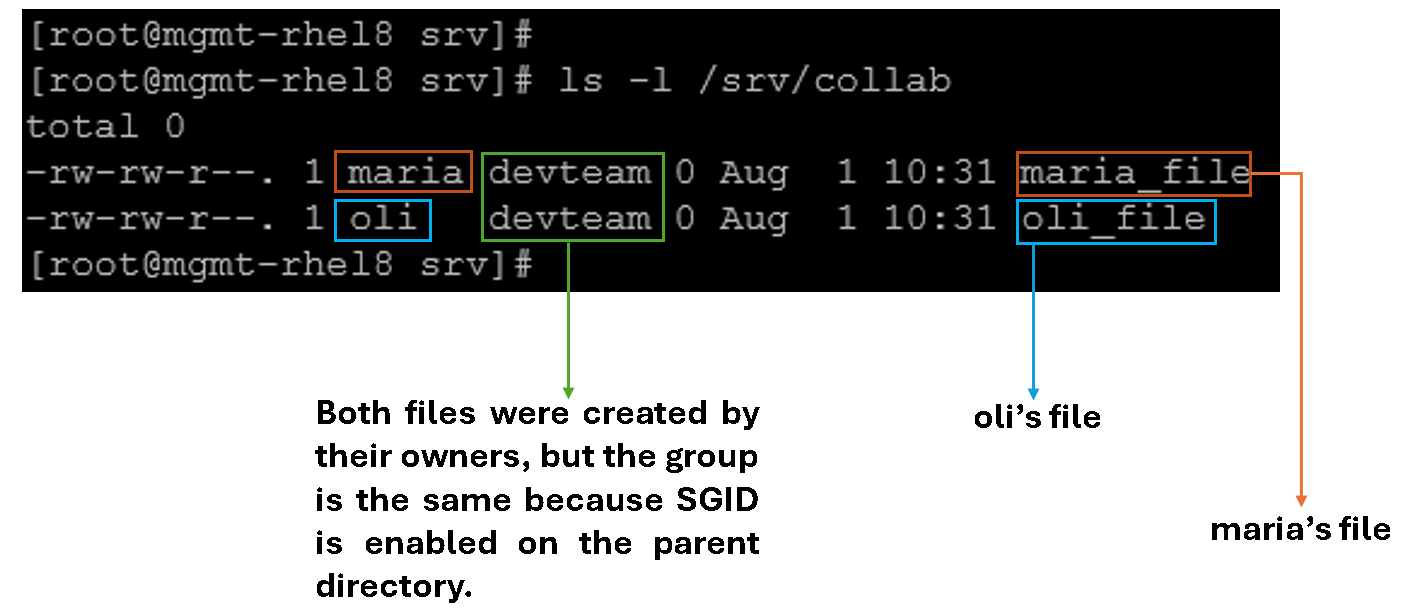
As we can see, all new files should belong to devteam rather than each user’s primary group.
Additional Examples with Special Permissions
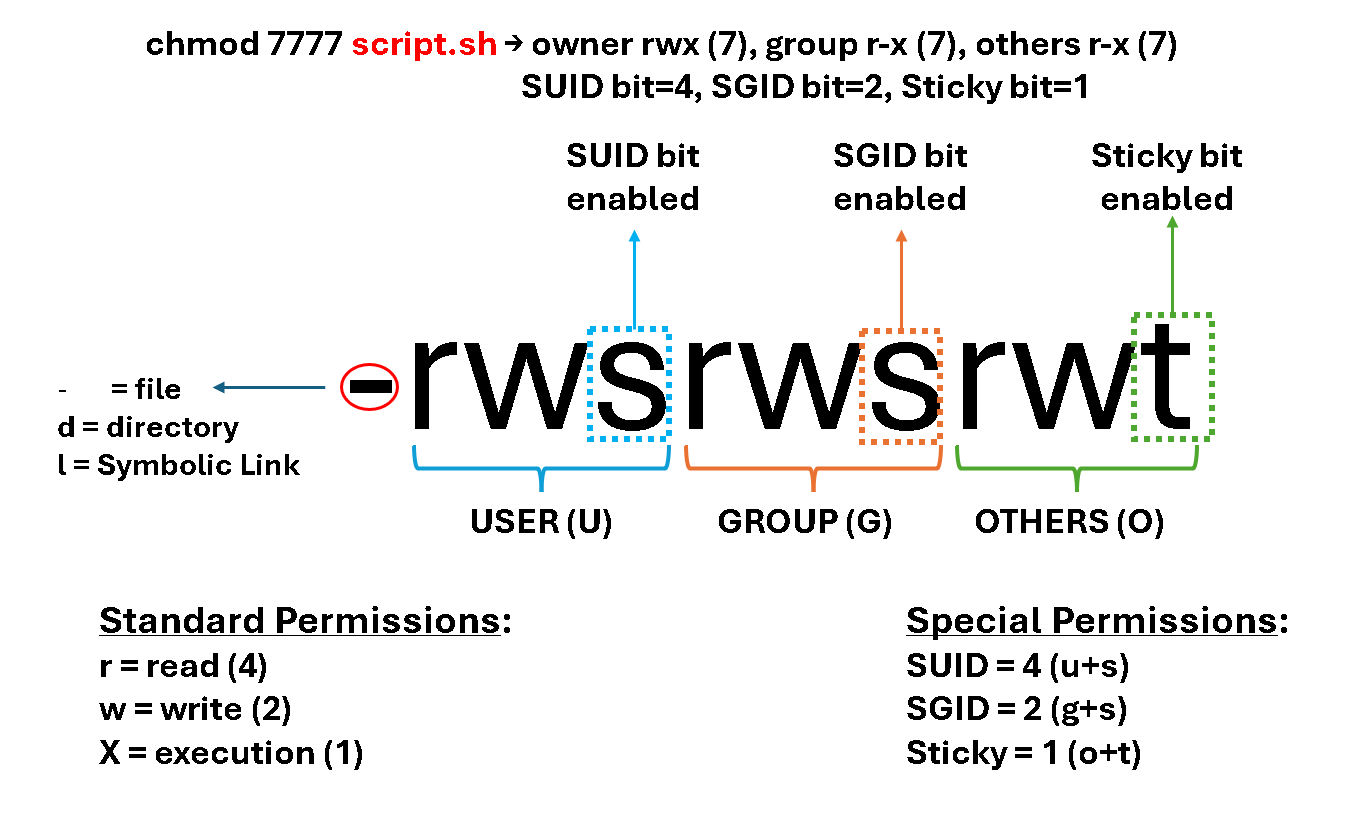
What happens if we set up the following permission to a script file?
chmod 7777 script.shDefining the permissions using the numeric or octal way, the first numeric value in “7777” is used to define the special permissions bits.
Let’s break it down:
What will be the permissions if all group and other standard permissions were removed from the script file, keeping only the special permissions for the group and others?
Let’s check it out:
1- We’ve two ways of removing these permissions:
# Removing using the numeric/octal way:
chmod 7700 script.sh

# Removing using the symbolic way:
chmod u=srwx,g=s,o=t script.sh
2- Inspect the script’s permissions:
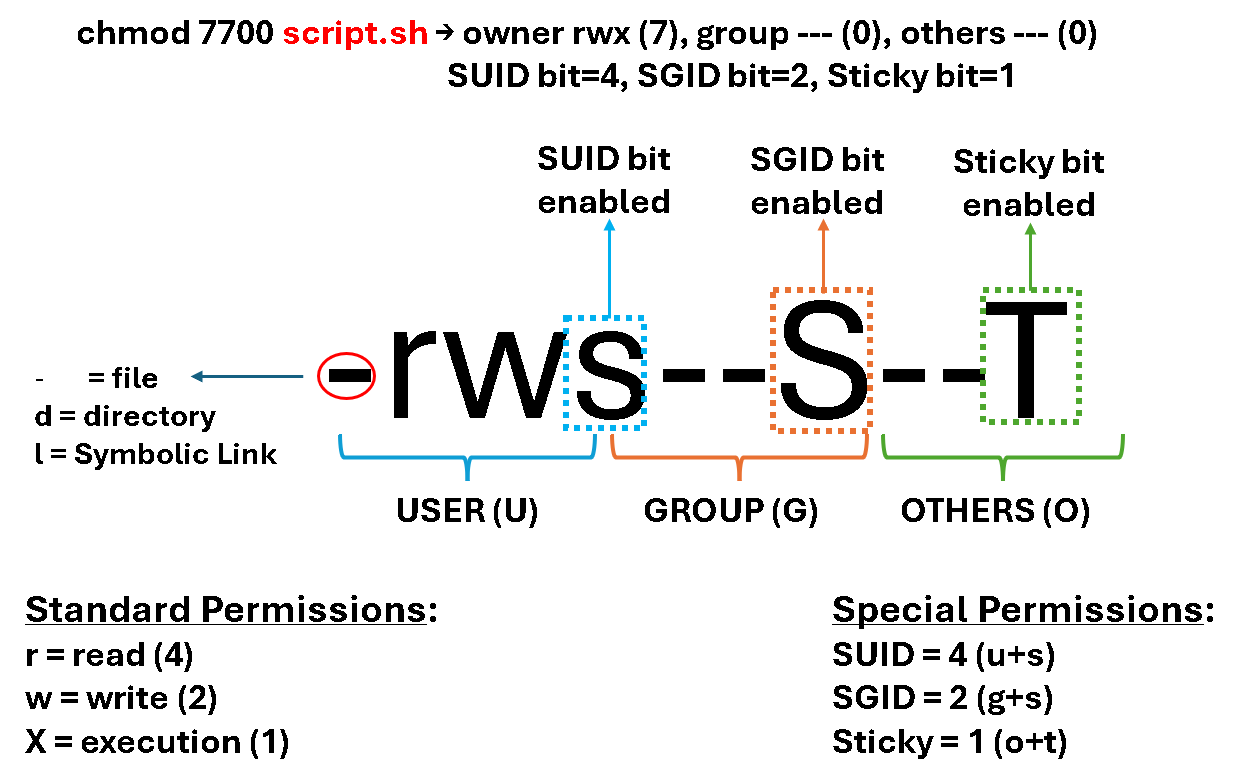
As we can see, when only the special permissions are defined, the letter shown is uppercase!
Default Permissions
In addition to setting special permissions, we can also manage the default permissions of new files and directories by using the umask setting. The umask setting alters the permission settings for newly created files or directories. The umask command shows the current umask value:
umask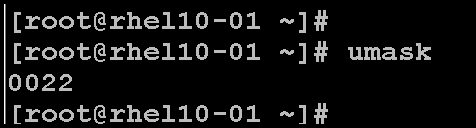
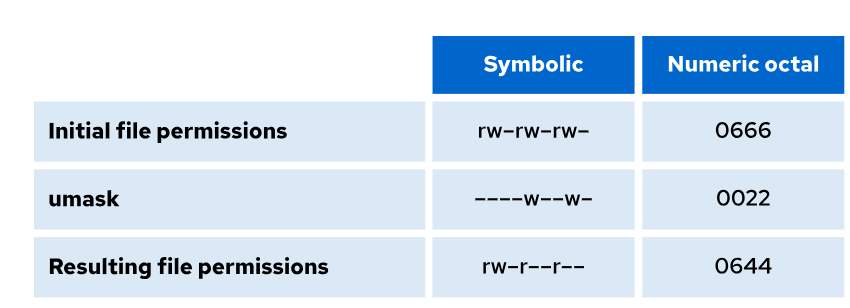
New files are assigned initial permissions based on two factors:
- Whether you are creating a regular file or a directory.
- The current umask (user file-creation mask).
Effects of umask on Files and Directories:
The umask is a permission filter that is applied to the default permissions when a file or directory is created. Each bit set in the umask removes a corresponding permission from the final permissions of new files or directories. Let’s provide some examples of files and directories when applying the umask:
| umask | Effect on Files | Effect on Directories |
|---|---|---|
0022 | rw-r—r-- | rwxr-xr-x |
0027 | rw-r----- | rwxr-x--- |
0002 | rw-rw-r-- | rwxrwxr-x |
We can temporarily set a new umask for the current shell by running the umask command with a single octal argument:
umask 0027Note:
The system's default umask values for Bash shell users are defined in the /etc/login.defs file, and in the /etc/bashrc file. Users can override the system defaults in the .bash_profile or .bashrc files in their home directories.So, before creating a file, there are initial file permissions. During the file creation process, the umask is applied to the file, generating the “resulting file permissions” as we can see in the following picture:
The same occurs when a directory is created:
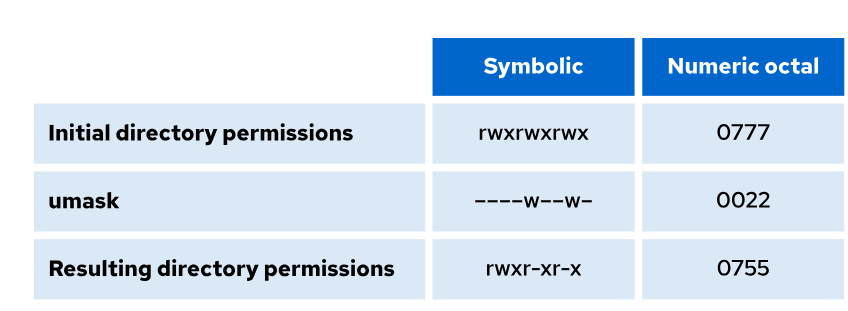
That’s it for now 🙂
