
NSX Distributed Firewall Challenge Scenario shows a scenario with a connectivity issue between two VMs placed on the same segment. The challenge here is to understand the issue by using troubleshooting techniques and fix the issue.
Let’s talk a little about the scenario:
- Both VMs “sa-infosec-03” and “sa-tlsvm-01” are placed in the same Segment called “STG-Infosec-Segment-01”. In this case, both VMs are in the same broadcast domain (L2 domain);
- Both VMs are being run on the same ESXi host (sa-esxi-07.vclass.local).
What is the issue?
From the VM “sa-infosec-03” the curl command failed. The curl command is using the reach a web page provided by the “sa-tlsvm-01” VM.
Our aim here is to troubleshoot and solve the issue!
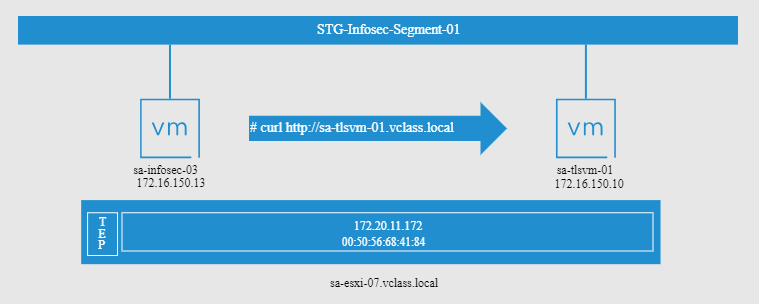
Note: There are some ways to troubleshoot this issue. So, based on this, we will show a couple of ways to identify or solve that. If you know more ways or tips, please, feel free to reach out to us and share them with us. You are more than welcome 🙂
Lab Scenario
In this troubleshooting scenario, two virtual machines are connected to the same NSX segment and are running on the same ESXi host:
- Source VM:
sa-infosec-03 - Destination VM:
sa-tlsvm-01 - Segment:
STG-Infosec-Segment-01 - ESXi host:
sa-esxi-07.vclass.local
The source VM should access an HTTP service hosted by sa-tlsvm-01 using its FQDN, but the curl request fails.
The objective is to determine whether the failure is caused by DNS, routing, NSX Distributed Firewall policy, or the application itself.
Why the Same Segment and Same ESXi Host Do Not Bypass DFW
An important detail in this lab is that both virtual machines are connected to the same NSX segment and are running on the same ESXi host. That does not bypass the NSX Distributed Firewall.
DFW enforcement occurs at the virtual-machine vNIC level. As a result, East-West traffic between two VMs can still be inspected and blocked even when the traffic never needs to leave the ESXi host or traverse a physical router.
This makes Distributed Firewall policy one of the first areas to investigate when two NSX-connected workloads cannot communicate despite having correct Layer 2 connectivity.
Checking the Host Transport Node Status
Checking the host transport node status is a good idea. It’s fundamental to know if the host is prepared to be part of the NSX environment. We can access the NSX Manager UI and go to the host transport nodes session to check it:
Access the NSX Manager UI –> System –> Configuration –> Fabric –> Nodes –> under Managed by selecting the vCenter Server –> and check the status of the desired ESXi host
In this case, for instance, the host “sa-esxi-07.vclass.local” is running fine in the NSX environment:
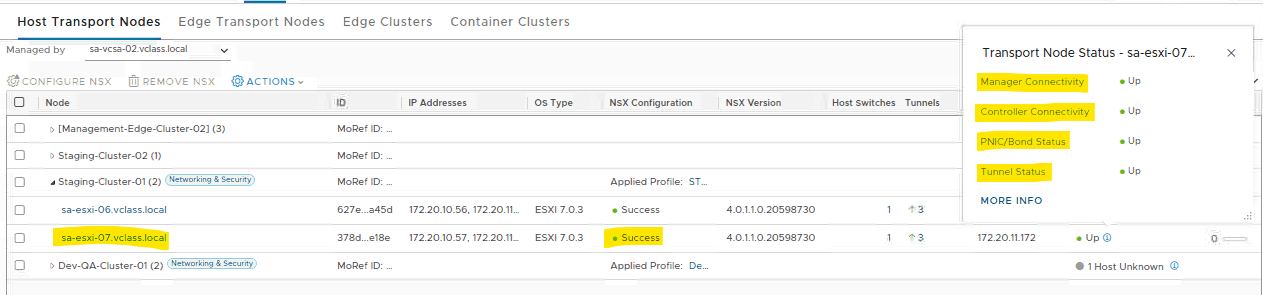
Note: If the host does not work as expected here, the first thing to do is fix this issue before going ahead.
If the issue points to Host or Edge TEP connectivity rather than the firewall policy itself, see “Troubleshooting NSX Overlay TEP Connectivity from ESXi and Edge Nodes“.
Checking the Segment Status
As we can see in the topology scenario, both VMs are placed in the same segment “STG-Infosec-Segment-01”. We can check the segment status by accessing the following menu:
Networking –> Connectivity –> Segments –> Select the desired segment and expand it to see all the details
As we can see in the following picture, the segment is “up” (Admin state”, is connected to the Tier-0 gateway, has a default gateway assigned, and is configured OK (overall status is “Success”):
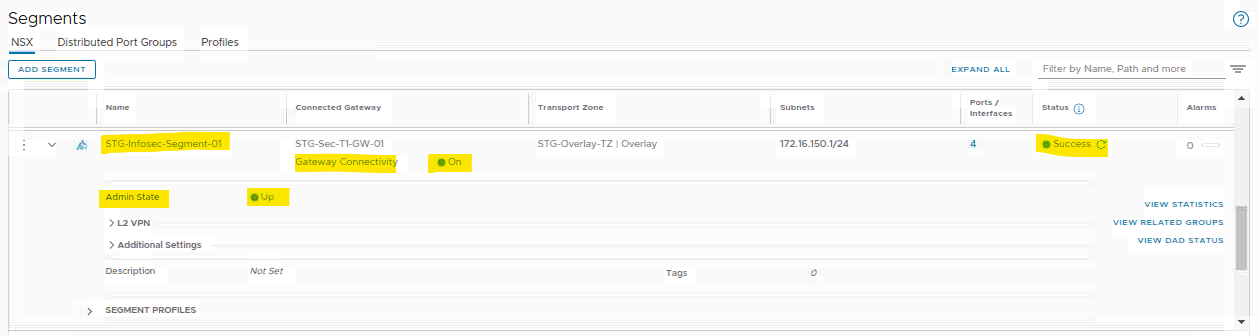
Note: If you detect some issues here, you need to fix them before going ahead.
Testing and Checking the Issue
As we told you before, from the VM “sa-infosec-03” the curl command failed. The curl command is using the reach a web page provided by the “sa-tlsvm-01” VM.
So, let’s get started and check this issue:
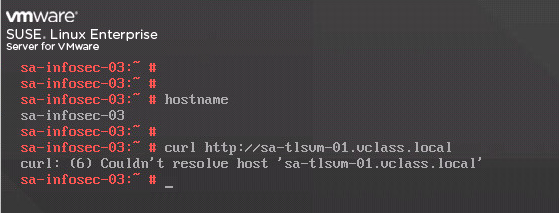
The error confirms that name resolution failed from the source VM. At this point, however, we still do not know whether the cause is the local resolver configuration, DNS server reachability, a firewall rule, routing, or the DNS service itself.
1- We can start by checking what DNS server(s) our source VM is using. Because our source VM is a Linux-based system, we can check it with the following command:
cat /etc/resolv.conf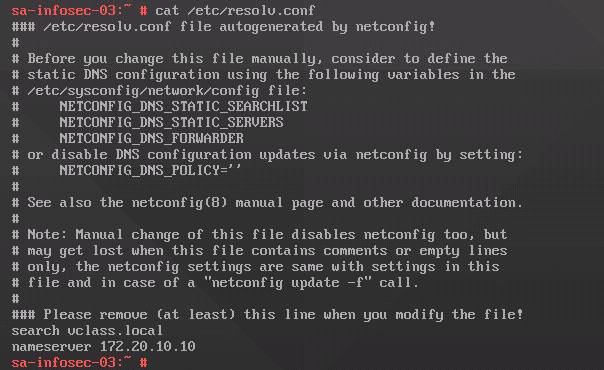
Our DNS server is 172.20.10.10. So, we can conclude that our DNS is placed external to our local NSX segment.
Querying the DNS server directly separates DNS resolution from the original HTTP application test. If the direct query times out, the next step is to determine whether UDP/TCP port 53 can reach the DNS server:
dig @172.20.10.10 sa-tlsvm-01.vclass.local
nslookup sa-tlsvm-01.vclass.local 172.20.10.10
2- From the source VM, we can apply the traceroute command and see what are the details that this command can show us:
traceroute 172.20.10.10
The !H indication represents an ICMP Host Unreachable response. This confirms that the path is not completing successfully, but it does not by itself tell us whether the root cause is routing, firewall policy, or another network condition.
We therefore need additional evidence before making a configuration change.
Executing the Traceflow Tool
Here, we will execute the traceflow troubleshooting tool just to see what happens with the DNS traffic from the source VM to the destination DNS server.
Access the NSX Manager UI –> Plan & Troubleshoot –> Troubleshooting tools –> Traffic Analysis –> Under Traceflow, click on Get Started:
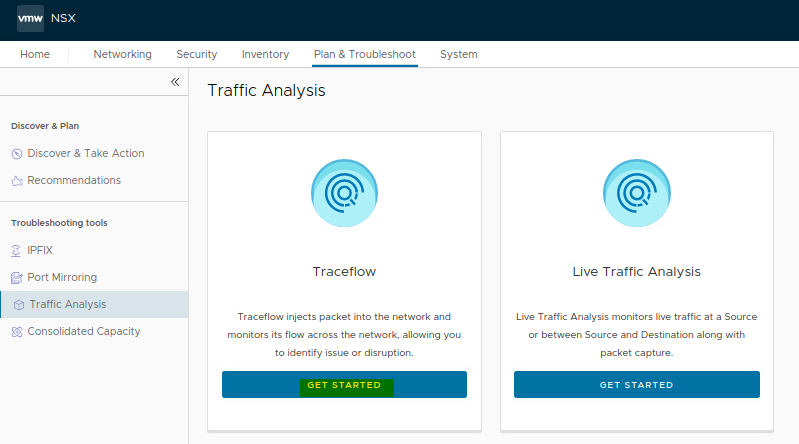
We need to configure the traceflow as we can see in the following picture:
- Protocol type = DNS
- Domain name/IP = sa-tlsvm-01.vclass.local
- Source = VM sa-infosec-03
- Destination = DNS server IP 172.20.10.10
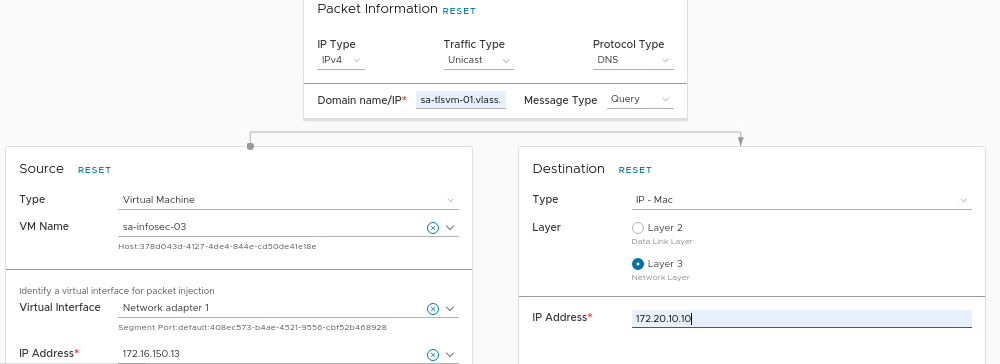
After that, click on TRACE to start the packet injection. After some seconds, we will see the results.
In this case, for instance, our flow has been blocked by the rule ID 2042. Sounds good, because now we have the information of what is happening with our DNS traffic:
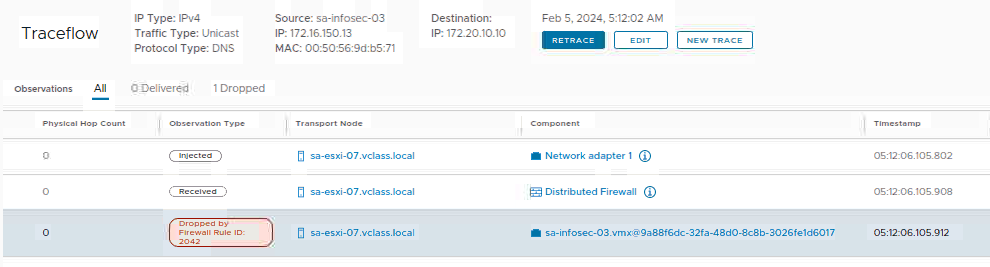
Note: Traceflow is particularly useful here because it gives us evidence about the simulated packet path and identifies the firewall rule responsible for the drop. Instead of changing policies based only on symptoms, we can now inspect the exact rule that acted on the flow.
Optional: Confirm the DFW Drop on the ESXi Host
Traceflow provides a convenient NSX-level view, but when deeper runtime evidence is required, the ESXi host can also show which Distributed Firewall rules are attached to a VM and which rule is processing the traffic.
Se rule logging estiver habilitado:
tail -f /var/run/log/dfwpktlogsIf packet loss needs to be traced deeper through the ESXi datapath, see “How to Troubleshoot Packet Drops on an ESXi Host“.
Checking the Distributed Firewall Rule ID Details
Access the following menu to check all the details of the distributed firewall rule:
Security –> Policy Management –> Distributed Firewall –> Under Category Specific Rules, select INFRASTRUCTURE
As we can see in the following picture, rule ID 2042 has the name “Block_All_Traffic” and its action is “Reject”.
So, based on this, we can conclude that we do not have a rule to allow the DNS traffic from the source VM to the DNS server 172.20.10.10:
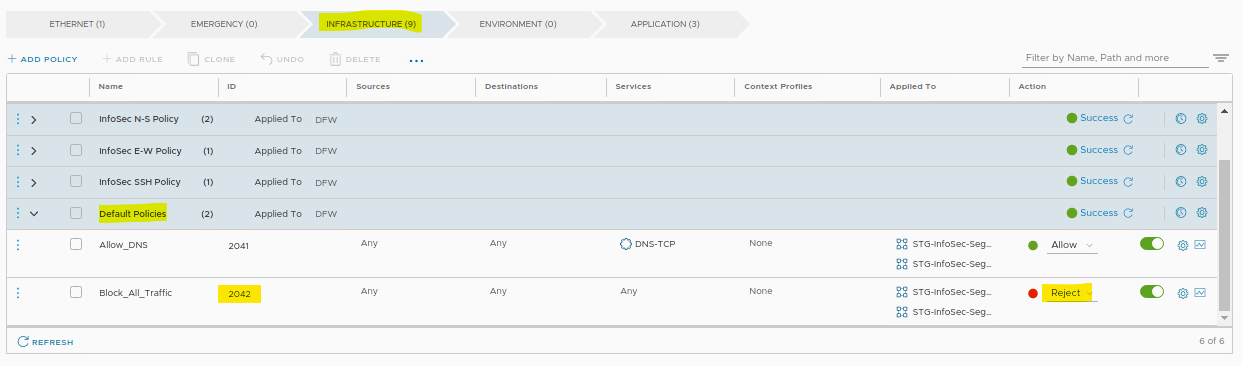
How we can fix this issue?
1- We can create a new rule before the rule “Block_All_Traffic” allowing the DNS-UDP traffic;
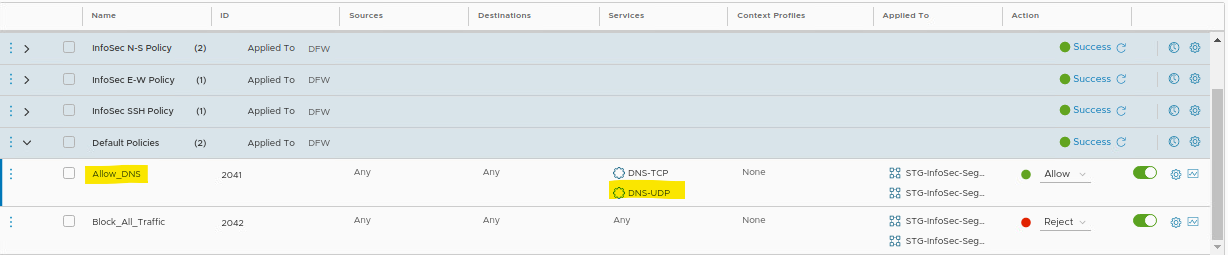
2- Or we can adjust the rule “Allow_DNS” by adding the DNS-UDP service (this rule allows the DNS-TCP traffic only).
The existing Allow_DNS rule allowed TCP port 53 but did not allow the UDP DNS traffic used by this query.
In this lab, adding the DNS-UDP service allowed the current query to reach the DNS server.
Important: DNS is not exclusively a UDP protocol. Valid DNS communication can use both UDP and TCP port 53. In a production policy, allow the protocols required by your DNS architecture rather than assuming that permitting UDP alone is sufficient.
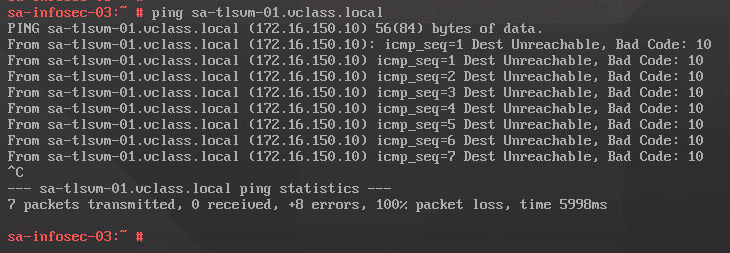
Now, from the source VM, we have a different error:

The “ping” command shows that the DNS resolution issue has been fixed, but we do not have a connection with the target VM yet:
If we execute a new traceflow (now using the TCP traceflow), we continue to see that the traffic continues blocked by the rule ID 2042.
Look that we are using the Destination port 80, and the source and destination VMs are our VMs from the challenge scenario:
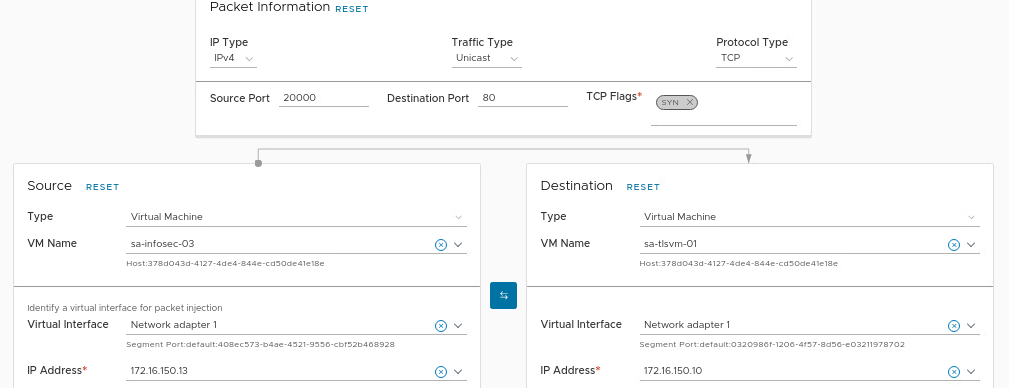
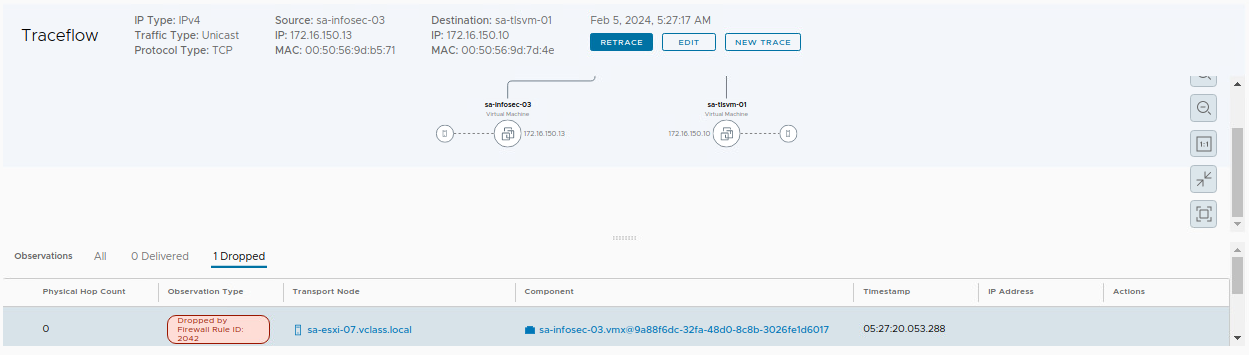
Here, we can conclude that we do not have an East-West rule to allow this traffic. So, we need to check all East-West rules again carefully. Let’s do that!
Under the distributed firewall rules, we found an interesting policy “InfoSec L7 Policy”. Under this policy we have a rule “Allow_HTTP” with an applied context profile:
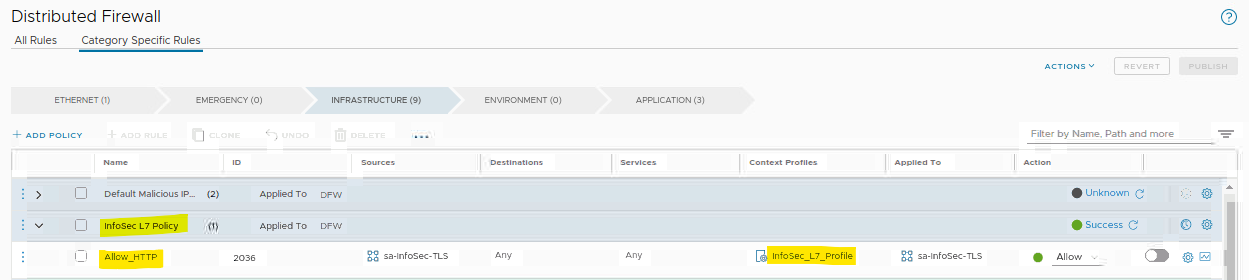
We will open this context profile just to see what configuration we have inside it:
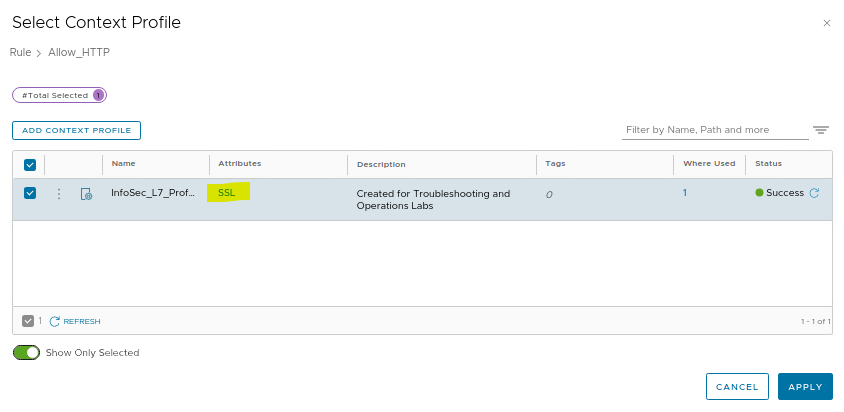
As we can see, we have an “SSL” attribute, however, our traffic is HTTP and does not use HTTPS (SSL). So, based on this, we will remove the “SSL” and add “HTTP”:
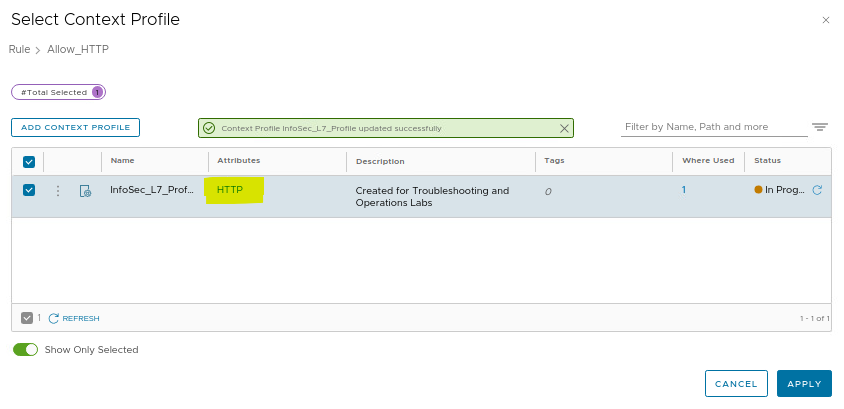
Note: The rule “Allow_HTTP” was disabled. I enabled it!
From our source VM, test the curl command again:
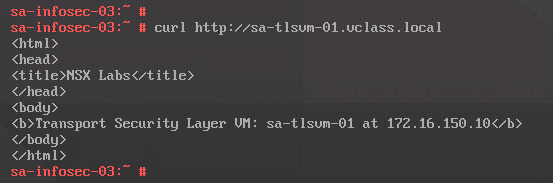
What This Troubleshooting Scenario Demonstrates
The most important takeaway is to troubleshoot one flow at a time: reproduce the failure, identify the exact protocol and destination involved, locate where the packet is blocked, correct the policy, publish it, and retest before moving to the next layer.
This lab demonstrates why network troubleshooting should follow the evidence instead of stopping at the first error.
The original curl failure initially appeared to be an application-connectivity problem, but the first confirmed issue was DNS traffic blocked by the Distributed Firewall. After DNS was corrected, a second test revealed that the HTTP flow itself was still being rejected by another firewall condition.
Traceflow was particularly useful because it identified the exact firewall rule acting on each simulated flow. However, the complete investigation also depended on validating the guest DNS configuration, testing the application again after each change, reviewing rule order and state, and checking the Layer 7 Context Profile.
External References
- Troubleshooting Distributed Firewall (DFW) Broadcom troubleshooting guide for validating NSX Distributed Firewall sources, destinations, services, Context Profiles, actions, Applied To scope, rule order, and rule enablement.
- Traceflow Drop Reason: Firewall Rule Broadcom reference explaining how Traceflow identifies Distributed, Gateway, or Bridge Firewall drops and exposes the firewall rule ID responsible for the packet decision.
-
Understanding NSX Distributed Firewall Packet Logging
Official guidance explaining DFW enforcement at the VM vNIC,
stateful processing, same-host East-West flows, and
dfwpktlogsentries on ESXi hosts. -
DNS Connectivity Issues Involving NSX Firewall
Broadcom practical troubleshooting example for DNS failures
caused by Distributed Firewall policy, including
summarize-dvfilter,vsipioctl, firewall rules, address sets, and packet-drop validation. - DNS Service Entries in NSX Distributed Firewall Rules Broadcom reference illustrating DNS service configurations containing both TCP and UDP port 53 entries in NSX firewall policies.
-
DNS-TCP and DNS-UDP Services in VMware NSX
Official reference explaining the NSX predefined
DNS-TCPandDNS-UDPservices and naming differences between NSX releases. - Layer 7 DNS Rule Skipped Unexpectedly Broadcom example showing how NSX Layer 7 Context Profiles interact with DNS traffic and why the underlying Layer 4 connectivity must work before application identification can succeed.
