

This guide walks through expanding an existing Dell PowerFlex block volume and making the additional capacity available to an ext4 filesystem on a Linux Storage Data Client (SDC). The example uses PowerFlex 4.5.2 in a nested lab environment. The volume is already mapped to the Linux SDC and contains a GPT partition with an ext4 filesystem.
Resizing happens at three separate layers: increase the PowerFlex volume’s capacity, extend the partition so it can use the added space, and then grow the ext4 filesystem. Increasing the volume alone does not expand the partition or filesystem. This procedure demonstrates a 64 GB volume increased to a final size of 96 GB.
Back up important data and verify the exact volume and partition before making changes, especially in production environments .
If you need to create and map a PowerFlex volume before following this procedure, see PowerFlex on Linux: Create and Map a Volume to an SDC.
Increase the PowerFlex Volume Capacity
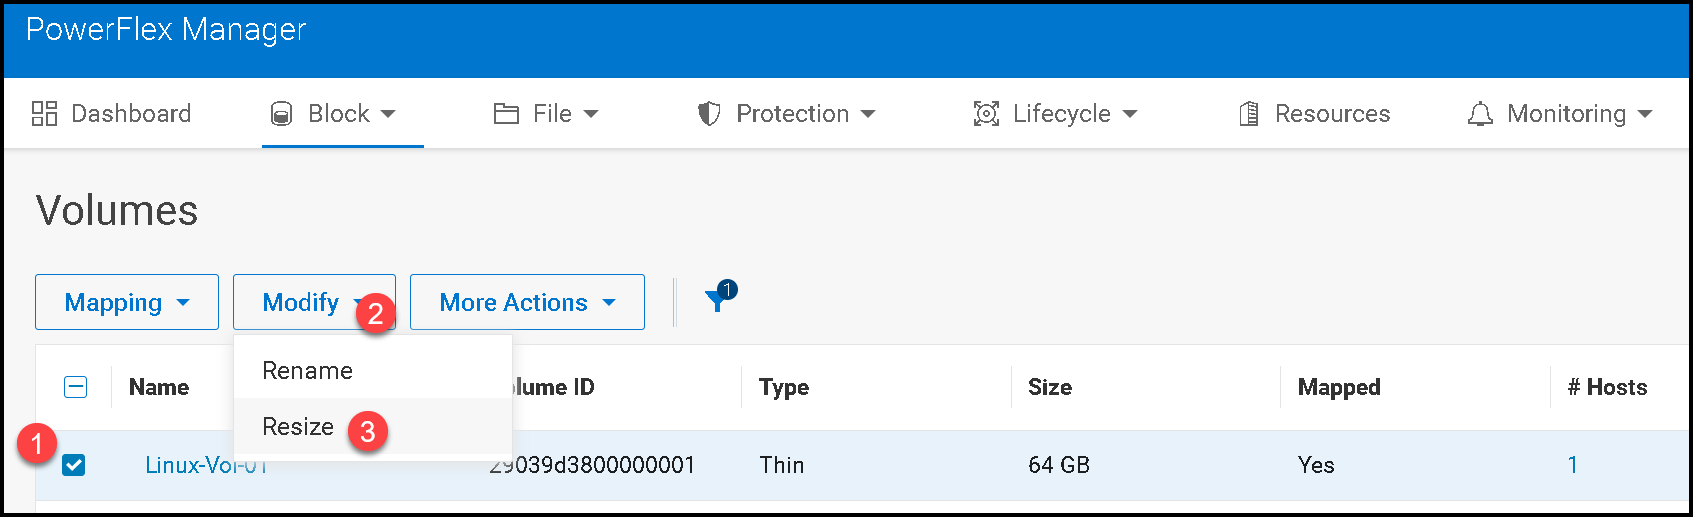
1- Access the PowerFlex Manager UI –> Block –> Volumes –> Select the volume (in this case, for instance, “Linux-Vol-01” –> Modify –> Resize:
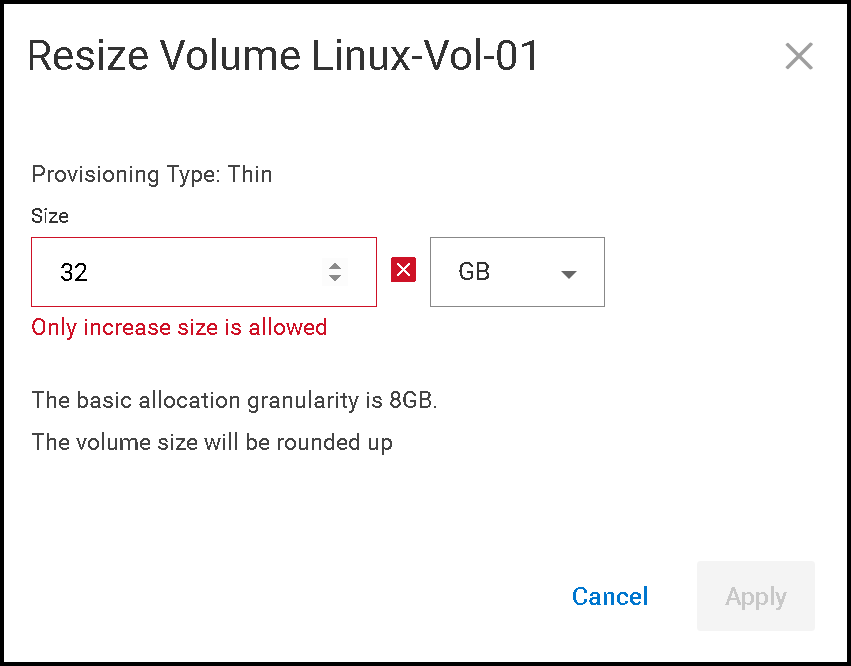
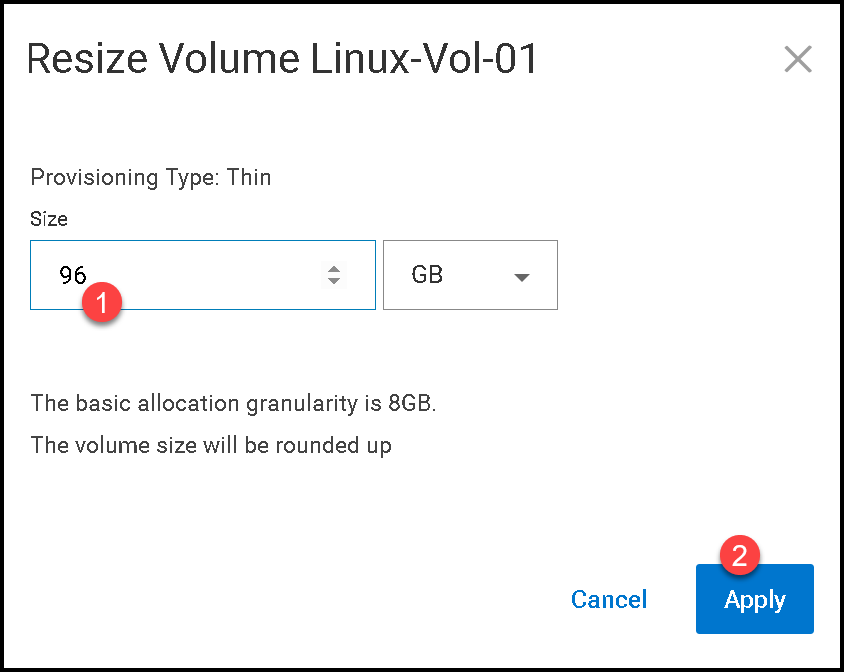
2- PowerFlex supports increasing a volume’s capacity, but not decreasing it. On the Resize Volume page, enter the new total capacity, not the amount to add. For example, to grow a 64 GB volume by 32 GB, enter 96 GB as the new size. The PowerFlex 4.5.x administration guide notes that the basic allocation granularity is 8 GB, so use a supported capacity increment and confirm there is enough free capacity in the storage pool:
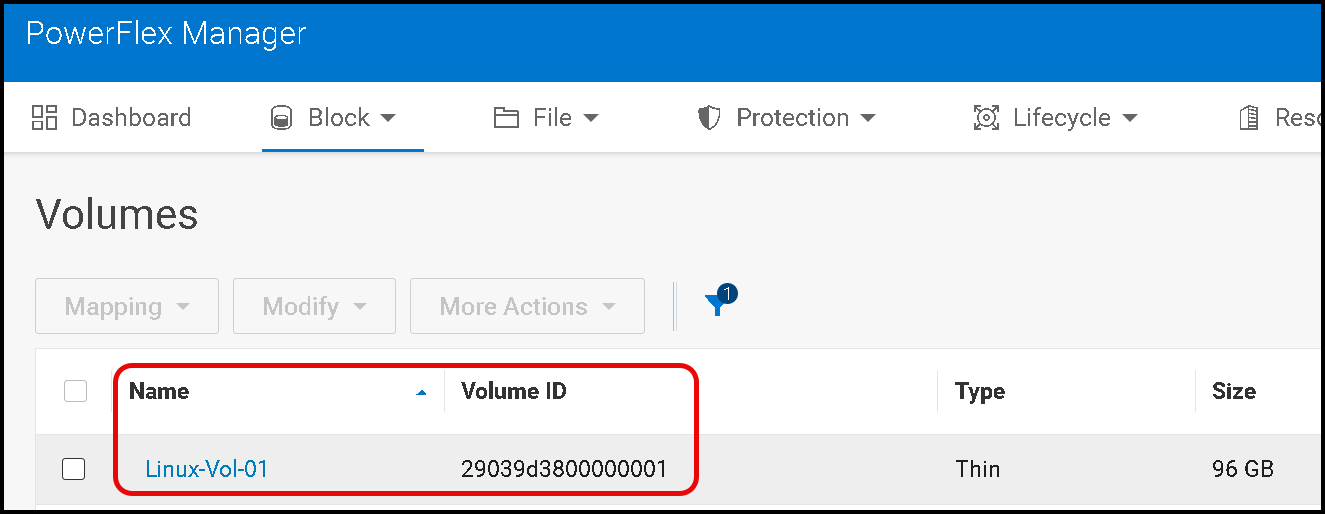
Apply the change and wait for PowerFlex Manager to report that the operation has completed successfully. Record the volume’s unique ID so that you can identify the corresponding device on the SDC:
Confirm the Expanded Device on the Linux SDC
3- Each volume has a “Volume ID”. Take notes of the Volume ID:
4- Access the SDC command line by SSH and check all disk devices already mapped from PowerFlex.
With the following command, we can see what volume is mapped to what disk identifier:
ls -l /dev/disk/by-id/
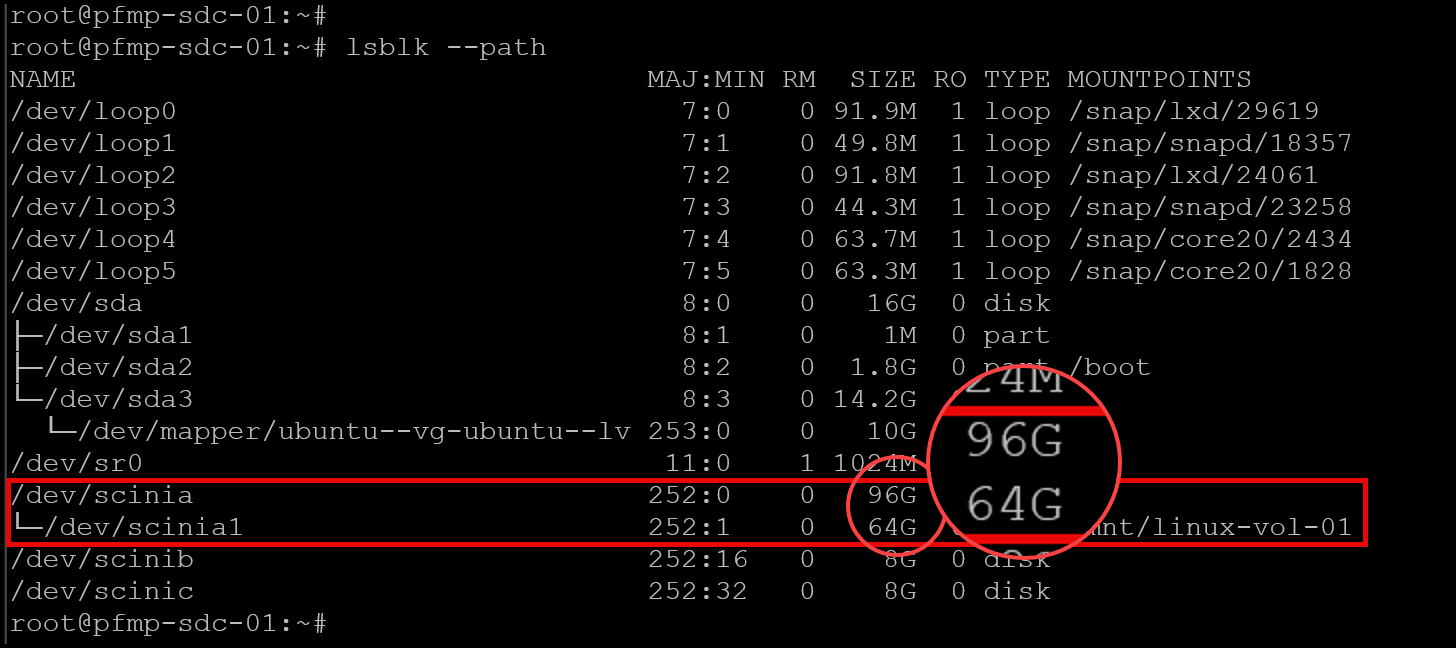
Match the volume ID recorded in PowerFlex Manager to the corresponding emc-vol-* link. In the lab example, the volume ID 29039d3800000001 maps to /dev/scinia. Confirm the current device and partition sizes before continuing:
lsblk --pathAfter the PowerFlex volume grows to 96 GB, the operating system may show the larger size for the whole device while the existing partition remains at its original size. That is expected: the partition and filesystem still need to be expanded. Do not proceed unless you have positively identified the correct PowerFlex device and partition:
Extend the GPT Partition
5- The following example assumes the PowerFlex device is /dev/scinia, the existing partition is number 1, and that partition can be extended to the end of the device. Adjust the device and partition number to match your host. Save or snapshot important data before editing the partition table.
Start parted and inspect the partition table first:
parted /dev/sciniaAt the parted prompt, verify that partition 1 is the intended GPT partition and then extend its end to the end of the enlarged device:
(parted) print
(parted) resizepart 1 100%
(parted) print
(parted) quit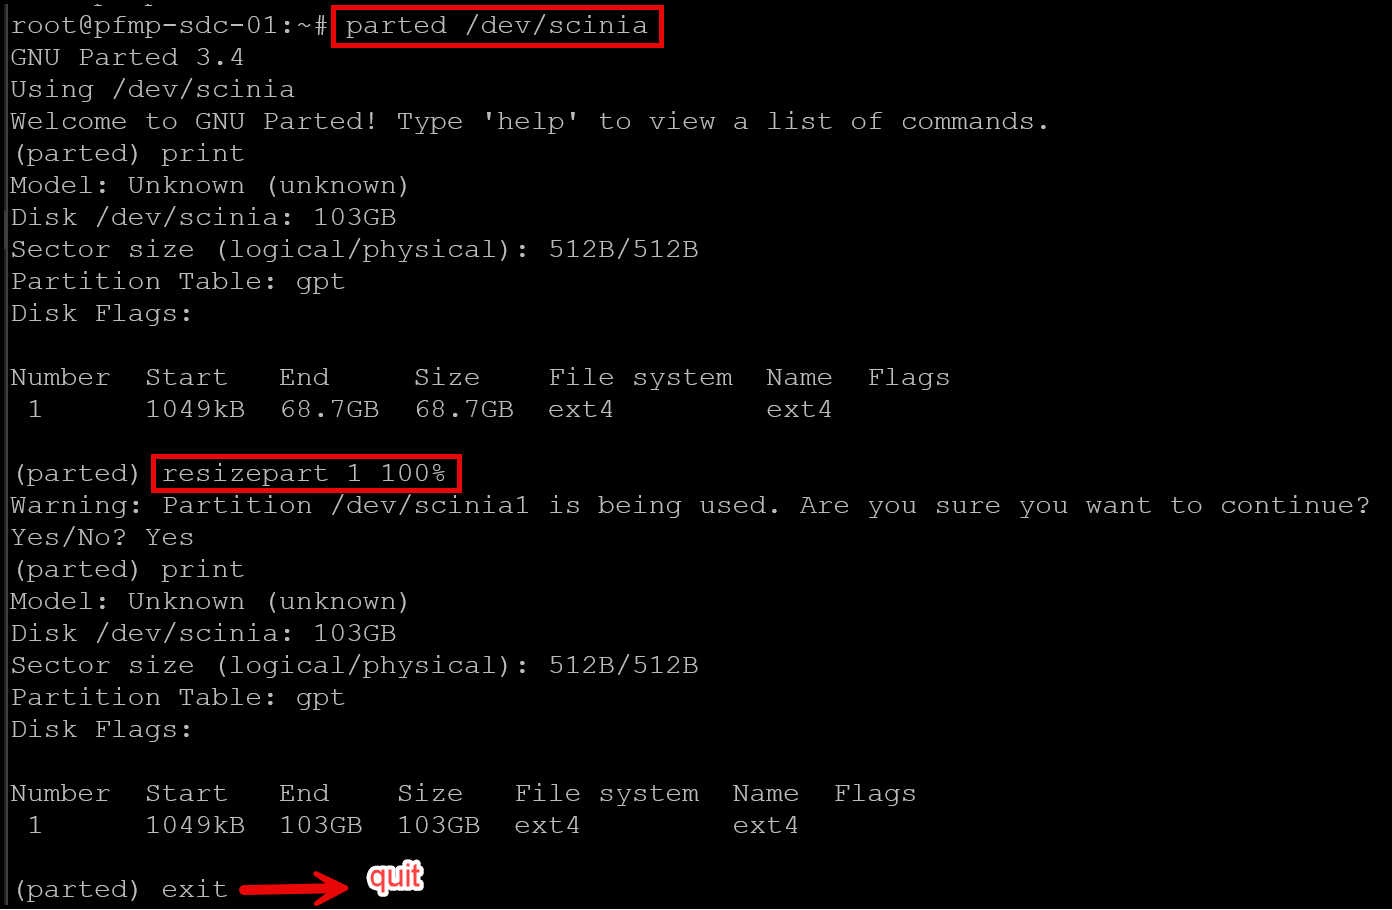
Important: resizepart changes the partition boundary; it does not resize the filesystem. Confirm that the new partition size is visible to the kernel before proceeding:
lsblk --path
cat /proc/partitions
If the partition still appears at its old size, do not run
resize2fsyet. Follow your Linux distribution’s guidance for re-reading the partition table, or schedule a maintenance window if the host cannot safely recognize the change online.
Grow the ext4 Filesystem
6- Once the partition reports the enlarged size, grow the ext4 filesystem on that partition. The lab example uses /dev/scinia1:
resize2fs /dev/scinia1
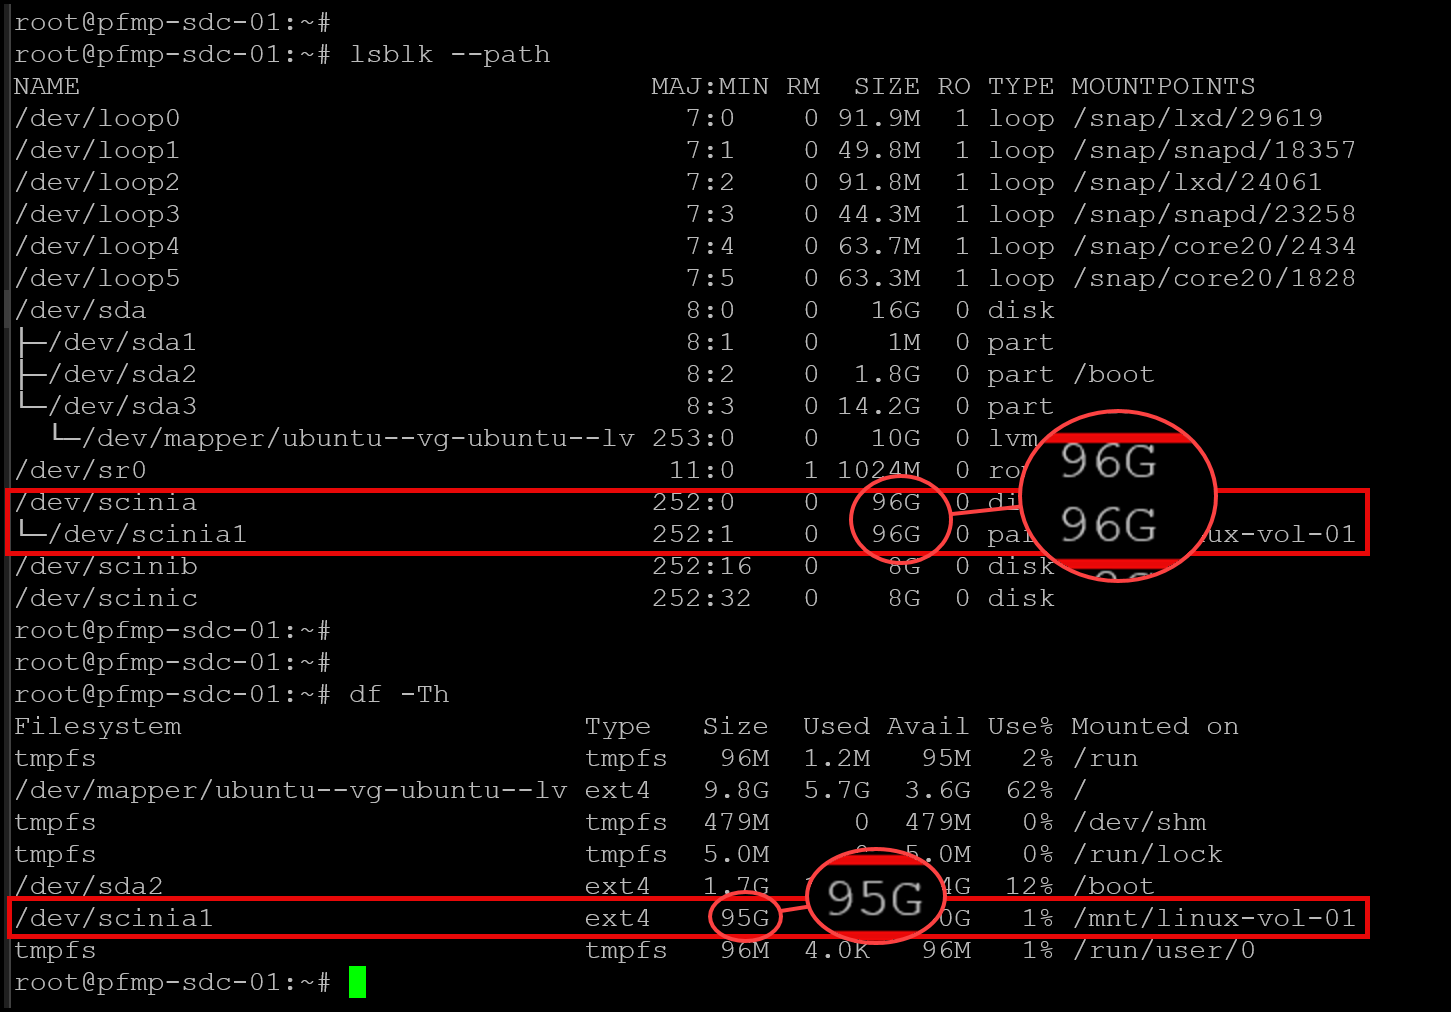
Check the resulting block-device, partition, and filesystem sizes:
lsblk --path
df -Th
The filesystem capacity should now reflect the additional space, allowing for differences in how tools report GB and GiB:
Verify the New Capacity at Both Layers
Confirm that PowerFlex Manager reports the intended volume size and that Linux shows the larger partition and ext4 filesystem.
Red Hat documents that an ext4 filesystem can be grown while mounted with resize2fs, but the ability to resize an in-use partition and have the kernel recognize the new boundary can depend on the Linux platform and configuration.
The lab procedure completing without a service interruption is not a guarantee of zero downtime for every production environment. Validate support for the exact operating system, PowerFlex release, workload, and maintenance requirements before applying it in production.
External References
- Dell — PowerFlex 4.5.x Administration Guide: Increase Volume Size Documents how to increase PowerFlex volume capacity in the UI, notes that volume capacity cannot be decreased, and describes the 8 GB basic allocation granularity.
- Red Hat — Partition Operations with parted Explains how to inspect a partition table, use `resizepart` to extend a partition, and verify that the kernel recognizes the new size. It also clarifies that partition resizing and filesystem resizing are separate operations.
- Red Hat — Getting Started with an ext4 File System Documents the `resize2fs` utility and explains that ext4 filesystems can be grown while mounted when the underlying block device has sufficient capacity.
- Dell — PowerFlex 4.5.x Install and Upgrade Guide: Create Partitions and Mount Points Provides PowerFlex-specific Linux guidance on identifying mapped volumes and partitions, and warns that `/dev/sciniX` device names are not guaranteed to persist across reboots.
