

Configuring bond and bridge interfaces on RHEL 8 is an important task for Linux administrators working with advanced networking, virtualization, and high-availability environments. These technologies improve network reliability by combining multiple interfaces and creating flexible virtual network connections.
In this guide, we will demonstrate how to create a bond interface and associate it with a bridge interface using NetworkManager tools such as nmcli. The configuration example shows how to combine physical network interfaces into a logical bond and use it as the foundation for a bridge connection.
Bond Interface
A bond interface aggregates multiple physical or virtual network interfaces into a single logical interface. This setup provides:
- Redundancy (failover): If one interface fails, traffic continues on another.
- Load balancing: Distributes traffic across multiple interfaces.
Key Features:
- Appears as a single interface (e.g.,
bond0) - Uses bonding modes like:
active-backup: One interface active, others standbybalance-rr: Round-robin packet distribution802.3ad: Link aggregation using LACP (requires switch support)
- Managed via
nmcli,nmtui, or the RHEL web console
Bridge Interface
A bridge interface acts like a virtual switch, forwarding traffic between multiple interfaces based on MAC addresses. It’s essential in virtualization to connect VMs to the same network as the host.
Key Features:
- Appears as a single interface (e.g.,
br0) - Connects multiple interfaces (physical, virtual, bonded, etc.)
- Used in KVM setups to allow VMs direct access to the LAN
- Managed via
nmcli,nmtui, or the web console
When to Use Each
| Use Case | Bond Interface | Bridge Interface |
|---|---|---|
| Redundancy / Failover | ✅ Yes | ❌ Not its purpose |
| Load Balancing | ✅ Yes (some modes) | ❌ Not its purpose |
| Connecting VMs to LAN | ❌ Not directly | ✅ Yes |
| Aggregating multiple NICs | ✅ Yes | ✅ Yes (via ports) |
| Acts like a virtual switch | ❌ No | ✅ Yes |
Step-by-step Bound + Bridge Configuration
Before providing the step-by-step configuration, let’s give an example of our topology:
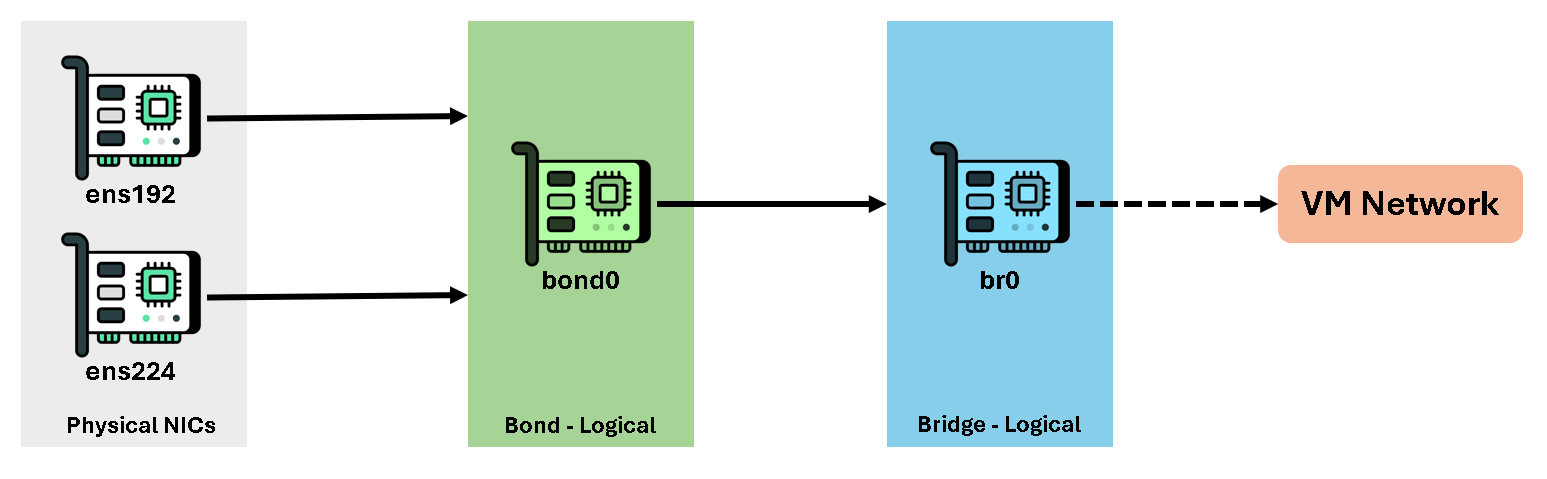
As we can see, there are two physical interfaces (ens192 and ens224). The bond “bond0” will be created, and the bridge “br0” will be created under the bound interface.
Note: You can use the command “ifconfig” or “ifconfig -a” to determine how your system recognized the physical interfaces!
To perform all configuration, we’re accessing the virtual machine through the virtual console (like accessing the VM using a local monitor and keyboard):
1- Inspect all connections with “nmcli” and delete the current connections:
nmcli connection show
In our case, the interface “ens192” was configured during the RHEL installation. Let’s delete it:
nmcli con delete ens192
2- Create the bridge interface (br0) and define the IP address, Mask, Gateway, and DNS server.
We’re also disabling IPv6 and adjusting the Spanning-Tree (STP) configuration for the bridge:
nmcli con add type bridge ifname br0 con-name br0 ipv4.method manual ipv4.addresses 192.168.255.168/24 ipv4.gateway 192.168.255.1 ipv4.dns 192.168.255.3 ipv6.method disabled

nmcli connection modify br0 bridge.stp no
3- Create the bond interface (bond0) and associate it with the bridge interface “br0”:
nmcli con add type bond ifname bond0 con-name bond0 master br0
nmcli connection modify bond0 mode active-backup
nmcli connection modify bond0 connection.autoconnect-slaves yes
nmcli connection modify bond0 bond.options "mode=active-backup,miimon=100"
At the end of this task, we should have both bond and bridge interfaces configured:
nmcli con show
4- Add both physical interfaces (ens192 and ens224) to the bond interface.
So, the bond interface was created, but does not have any physical interfaces associated at this time. Now, we need to associate the physical nics to the bond interface:
nmcli con add type ethernet ifname ens192 con-name bond0-ens192 master bond0
nmcli con add type ethernet ifname ens224 con-name bond0-ens224 master bond0
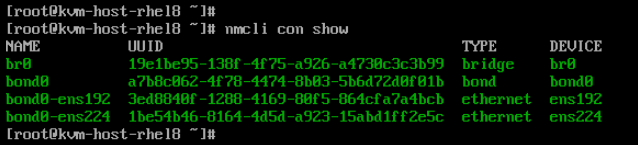
Inspect all interfaces. Now, we should see all interfaces:
5- Enable/up all connections:
nmcli connection up bond0-ens192
nmcli connection up bond0-ens224
nmcli connection up bond0
nmcli connection up br0
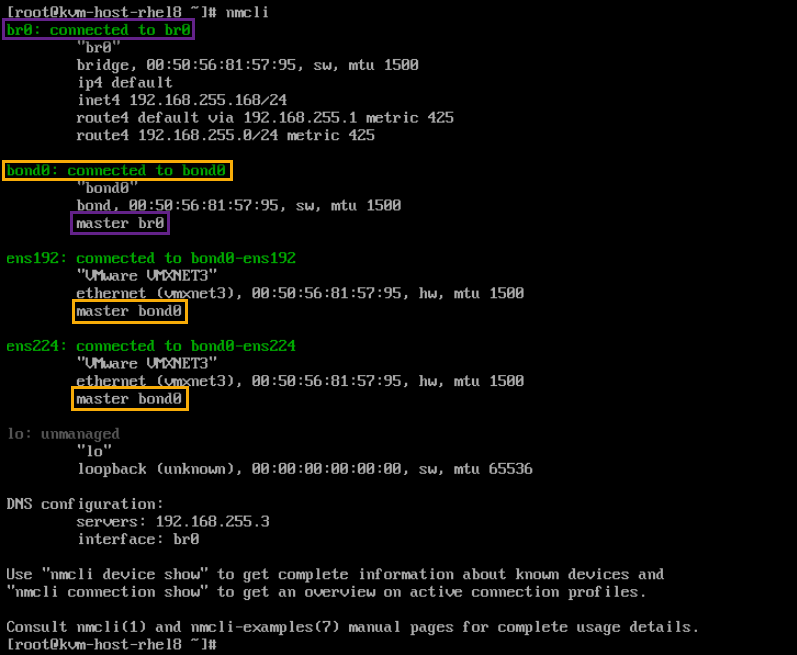
6- Inspect the interfaces:
nmcliAs we can see in the following picture, both physical interfaces are associated with the bond interface, and the bond interface is associated with the bridge interface:
7- Test the network communication.
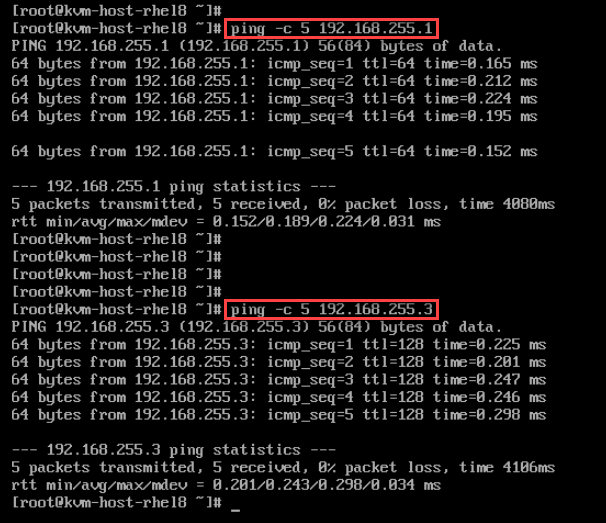
In our case, we’re testing the communication with the default gateway (192.168.255.1) and with the DNS server (192.168.255.3):
That’s it for now 🙂
