


Working with Shell Input and Output on RHEL aims to provide essential knowledge of standard input, standard output, and standard error on a Linux system. We’ll demonstrate how to manipulate each one and how to utilize it with pipelines to achieve a wide range of possible outcomes. All examples are run on Red Hat Enterprise Linux (RHEL); however, they apply to any Linux distribution.
Standard Input (stdin), Standard Output (stdout), and Standard Error (stderr)
A running program, or process, reads input and writes output. When we run a command from the shell prompt, it typically reads its input from the keyboard and sends its output to the terminal window.
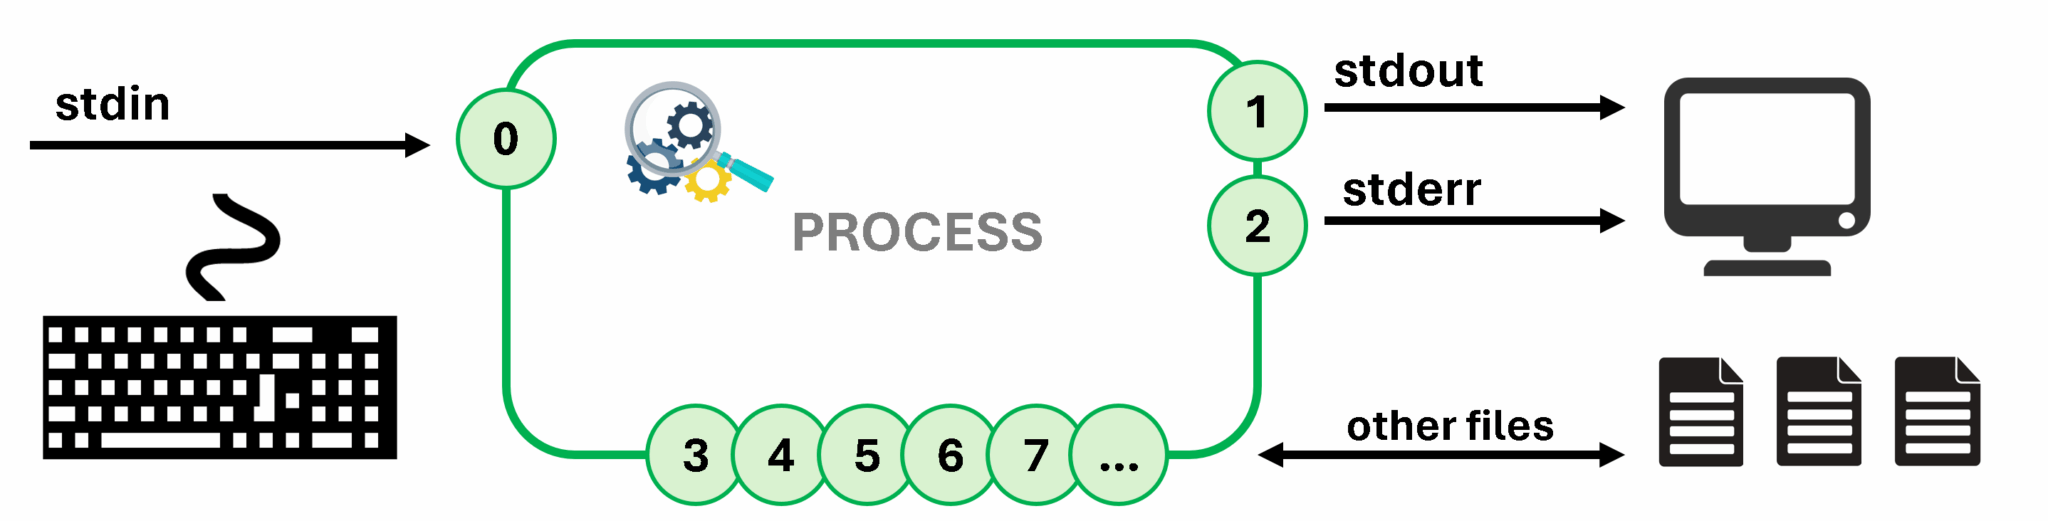
A process uses numbered channels, known as file descriptors, to receive input and send output. All processes start with at least three file descriptors:
- Standard input (channel 0) reads input from the keyboard.
- Standard output (channel 1) sends regular system output to the terminal.
- Standard error (channel 2) sends error messages to the terminal (output).
If a program opens separate connections to other files, then it might use file descriptors with higher numbers. The following pictures serve as a visual aid for that:
The following table summarizes information about file descriptors:
| Number | Channel name | Description | Default connection | Usage |
|---|---|---|---|---|
| 0 | stdin | Standard input | Keyboard | Read only |
| 1 | stdout | Standard output | Terminal | Write only |
| 2 | stderr | Standard error | Terminal | Write only |
| 3+ | | Other files | None | Read, write, or both |
Redirecting Output to a File
The Input/Output (I/O) redirection alters how a process receives its input or output. Instead of getting input from the keyboard or sending output and errors to the terminal, the process can read from or write to files. With redirection, you can save messages to a file instead of displaying the output on the terminal. You can also use redirection to discard output or errors, so that the output does not appear on the terminal or in a file.
We can redirect the standard output (stdout) of a process to suppress the process output from appearing on the terminal. If you redirect standard output to a file and the file does not exist, it is created. If the file does exist and the redirection does not append to the file, then the redirection overwrites the file’s contents. To discard the output of a process, you can redirect it to the empty /dev/null special file, which discards channel output that is redirected to it.
The following pictures show each possibility that we have:
Usage: > FILE
Explanation: Redirect stdout to overwrite a file. If the file does not exist, a file is created.
Example: Execute the “ls -la” command and redirect its output to the file “ls-report.txt”:
ls -la > ls-report.txt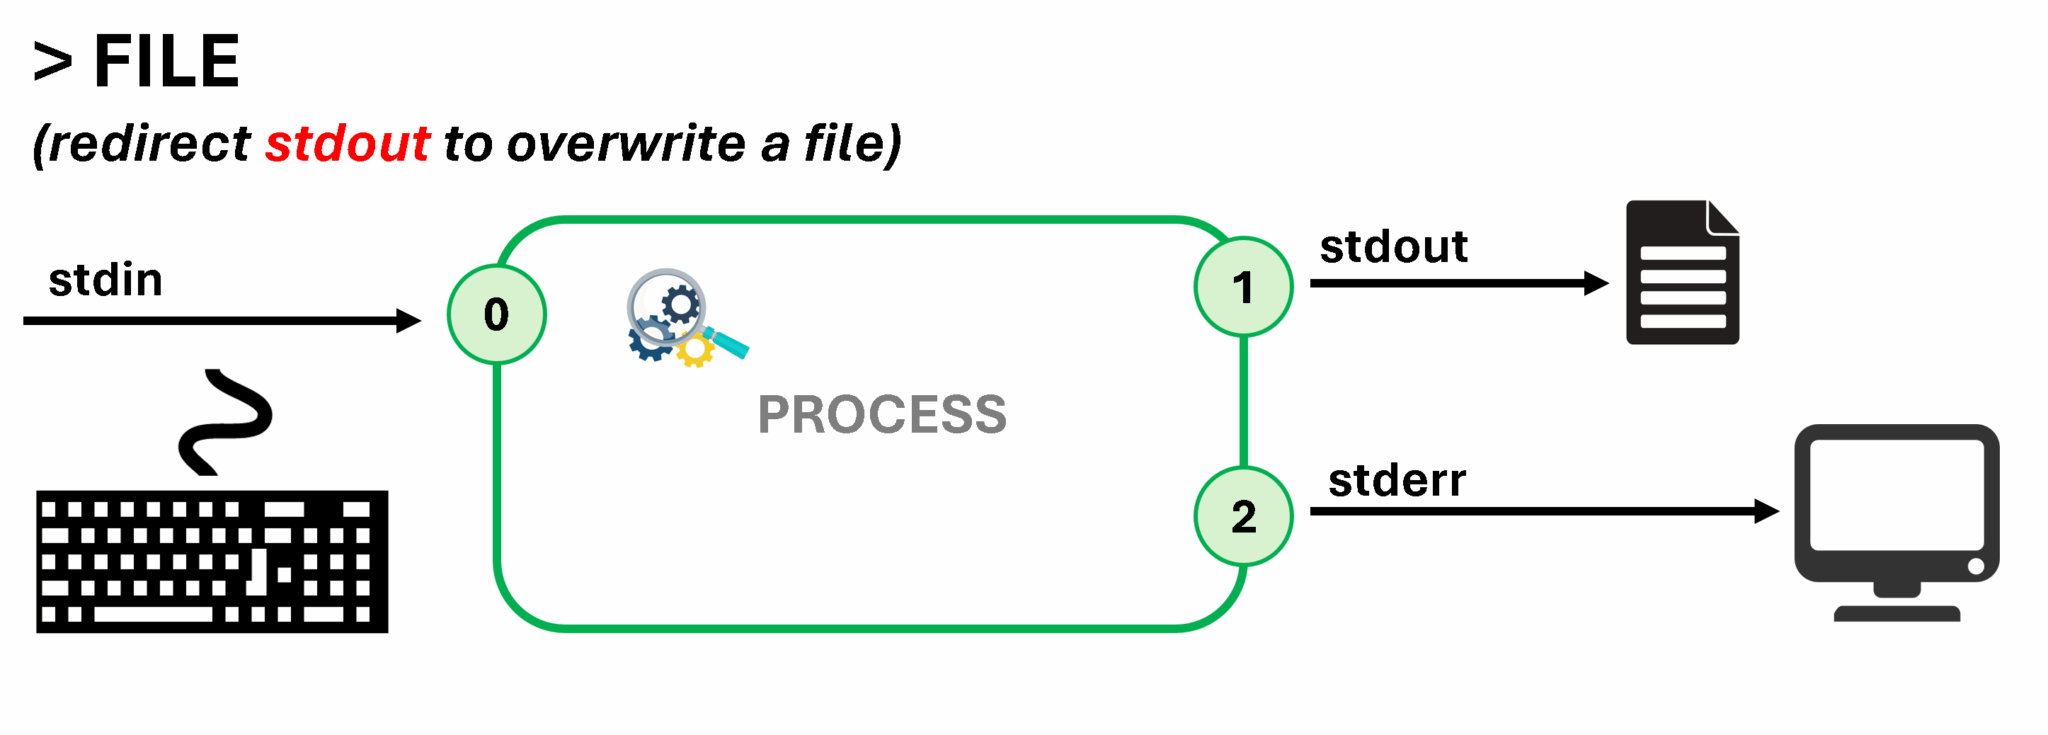
Usage: >> FILE
Explanation: Redirect stdout to append to a file.
Example: Execute the “df -Th” command and redirect its output to the same file used in the previous example (“ls-report.txt”). However, the df output will be appended to the file (will not overwrite the file):
df -Th >> ls-report.txt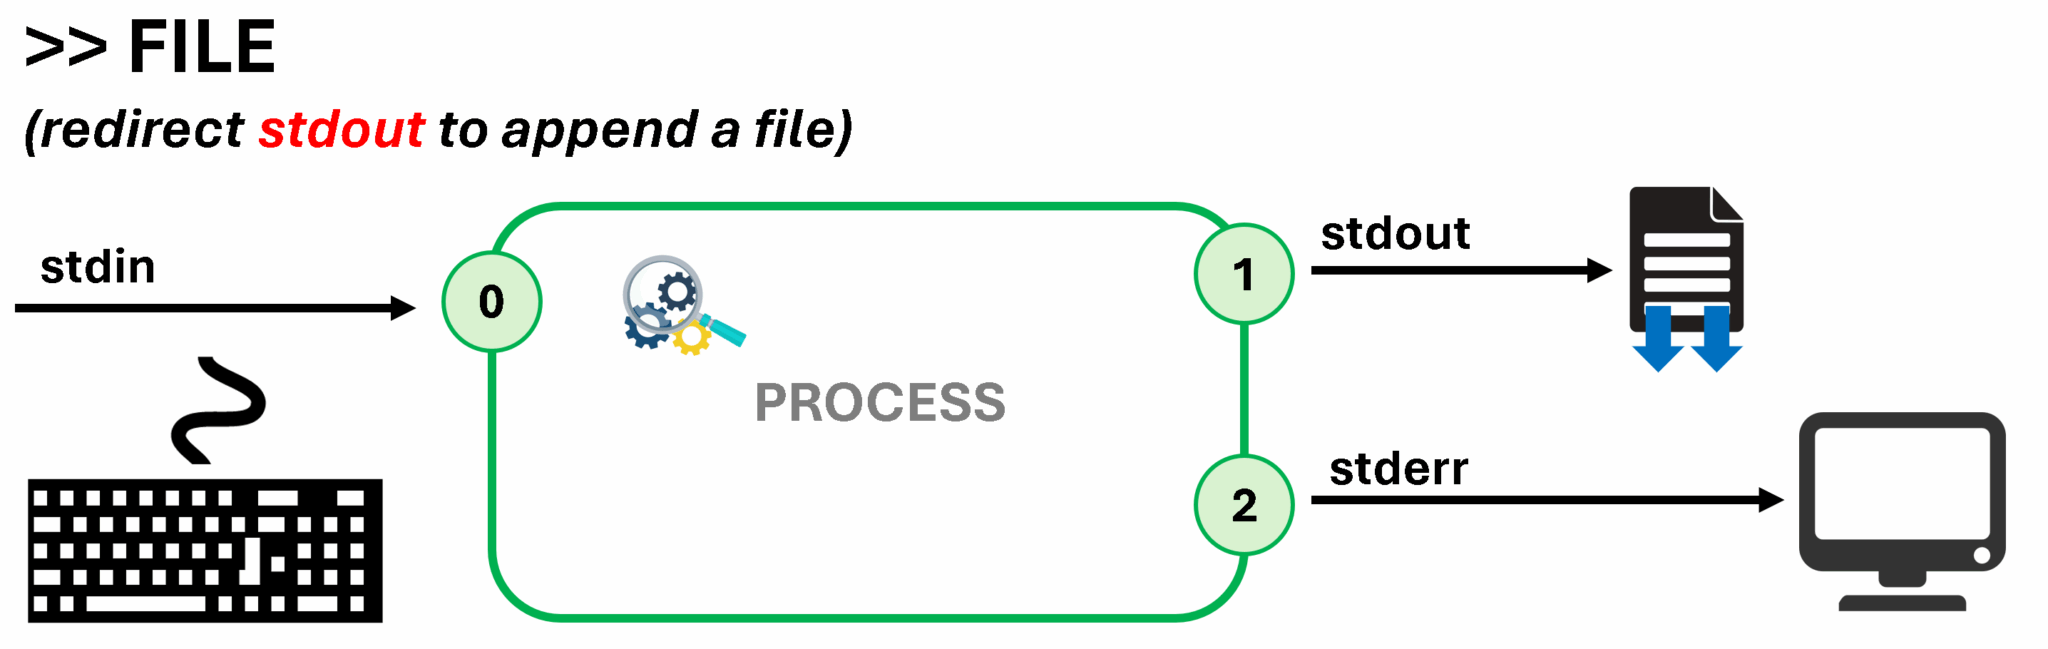
Usage: 2> FILE
Explanation: Redirect stderr to overwrite a file.
Example: Execute an nonexistent command and redirect stderr to a file:
hh 2> error.txt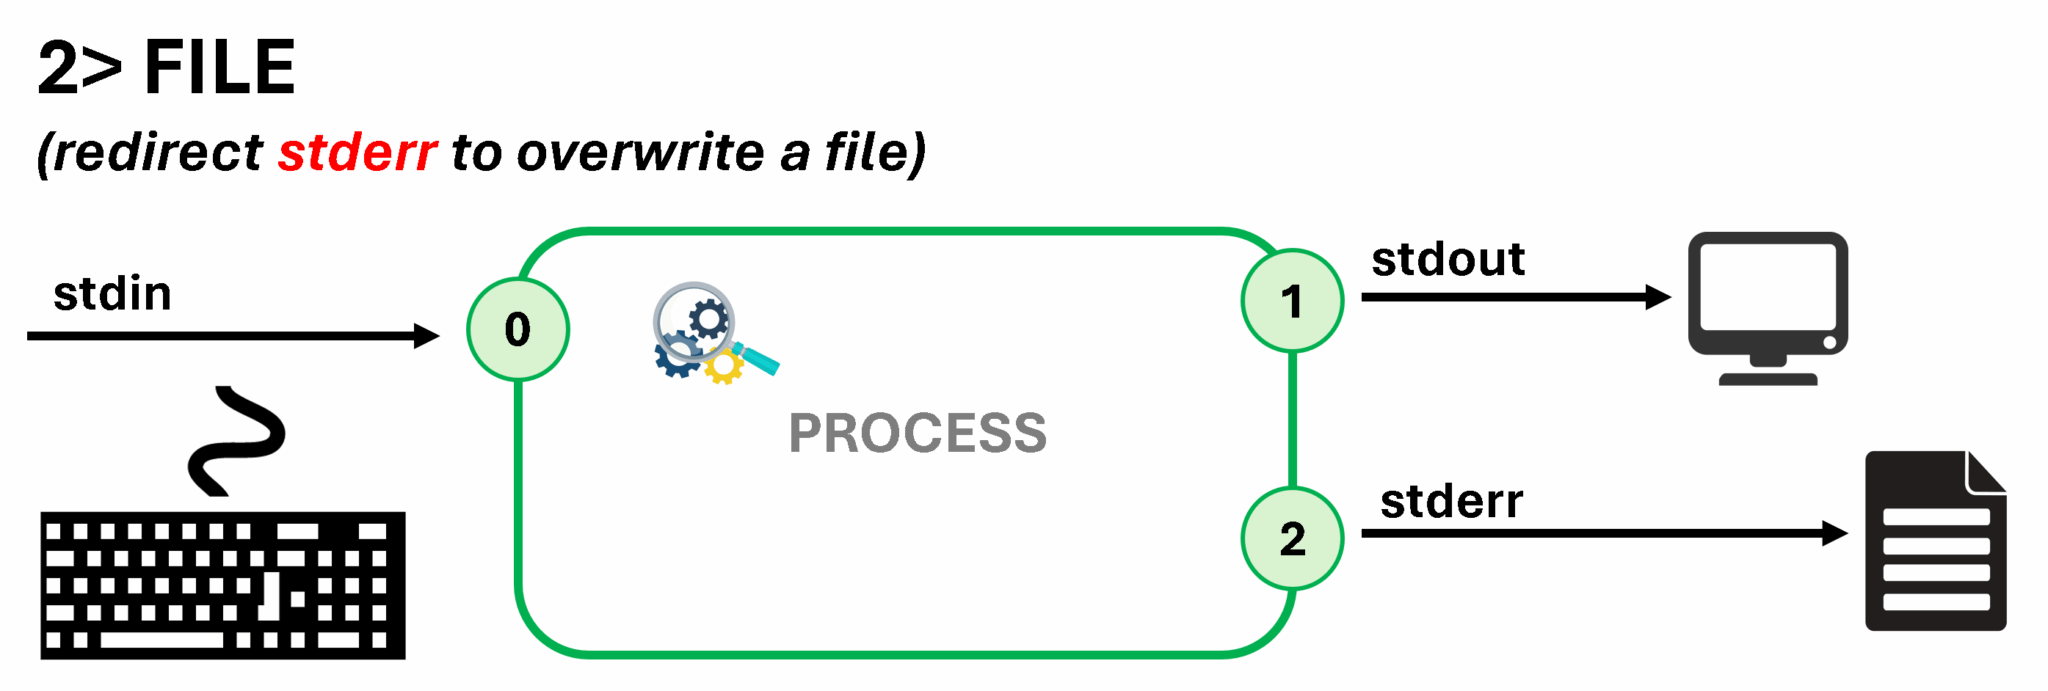
Usage: 2> /dev/null
Explanation: Discard stderr error messages by redirecting them to /dev/null.
Example: Execute the find command and redirect the stderr to the special file /dev/null (trash bin):
find / -name *.sh 2> /dev/null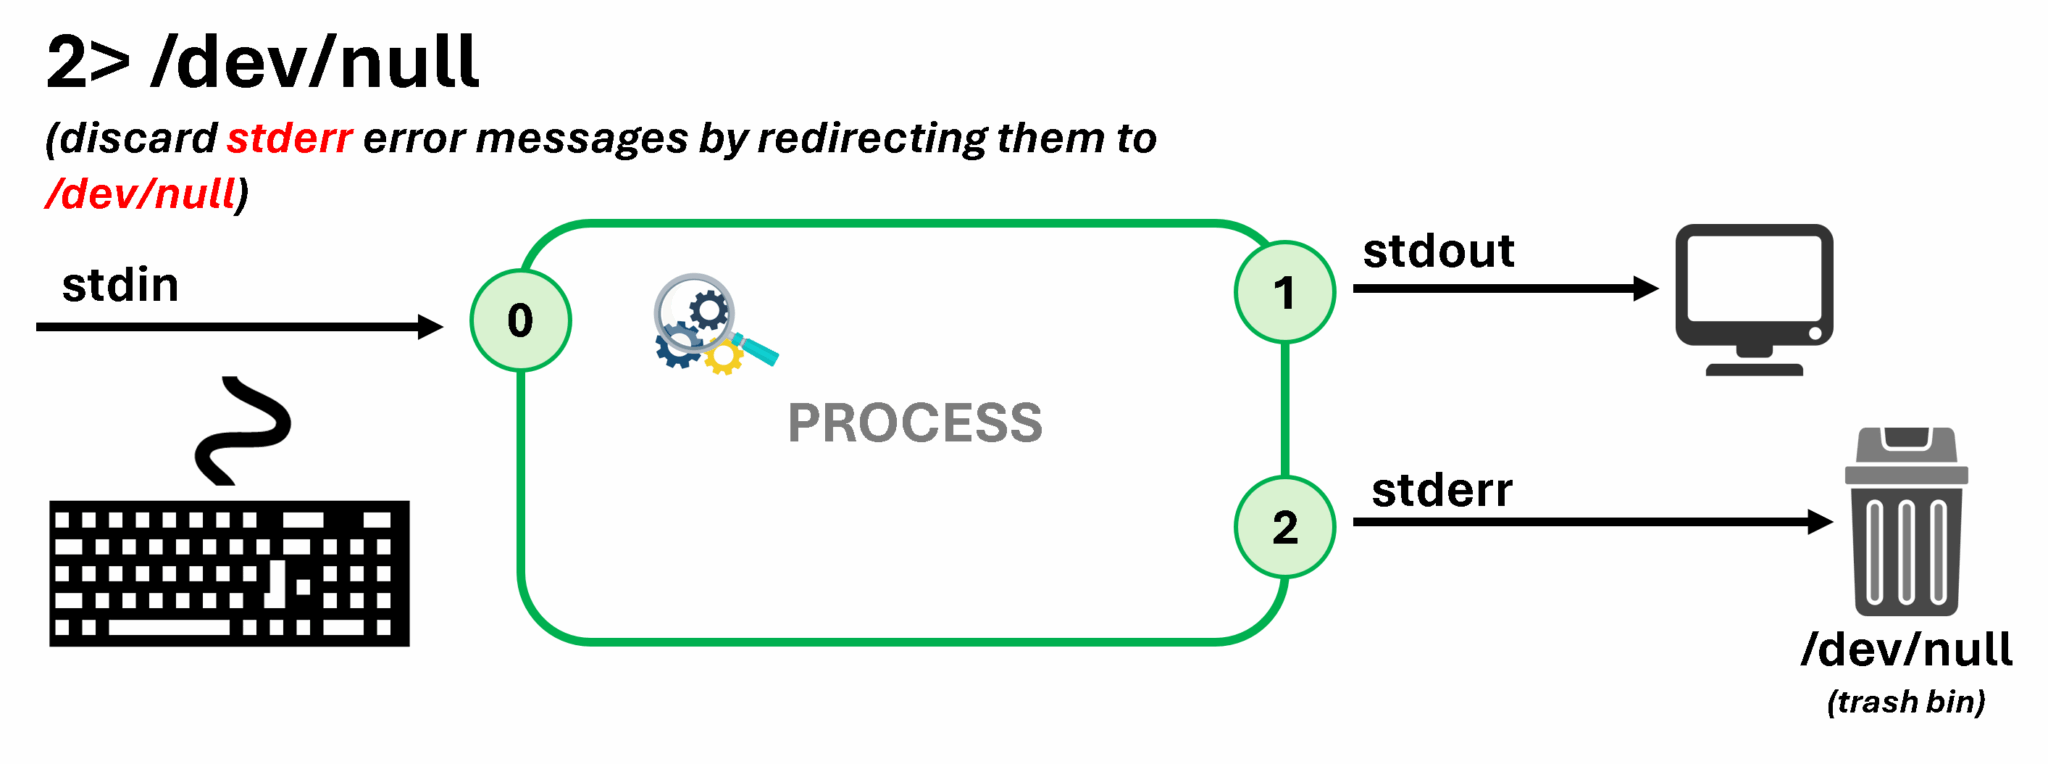
Usage: > FILE 2>&1 or &> FILE
Explanation: Redirect stdout and stderr to overwrite the same file.
Example: Execute the find command and redirect the stdout and stderr to the same file:
find / -name *.sh > find-stdout_stderr.log 2>&1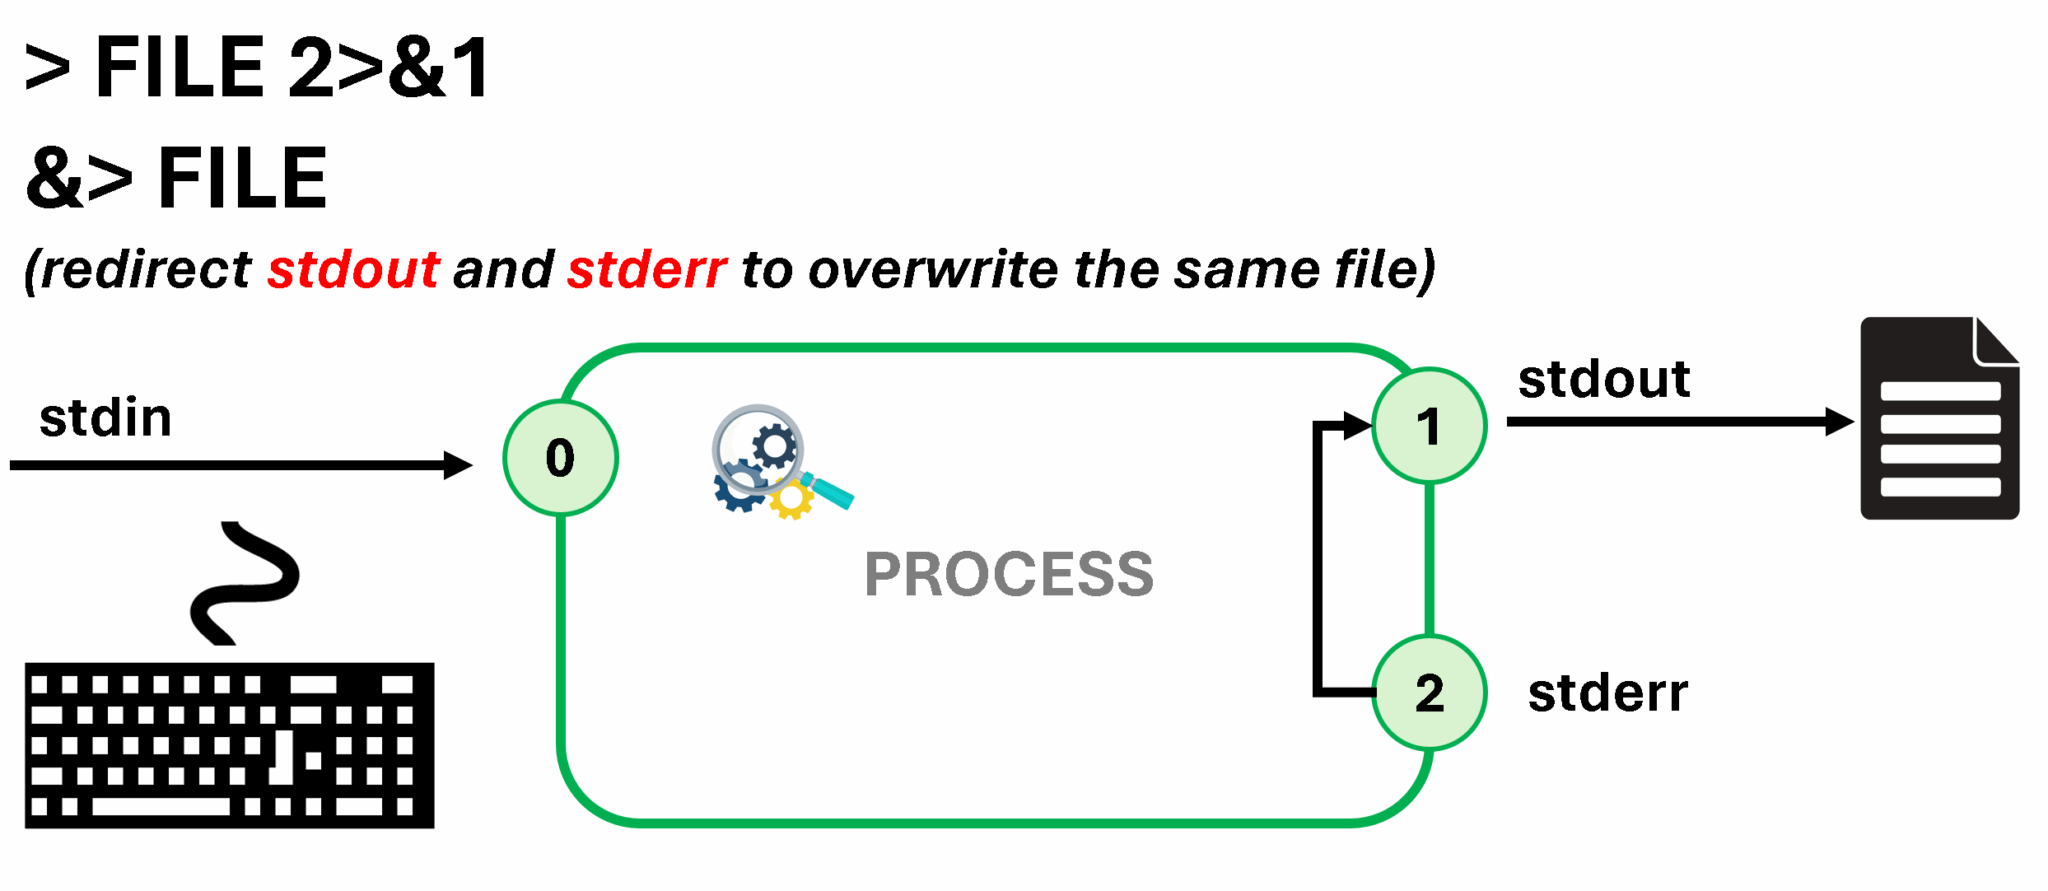
Usage: >> FILE 2>&1 or &>> FILE
Explanation: Redirect stdout and stderr to append to the same file.
Example: Execute another find command and use the same file used in the previous example (we will append the results and not overwrite the file content):
find / -name *.conf >> find-stdout_stderr.log 2>&1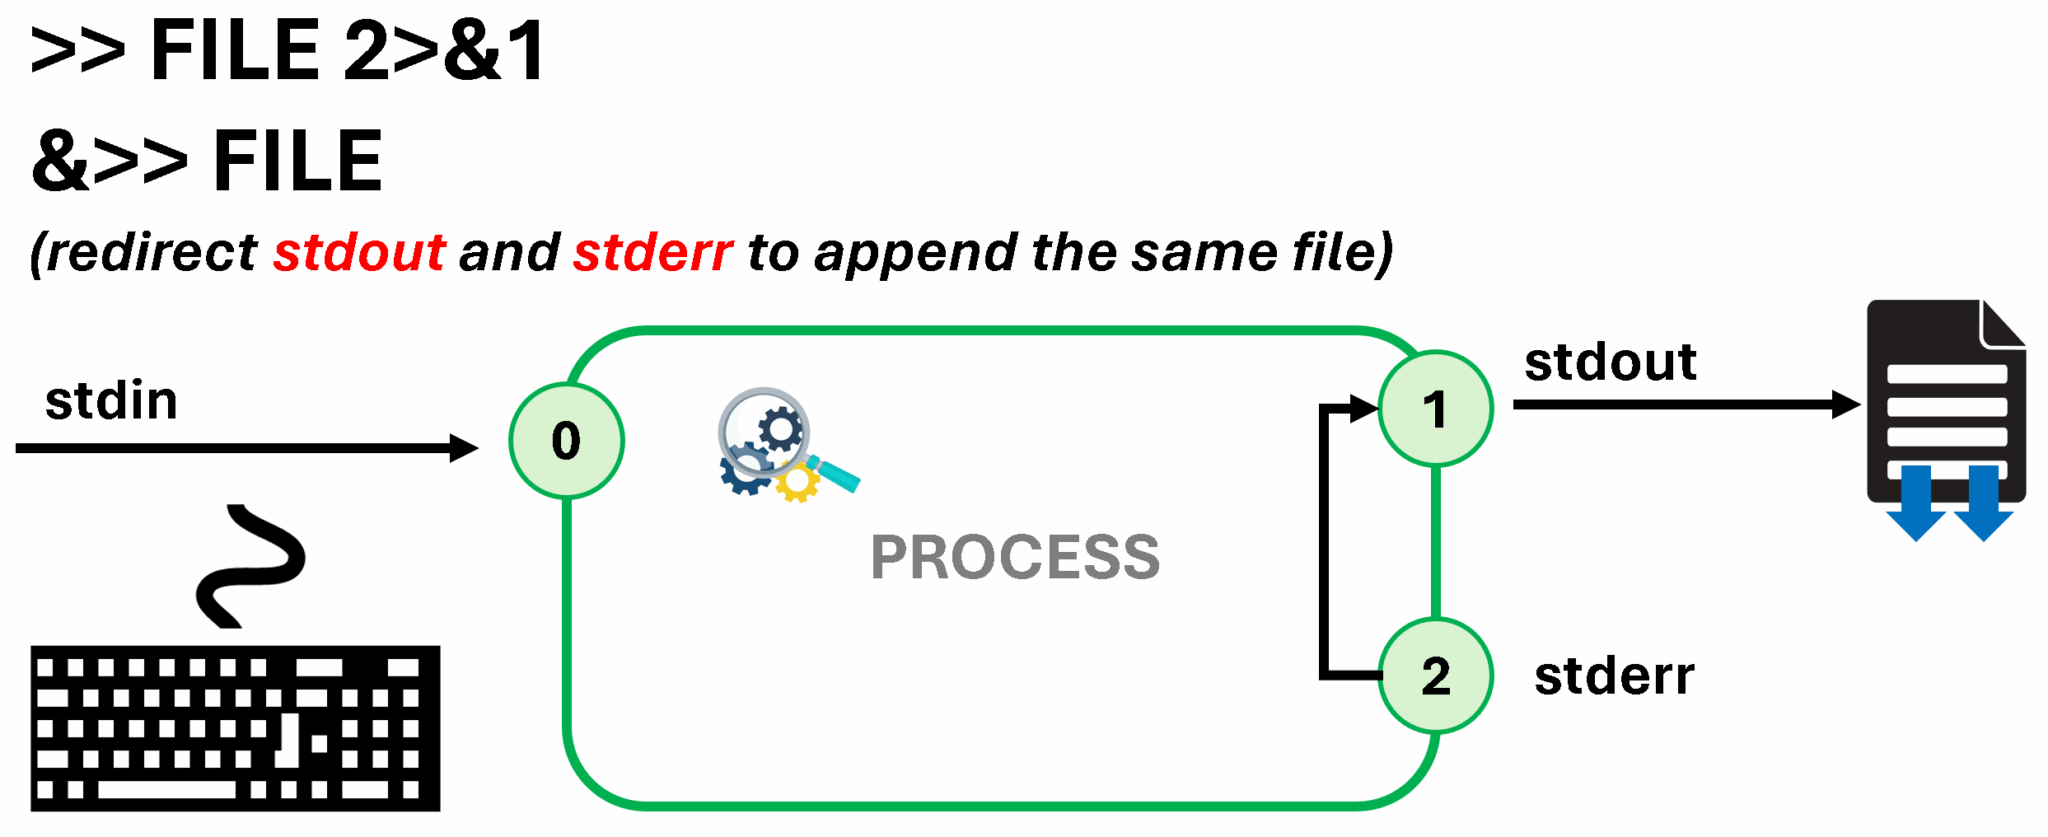
Important:
The order of redirection operations is important. The following sequence redirects standard output to the output.log file and then redirects standard error messages to the same place as standard output (output.log):
> output.log 2>&1
The following sequence redirects in the opposite order. This sequence redirects standard error messages to the default place for standard output (the terminal window, so no change) and then redirects only standard output to the output.log file:
2>&1 > output.log
For this reason, some people prefer to use the merging redirection operators:
&> output.loginstead of> output.log 2>&1&>> output.loginstead of>> output.log 2>&1
Output Redirection Examples
1- Save a time stamp in the /tmp/saved-timestamp file for later reference:
date > /tmp/saved-timestamp
2- Copy the last 100 lines from the /var/log/secure file to the /tmp/last-100-log-secure file:
tail -n 100 /var/log/secure > /tmp/last-100-log-secure
3- Concatenate all four step files into one file in the tmp directory:
cat step1.log step2.log step3.log step4.log > /tmp/all-four-steps-in-one
4- List the home directory’s hidden and regular file names, and save the output to the my-file-names file:
ls -a > my-file-names5- Append a line to the existing /tmp/many-lines-of-information file:
echo "new line of information" >> /tmp/many-lines-of-information6- Redirect errors from the find command to the /tmp/errors file when viewing regular command output on the terminal:
find /etc -name passwd 2> /tmp/errors7- Save process output to the /tmp/output file and error messages to the /tmp/errors file:
find /etc -name passwd > /tmp/output 2> /tmp/errors8- Save process output to the /tmp/output file and discard error messages:
find /etc -name passwd > /tmp/output 2> /dev/null
9- Store output and errors together in the /tmp/all-message-output file:
find /etc -name passwd &> /tmp/all-message-output10- Append output and errors to the /tmp/all-message-output file:
find /etc -name passwd >> /tmp/all-message-output 2>&1

or

find /etc -name passwd &>> /tmp/all-message-output
Constructing Pipelines
A pipeline is a sequence of one or more commands that are separated by the pipe character (|). A pipeline connects the standard output of the first command to the standard input of the next command:
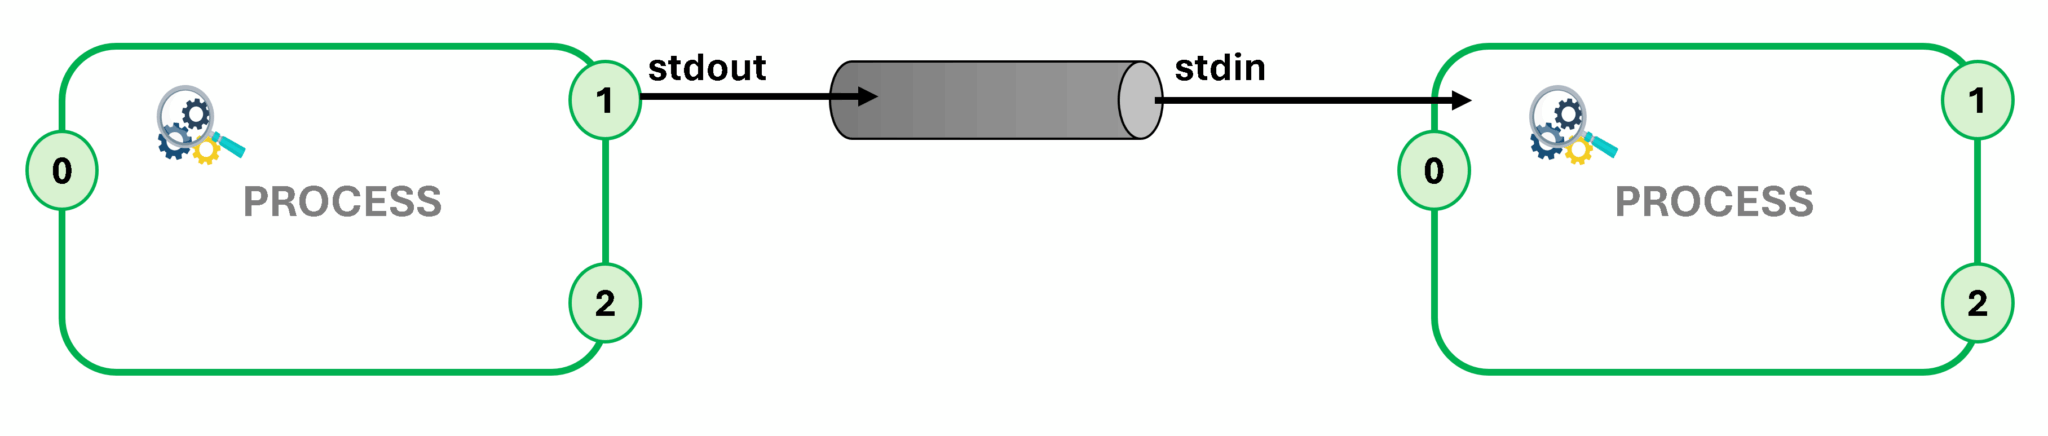
Note: Pipelines and I/O redirection both manipulate standard output and standard input. Pipelines send the standard output from one process to the standard input of another process. Redirection sends standard output to files or gets standard input from files.
Let’s provide some pipeline examples:
1- The following example redirects the output of the ls command to the less command to display it on the terminal one screen at a time:
ls -l /usr/bin | less2- Redirect the output of the ls command to the wc -l command, which counts the number of received lines from the ls command and prints that value to the terminal (standard output):
ls | wc -l3- Redirect the output of the ls -t command to the head command to display the first 10 lines, with the final result redirected to the /tmp/first-ten-changed-files file:
ls -t | head -n 10 > /tmp/first-ten-changed-files4- List all processes with the ps command and redirect its output to the grep command, to find a specific process by name:
ps aux | grep sshdPipelines, Redirection, and Appending to a File
When we combine redirection with a pipeline, the shell sets up the entire pipeline first, and then it redirects the input/output. If you use output redirection in the middle of a pipeline, then the output goes to the file and not to the next command in the pipeline.
In the following example, the output of the ls command is redirected to the /tmp/saved-output file, and the less command displays nothing on the terminal:
ls > /tmp/saved-output | lessSo, how can we overcome this “limitation”? How can I redirect a command’s standard output (stdout) to a pipeline and simultaneously redirect it to a file? The short answer is: using the “tee” command!
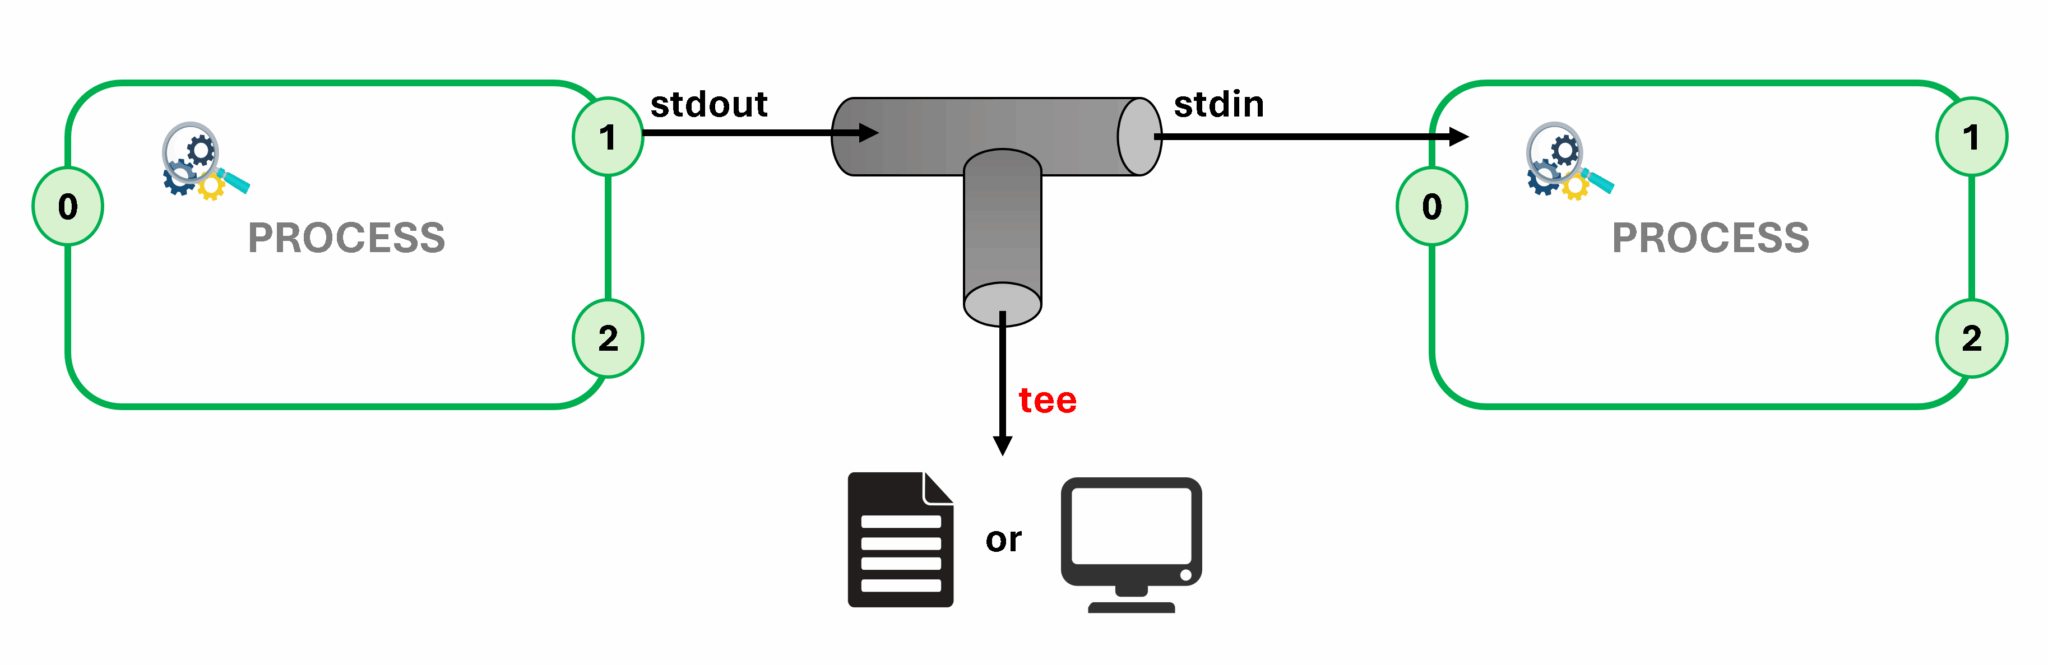
In a pipeline, the tee command copies its standard input to its standard output and also redirects its standard output to the files that are provided as arguments to the command. If you imagine data as water that flows through a pipeline, then you can visualize the tee command as a “T” joint in the pipe that directs output in two directions.
Let’s provide a visual aid with a process I/O piping with tee:
Examples:
1- Redirects the output of the ls command to the /tmp/saved-output file and passes it to the less command, so it is displayed on the terminal (stdout) one screen at a time:
ls -l | tee /tmp/saved-output | less2- If we use the tee command at the end of a pipeline, then the terminal shows the output of the commands in the pipeline and saves it to a file at the same time:
ls -t | head -n 10 | tee /tmp/ten-last-changed-files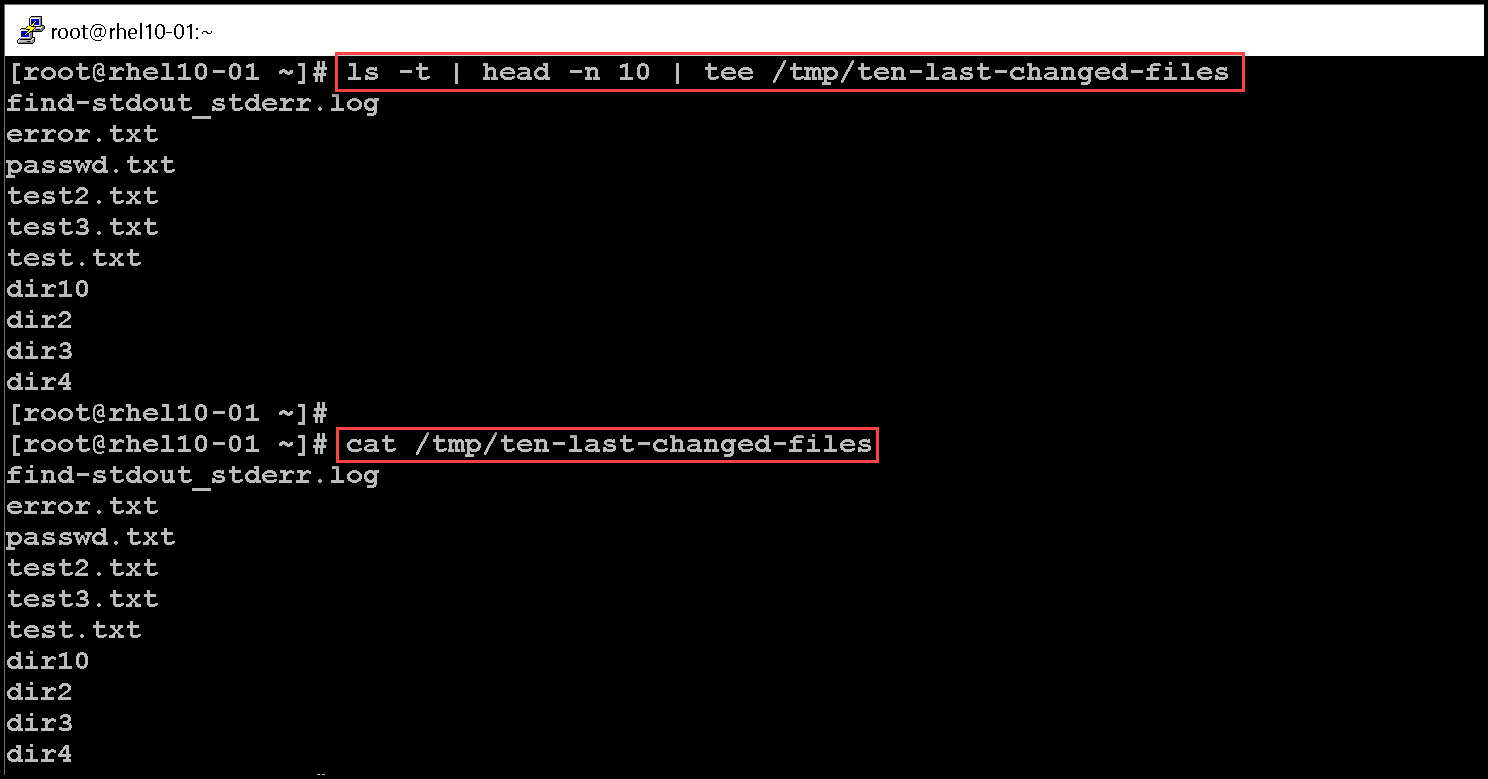
3- Use the tee command -a option to append the content to a file instead of overwriting it:
ls -l | tee -a /tmp/append-filesImportant: We can redirect standard error through a pipeline, but we cannot use the merging redirection operators (&> and &>>). The following example is the correct way to redirect both standard output and standard error through a pipeline:
find / -name *.sh 2>&1 | lessThat’s it for now 🙂
