
Close Menu
DPC Virtual Tips
    Read More

    How to Troubleshoot Packet Drops on an ESXi Host

    August 16, 2026

    SlurmDBD Is Down: What Continues Working and What Does Not

    August 15, 2026

    How to Investigate Jobs Stuck in COMPLETING State on Slurm

    August 14, 2026
    • Home
    • About Us
    • Contact
    • Cookie Policy
    • Comment Policy
    • Privacy Policy
    • Terms of Use
    • Disclaimer
    Tuesday, August 25
    DPC Virtual Tips
    • Home
    • Operating Systems
    • PowerFlex
    • HPC
    • Virtualization
    • About the Author
    • About Us
    • Contact
    DPC Virtual Tips
    Home » Adding Additional NSX Manager Appliance
    Virtualization

    Adding Additional NSX Manager Appliance

    DaniloBy DaniloMarch 10, 2023Updated:July 29, 2026No Comments3 Mins Read
    Facebook Twitter Pinterest LinkedIn Tumblr Email
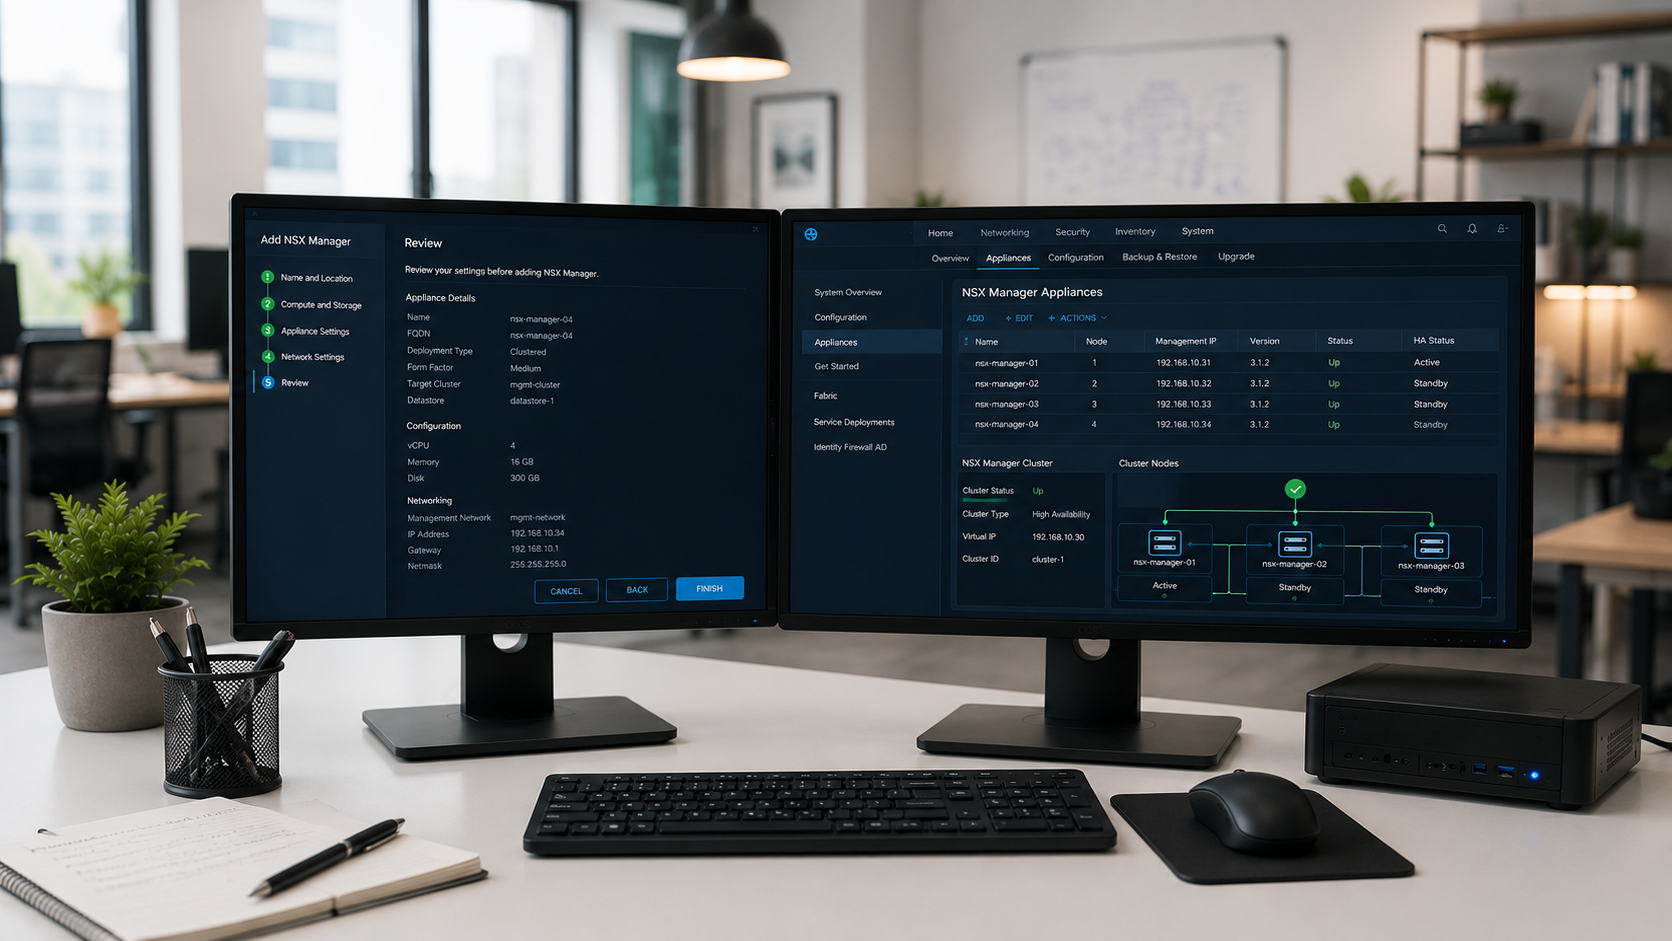
    add NSX Manager appliance
    Share
    Facebook Twitter LinkedIn Pinterest Email

    Adding additional NSX Manager appliance is an important step when expanding an NSX-T Data Center environment. In this guide, we will demonstrate how to add a new NSX Manager node to an existing Management Cluster and configure the required parameters.

    VMware recommends deploying multiple NSX Manager appliances to improve resilience and redundancy in the environment. After the first NSX Manager deployment is completed, additional appliances can be added directly through the NSX Manager interface.

    The process involves accessing the current NSX Manager UI, starting the appliance addition wizard, and providing the required information such as hostname, IP configuration, DNS, NTP, deployment size, storage location, and authentication settings.

    We posted a previous article explaining how to deploy the first NSX Manager. So, click HERE to read this article. There is a recommendation from VMware to deploy 3 NSX Managers in an NSX-T Data Center environment. This is a very important recommendation for resilience and redundancy purposes.

    Firstly, we need to log in on the current NSX Manager UI. After that, click on:
    System –> Appliances –> ADD NSX APPLIANCE
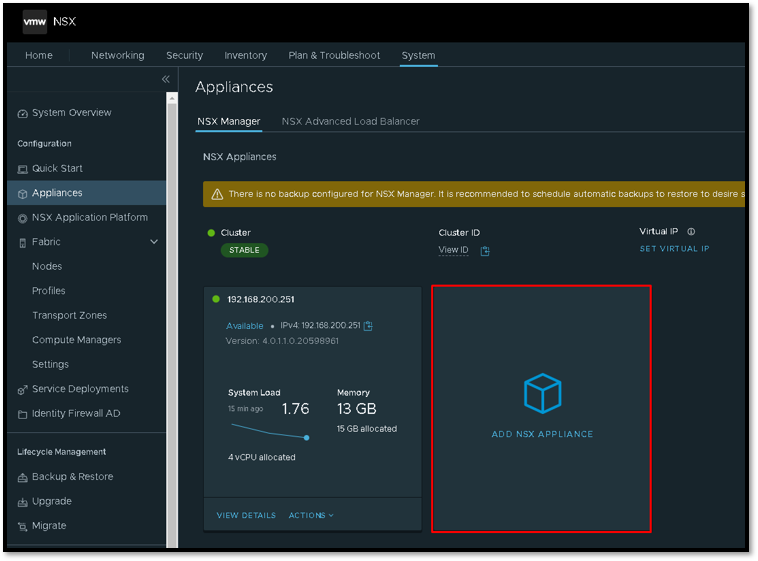
    An Add Appliance wizard will show.
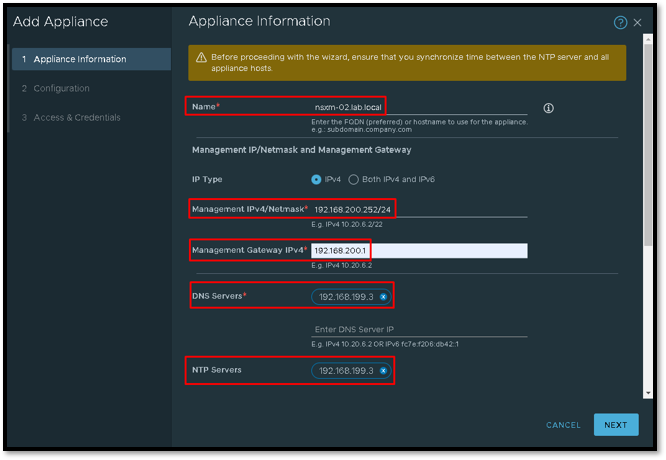
    On this page, we need to type the required detail for the next NSX Manager Appliance.

    In this example, the name for this NSX Manager Appliance is “nsxm-02.lab.local”.
    The management IP is 192.168.200.252/24.
    The management default gateway IP is 192.168.200.1.
    The DNS server is 192.168.199.3.
    The NTP Server is 192.168.199.3.

    Type the detail correctly and click on NEXT to continue:
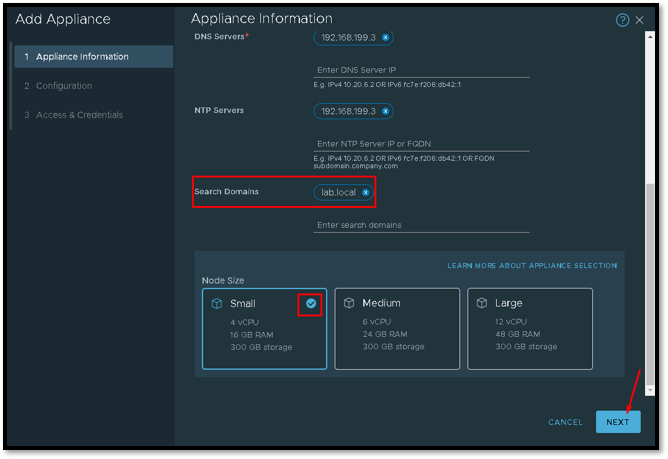
    Also, type the Search Domains for the DNS resolution process and choose the Node Size. In this lab, we are using a Small size. Click on NEXT to continue:
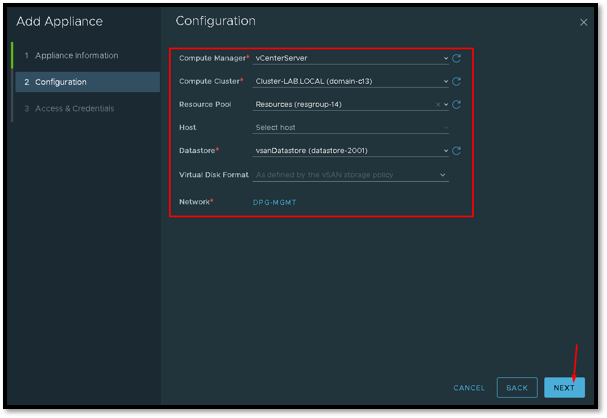
    On this page, we need to type where the new NSX Manager Appliance will be placed and run.

    Note: In our lab, we are using a vSAN Cluster. So, our Datastore is vSAN based. Look that our datastore is “vSAN Datastore”. Type the correct information based on your environment. Click on NEXT to continue:
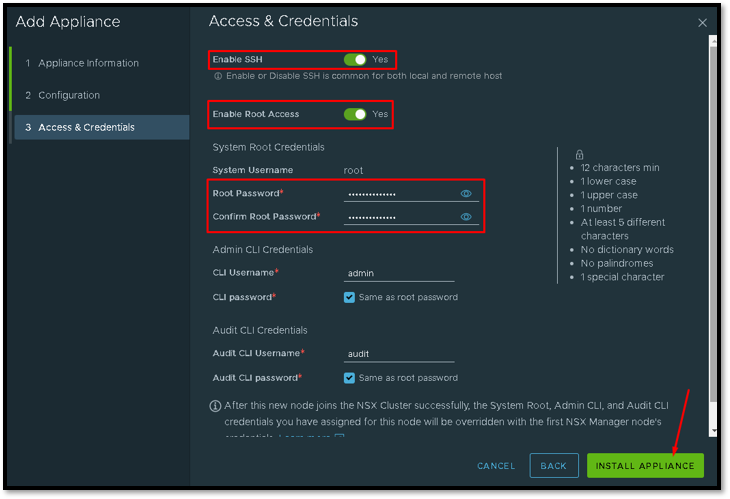
    Now, here is the last part of the configuration wizard.

    We need to Enable SSH and Enable SSH Root Access too. Also, we need to define the root, admin, and audit passwords. Look that in this case, the same password will be used for all these users.

    So, click on INSTALL APPLIANCE to start the deployment process:
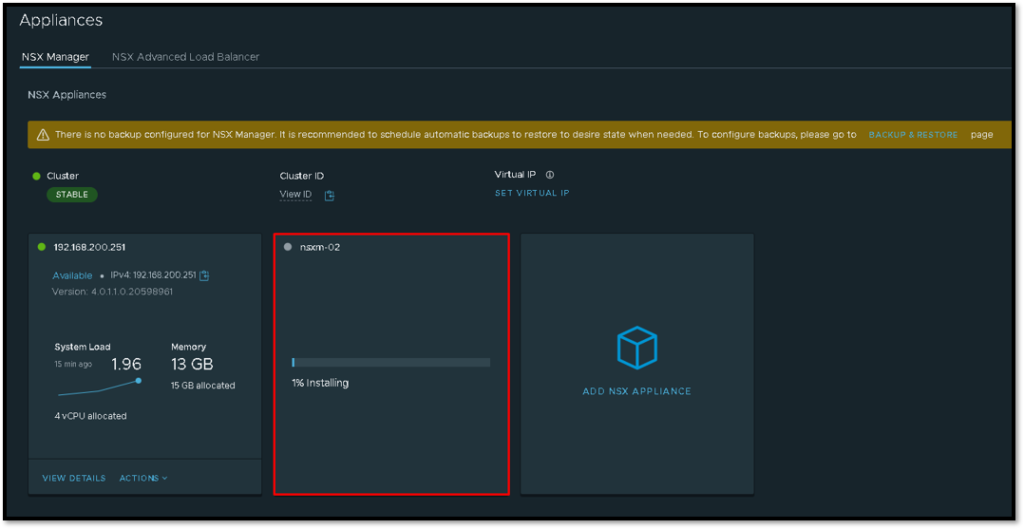
    On the same page, for instance, it is possible to follow the deployment process:
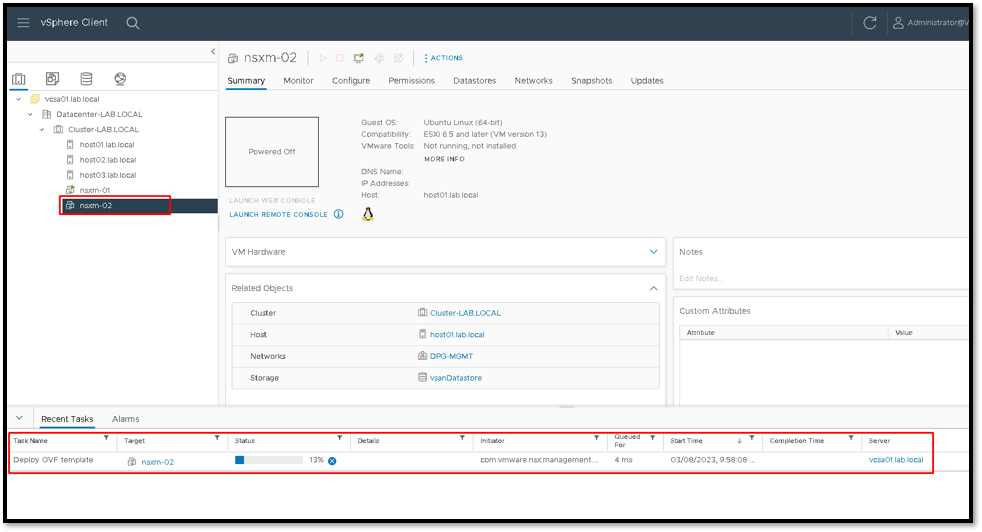
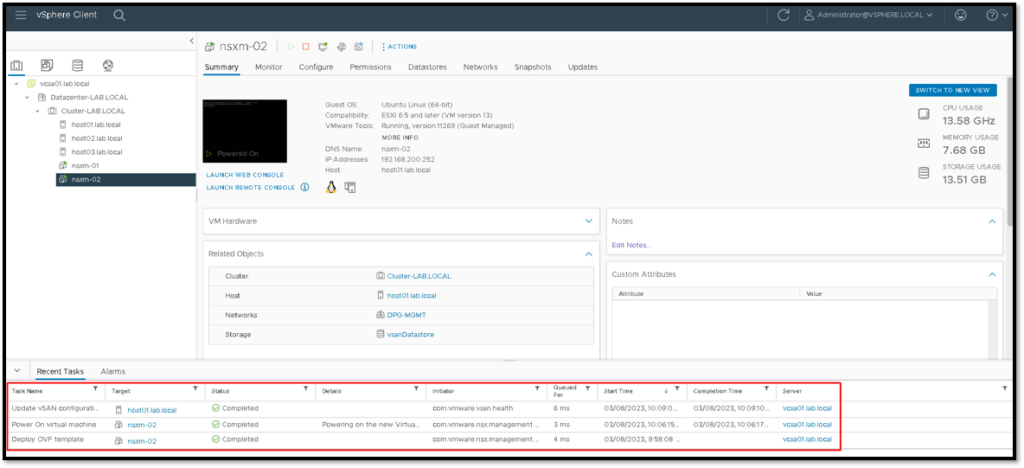
    However, you can see related tasks on the vSphere Client Recent Tasks.

    This process can take a lot of time to finish. So, take your coffee and wait some minutes 😉
    So, the deployment process is finished. We can see all related tasks with “Completed” status:
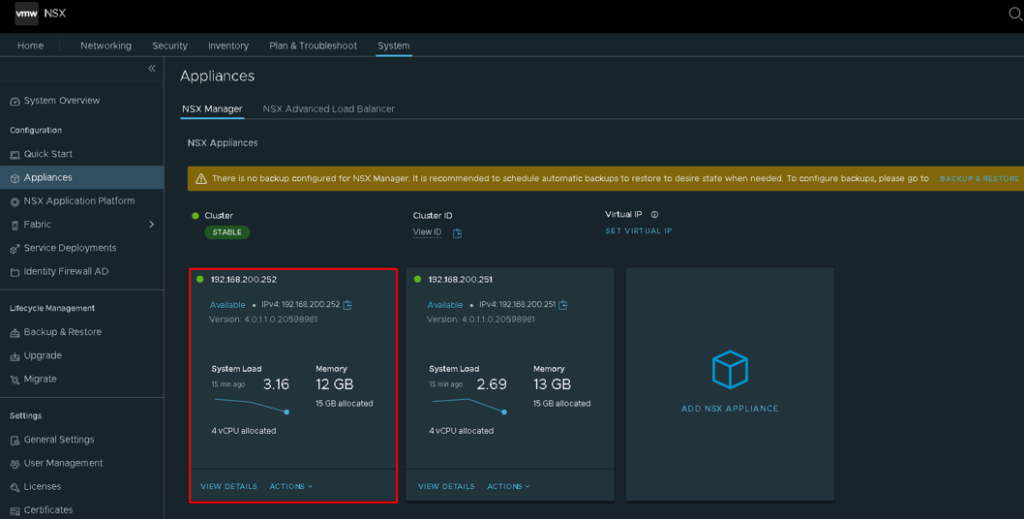
    Finally, after some minutes, this new NSX Manager Appliance will be available on the Appliances page under NSX Manager UI 🙂
    Share. Facebook Twitter Pinterest LinkedIn Tumblr Email
    Previous ArticleNSX Manager Deployment Steps
    Next Article Debugging vCenter and ESXi Heartbeat
    Danilo

    Infrastructure Engineer with experience in Virtualization, Linux, Windows Server and learning automation using Python. DPC Virtual Tips was created to share practical tutorials, lab experiences and troubleshooting guides focused on enterprise infrastructure technologies.

    Related Posts

    How to Troubleshoot Packet Drops on an ESXi Host

    August 16, 2026

    VM Replication with vSphere Replication and Site Recovery Manager

    June 16, 2025

    Changing DNS Settings on ESXi Hosts

    May 20, 2025

    Comments are closed.

    Search
    Categories
    • HPC (12)
    • Operating Systems (85)
    • PowerFlex (22)
    • Virtualization (130)
    Read More
    Virtualization

    How to Troubleshoot Packet Drops on an ESXi Host

    By DaniloAugust 16, 20260
    HPC

    SlurmDBD Is Down: What Continues Working and What Does Not

    By DaniloAugust 15, 20260
    HPC

    How to Investigate Jobs Stuck in COMPLETING State on Slurm

    By DaniloAugust 14, 20260
    Operating Systems

    Linux Server Has Free Memory but Is Swapping: Why?

    By DaniloAugust 13, 20260
    Operating Systems

    How to Determine Whether Packet Loss Is Local or Network Related on Linux

    By DaniloAugust 12, 20260
    Latest Posts

    How to Troubleshoot Packet Drops on an ESXi Host

    August 16, 2026

    SlurmDBD Is Down: What Continues Working and What Does Not

    August 15, 2026

    How to Investigate Jobs Stuck in COMPLETING State on Slurm

    August 14, 2026
    Images from Gallery
    hpc main commands
    linux commands
    install rock linux
    lustre fs
    shell scripting
    vSAN Trace Files
    Categories
    • HPC
    • Operating Systems
    • PowerFlex
    • Virtualization
    • Home
    • About Us
    • Contact
    • Cookie Policy
    • Comment Policy
    • Privacy Policy
    • Terms of Use
    • Disclaimer
    Copyright © 2026, DPC Virtual Tips. All rights reserved.

    Type above and press Enter to search. Press Esc to cancel.

    We use cookies to ensure your best experience on our website. If you continue using our website, we'll assume you agree to our cookie policy