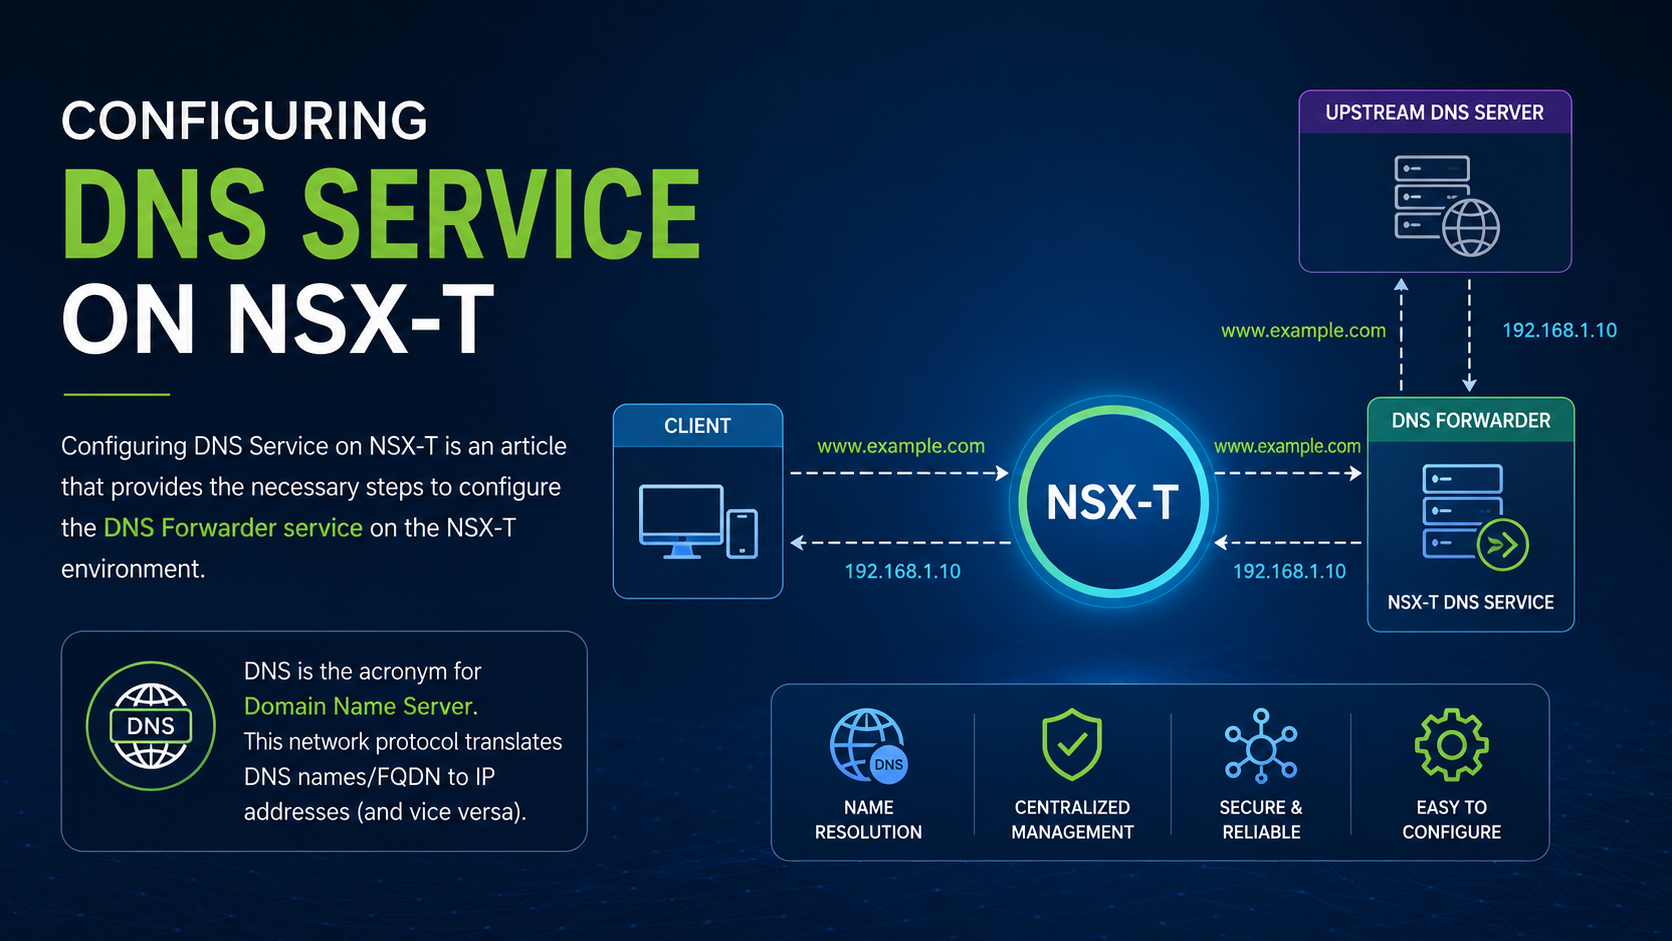
Configuring DNS Service on NSX-T is an article that provides the necessary steps to configure the DNS Forwarder service on the NSX-T environment.
DNS is the acronym for Domain Name Server. This network protocol translates DNS names/FQDN to IP addresses (and vice versa).
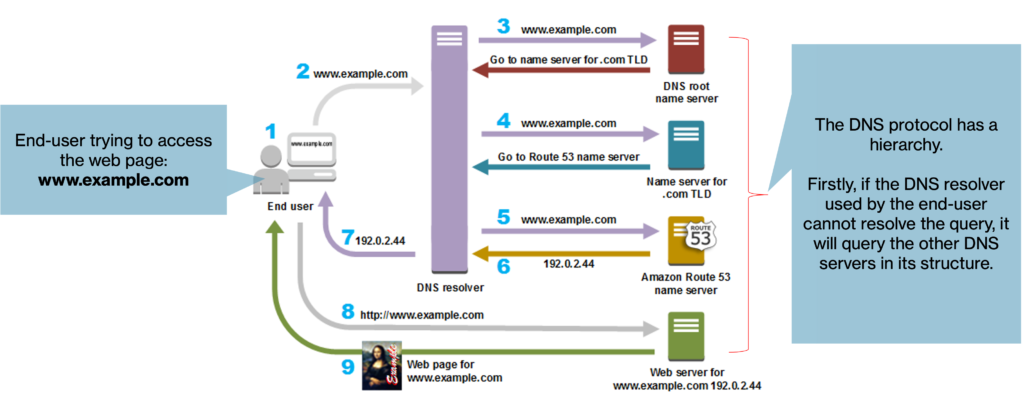
In the picture below, we have an example of how the DNS protocol translates the domain name to the IP address. The end-user is requesting the domain name “www.example.com” to its DNS resolver and it is responsible for giving the IP address for the user’s request. If the DNS resolver (DNS server used by the end-user) does not know how to answer the user’s query, the DNS resolver will send the query to the next DNS server in the DNS hierarchy:
What is DNS Forwarder?
Generally, the DNS server is a dedicated server present in each environment hosting the application responsible for answering DNS queries from users.
The NSX-T cannot operate as a DNS server. But it can operate as a “DNS relay”. In other words, the NSX-T can operate like a “proxy”, catching the user’s queries and sending them to the DNS server present in the environment.
In this context, the end-user will use the NSX-T as a DNS server (when we configure the DNS service on NSX-T, we need to set an IP address for this service). So, the end-user will use this IP address as a DNS server.
The DNS forwarder service can be configured either on the Tier-0 Gateway or on the Tier-1 Gateway.
Notes:
- After each answer that NSX-T gives to end-user, the NSX-T stores this answer in a local cache (such as a local database);
- If the end-user requests the same query again, the NSX-T does not send this query to the DNS server – it will answer the query with the information in its local cache.
DNS Default Zone Creation
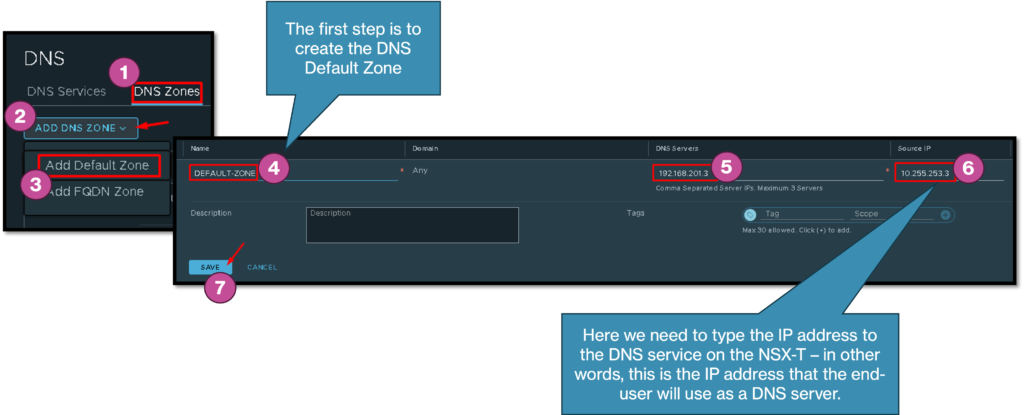
So, the first step is to create the Default DNS Zone. The Default DNS Zone is necessary to set up the DNS forwarder service on the NSX-T.
To do that, we need to access the menu:
Networking –> IP Management –> DNS –> DNS Zones –> ADD DNS ZONE –> Add Default Zone
Below we have an example of the configuration:
FQDN DNS Zone Creation
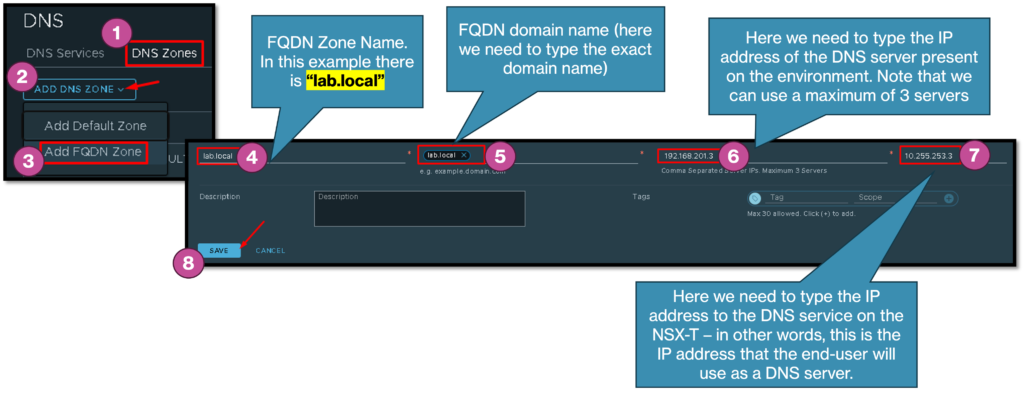
The next step is to create the FQDN zone. The main point here is typing the correct domain name (the domain name needs to match your domain configured in the DNS server).
To create the FQDN zone, we need to access the menu:
Networking –> IP Management –> DNS –> DNS Zones –> ADD DNS ZONE –> Add FQDN Zone
Below we have an example of the configuration:
DNS Service Creation
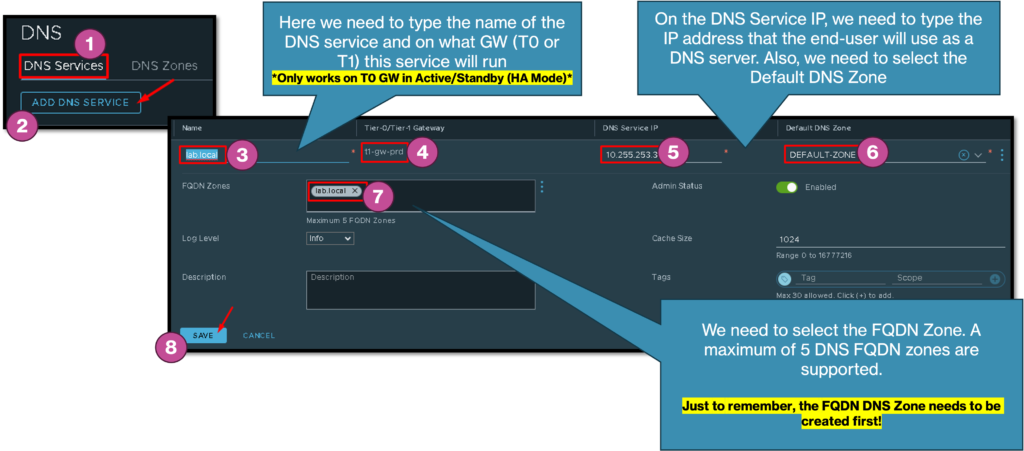
So, now we need to set up the DNS service. Basically, in this step, we need to set up in what Gateway (Tier-0 or Tier-1) the DNS forwarder service will be enabled and available.
To set up it, we need to access the below menu:
Networking –> IP Management –> DNS –> DNS Services –> ADD DNS SERVICE
Below we have an example of the configuration – we are enabling the DNS service on the Tier-1 Gateway and the IP address 10.255.253.3 is the IP address of the DNS service:
Route Advertisement and Route Re-Distribution
So, all network devices in the environment need to know the IP address of the DNS service. In our example, the DNS service IP is 10.255.253.3 and all network devices need to know this IP address for this service to work as expected.
Firstly, we need to edit the Tier-1 Gateway configuration and enable the route advertisement for DNS service IP. Under the “Route Advertisement” configuration, enable the option “All DNS Forwarder Routes”:
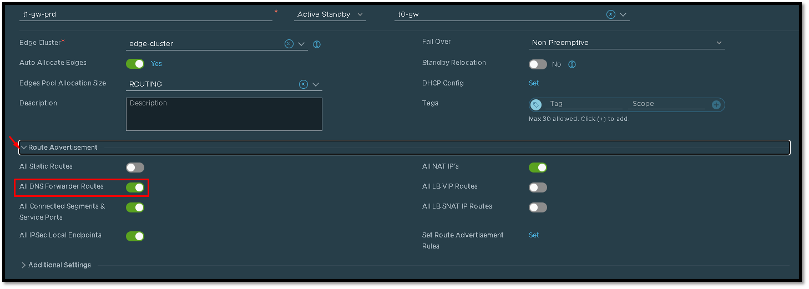
After that, the Tier-1 Gateway will advertise the DNS service IP to the Tier-0 Gateway!
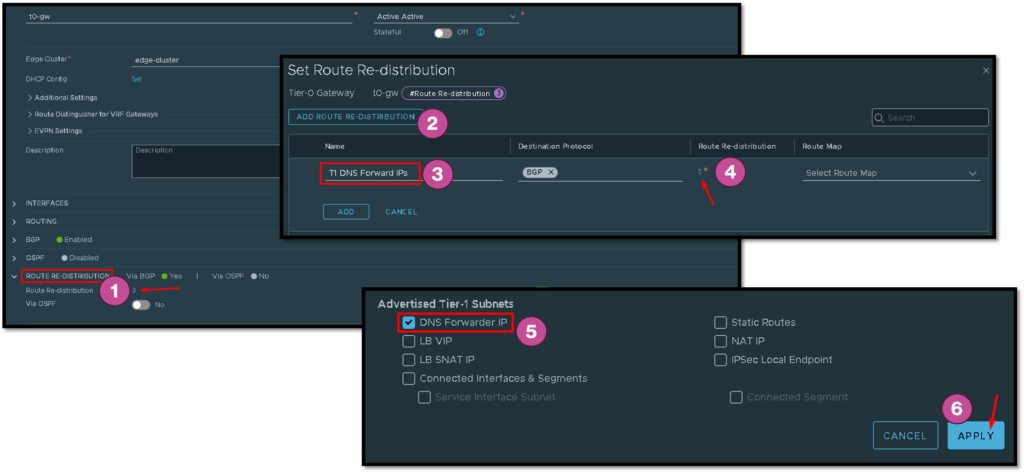
Secondly, we need to edit the Tier-0 Gateway configuration and create a route re-distribute rule for the Tier-0 Gateway to re-distribute the DNS service IP learned by Tier-1 to the Physical Routers (generally the Tier-0 Gateway has neighbors located on the Physical Network).
In the below picture, we have an example of this configuration. Basically, under “Route Re-Distribution” we need to set up what route will re-distribute:
Checking Physical’s Route Table
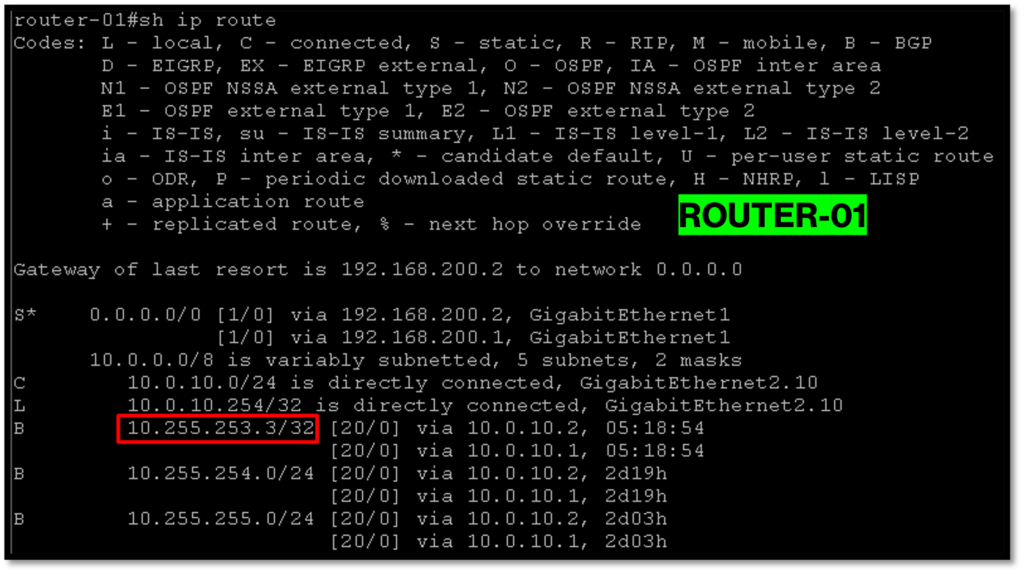
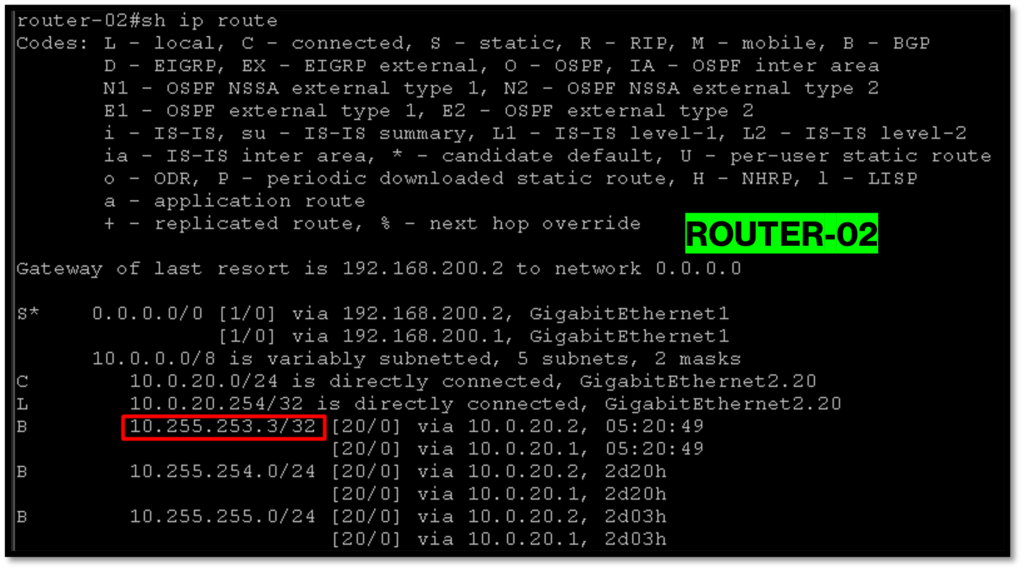
Here, we can validate that each Physical Router received the DNS service IP. As we talked before, generally the Tier-0 Gateway has neighbors in the Physical Network and then routers are exchanged using the BGP protocol.
In the picture below, we applied the “show ip route” command on the first Physical Route, and we could confirm that we have a route to the IP 10.255.253.3 (this is the IP used for the DNS service):
The same command was applied to the second Physical Route – we could confirm that we have a route to the IP 10.255.253.3:
Testing the DNS Service IP
Here, we are just performing a test using the DNS service IP.
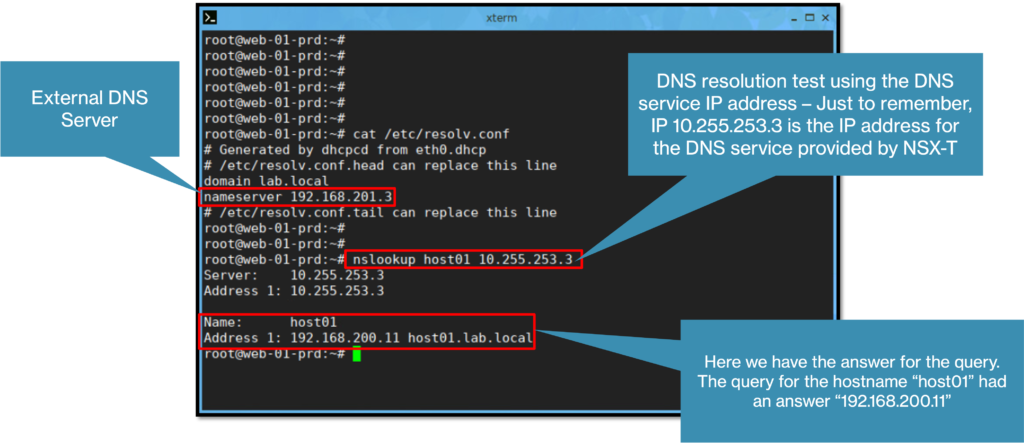
On our Linux command line, we are applying the “nslookup” sending the DNS query to the DNS service IP:
nslookup host01 10.255.253.3In this example, the Linux has the IP 192.168.201.3 configured in its resolv.conf file, but the “nslookup” command is using the DNS service IP 10.255.253.3 to answer the query:
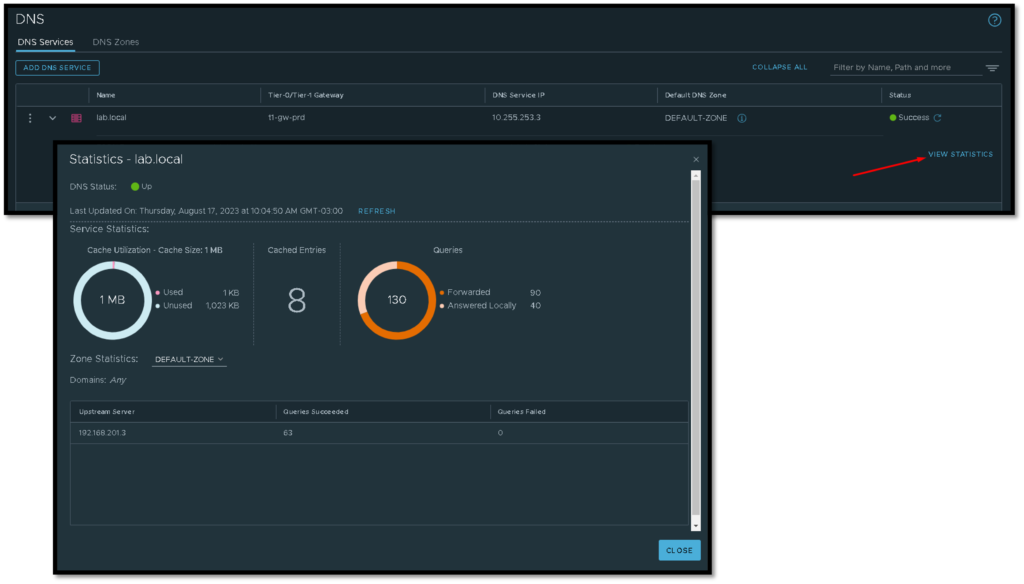
Under the FQDN zone, we can click on “VIEW STATISTICS” to see a lot of information about the DNS service: