

Configuring vCenter Server HA is a practical guide that explains how to implement High Availability for VMware vCenter Server environments. This feature helps protect the vCenter Server management platform by using additional nodes to provide availability during failures.
The vCenter Server is a critical component in a vSphere environment, responsible for managing and configuring cluster resources. Without High Availability, recovering an unavailable vCenter Server instance can require additional time and manual intervention.
In this tutorial, we will configure vCenter Server HA by creating the required network configuration and deploying the Active, Passive, and Witness nodes. The process covers the HA setup, IP configuration, validation steps, failover operation, and removal procedure.
How vCenter Server HA work?
Firstly, it’s necessary to understand how vCenter Server HA works and how and why we should enable it. Basically, as we said, the vCenter Server is a core component in a vSphere Cluster. It is responsible for managing and configuring the majority of resources in the vSphere Cluster.
Normally, in all environments, we have only the vCenter Server instance. If this instance goes down or is unavailable, for example, it’s necessary to recover this instance (maybe from a valid backup, or maybe via some replication tool for instance). So, it’s a hard job to do in some cases and it’s necessary to spend a lot of time doing it.
However, with the vCenter Server HA feature, we can avoid it. In this scenario, we have some components, such as shown in the picture below:
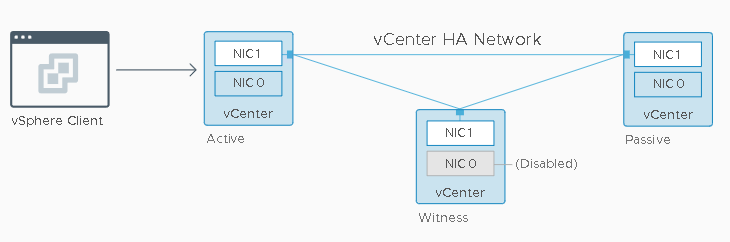
vSphere Client = The management vCenter Server Console
Active = The Active instance of the vCenter Server. The vSphere Client interface is provided by this vCenter Server Instance, for example.
Passive = The Passive instance of the vCenter Server. It receives all data from Active Instance (replica). In case of Active instance failure, the Passive instance can provide the management interface.
Witness = The Witness instance of the vCenter Server. It is used to indicate what vCenter Server instance is available, for example.
Note: To replicate the data between the vCenter Server instances, it used an internal network called “vCenter Server HA Network”. This network can be a separate Port Group specifically for this type of traffic.
Configure the vCenter Server HA
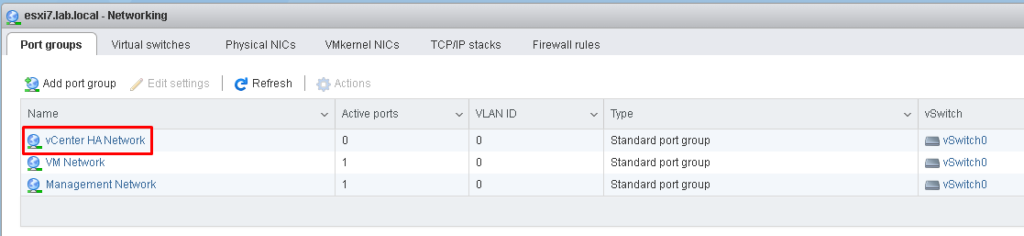
Firstly, we need to add a dedicated Port Group for the vCenter Server HA Network. In our lab, we are using a Standard Switch. Click on “Add port group” and type the name of the Port Group.
In this example, the Port Group name is “vCenter-HA-Network”:
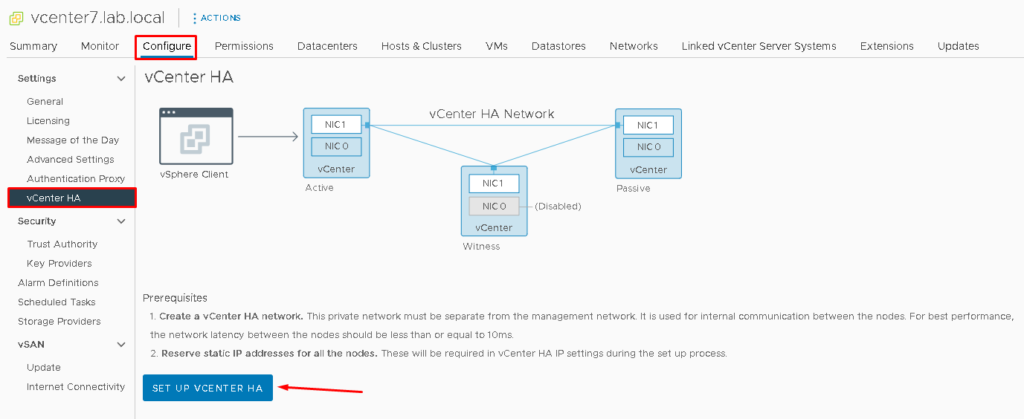
To configure the vCenter Server HA, access the vSphere Client Interface, select the vCenter Server –> Configure –> vCenter HA –> SET UP VCENTER HA:
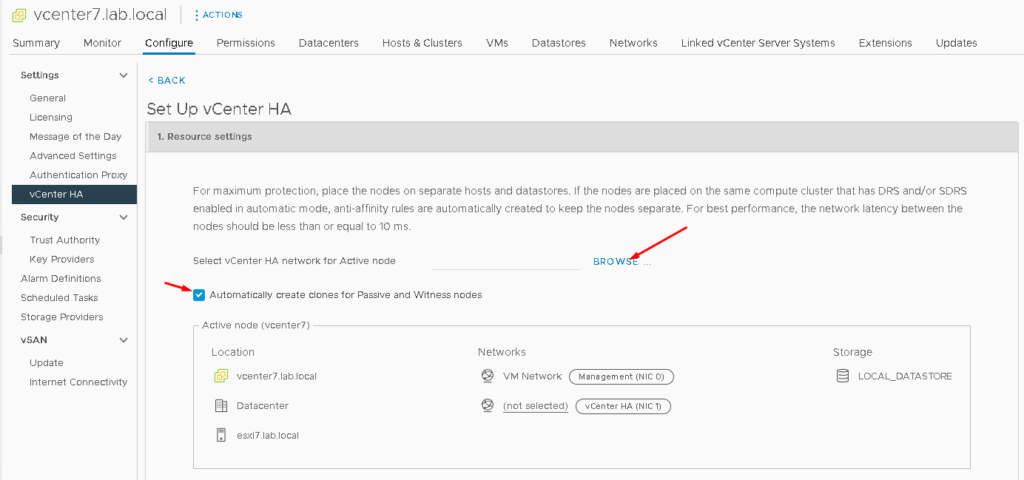
Now it’s necessary to select the vCenter Server HA network.
So, to do it, click on “BROWSE…” and select the Port Group for the HA Network.
Also, mark the option “Automatically create clones for Passive and Witness nodes”:
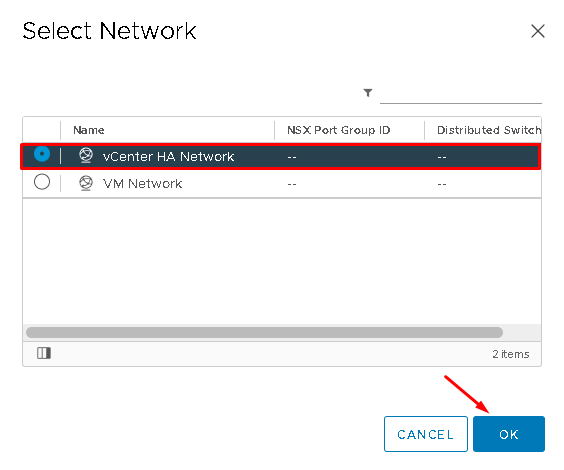
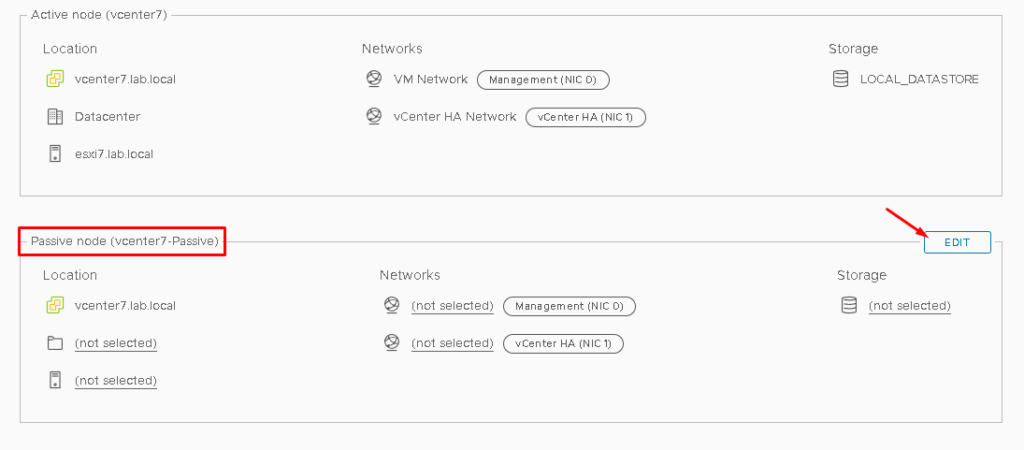
On the Passive node, it’s necessary to configure a lot of things such as the Management Network, vCenter Server HA Network, Storage, etc. Click on “EDIT”:
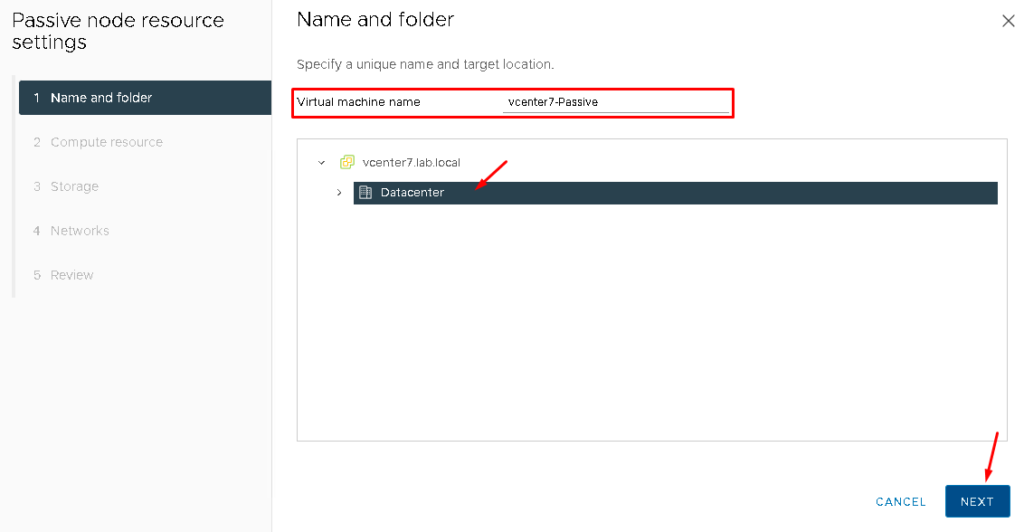
Type the virtual machine name and select the datacenter.
In our lab, for instance, the vCenter Server VM name is “vcenter7”. So, the default name for the Passive VM is “vcenter7-Passive”:
Select the compute resource. Here, it’s necessary to select the ESXi host to run this VM:
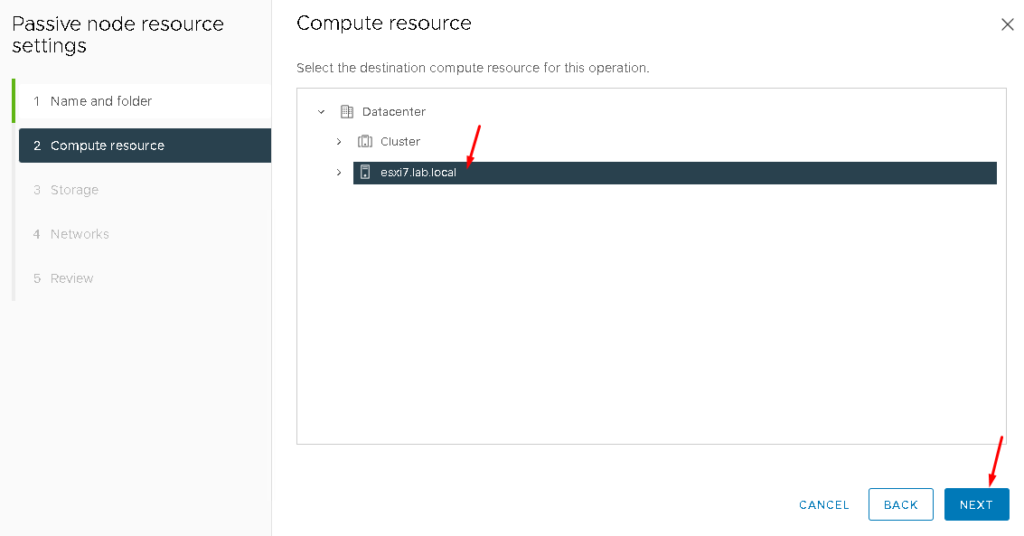
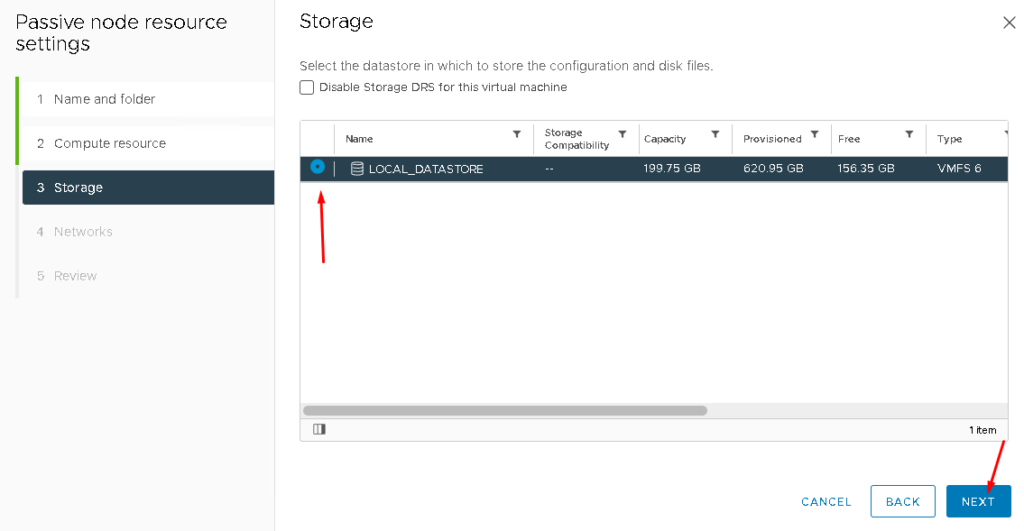
Select the Storage to place this VM:
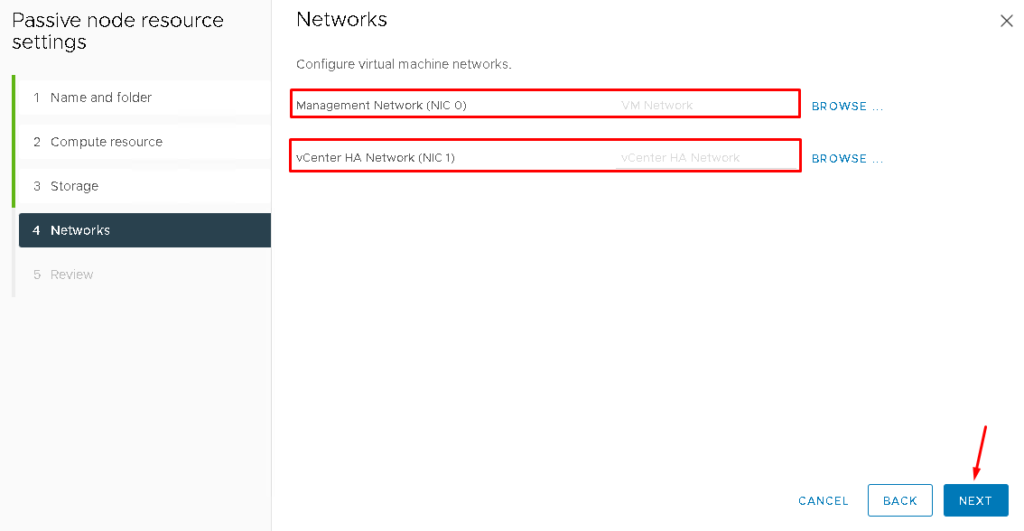
Select the networks. In our lab, for example, the Port Group used for these Networks are:
Management Network (NIC 0) = VM Network
vCenter HA Network (NIC 1) = vCenter HA Network
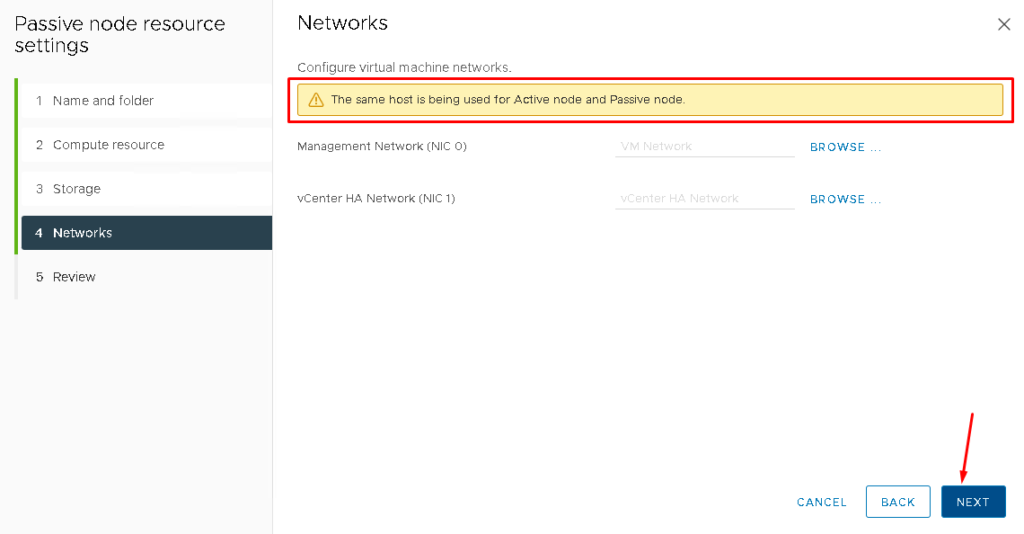
In this case, as we have only an ESXi host, the warning message “The same host is being used for Active and Passive node.” is shown. Such as a lab environment, no problem here. Click on NEXT to continue:
So, the next step is to configure the Witness node. Click on EDIT:
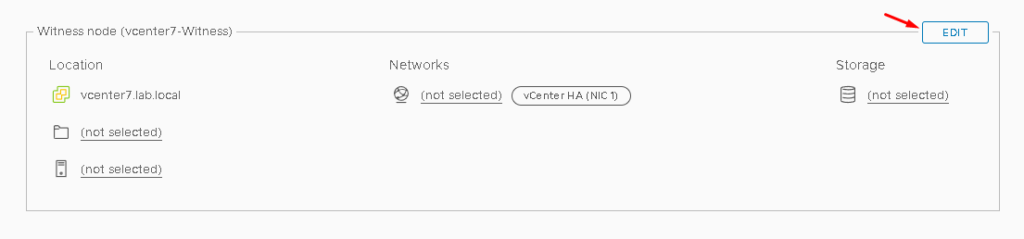
Type the Witness node VM name and select the datacenter:
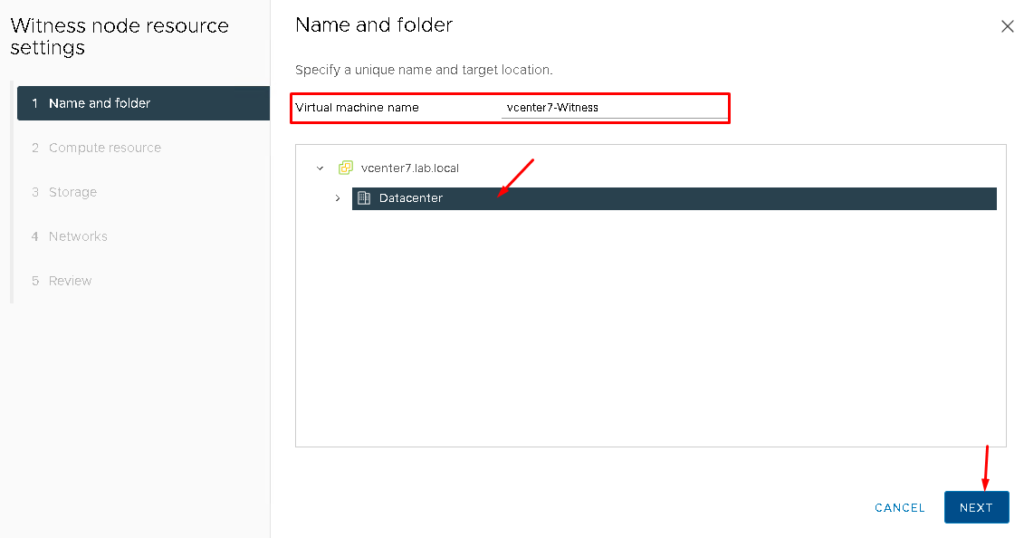
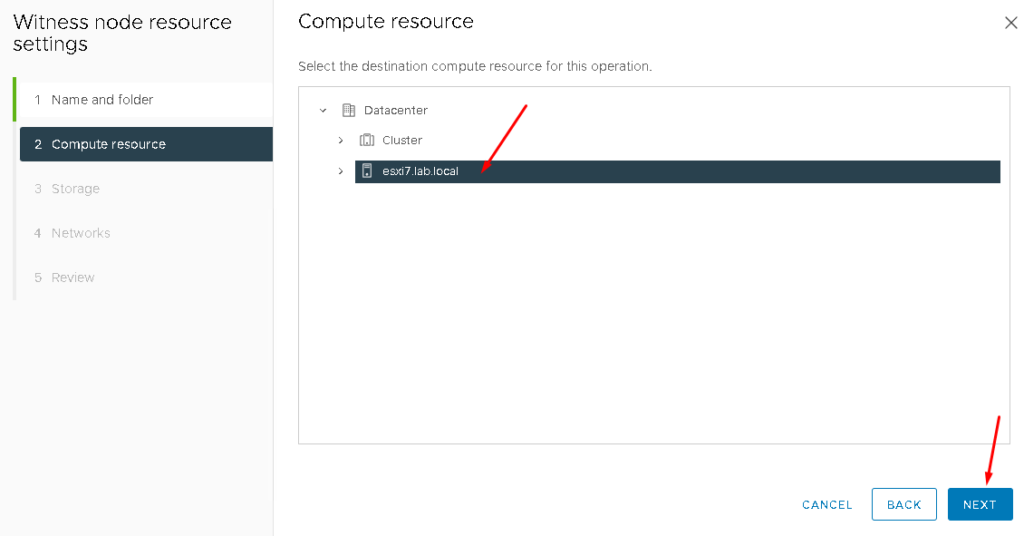
Select the compute resource:
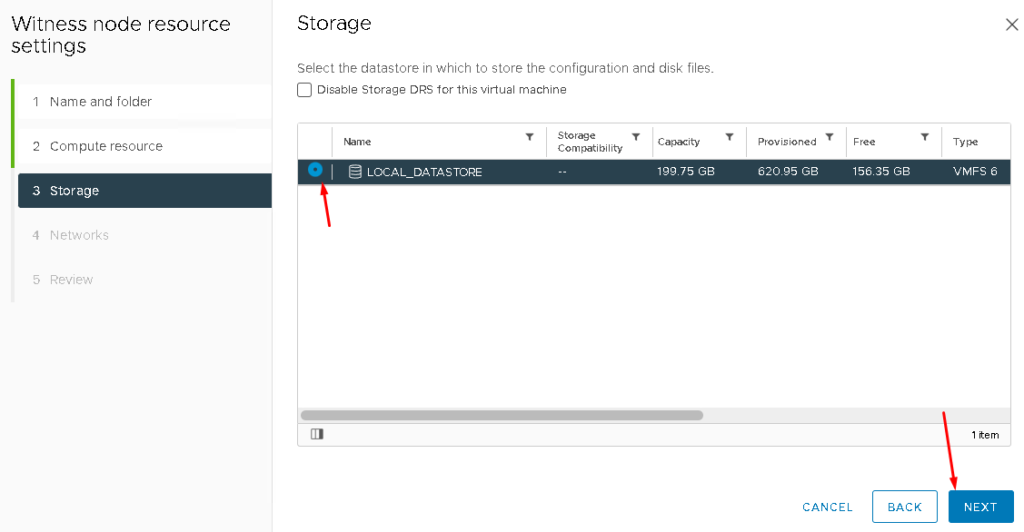
Select the Storage:
For the Witness node, only the vCenter HA network is necessary to assign:
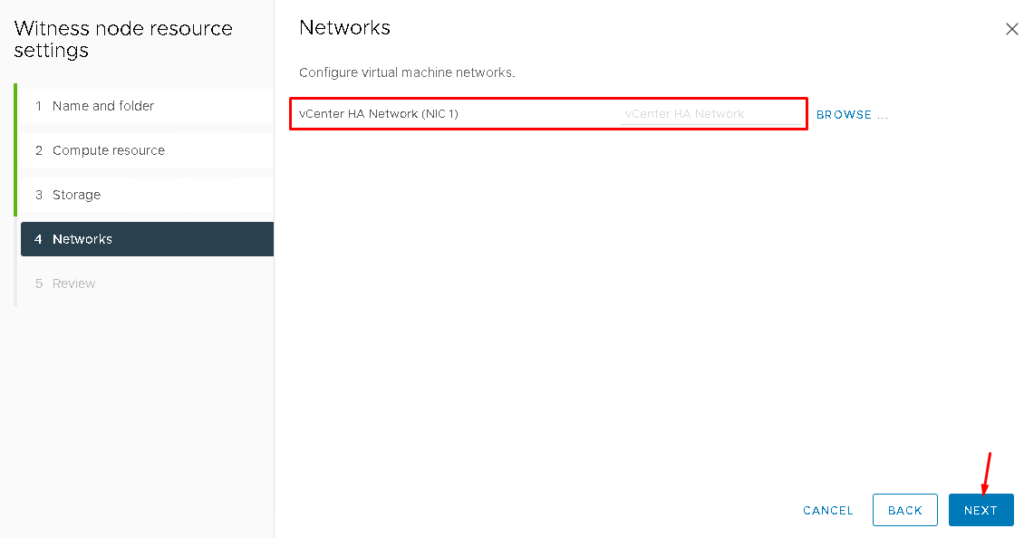
Click on NEXT to continue:
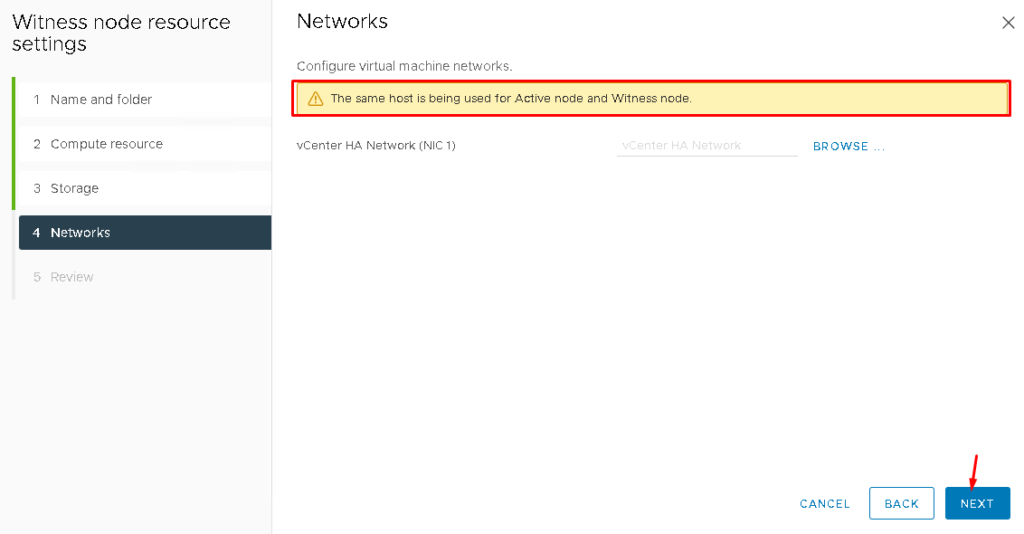
The next step is to configure the IP settings. Click on NEXT:
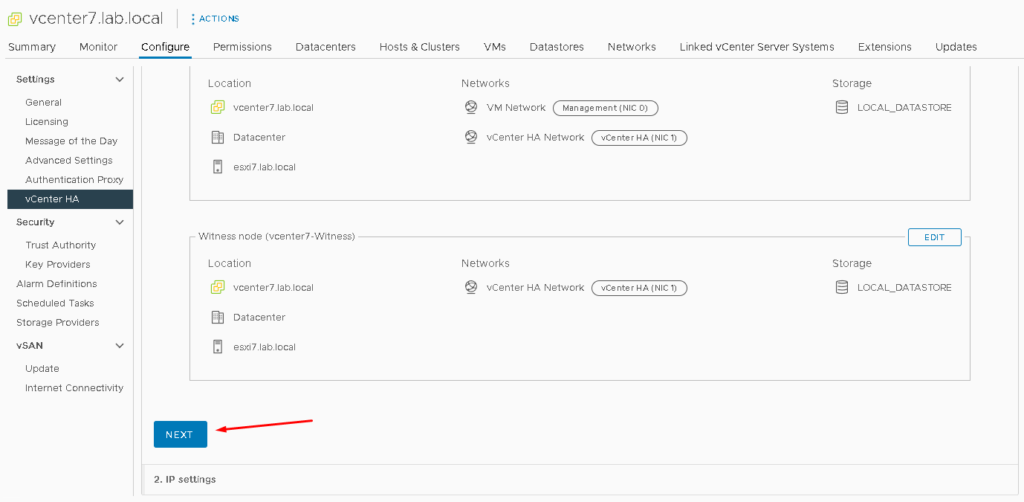
In our lab, the vCenter Server HA Network is:
172.31.255.0/24 –> You can choose an internal subnet for it
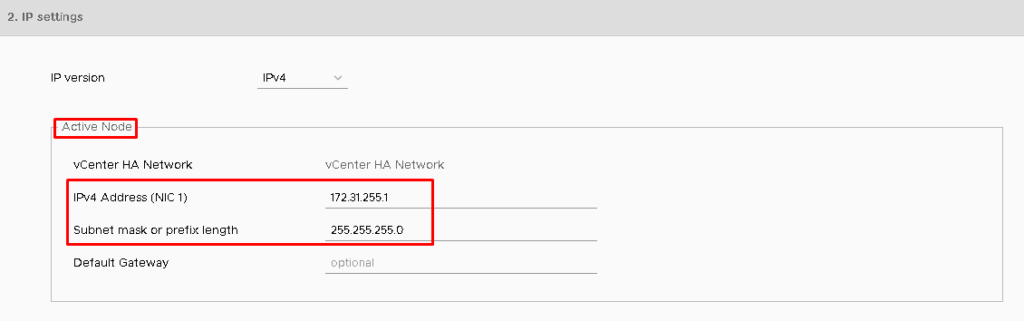
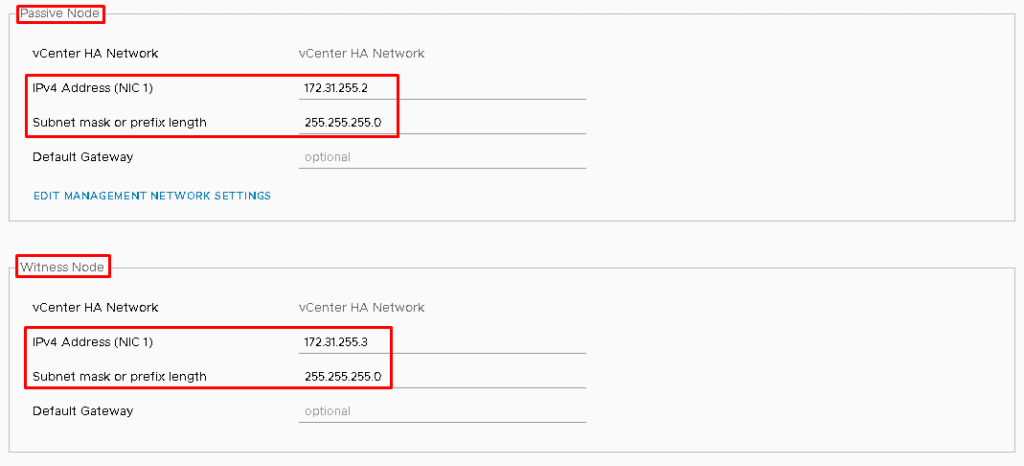
On Active Node, type the IP for the vCenter HA Network. In this example, the IP is 172.31.255.1. The netmask is 255.255.255.0:
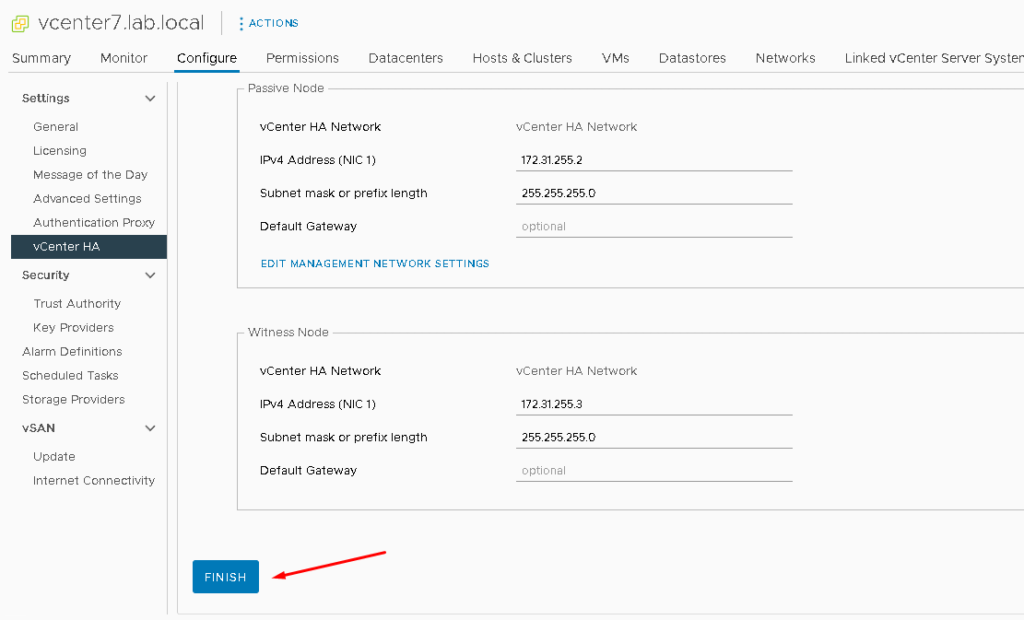
On Passive Node, type the IP for the vCenter HA Network too. In this example, the IP is 172.31.255.2. The netmask is 255.255.255.0.
On Witness Node, the IP for the vCenter HA Network is 172.31.255.3. The netmask is 255.255.255.0:
After that, click on FINISH:
Setting Up vCenter HA
Now, the vCenter Server HA is enabling:
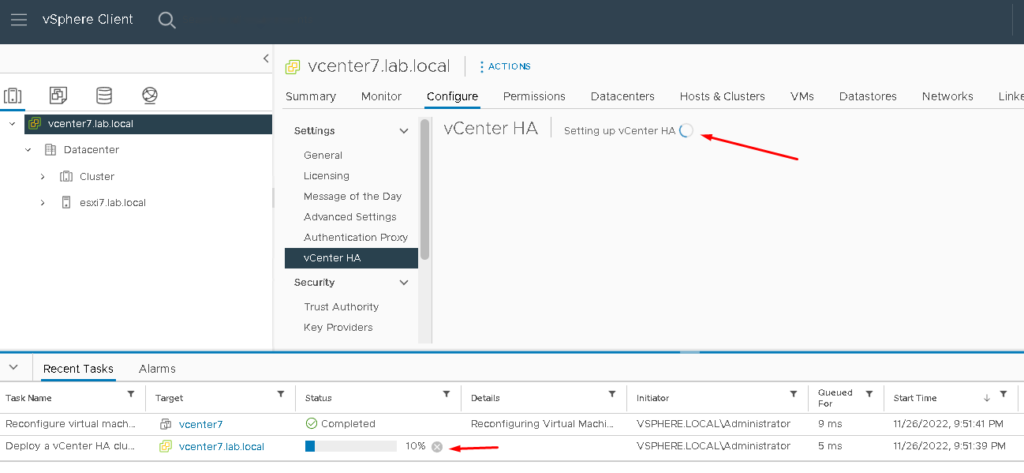
For create the Passive and Witness node, a cloning process from the vCenter Server Active VM is realized:
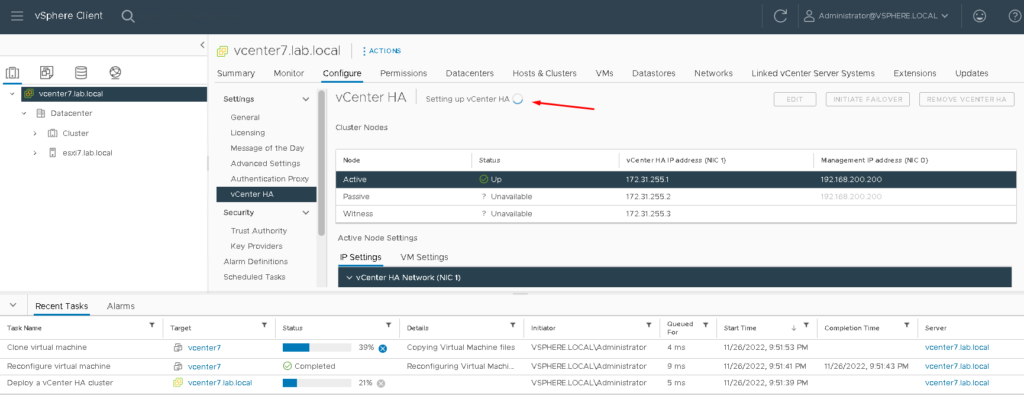
After a lot of minutes, the vCenter Server HA configuration is finished, as shown in the picture below:
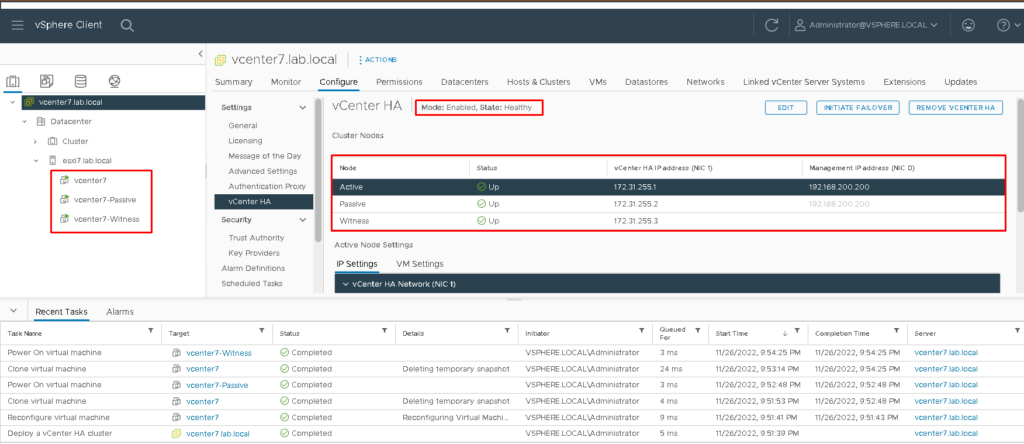
Check vCenter Server HA Details
In the Active Node Settings session, we can see a lot of interesting details.
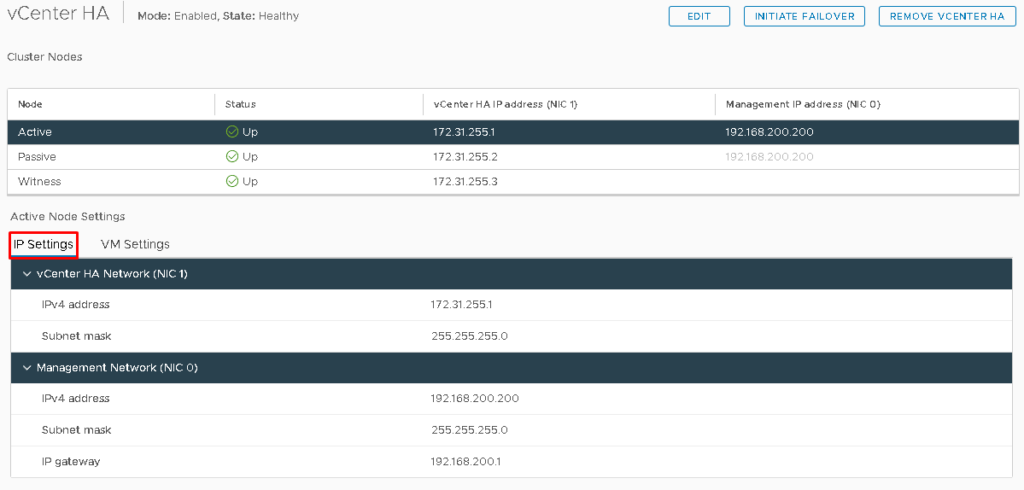
On IP Settings, we can see details about the IP address for NIC 0 (Management Network) and NIC 1 (vCenter Server HA Network).
Note: Each node (Active, Passive, and Witness) has its own IP address for the vCenter Server HA Network. For the Management Network, the same IP address is used. So, when the Active node is running, the IP address for the Management Network is available on this node (The Passive Node will receive this address only when the Passive Node is used as Active):
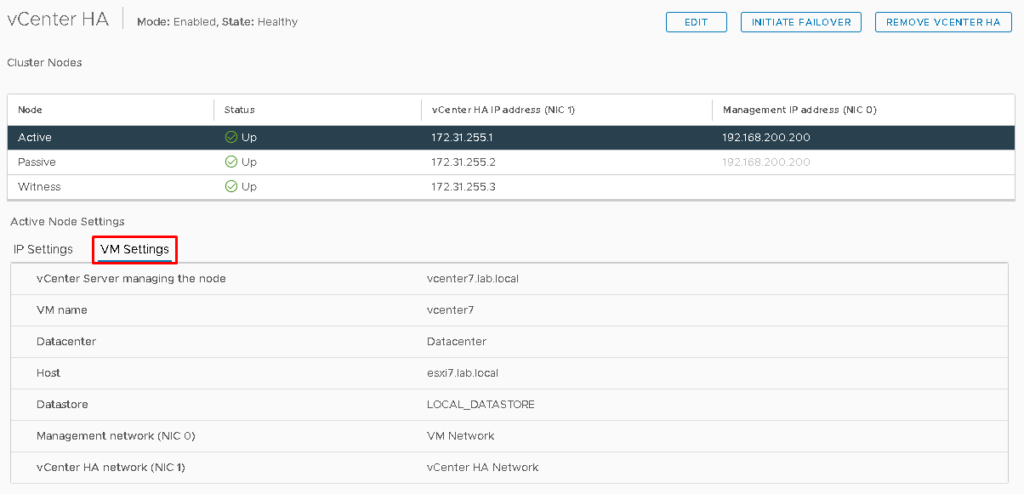
On VM Settings, we can see a lot of details, such as VM name, Datacenter name, Management and HA Network, etc:
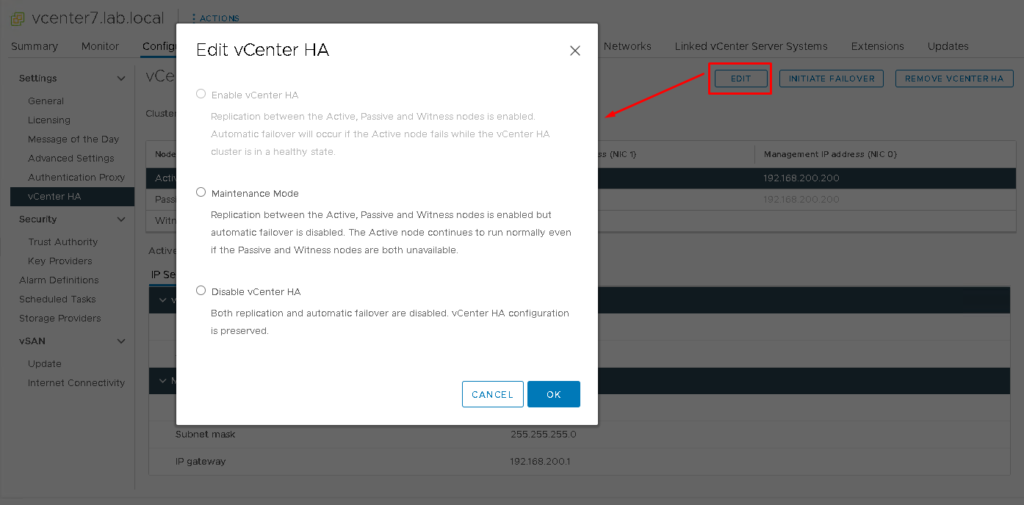
Edit vCenter HA
Here, it’s possible to put the vCenter Server HA in Maintenance Mode. In maintenance mode, replication between the Active, Passive, and Witness nodes is enabled but automatic failover is disabled.
Also, it’s possible Disable vCenter HA. In this case, both replication and automatic failover are disabled. vCenter HA configuration is preserved:
vCenter HA Failover
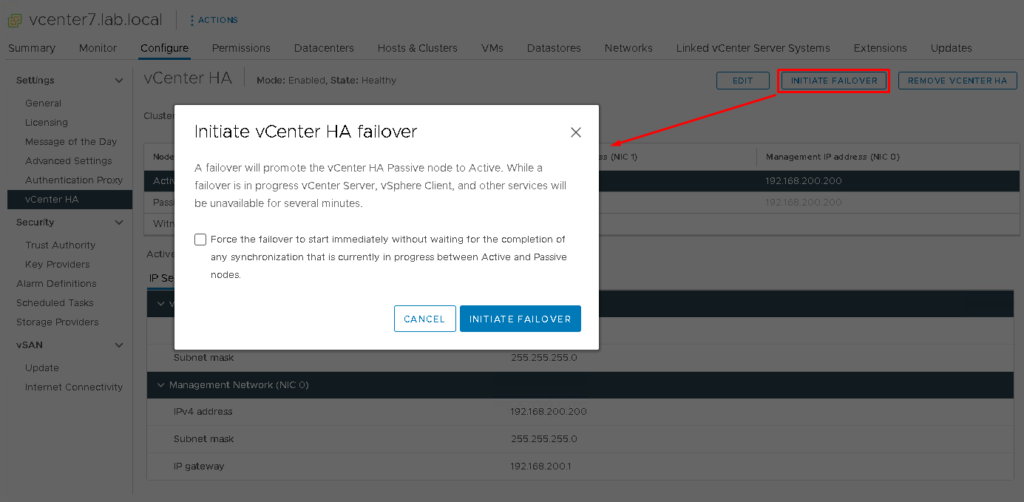
A failover will promote the vCenter HA Passive node to Active.
While a failover is in progress, vCenter Server, vSphere Client, and other services will be unavailable for several minutes (it’s normal).
To do the failover, click on “INITIATE FAILOVER” and then, click on “INITIATE FAILOVER” again:
Remove vCenter HA
If you need to remove the vCenter Server HA, click on “REMOVE VCENTER HA”:
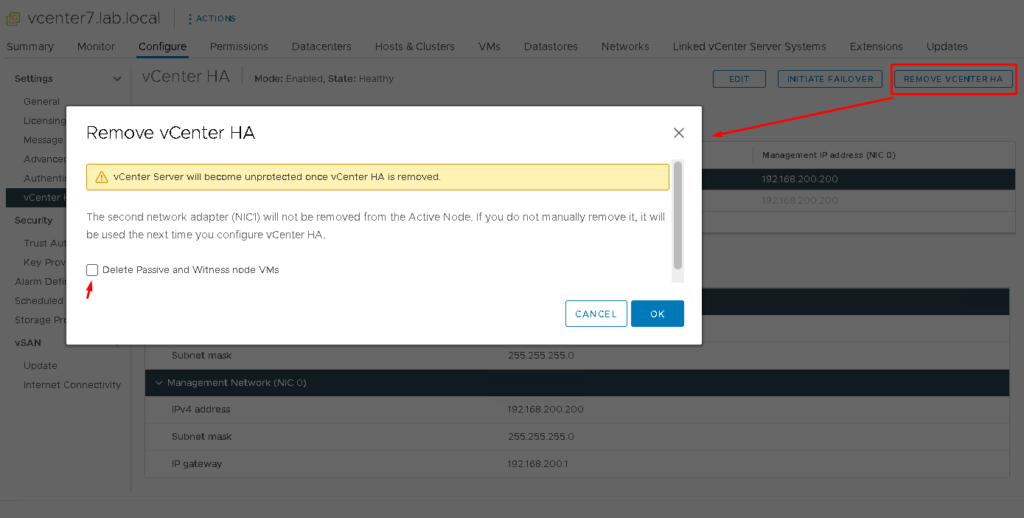
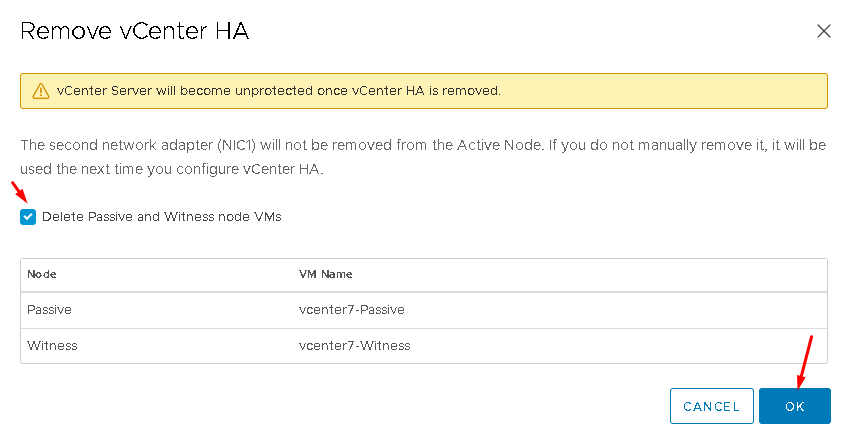
Besides removing the HA configuration, mark the option “Delete Passive and Witness node VMs” to delete from datastore the Passive and Witness VMs too. Click on “OK” to confirm:
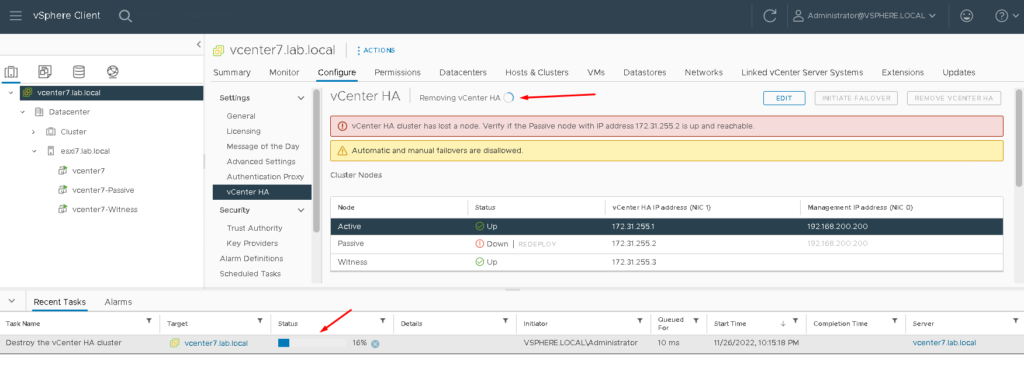
The process to remove is running and can take a few minutes to finish:
References:
Patch a vCenter High Availability Environment:
https://docs.vmware.com/en/VMware-vSphere/7.0/com.vmware.vcenter.upgrade.doc/GUID-C27CD7DF-AB52-4A77-A6A6-A966498D5CA0.html
Install vCenter Server Patches:
https://docs.vmware.com/en/VMware-vSphere/7.0/com.vmware.vcenter.upgrade.doc/GUID-5FCA78EC-8637-43A4-8B28-24624E4D5EBA.html
Configure vCenter HA With the vSphere Client:
https://docs.vmware.com/en/VMware-vSphere/7.0/com.vmware.vsphere.avail.doc/GUID-5F7DAFB2-60BD-4C50-A7E5-29A319CBB714.html
How to install vCenter Server 7:
https://dpcvirtualtips.com/how-to-install-vcenter-7-in-lab-environment
Reboot or Shut down the vCenter Server Nodes:
https://docs.vmware.com/en/VMware-vSphere/7.0/com.vmware.vsphere.avail.doc/GUID-F5F3597D-2363-49A7-8629-EC8FD92EDB6D.html
vCenter HA FAQ:
https://kb.vmware.com/s/article/2148003
