

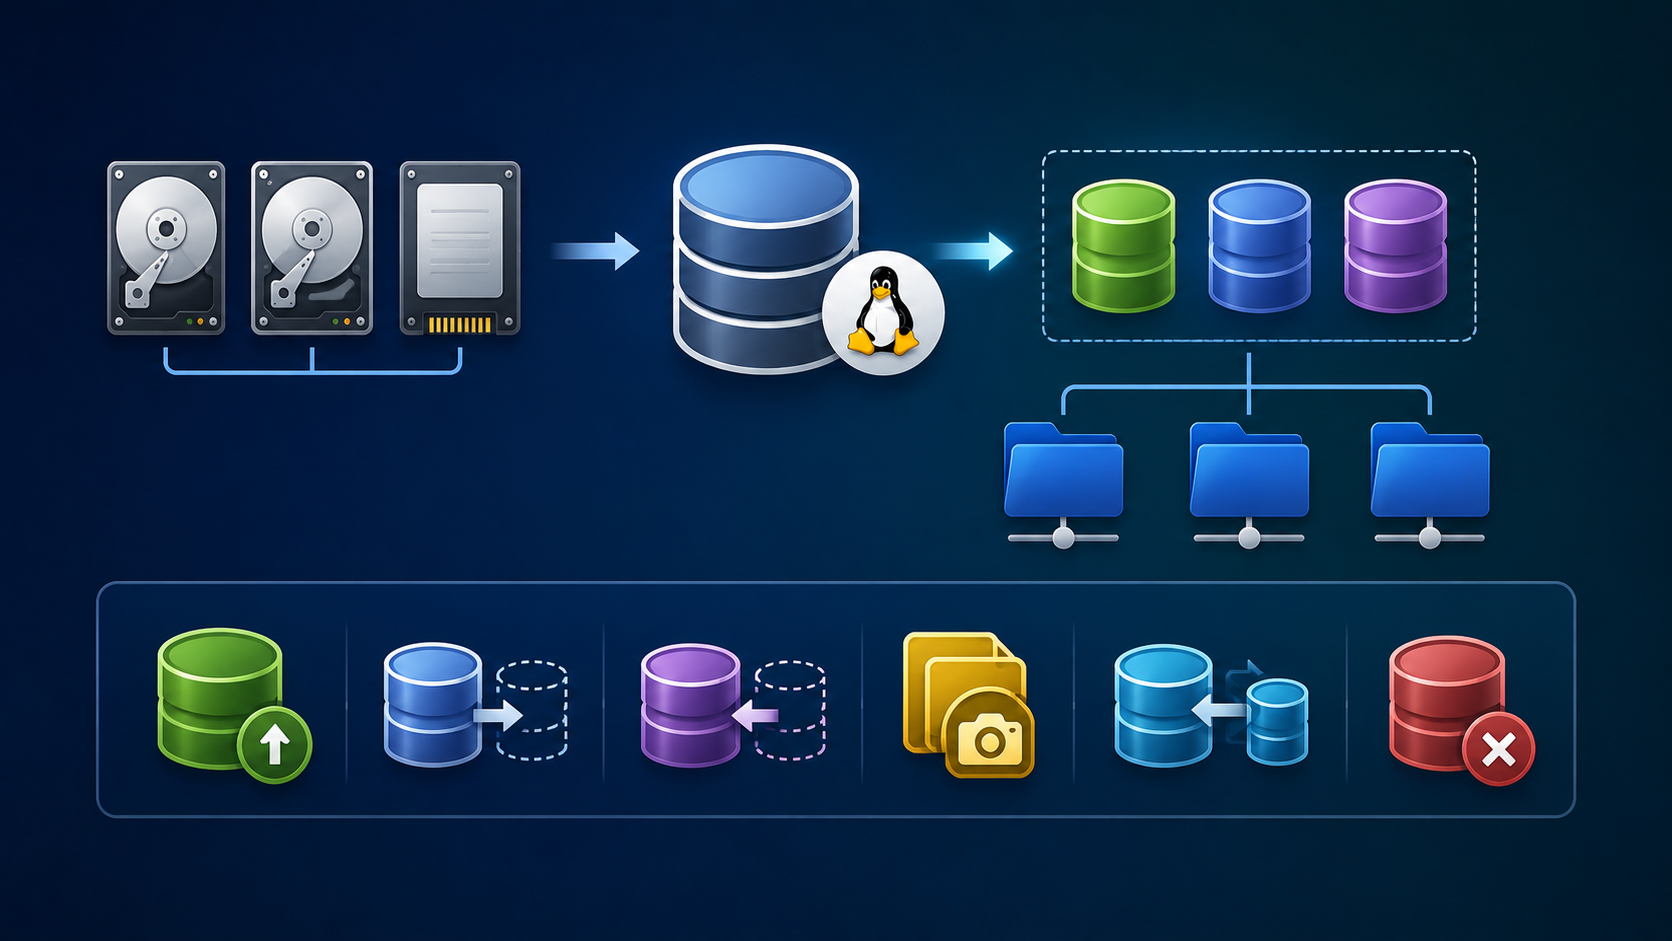
Logical Volume Management (LVM) lets you treat physical storage devices as flexible pools, making resizing, snapshotting, and reallocating space seamless. All the provided examples will be made under Red Hat Enterprise Linux 8.
First and foremost, we’ve written an article on MBR and GPT partition tables. Click here to access the article.
Additionally, if you want to know more about disk partitions, click here to access an article about them!
Core LVM Concepts
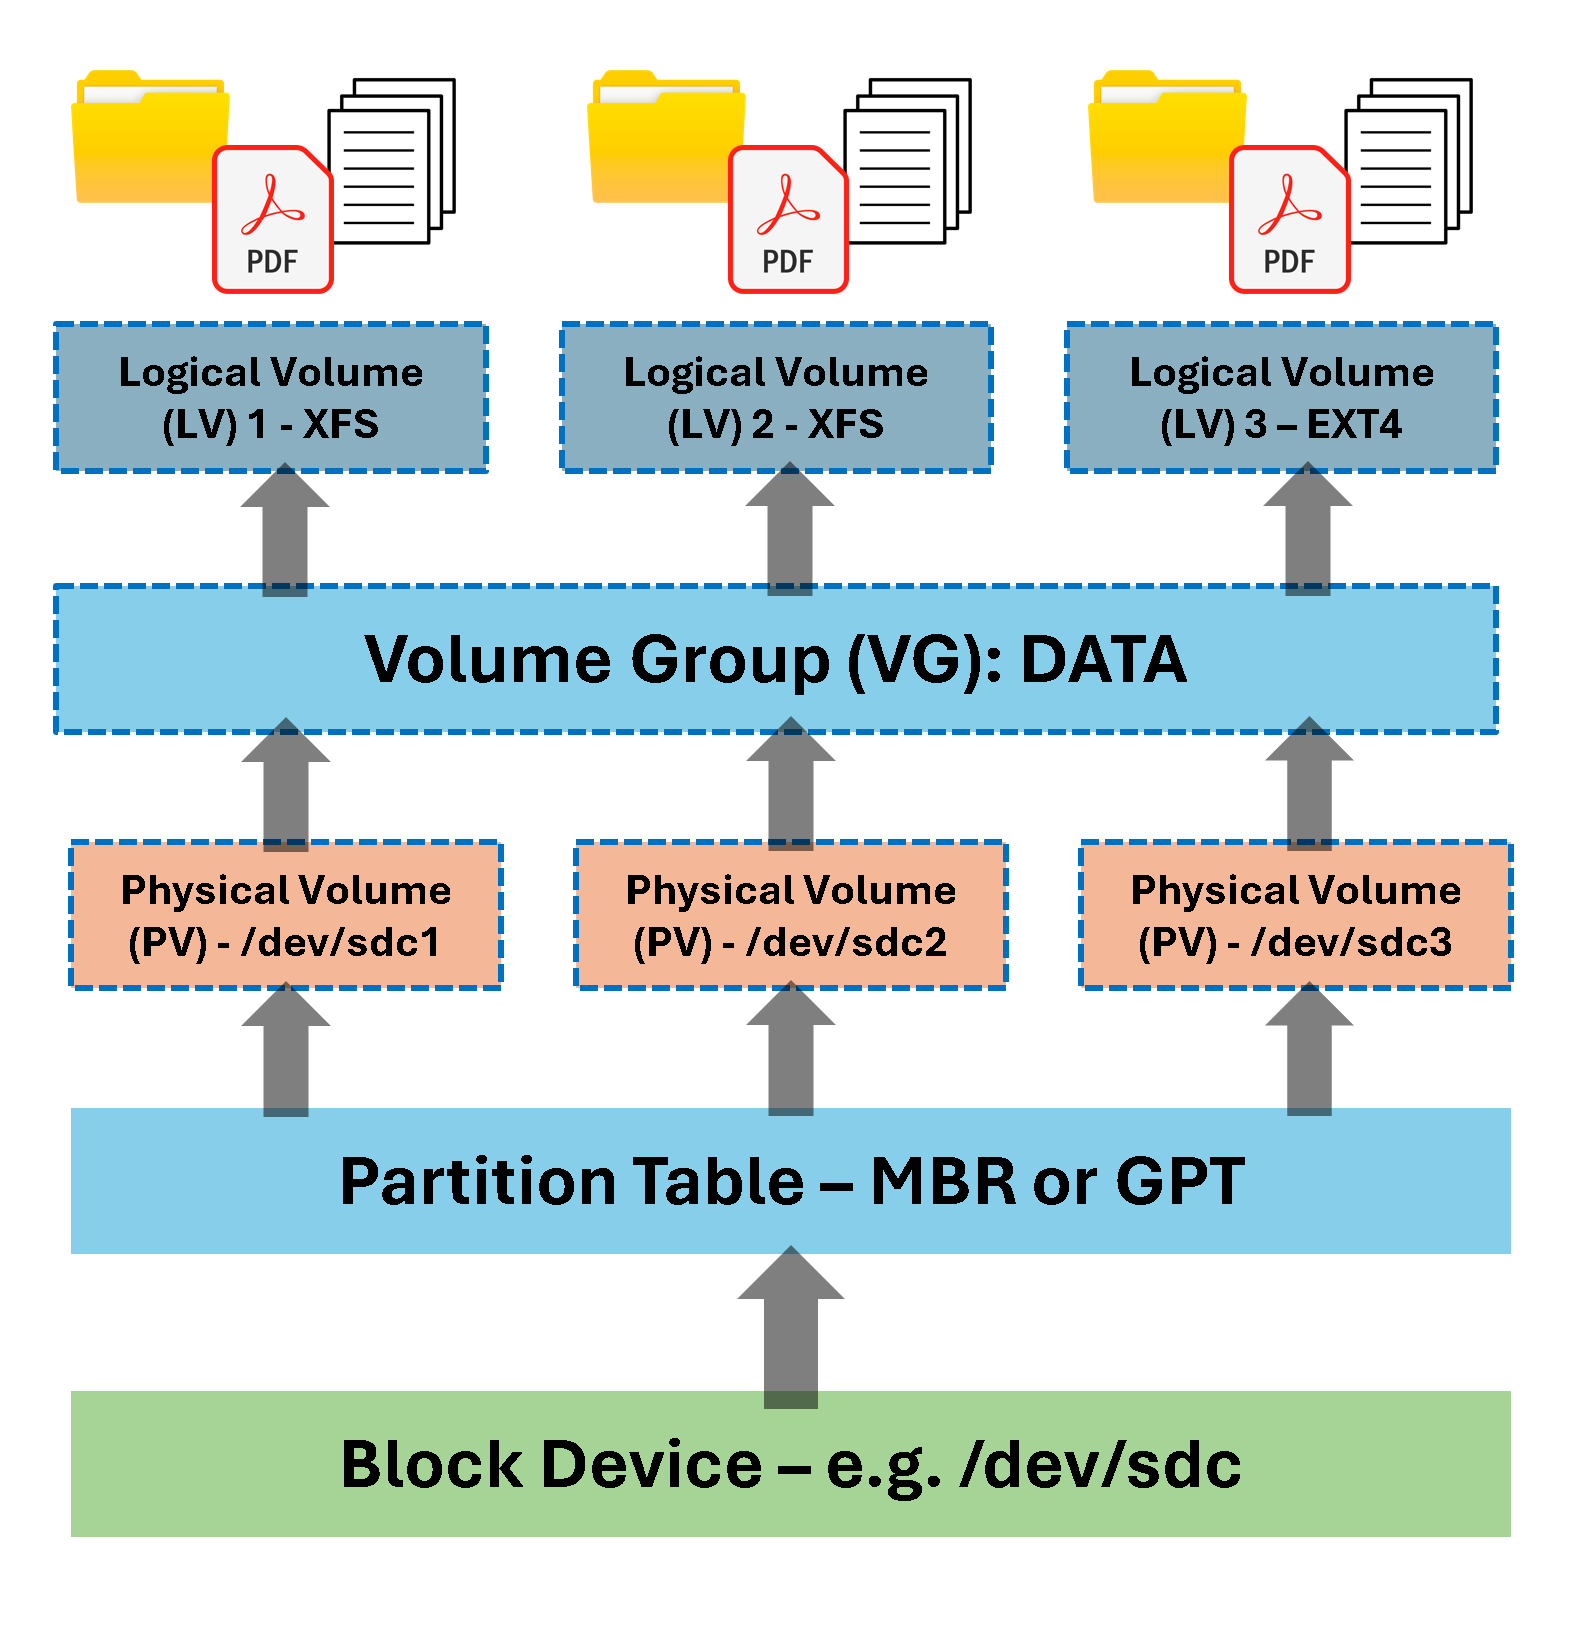
- Physical Volume (PV): A block device (disk or partition) initialized for LVM usage.
- Volume Group (VG): A pool of one or more PVs. Think of it as a storage bucket.
- Logical Volume (LV): A “virtual partition” carved out of a VG, formatted with a filesystem, and mounted.
- Snapshot: A point-in-time copy of an LV for backups or testing, using copy-on-write.
The following picture explains the basic structure of the LVM:
Step-by-Step LVM Workflow
For this example, let’s use our block device /dev/sdf – this is a 1GB device:
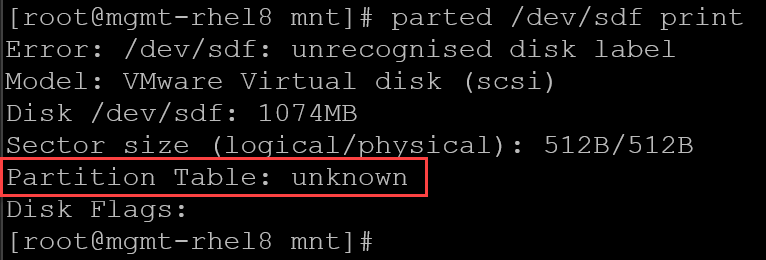
1- First, create a GPT partition table:
parted -s /dev/sdf mklabel gpt2- Create four partitions, each one with 250MB:
parted -s /dev/sdf mkpart primary xfs 1MiB 250MiB
parted -s /dev/sdf mkpart primary xfs 250MiB 500MiB
parted -s /dev/sdf mkpart primary xfs 500MiB 750MiB
parted -s /dev/sdf mkpart primary xfs 750MiB 1000MiB
Let’s check the partition table:
parted /dev/sdf print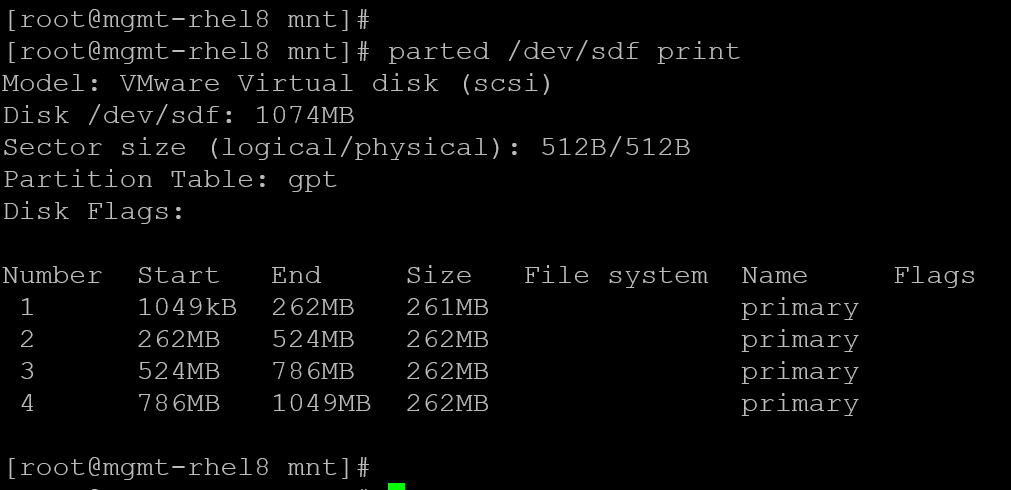
And confirm with “lsblk”:
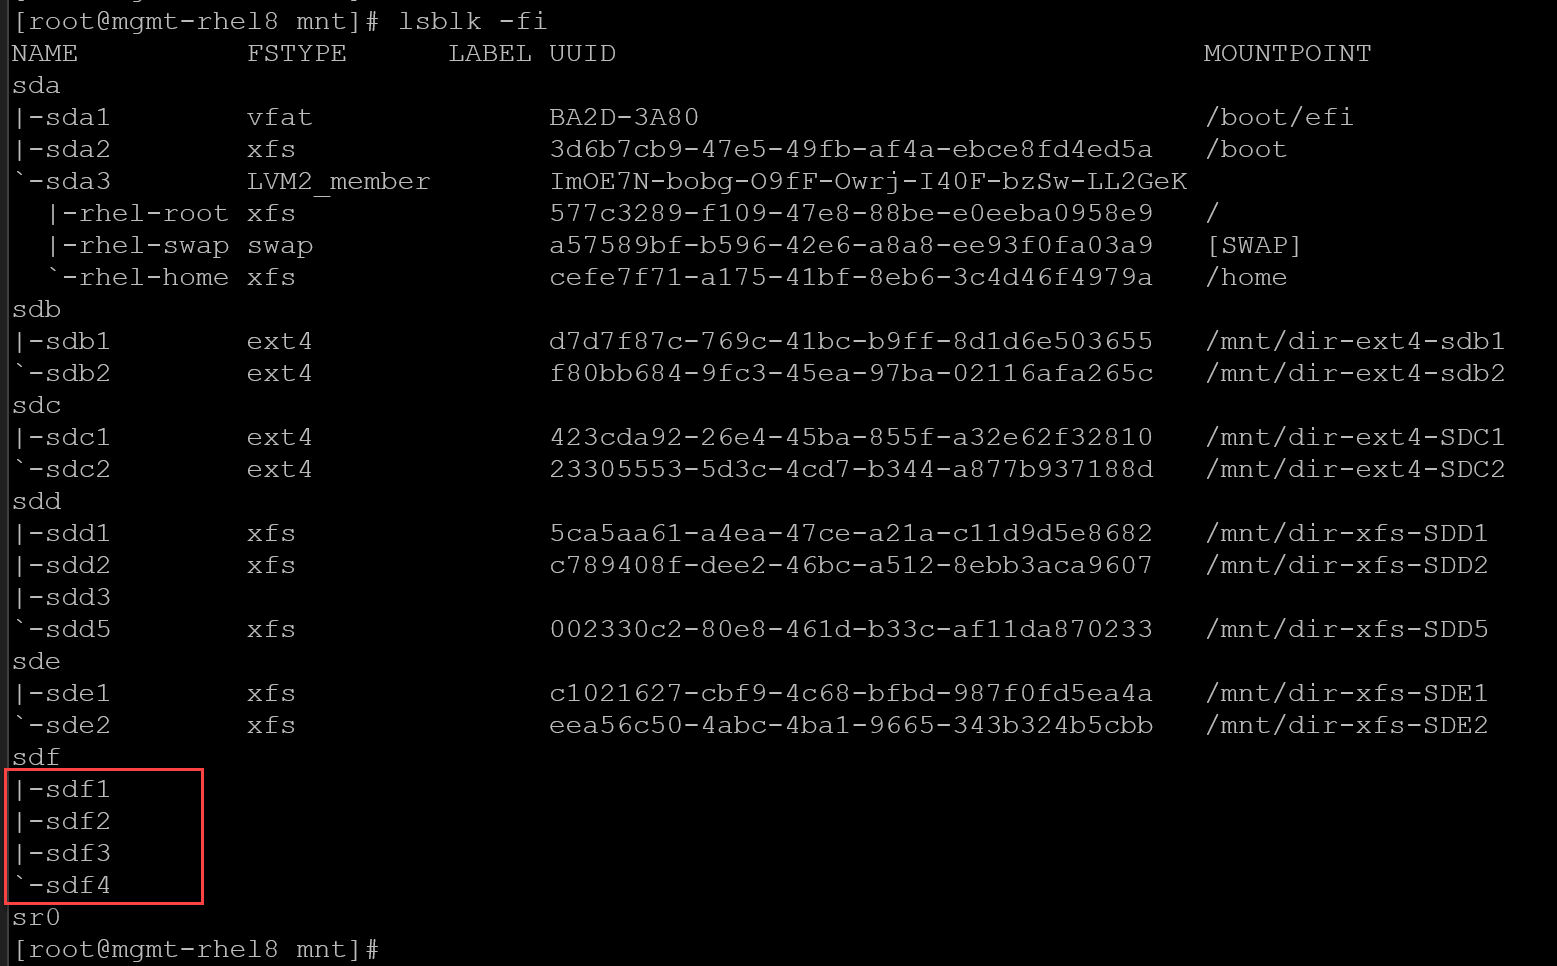
3- Initialize all sdf disk partitions as Physical Volumes (PVs):
pvcreate /dev/sdf1 /dev/sdf2 /dev/sdf3 /dev/sdf4And check them using “pvs”:
pvs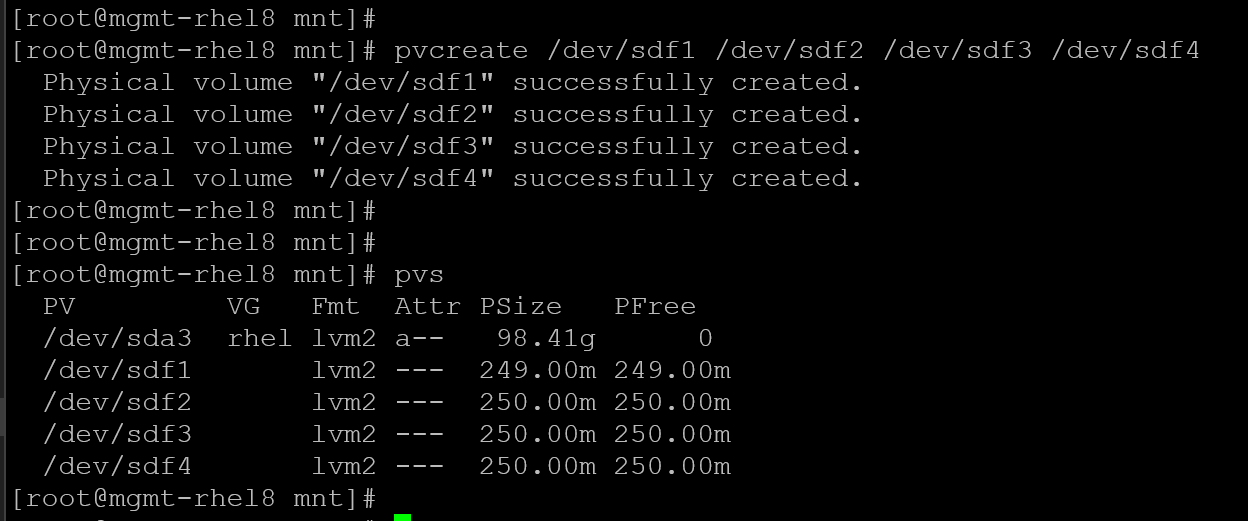
4- Create a Volume Group (VG) named “data_vg” spanning all Physical Volumes (PVs) created before:
vgcreate data_vg /dev/sdf1 /dev/sdf2 /dev/sdf3 /dev/sdf4Inspect the VG with the “vgs” command:
vgs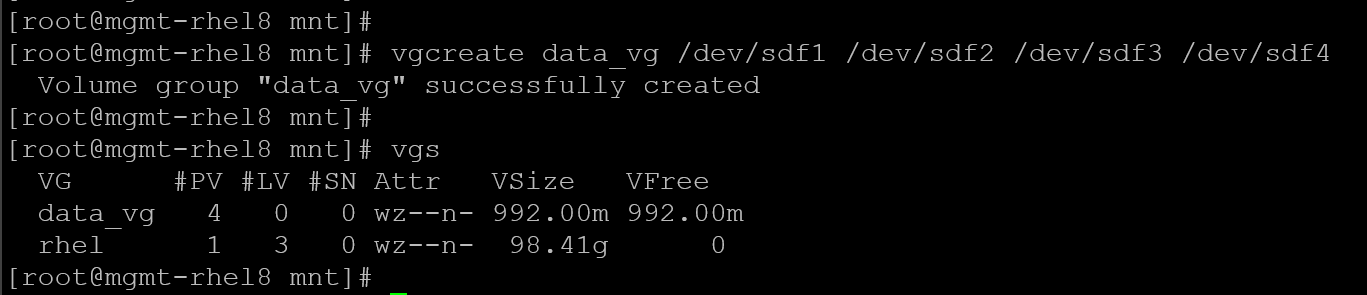
5- The next step is to create Logical Volumes (LVs) using the Volume Group (VG) “data_vg”.
Carve out a 500MB LV called “lv_data1”:
lvcreate -L 500M -n lv_data1 data_vgInspect with “lvs”:
lvs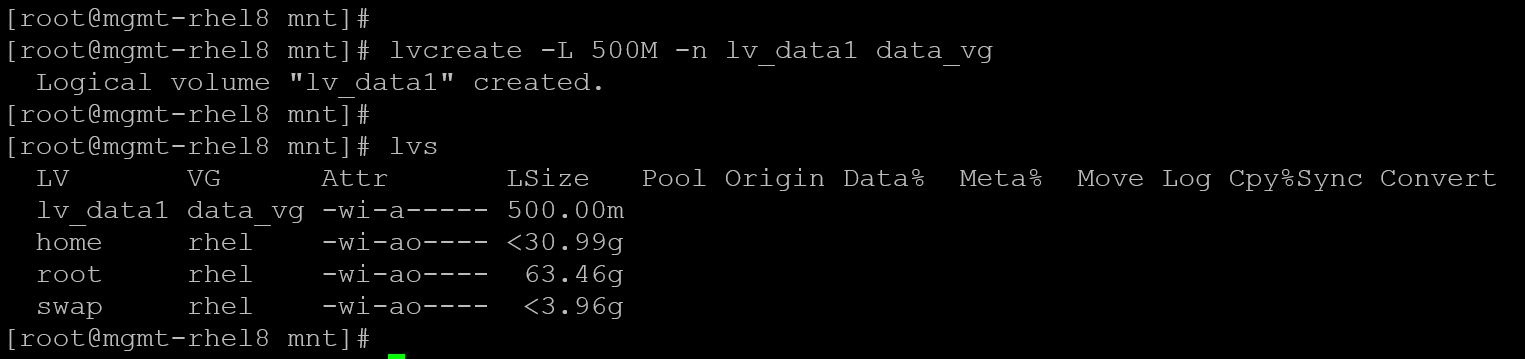
Carve out a new LV called “lv_data2” using the remaining space:
lvcreate -l 100%FREE -n lv_data2 data_vg
Inspect with “lvs”:
lvs
6- Create a filesystem for each Logical Volume (LV):
mkfs.xfs /dev/data_vg/lv_data1
mkfs.xfs /dev/data_vg/lv_data2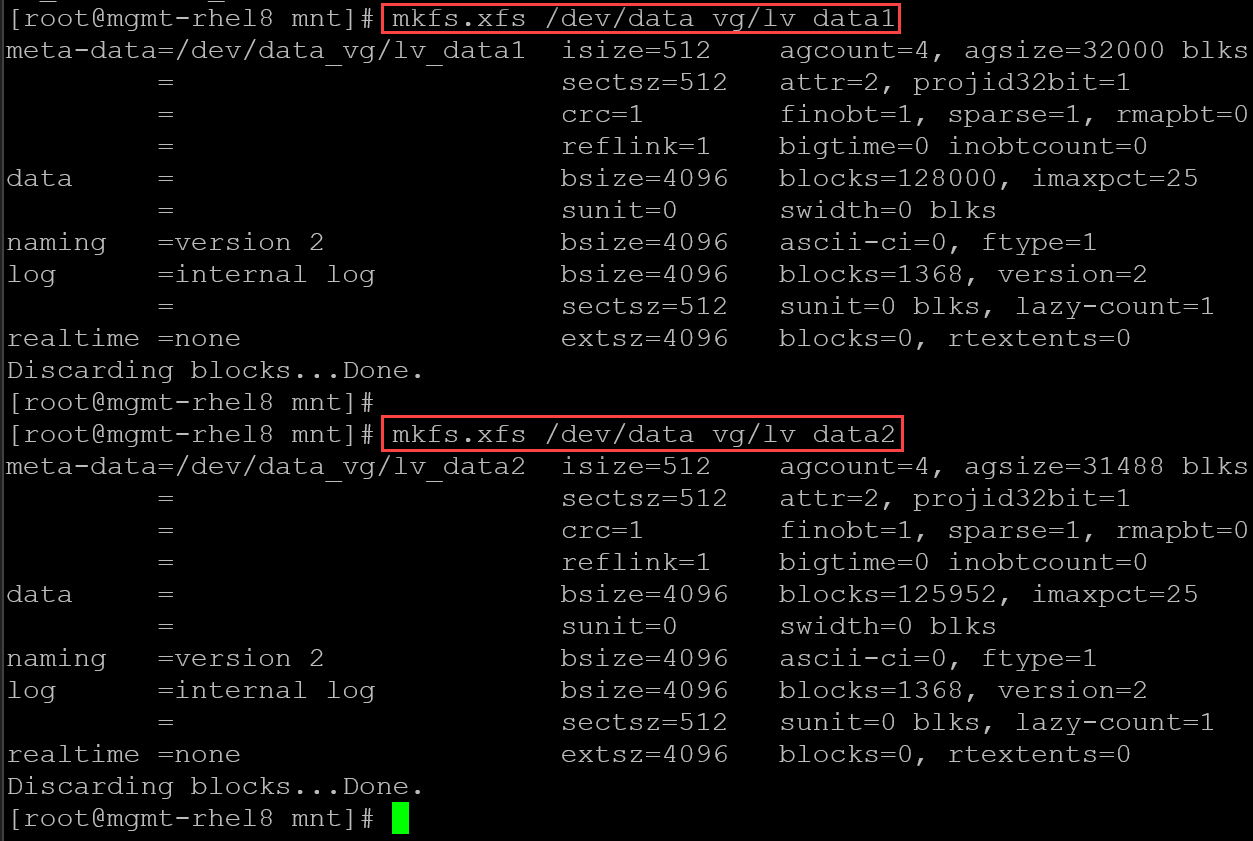
7- Create local directories and add entries on the /etc/fstab to mount on boot:
mkdir dir-xfs-LVM-SDF1
mkdir dir-xfs-LVM-SDF2
Add to /etc/fstab:
/dev/data_vg/lv_data1   /mnt/dir-xfs-LVM-SDF1   xfs     defaults        0       0
/dev/data_vg/lv_data2   /mnt/dir-xfs-LVM-SDF2   xfs     defaults        0       0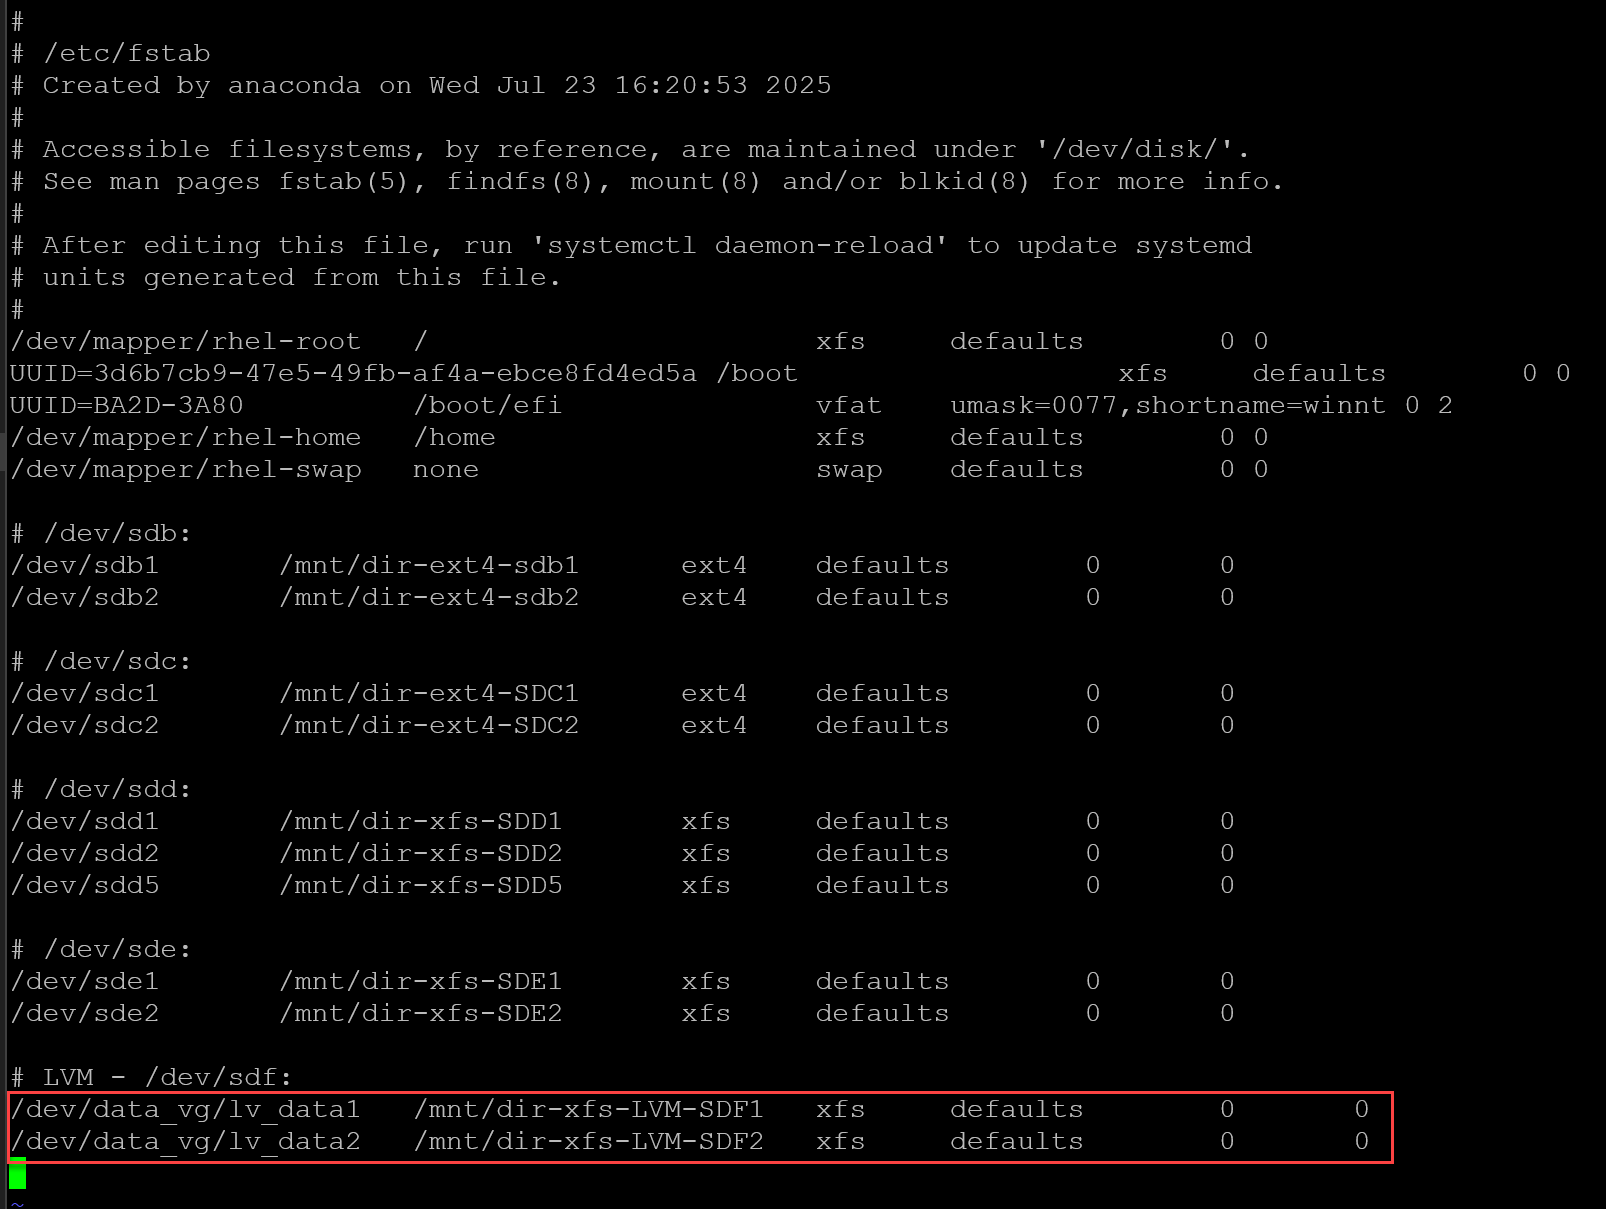
8- Mount:
mount -a
systemctl daemon-reload
9- Inspect:
lsblk -fi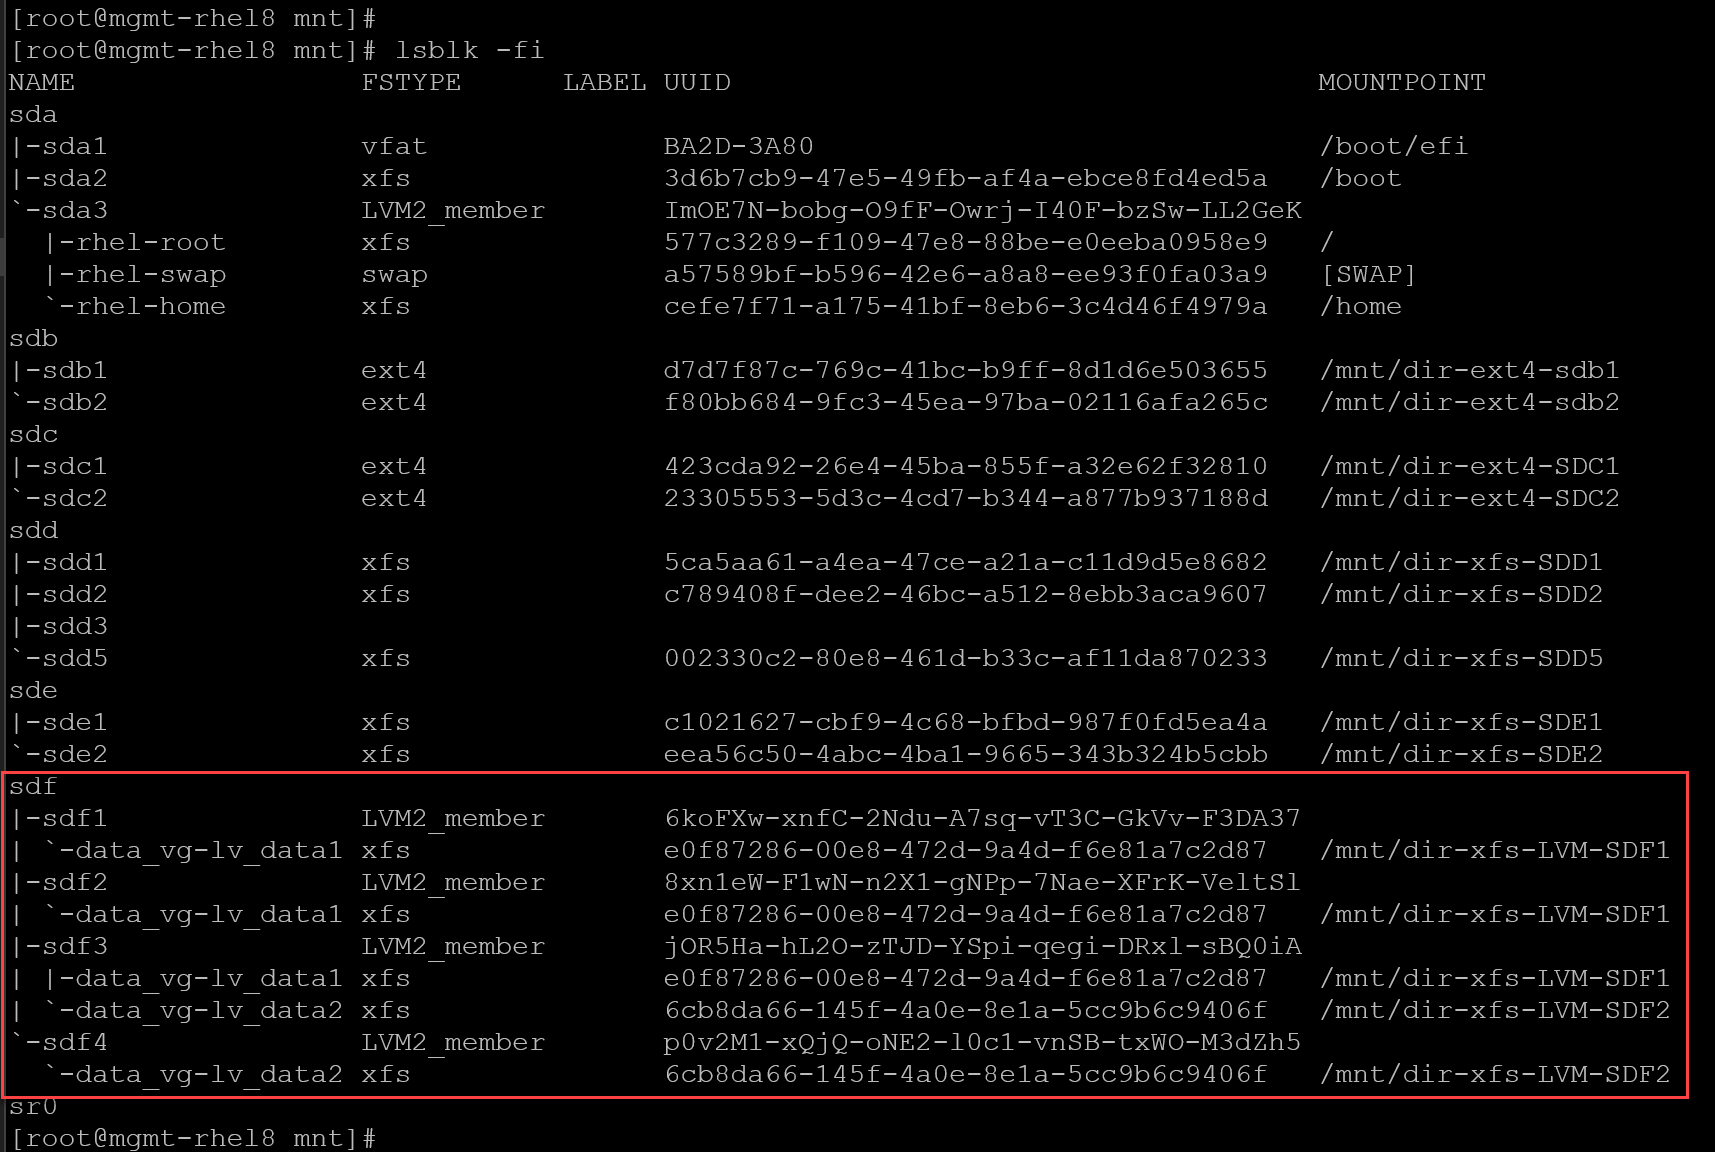
Persist in /etc/fstab using a UUID
When a disk partition is created, a UUID is automatically created and assigned to the partition. To see the UUID, we can use the commands “lsblk” and “blkid”:
lsblk -fi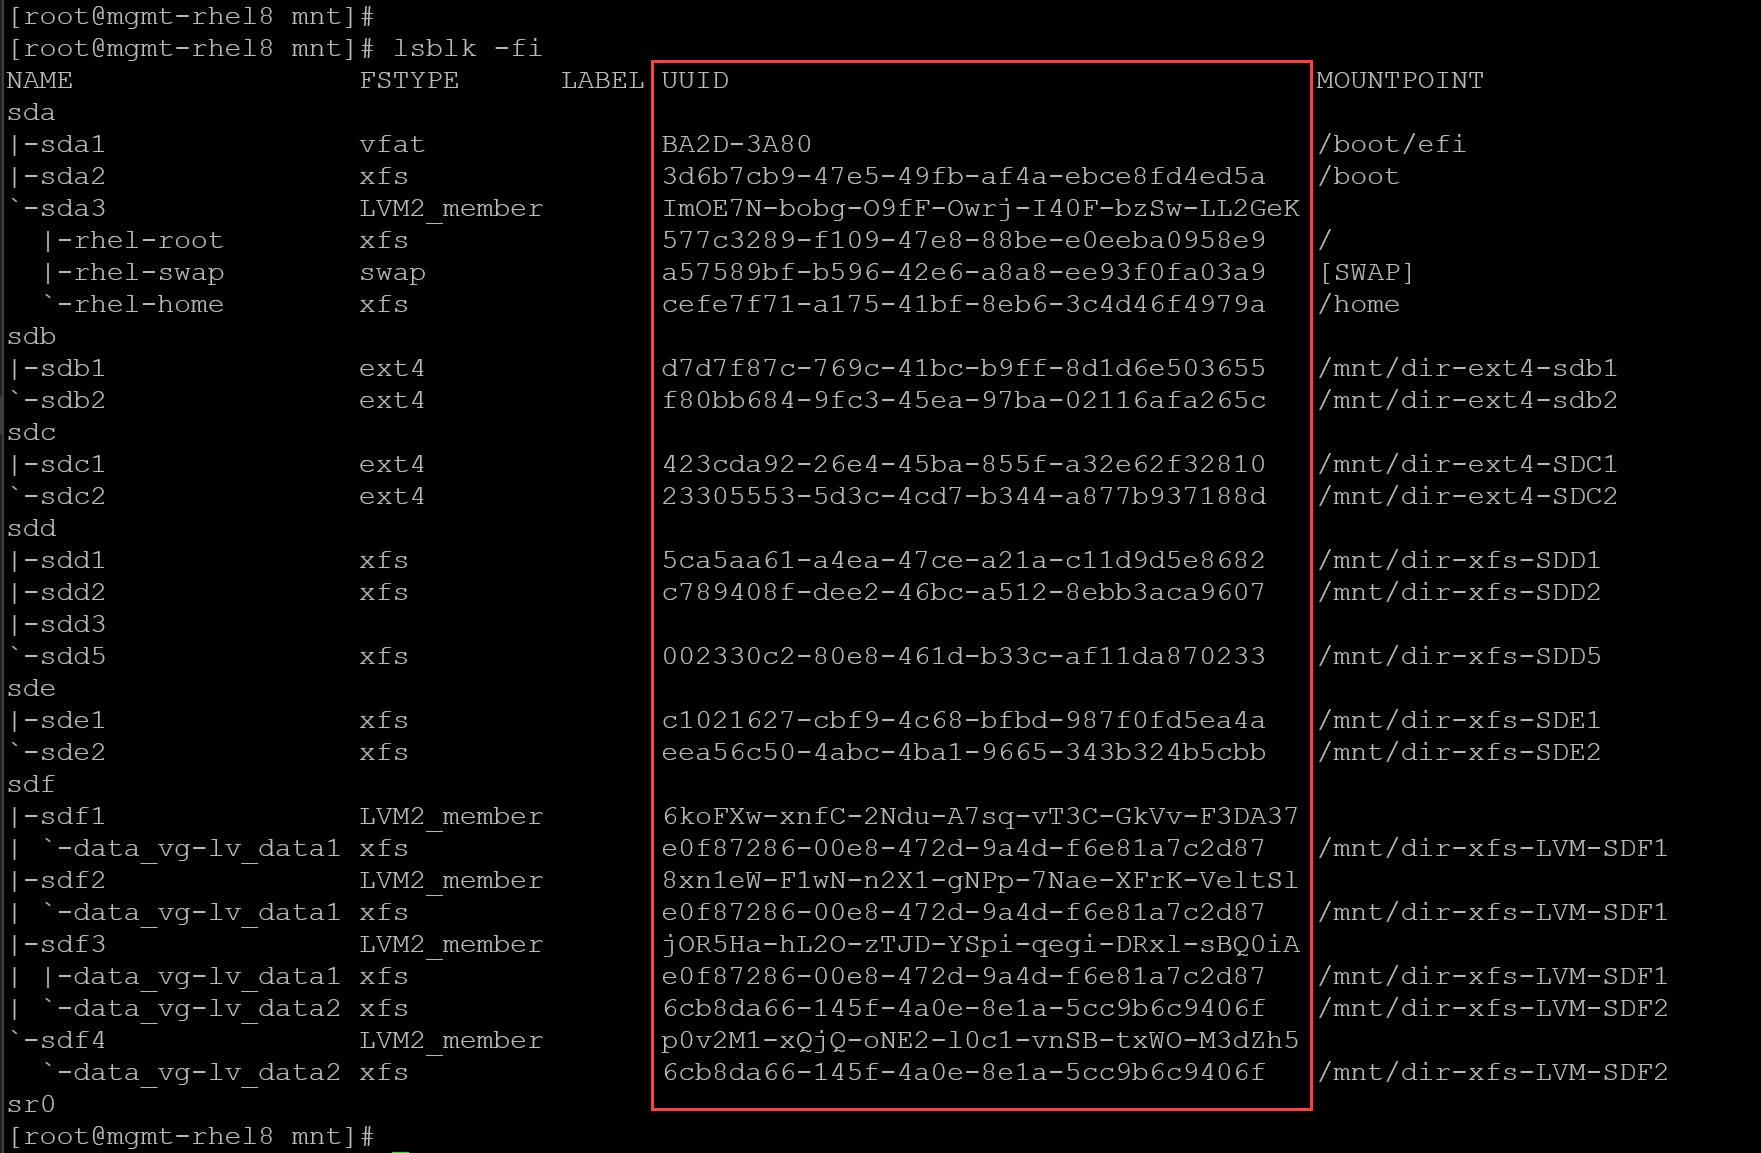
blkid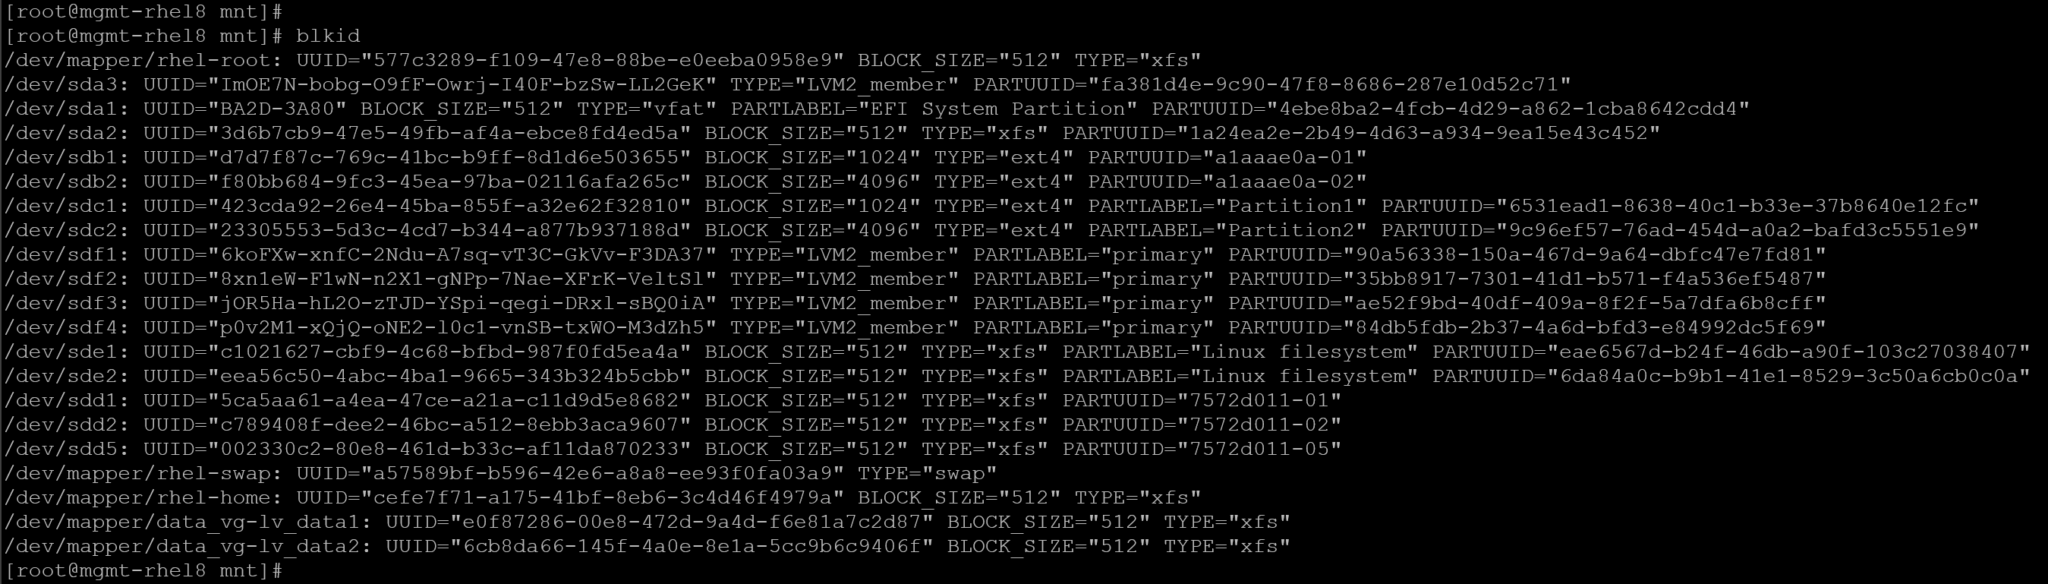
So, let’s get the UUID for the Logical Volumes (LV) and mount them using it:
1- Get the UUID for each Logical Volume (LV):
blkid | grep -E "lv_data1|lv_data2"
2- Edit the /etc/fstab, comment or delete the previous entries for each Logical Volume (LV) and add the following entries (using the UUID instead of using the device block):
#/dev/data_vg/lv_data1  /mnt/dir-xfs-LVM-SDF1   xfs     defaults        0       0
#/dev/data_vg/lv_data2  /mnt/dir-xfs-LVM-SDF2   xfs     defaults        0       0

UUID=e0f87286-00e8-472d-9a4d-f6e81a7c2d87       /mnt/dir-xfs-LVM-SDF1   xfs     defaults      0       0
UUID=6cb8da66-145f-4a0e-8e1a-5cc9b6c9406f       /mnt/dir-xfs-LVM-SDF2   xfs     defaults      0       0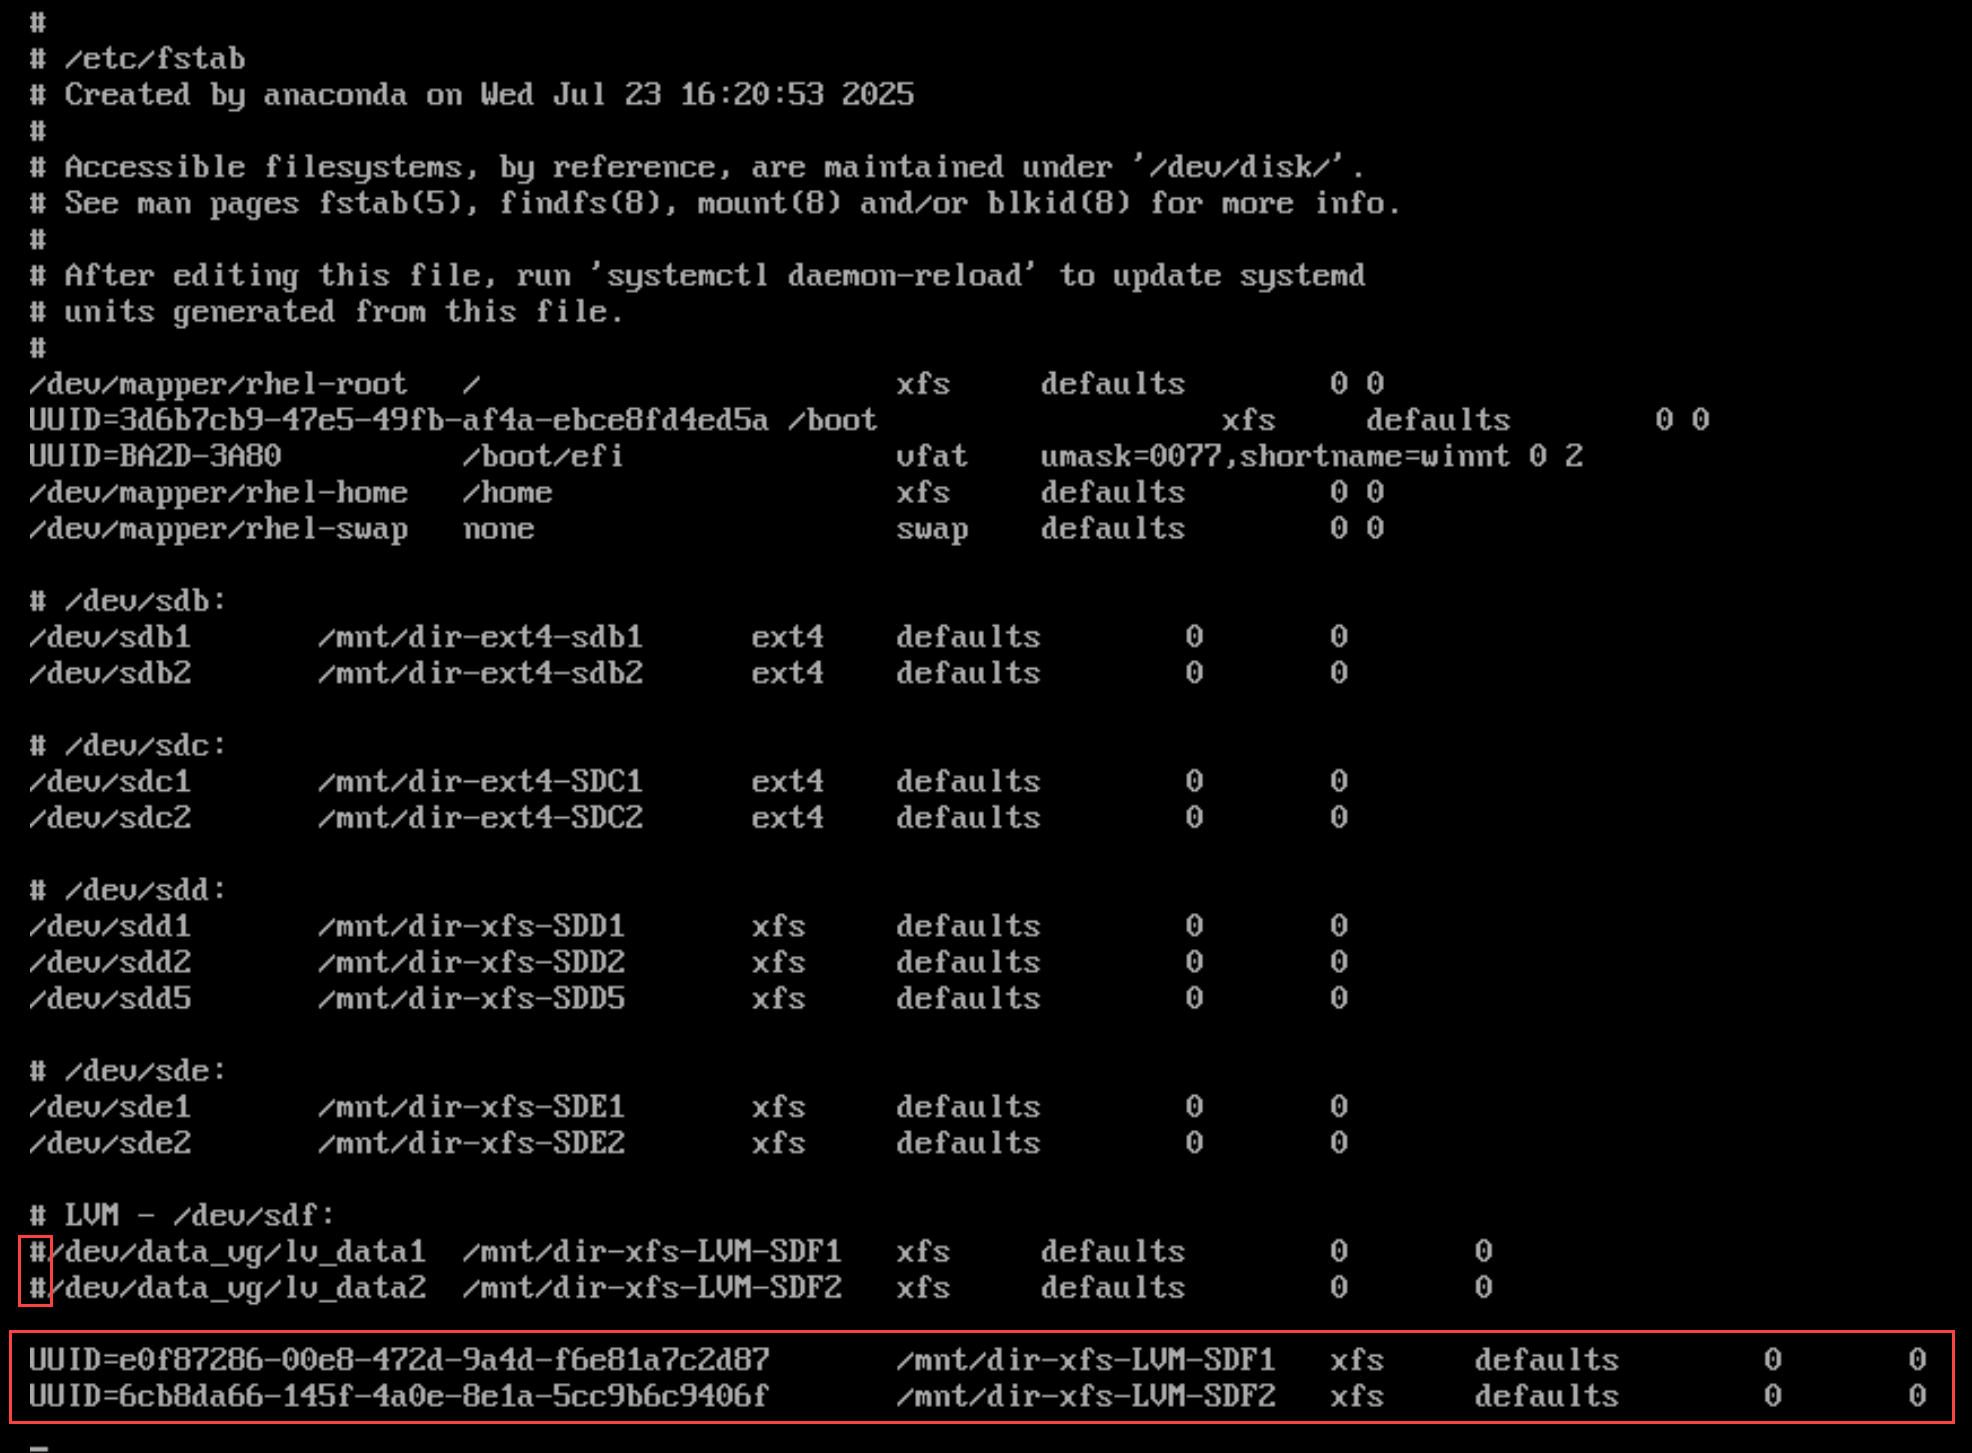
3- Mount:
mount -aPersist in /etc/fstab using a LABEL
Using filesystem labels in /etc/fstab makes your mounts more human-readable and resilient to device renaming. Below are examples covering labeling, verification, and fstab entries.
Before you can reference a label in/etc/fstab, you must assign one. Common tools:
For ext2/3/4 filesystems:
e2label /dev/data_vg/lv_data1 LABEL_NAMEFor XFS filesystems:
xfs_admin -L LABEL_NAME /dev/data_vg/lv_data1So, let’s deep dive into our scenario:
1- Create a label for each Logical Volume (LV). To remember, both LVs are using the XFS filesystem:
df -Th | grep -E "lv_data1|lv_data2"
Note: If the filesystems are mounted, we need to unmount them first:
umount /dev/data_vg/lv_data1
umount /dev/data_vg/lv_data2
Create the labels:
xfs_admin -L LV1 /dev/data_vg/lv_data1
xfs_admin -L LV2 /dev/data_vg/lv_data2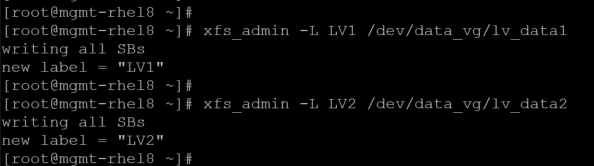
2- Confirm the labels:
blkid | grep -E "lv_data1|lv_data2"
3- Comment or delete previous entries on /etc/fstab pointing to both Logical Volumes (LVs) and add the new ones using labels:
# LVM - /dev/sdf:
#/dev/data_vg/lv_data1  /mnt/dir-xfs-LVM-SDF1   xfs     defaults        0       0
#/dev/data_vg/lv_data2  /mnt/dir-xfs-LVM-SDF2   xfs     defaults        0       0

#UUID=e0f87286-00e8-472d-9a4d-f6e81a7c2d87      /mnt/dir-xfs-LVM-SDF1   xfs     defaults        0       0
#UUID=6cb8da66-145f-4a0e-8e1a-5cc9b6c9406f      /mnt/dir-xfs-LVM-SDF2   xfs     defaults        0       0

LABEL=LV1       /mnt/dir-xfs-LVM-SDF1   xfs     defaults        0       0
LABEL=LV2       /mnt/dir-xfs-LVM-SDF2   xfs     defaults        0       0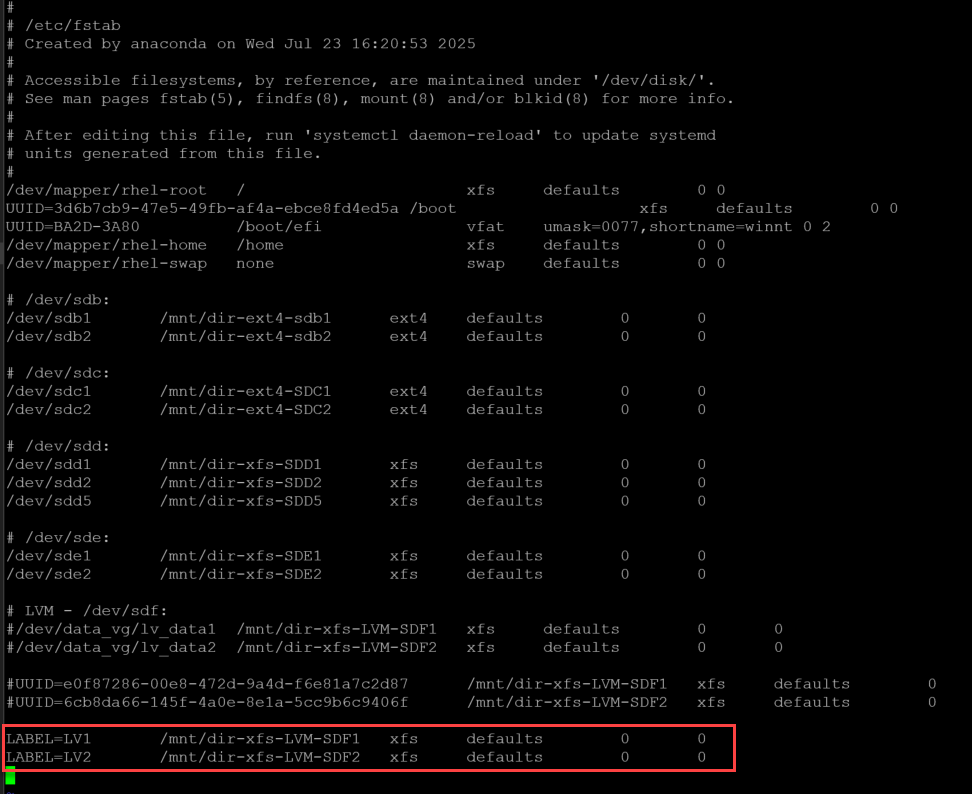
4- Mount:
mount -a
systemctl daemon-reload
Extend a Logical Volume (LV)
With LVM, we can extend an existing Logical Volume (LV). Of course, to do that, we need to have free space on the Volume Group (VG). To inspect in, in our case:
vgdisplay data_vgIn our case, we do not have free/available space in our VG:
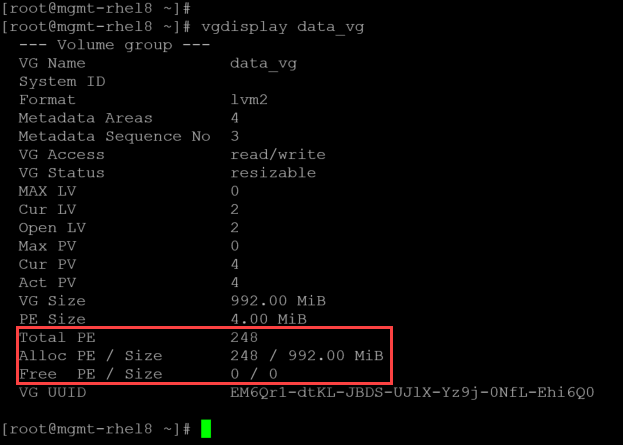
So, the first step is to add more space in this VG. Let’s do that:
1- Create a new Physical Volume (PV) using a new block device:
pvcreate /dev/sdf5Afterward, extend the Volume Group (VG) by adding the new Physical Volume (PV):
vgextend data_vg /dev/sdf52- Now, we have a free space in the Volume Group (VG):
vgdisplay data_vg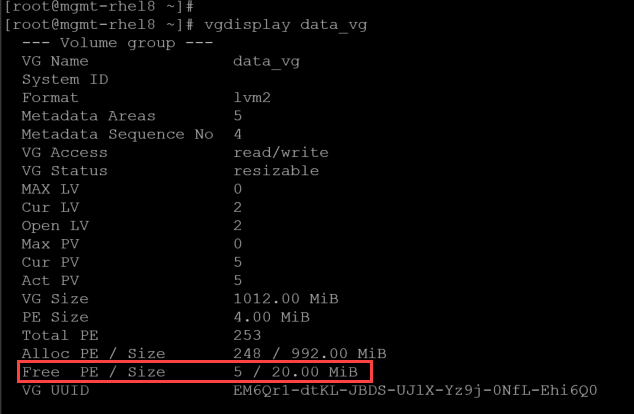
3- Basically, we have two ways to extend a Logical Volume (LV):
- Using the number of free Physical Extents (PEs)
- Using the number of free Space (MiB)
If you want to extend an LV using the number of free PEs:
lvextend -l 5 /dev/data_vg/lv_data1Or, if you’re going to extend an LV using the free space (MiB):
lvextend -L +20MiB /dev/data_vg/lv_data1Let’s extend using the free size (MiB). Before extending:
lvdisplay /dev/data_vg/lv_data1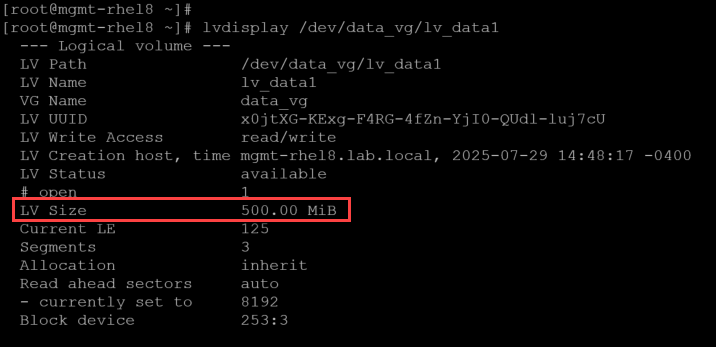
Extending:
lvextend -L +20MiB /dev/data_vg/lv_data1
After extending:
lvdisplay /dev/data_vg/lv_data1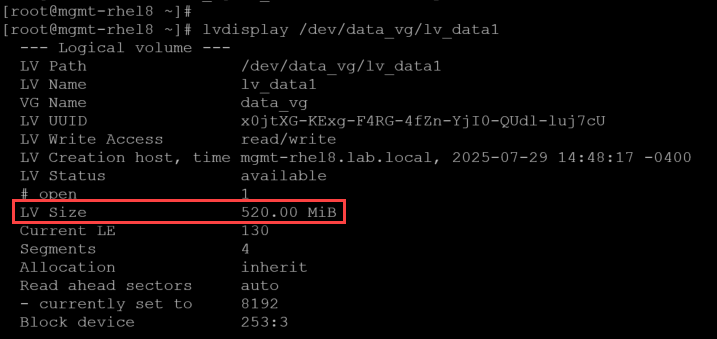
4- To finish, we need to grow the filesystem. Since we’re using XFS, the command is:
xfs_growfs /dev/data_vg/lv_data1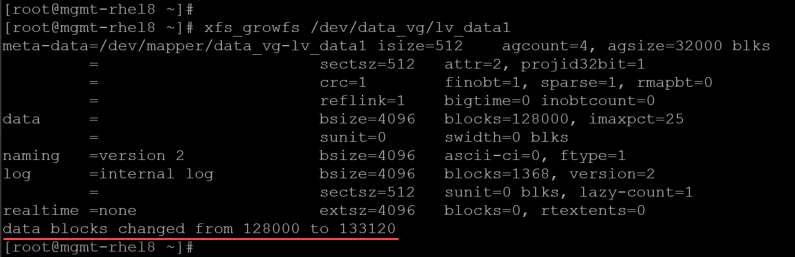
Using “lvresize” and “lvreduce”
lvresize — Resize a logical volume.
lvresize resizes an LV in the same way as lvextend and lvreduce.
lvreduce — Reduce the size of a logical volume.
lvreduce reduces the size of an LV. The freed logical extents are returned to the VG to be used by other LVs.
Before a deep dive into the commands “lvresize” and “lvreduce”, let’s provide a scenario and talk about it:
- You have a 100GB disk in a virtual machine (VM) – /dev/sda.
- GPT is the partition scheme used to create the disk partition table.
- There is one partition flagged as LVM. This partition is 50 GB – /dev/sda1.
- A Volume Group (VG) was created using the only available disk partition.
- Inside the VG, a Logical Volume (LV) was created. The LV is using the entire available space in the VG. The filesystem inside the LV is XFS.
- A new project will demand more disk space.
- Challenge: How can the IT admin expand the current LV to provide more space to address the new project demands?
This fictitious scenario can happen in the real world frequently. So, let’s give a way to address this new demand. In this case, for instance, our example will use:
- A 2GB disk – /dev/nvme0n3.
- An 800MB partition flagged as LVM – /dev/nvme0n3p1.
- A Volume Group (VG) named “VG-Project_Thor”.
- A Logical Volume (VG) named “LV-Project_Thor_Data”.
1- The first step is to create the GPT partition table on the block device /dev/nvme0n3:
parted -s /dev/nvme0n3 mklabel gpt2- Create the disk partition and flag it up to be LVM:
parted -s /dev/nvme0n3 unit MiB
parted -s /dev/nvme0n3 mkpart primary ext4 1MiB 800MiB
parted -s /dev/nvme0n3 set 1 lvm on
3- Inspect the disk partition table to confirm that the new partition has been created successfully:
parted /dev/nvme0n3 print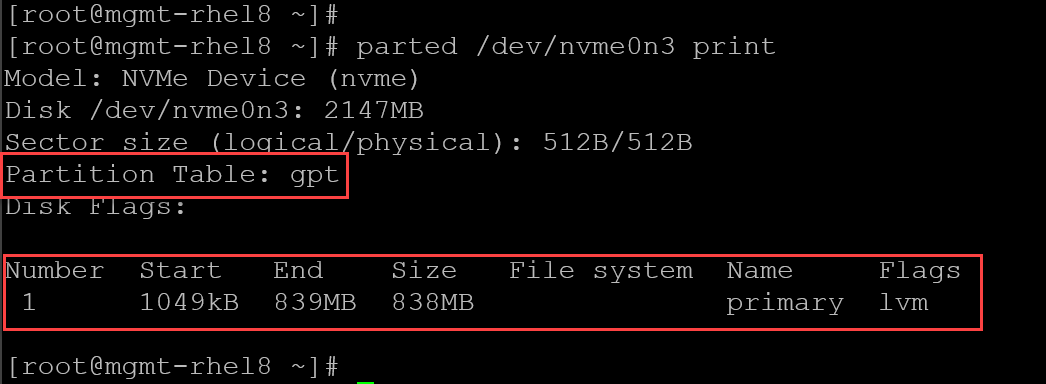
4- Create the Physical Volume (PV):
pvcreate /dev/nvme0n3p15- Create the Volume Group (VG):
vgcreate VG-Project_Thor /dev/nvme0n3p16- To inspect the PV and VG, respectively:
pvs
vgs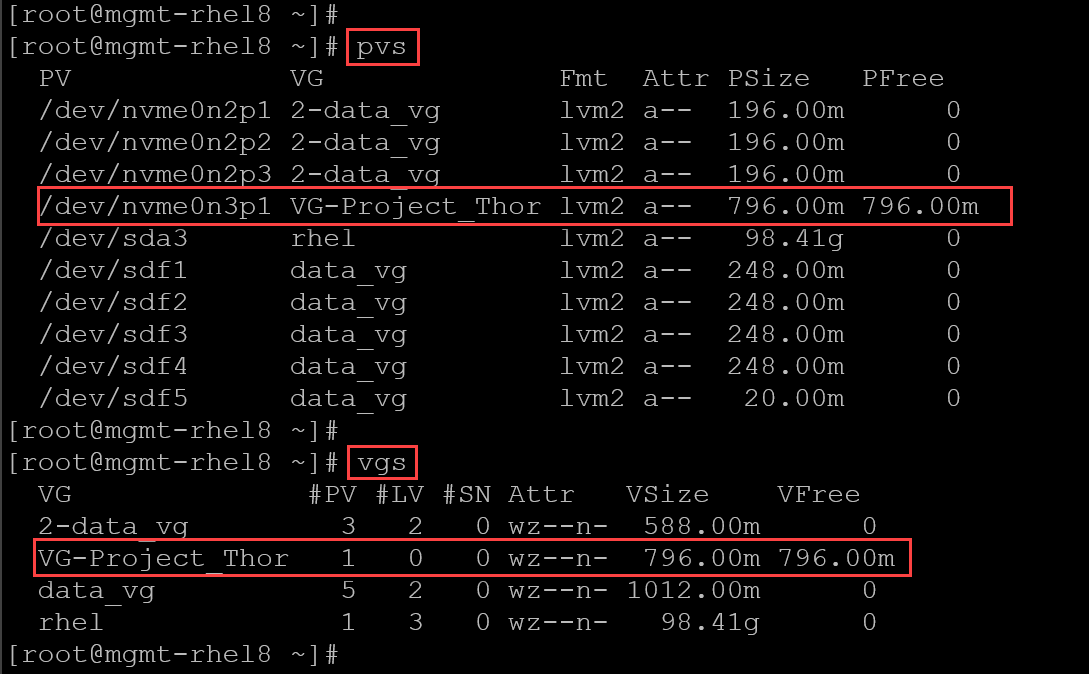
7- Create the Logical Volume (LV) using all the available space in the VG:
lvcreate -l 100%FREE -n LV-Project_Thor_Data VG-Project_Thor8- To inspect the LV:
lvs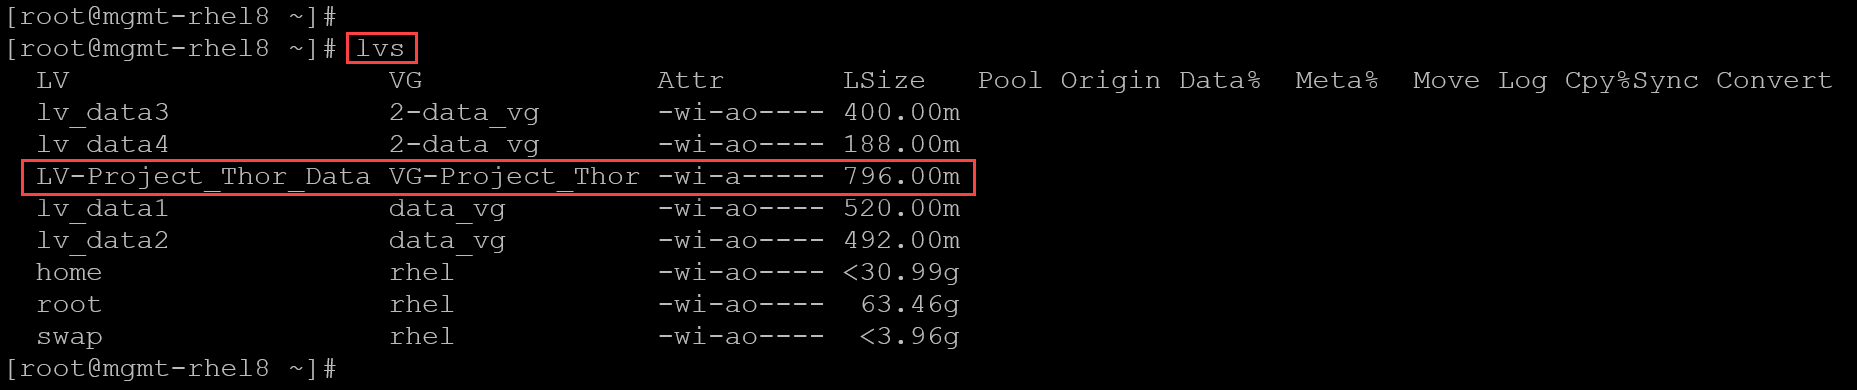
9- To get specific details of the created LV:
lvdisplay /dev/VG-Project_Thor/LV-Project_Thor_Data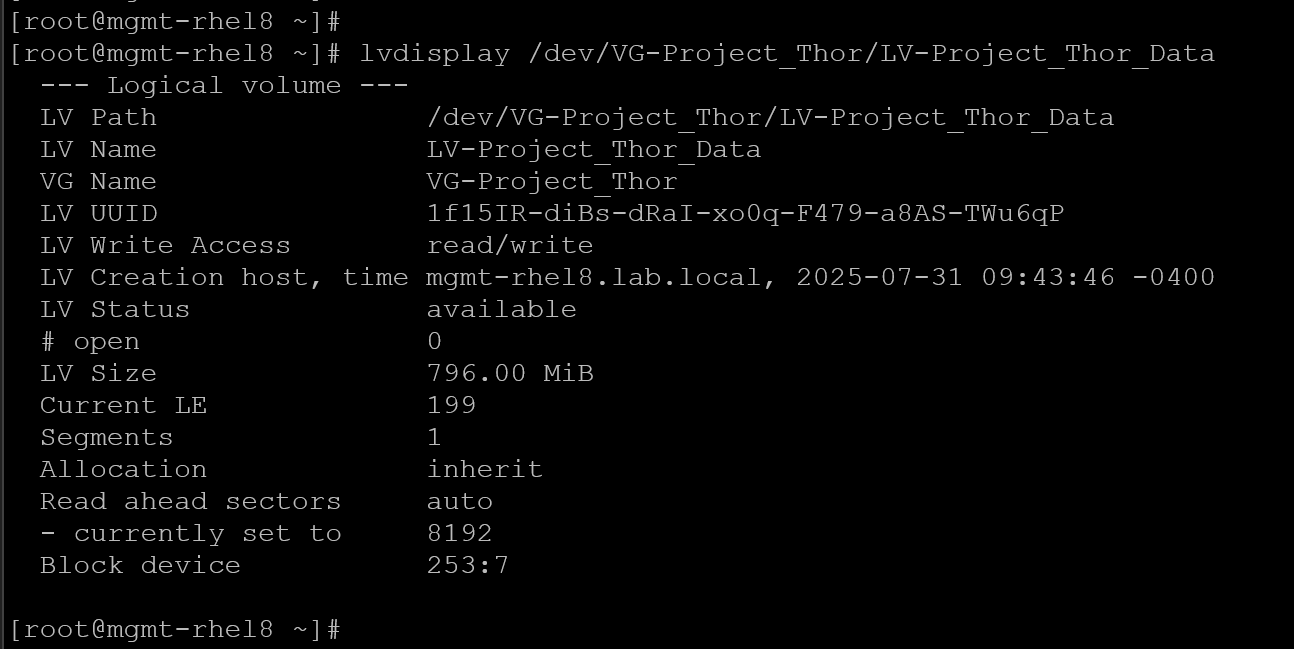
10- Create the XFS filesystem under the LV:
mkfs.xfs /dev/VG-Project_Thor/LV-Project_Thor_Data11- Add the entry in the /etc/fstab to mount the filesystem:
# LVM - /dev/nvme0n3:
/dev/VG-Project_Thor/LV-Project_Thor_Data       /mnt/dir-xfs-LVM-Project_Thor   xfs     defaults        0       0
12- Mount:
mount -a
systemctl daemon-reload
13- Inspect to confirm if the filesystem has been mounted successfully:
lsblk -fi | grep -i -E "name|nvme0n3|Project"
14- Going forward, the next step is:
- Resize the disk partition.
- Resize the Logical Volume (LV).
- Resize the filesystem under the Logical Volume (LV).
To get the free space on the disk:
parted /dev/nvme0n3 print free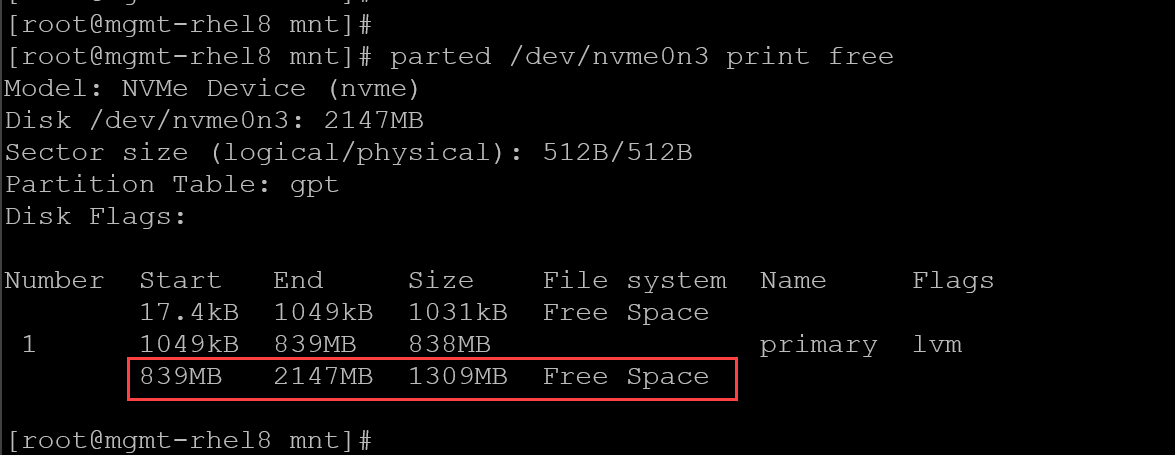
Resize the partition to use all the available/free space:
parted -s /dev/nvme0n3 resizepart 1 100%Before LVM sees the extra space, force the kernel to reload your partition layout:
partprobeTell LVM to use the newly available extents in that partition:
pvresize /dev/nvme0n3p1Inspect the Physical Volume (PV) to confirm the “Free PE”:
pvdisplay /dev/nvme0n3p1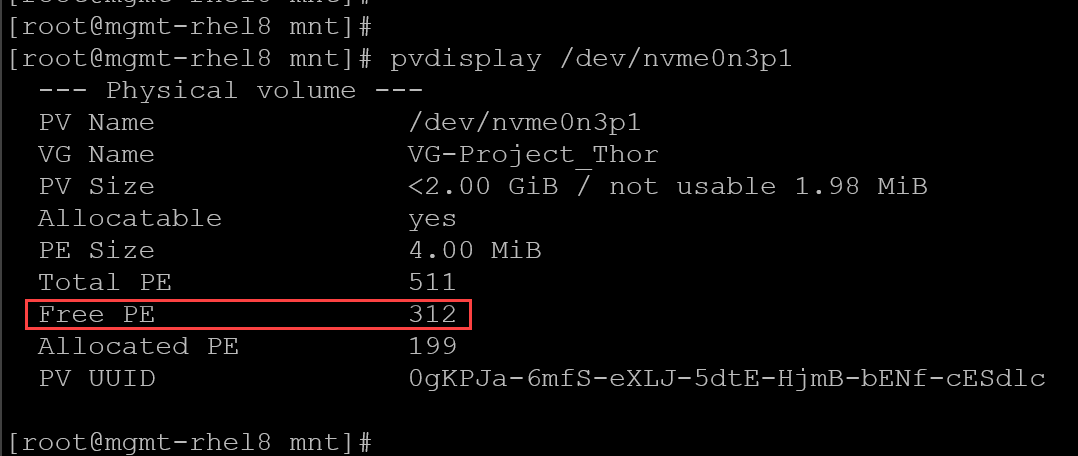
Check the PV size and free space:
pvs --units m -o pv_name,pv_size,pv_free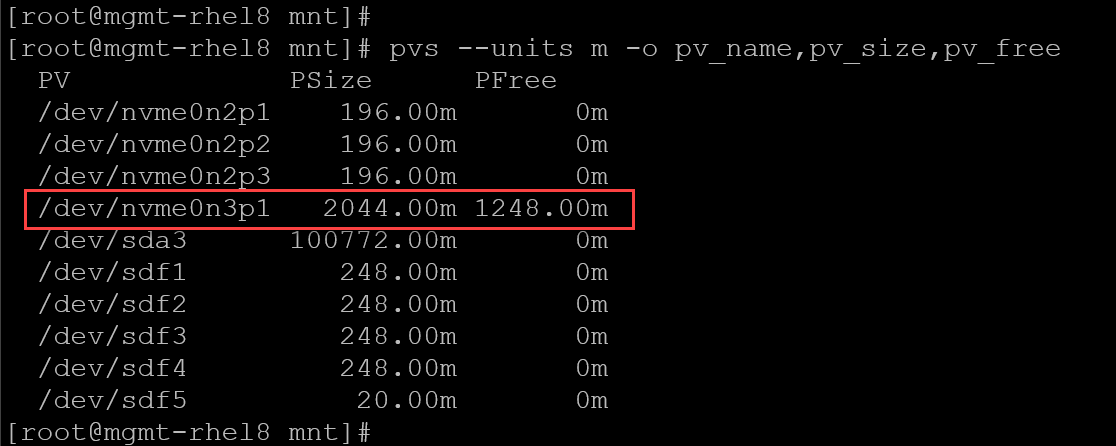
After extending the Physical Volume (PV) using the “pvresize”, the Volume Group (VG) detects it automatically. We can confirm it using the command “vgs”:
vgs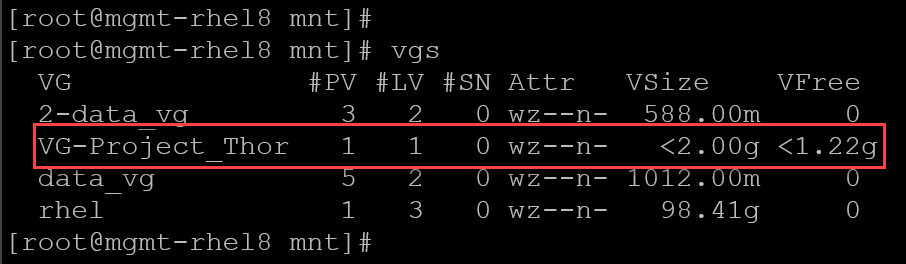
The last step is to grow the Logical Volume (LV) and the XFS filesystem on it. We can do that using the “lvresize”:
Before resizing:
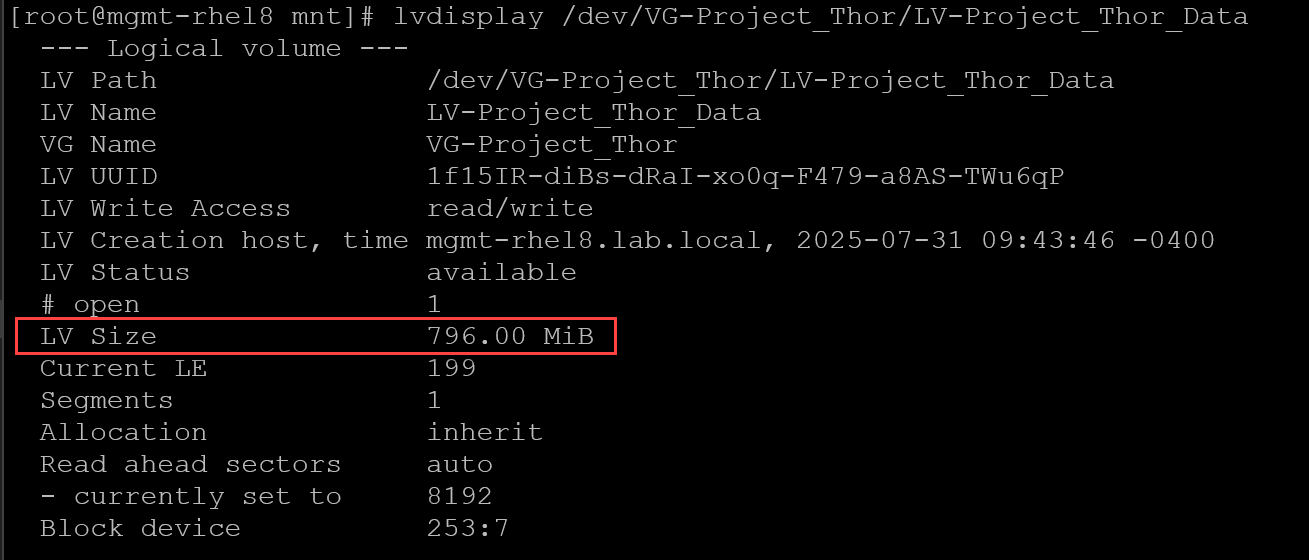
Resizing using all free space in the VG – as we can see, the “lvresize -r” will expand the LV and will call the “resize2fs” to grow the filesystem 😉
lvresize -r -l +100%FREE /dev/VG-Project_Thor/LV-Project_Thor_Data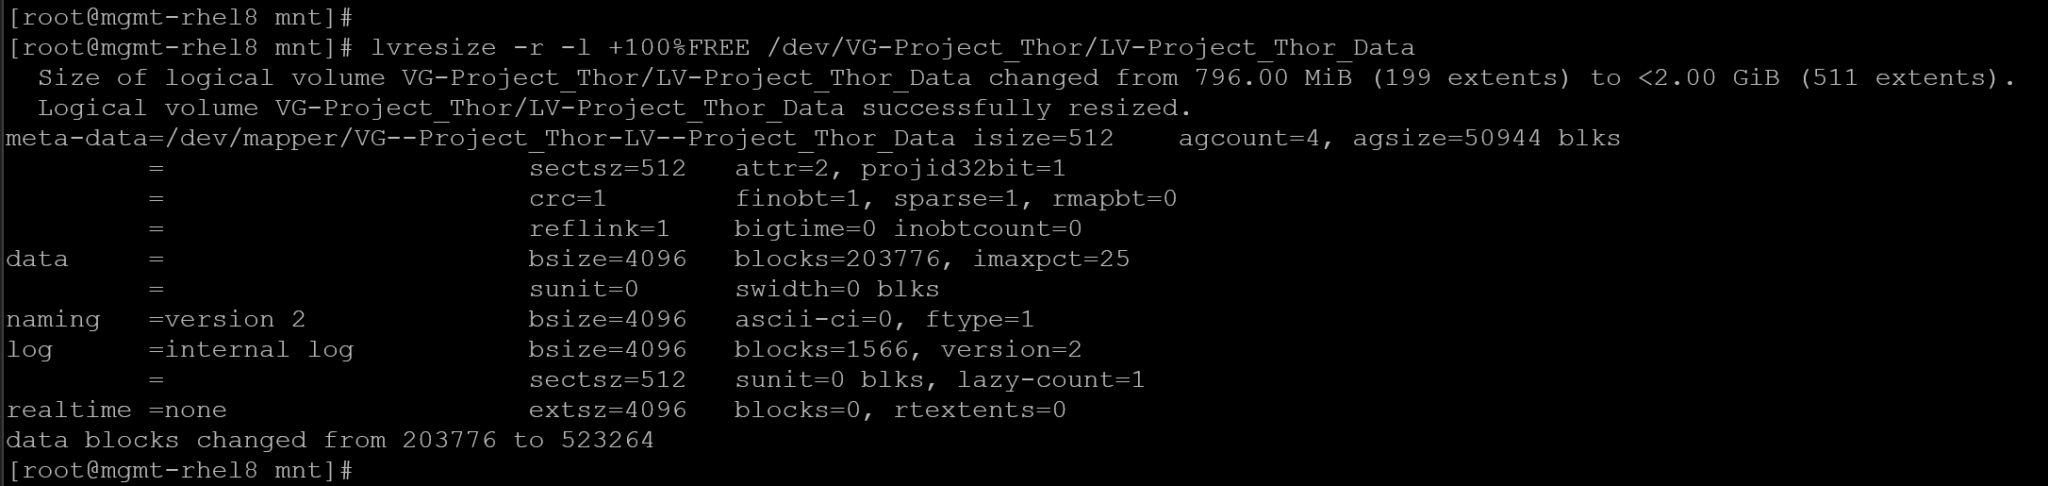
After resizing:
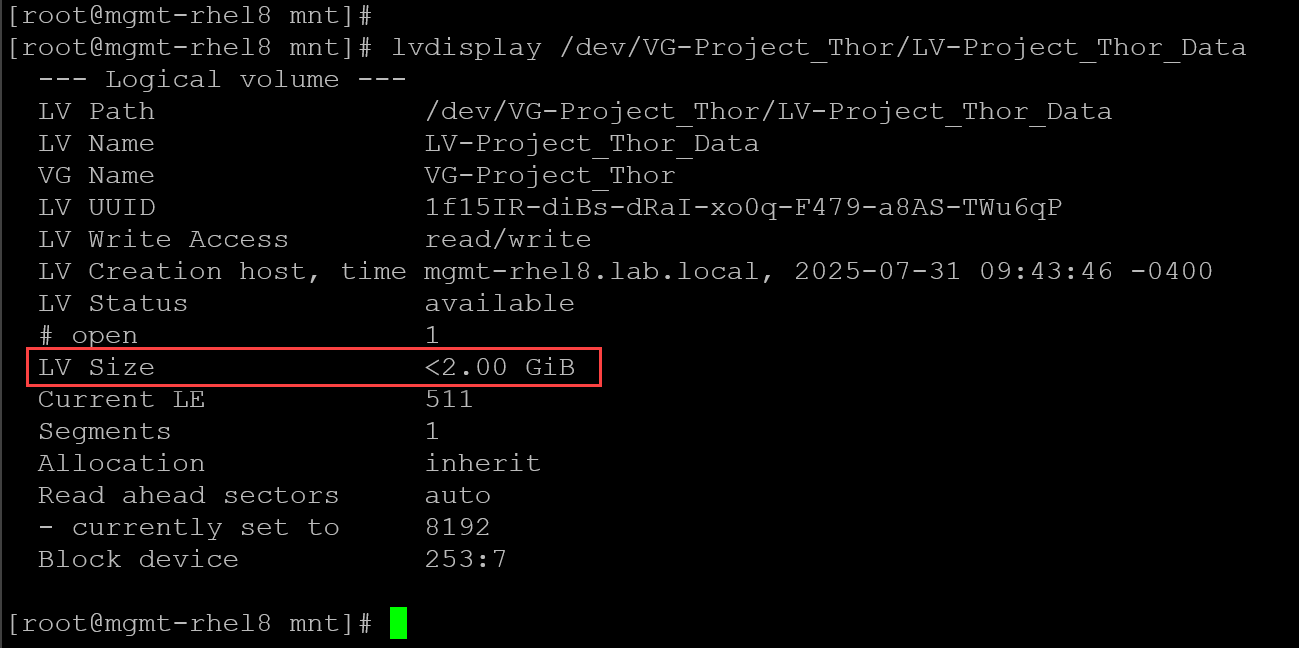
We can also confirm the new size using the “df”:
df -Th | grep -i -E "filesystem|Project"
Important notes:
- The XFS filesystem can be grown online – it’s not necessary to unmount to expand the filesystem.
- However, XFS does not support shrinking or reducing its size.
- The Ext3/Ext4 can be grown online, but to shrink or reduce it, it’s necessary to unmount the filesystem.
- We can use the command below to reduce a Logical Volume (LV) and the filesystem on it:
# Considering, in this example, reducing 70MB:
lvreduce -r -L -70M /DEV/VG_NAME/LV_NAME
That’s it for now 🙂
