

An MTU change can appear simple, but in a VMware environment it affects multiple layers of the network path. A mismatch between a VMkernel adapter, a vSphere Distributed Switch, and the physical network can interrupt management, storage, vMotion, or vSAN communication.
I encountered this situation while helping troubleshoot a four-node vSAN cluster. The environment originally used Jumbo Frames, but the MTU was changed from 9000 to 1500 on parts of the network while several VMkernel interfaces remained configured with MTU 9000.
The resulting mismatch disrupted vSAN communication and made the vCenter Server and affected virtual machines inaccessible.
In this article, I will show what happened, how we identified the mismatch directly from the ESXi console, how connectivity was recovered, and the correct order to follow when changing MTU values in a VMware environment.
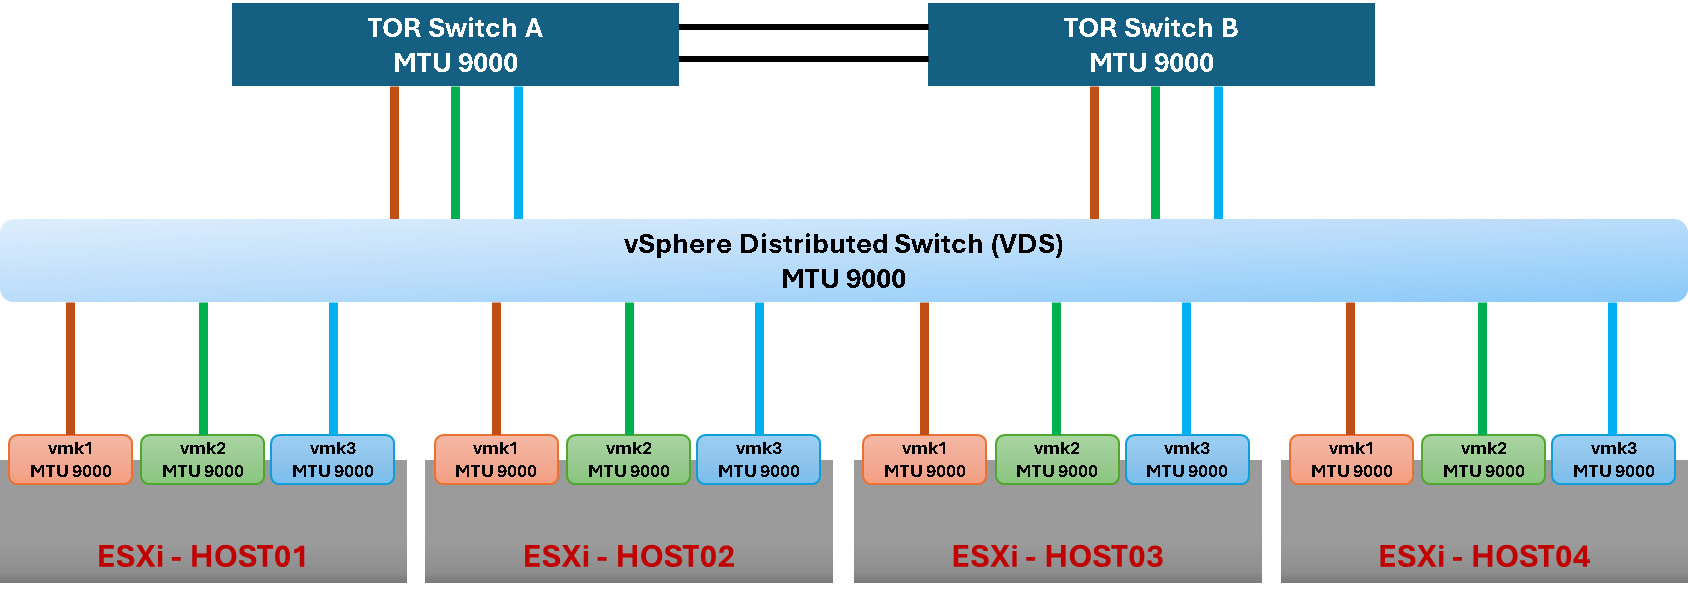
Note: The MTU value required on the physical switch depends on the vendor and platform. Some switches require a larger Layer 2 MTU, such as 9216, to carry a vSphere MTU of 9000. Always verify the physical switch vendor’s documentation.
They changed the MTU value from 9000 to 1500 at the VDS and physical switch levels. After that, all VMKernel interfaces configured with 9000 bytes MTU stopped working, causing the entire environment to fail.
So, we have a question: Why did the cluster go down?
The problem was not that every packet suddenly became impossible to transmit. The problem was that the VMkernel interfaces were still configured to generate traffic using an MTU of up to 9000 while the vDS had been reduced to 1500.
Traffic that required the larger MTU could therefore be dropped at the lower-MTU point in the path. For a workload such as vSAN, this can lead to failed large-packet health checks, cluster partitioning, inaccessible objects, and virtual machines becoming unresponsive or inaccessible.
The important rule is that every component forwarding a frame must support an MTU equal to or greater than the MTU required by the traffic source.

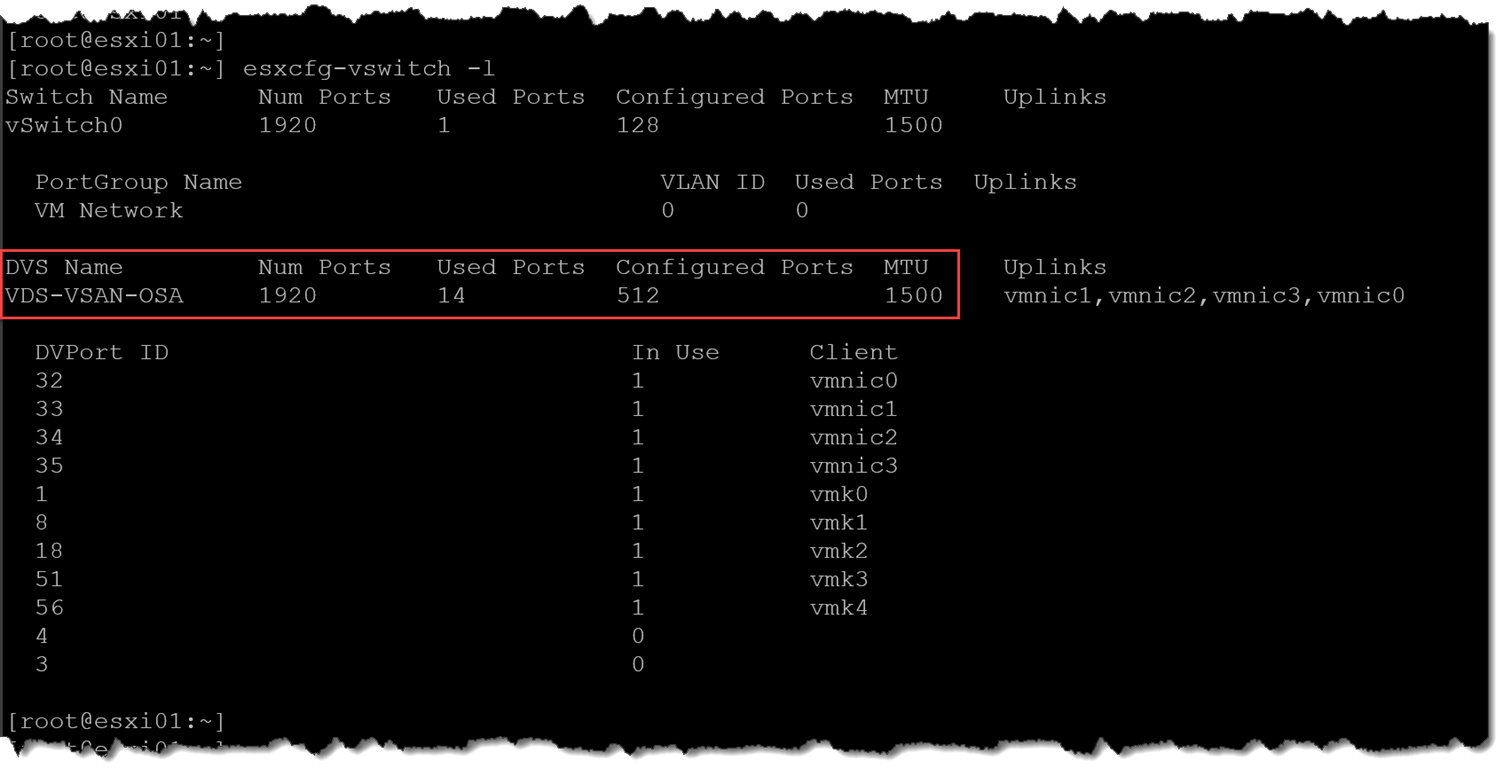
Afterward, they changed the MTU to 9000 at the physical switches, but the cluster remained down (as we can see in the following picture, even after changing the MTU to 9000 at the physical switch, the VDS MTU remained 1500):

How the vSphere Distributed Switch Fits Into the Failure
A vSphere Distributed Switch is centrally managed through vCenter Server. The distributed-switch configuration is propagated to the participating ESXi hosts, which maintain local switch state and continue forwarding traffic even if vCenter temporarily becomes unavailable.
However, most distributed-switch configuration changes are performed through vCenter. This becomes particularly important during a recovery scenario: if the MTU change also makes the vCenter Server unreachable, correcting the vDS itself can become considerably more difficult.
ESXi CLI tools provide useful visibility into the distributed switch and limited recovery functionality, but they do not provide the same configuration capabilities available for a Standard vSwitch.
Troubleshooting the issue
At this point, we lost access to the vCenter Server and Host’s Client interface. We could not access anyone by SSH either. So, is the moment to sit down and start to cry =/
Remember, this is a vSAN cluster, and vSAN depends on the network to work correctly. In this incident, the vSAN network became partitioned and the affected virtual machines became inaccessible.
All ESXi hosts are Dell-based. So, they have an out-of-band management interface (iDRAC). We could access each one and have access to the ESXi DCUI interface (Alt + F1). In this interface, we could access the ESXi as a root and execute some commands to troubleshoot the issue.
The first action we did was to check the MTU on each physical host interface:
esxcli network nic listAs we can see, each vmnic interface has the 9000 MTU (we applied this command on each ESXi host):

The next step was to check the MTU at the VDS level:
esxcfg-vswitch -lAs we can see, the VDS “VDS-VSAN-OSA” has the 1500 MTU:
Next, we checked the MTU value for each host’s vmkernel interface:
esxcfg-vmknic -lAs we can see, some vmkernel has the 9000 MTU, making the communication from them impossible to happen:

If the management network itself must be rebuilt because the host can no longer communicate through the distributed switch, see “Recover ESXi Management Network When the Host Is Disconnected from a vDS“.
Validate the MTU with vmkping
First identify the VMkernel interface used by vSAN:
esxcli vsan network listSuppose the vSAN interface is:
vmk3Test standard MTU connectivity to another vSAN VMkernel IP:
vmkping -I vmk3 -d -s 1472 <remote-vsan-vmk-ip>Then test a 9000-byte path:
vmkping -I vmk3 -d -s 8972 <remote-vsan-vmk-ip>Notes:
- With IPv4, a payload of
1472plus 28 bytes of IPv4/ICMP headers represents a 1500-byte IP packet.
- A payload of
8972plus the same 28 bytes represents a 9000-byte IP packet.
- If the 1472-byte test succeeds while the 8972-byte test fails, the evidence strongly points to an MTU inconsistency somewhere along the path.
If connectivity still shows packet loss after the MTU values are consistent, see “How to Troubleshoot Packet Drops on an ESXi Host“ for a deeper investigation of physical NICs, virtual switching, queues, and the ESXi datapath.
Fixing the issue
In this incident, the fastest supported way to restore connectivity was to reduce the affected VMkernel MTUs to 1500, matching the vDS MTU that was currently active.
This removed the condition where the traffic source could generate frames larger than the virtual switch was configured to forward:
esxcli network ip interface set -m=1500 --interface-name=vmkXWhere:
interface-name: Specify the vmkernel name, for example “vmk3”
After that, the cluster went up, and all VMs were accessible again:

Restore the vDS MTU After vCenter Becomes Available
Once management and vSAN connectivity have been restored and vCenter Server is accessible again, correct the vSphere Distributed Switch through the supported vSphere Client workflow.
Navigate to the affected distributed switch and open:
Actions → Settings → Edit Settings → Advanced
Configure the required MTU according to your network design.
Important: Changing the MTU of a vDS can cause its attached uplinks to go down and back up temporarily, creating a short network interruption for workloads using those uplinks. Plan the change accordingly.
After the vDS is correctly configured, migrate the VMkernel MTUs back to the intended value only after the complete downstream path is capable of forwarding that MTU.
The Correct Order for Changing MTU
MTU changes should not be performed in an arbitrary order.
When increasing MTU:
Physical network → Virtual switch → VMkernel adapter
The forwarding path must be capable of carrying the larger frames before the VMkernel begins generating them.
When decreasing MTU:
VMkernel adapter → Virtual switch → Physical network
Reduce the traffic source first so that it stops generating frames larger than the MTU supported by the downstream components.
The incident documented in this article occurred because the MTU was reduced on the switches while VMkernel interfaces were still configured for 9000.
What This MTU Incident Demonstrates
An MTU mismatch is not simply a configuration difference displayed in the vSphere Client. When a VMkernel interface generates traffic larger than the next component in the path can forward, critical services such as vSAN, vMotion, storage, or management can become unavailable.
In this incident, comparing the physical NIC, distributed switch, and VMkernel MTU values exposed the mismatch and reducing the affected VMkernel interfaces to the currently supported MTU restored connectivity.
The most important lesson is the order of operations. When increasing MTU, prepare the network path before increasing the traffic source. When decreasing MTU, reduce the source first before lowering the forwarding infrastructure.
After every MTU change, validate the actual path with vmkping rather than relying only on configuration values. A consistent configuration and a successful large-packet test together provide much stronger evidence that the network is ready for production traffic.
External References
- vCenter and/or VMs Down After Changing MTU Broadcom guidance explaining failures caused by MTU changes between VMkernel adapters, virtual switches, physical networking, and network-backed storage, including the correct order for increasing or decreasing MTU values.
- vSAN MTU Check (Ping with Large Packet Size) Skyline Health Errors Official vSAN troubleshooting reference for MTU mismatches, cluster partitioning, inaccessible workloads, VMkernel and physical NIC validation, and large-packet connectivity tests.
-
Testing Jumbo Frame Pings from ESXi over the Network
Broadcom procedure for validating standard and Jumbo Frame
connectivity using
vmkping, including-d -s 1472and-d -s 8972tests. - Configuring Standard vSwitch or Distributed Switch Networking from the ESXi CLI Broadcom command-line reference for inspecting ESXi virtual switches, VMkernel interfaces, physical adapters, and the supported scope and limitations of CLI operations on vSS and vDS.
- vSAN Shutdown Precheck Fails Due to MTU Mismatch Broadcom example demonstrating how an inconsistent MTU across vSAN VMkernel adapters and the physical network causes large packet tests to fail and how to validate the path.
