

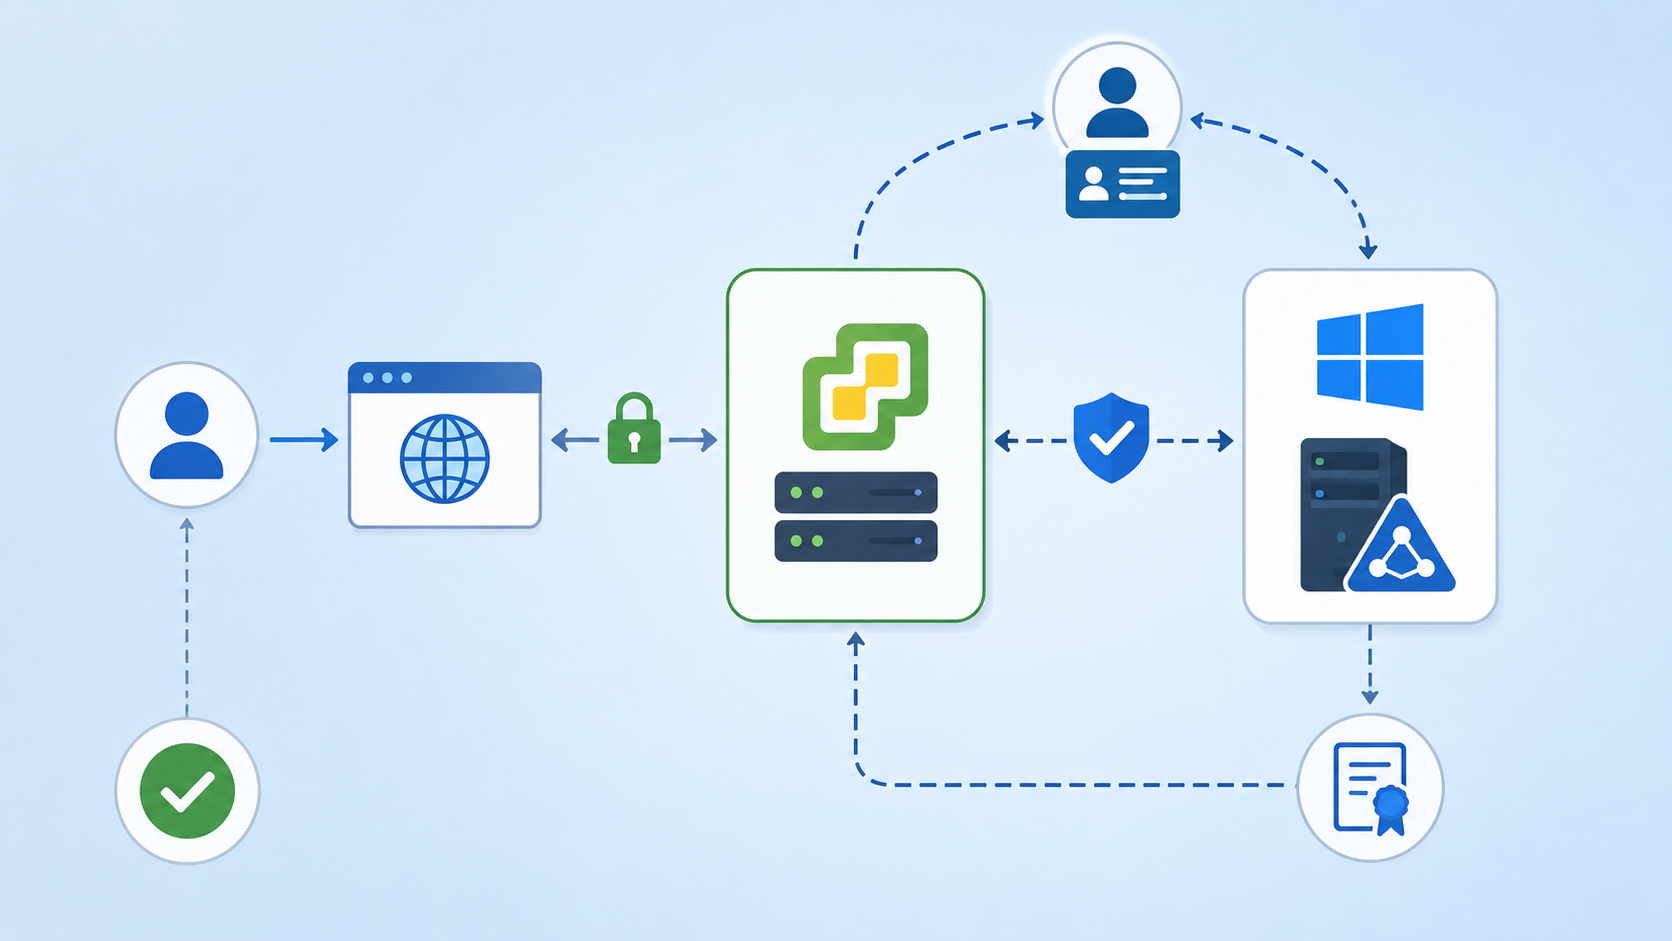
Integrating vCenter with Windows ADFS is an article that shows how to change the Identity Provider used by the vCenter Server and integrate with Windows ADFS.
Basically, What is the IDP?
The Identity Provider (IDP) is a service running on the vCenter Server responsible for interacting with the end-user and providing authentication services. By default, the vCenter Server has an embedded Identity Provider and it can communicate with the Active Directory to handle user authentication, for example. In the picture below, we can see this interaction:
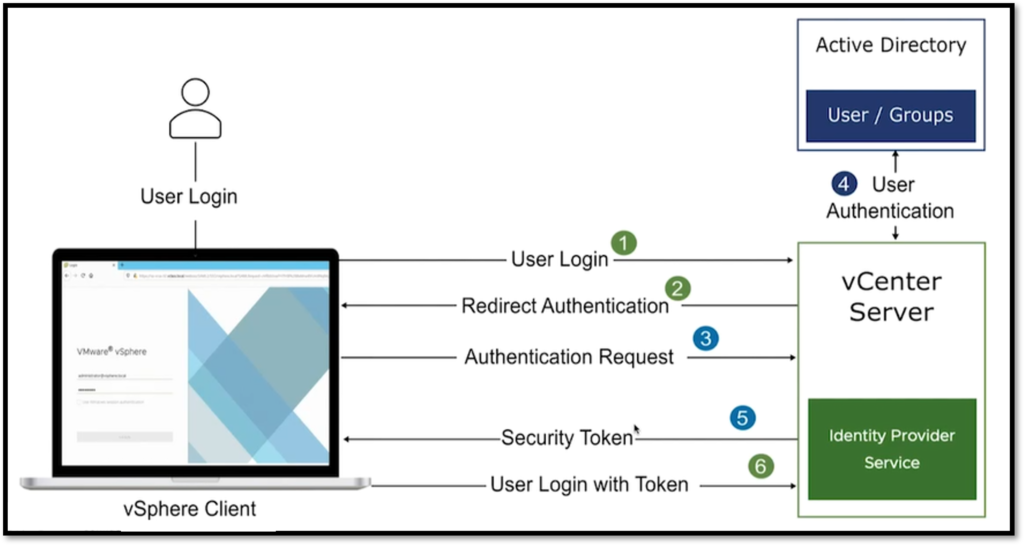
In the example provided in the picture above, the vCenter is responsible for handling the user login and then interacting with the Active Directory to check if the user is correct. After this step, the built-in IDP generates the security token and sends it to the user. Lastly, the user can log in using the token.
vCenter Server IDP Federation Use Cases
We can use an external IDP to replace the built-in IDP present on the vCenter Server and enable single sign-on (SSO) with federated infrastructure and applications. Below are some scenarios when we can use an external IDP such as Microsoft ADFS:
- When using SSO with the existing ADFS-integrated infrastructure and applications;
- For improving data center security because vCenter Server never handles the user’s credentials in this way;
- When using the authentication mechanisms that are supported by the external IDP.
Login Workflow of the vCenter Server IDP Federation for ADFS
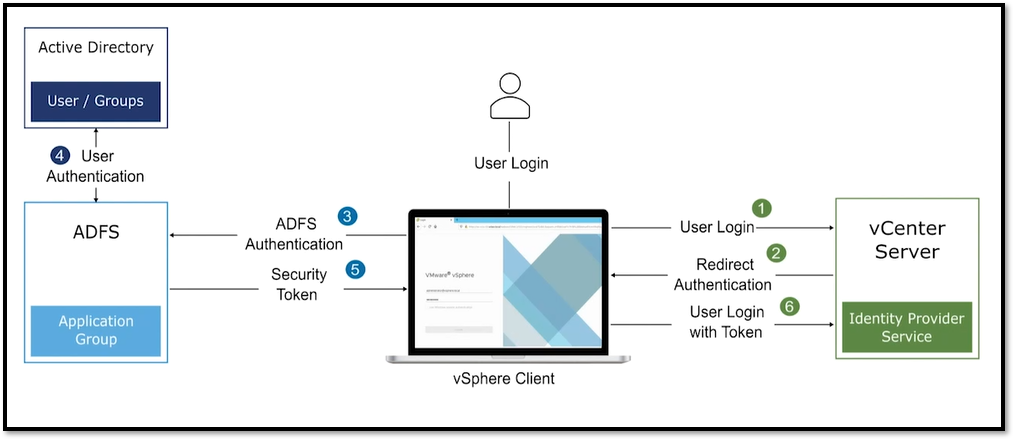
In the picture below, we can see the login workflow from the user.
Look that after the vCenter Server receives the user login, it redirects the authentication to the ADFS service and it is responsible for handling the user credentials (because of that the vCenter Server never handles the user’s credentials).
After ADFS authenticates the user on the Active Directory, it will generate a token and send it to the vCenter Server:
Prerequisites for vCenter Server IDP Federation
Below, we are describing the ADFS prerequisites and requirements:
- ADFS for Windows Server 2016 R2 or greater must be deployed;
- ADFS must be connected to Active Directory;
- An Application Group for vCenter must be created in ADFS;
- The ADFS certificate should be signed by a trusted certificate authority (in other words, we need to import the CA certificate that signed the ADFS certificate into the vCenter Server).
We already have written an article, step-by-step, about setting up the ADFS service. Click on the below link to access this article:
https://dpcvirtualtips.com/setting-up-windows-ad-fs/
Creating the Application Group for the vCenter Server
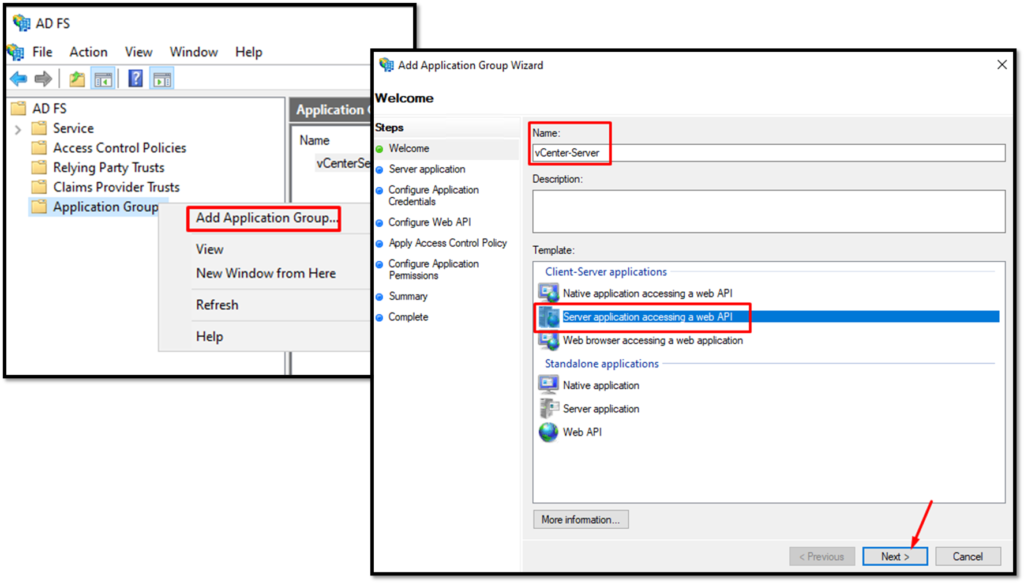
Firstly, we need to open the AD FS Management to create the Application Pool. To do that, open the Server Manager –> Click on Tools –> AD FS Management:
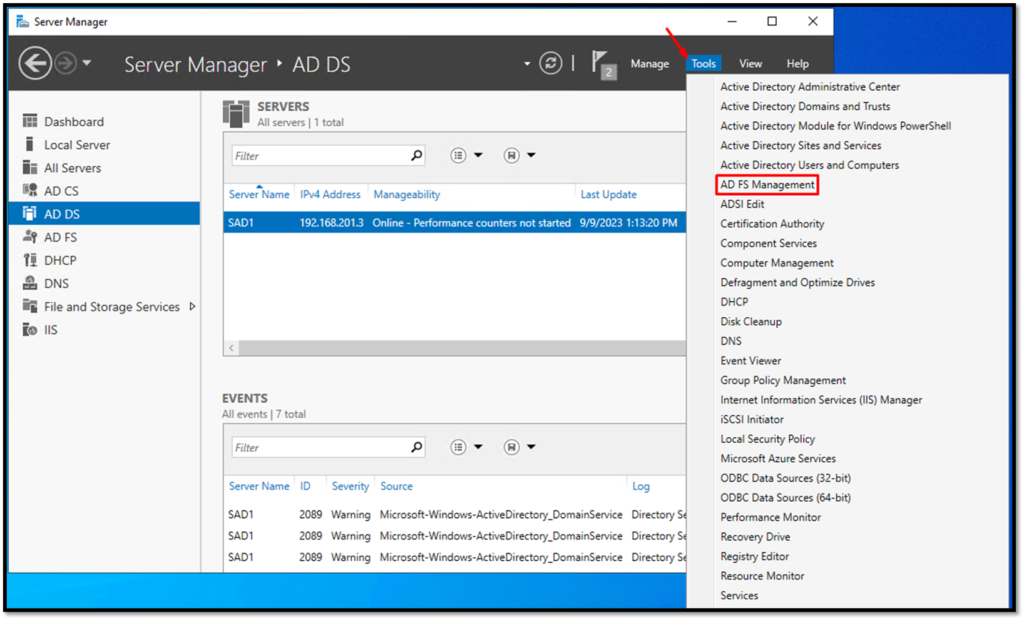
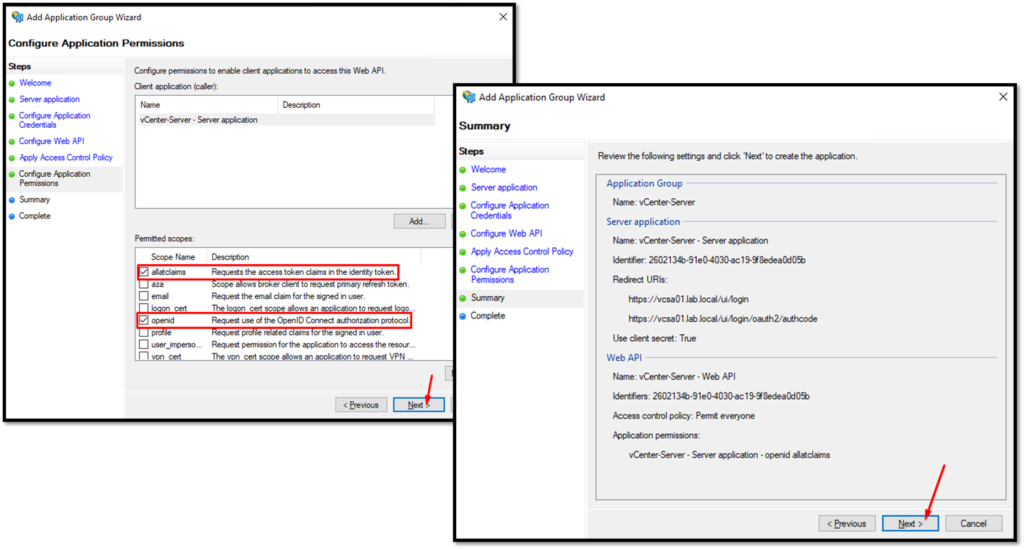
Right-click under Application Group and follow the configuration wizard. The pictures below will show all steps:
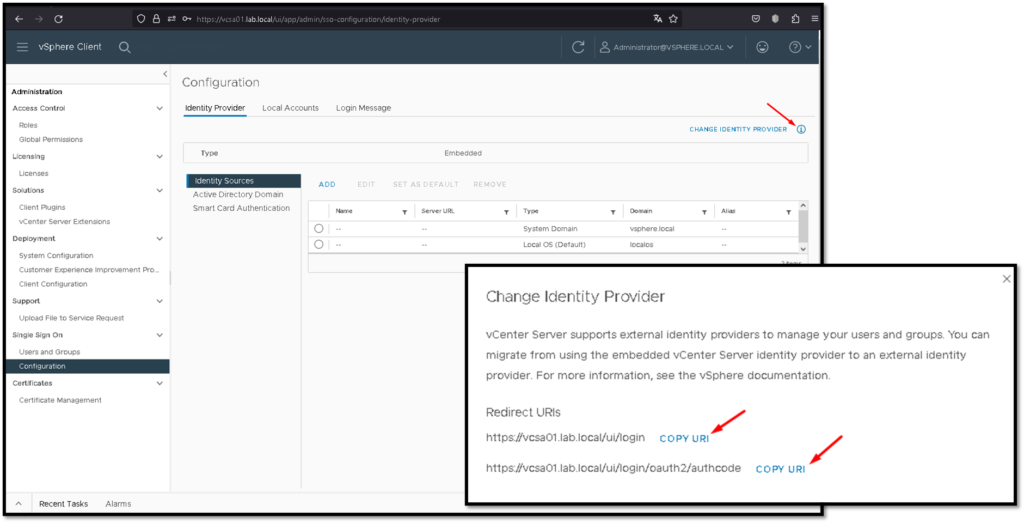
In parallel, access the vCenter Server (by vSphere Client), menu Administration –> Under Single Sign-On click on Configuration –> and click on the “i” icon next to “CHANGE IDENTITY PROVIDER” as we can see in the picture below.
On this page, we need to copy the “Redirect URIs” (copy both URIs in your text editor):
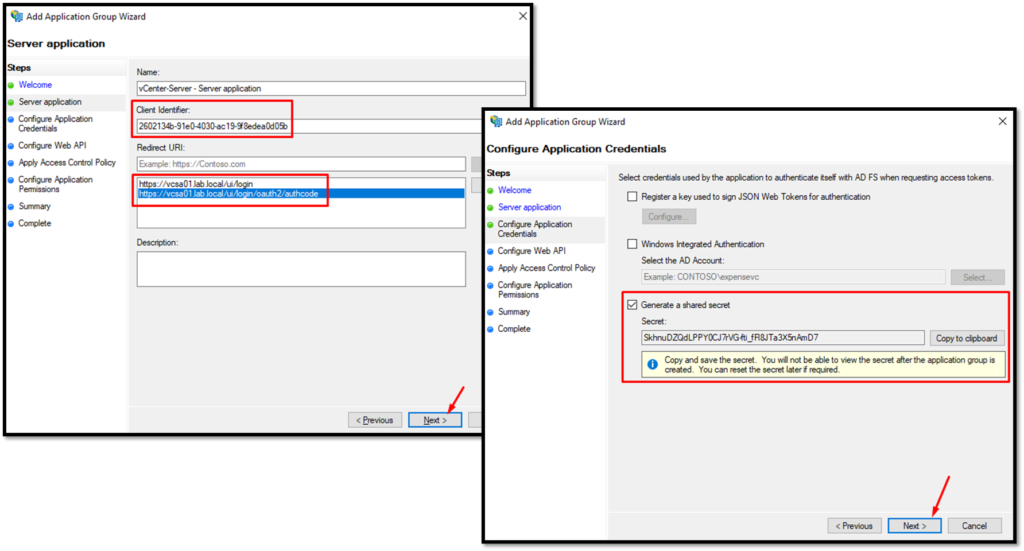
Continuing, copy the “Client Identifier” in your text editor. Under “Redirect URI“, add both URI that you copied in the step before. Click on NEXT to continue.
Marking the option “Generate a shared secret” and copy this secret in your text editor too:
Here, under “Identifier”, type the value present on “Client Identifier”:
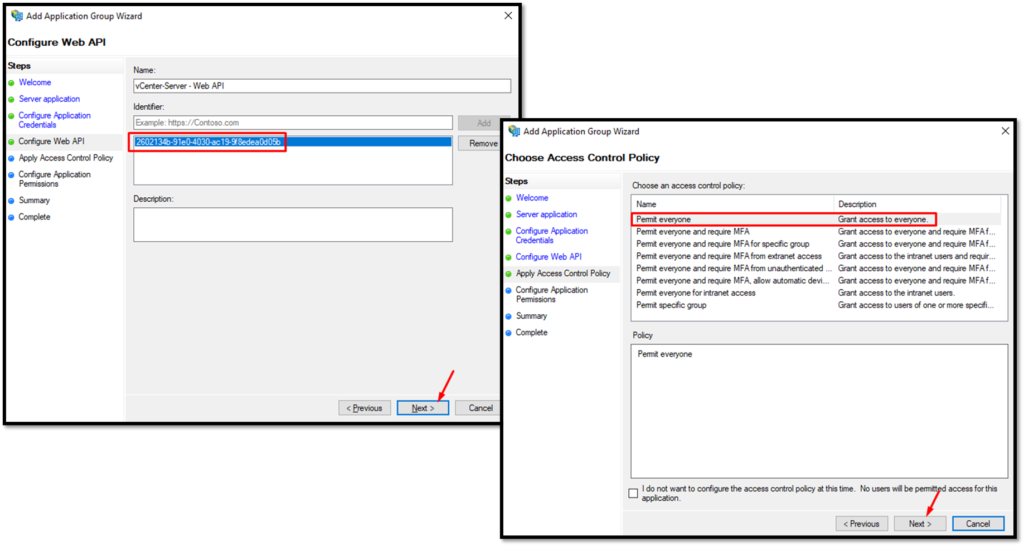
Configure the application permissions as shown in the picture below:
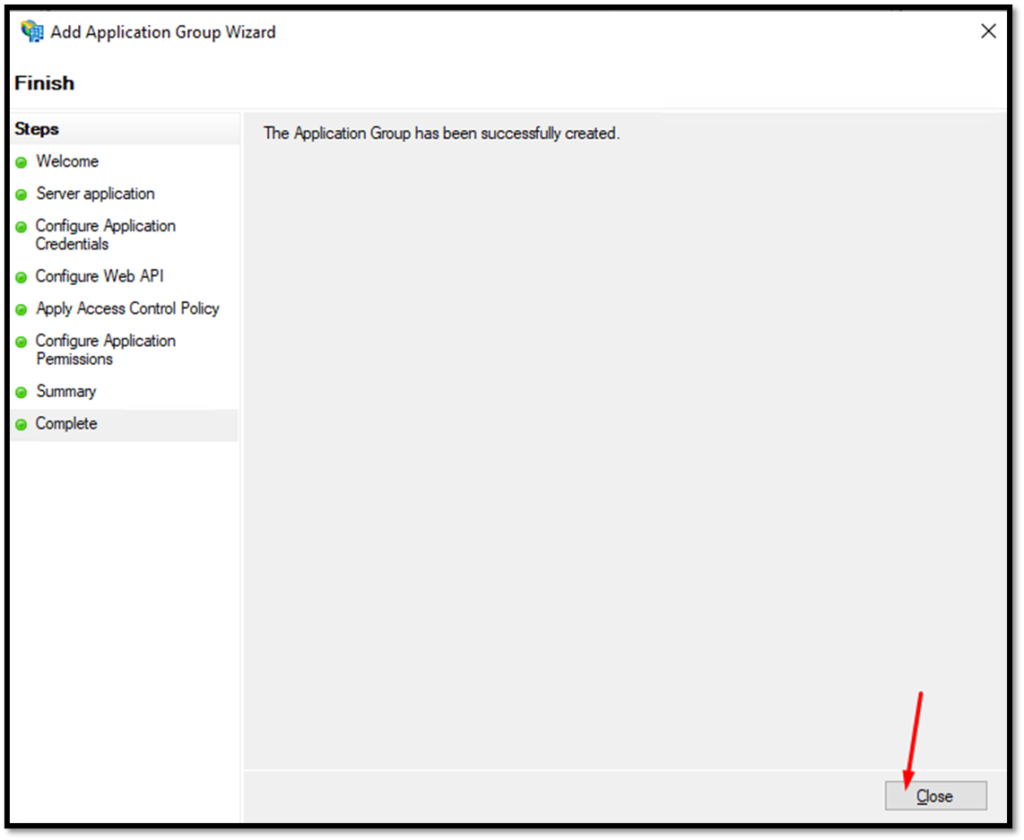
At this point, the Application Group has been created:
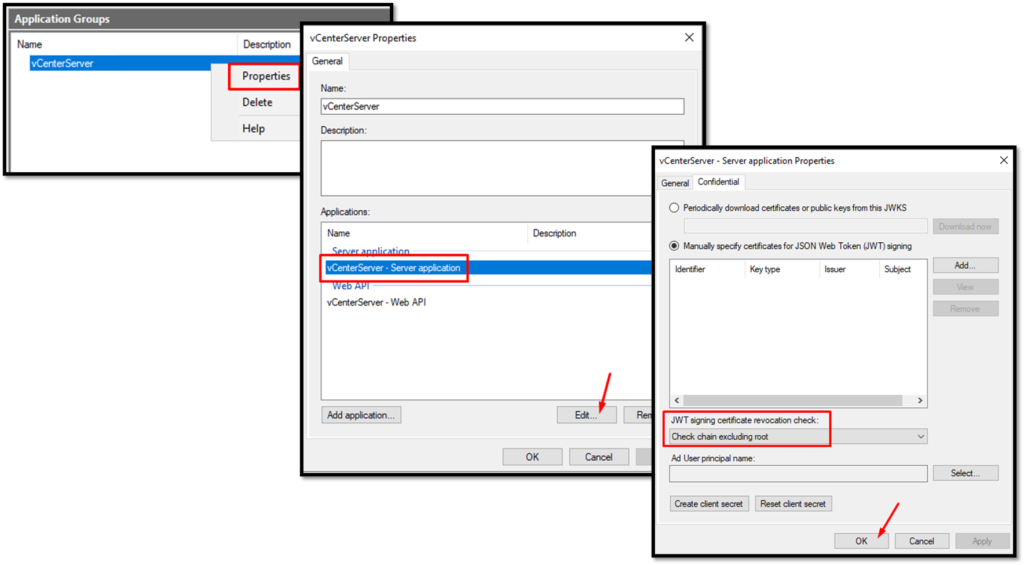
Select the Application Group, right-click on it, and then click on Properties. Adjust the property as shown in the picture below and click on OK:
Now, we need to create three rules. In the picture below, all rules were created but we will share another picture with details to create each rule:
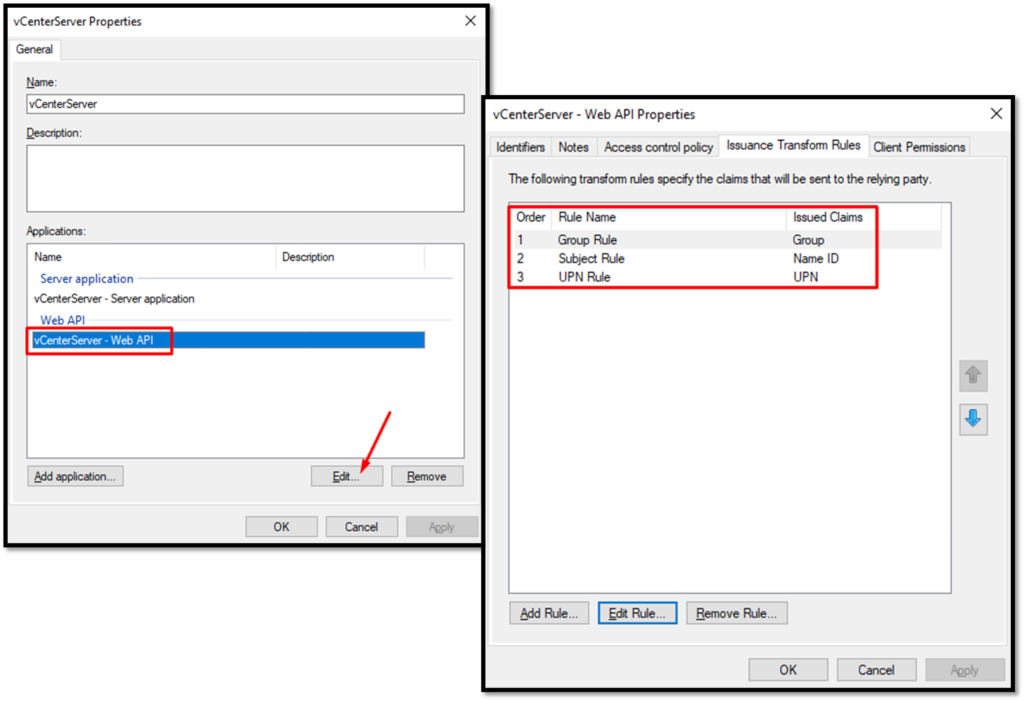
Here, we can see the content of each rule:
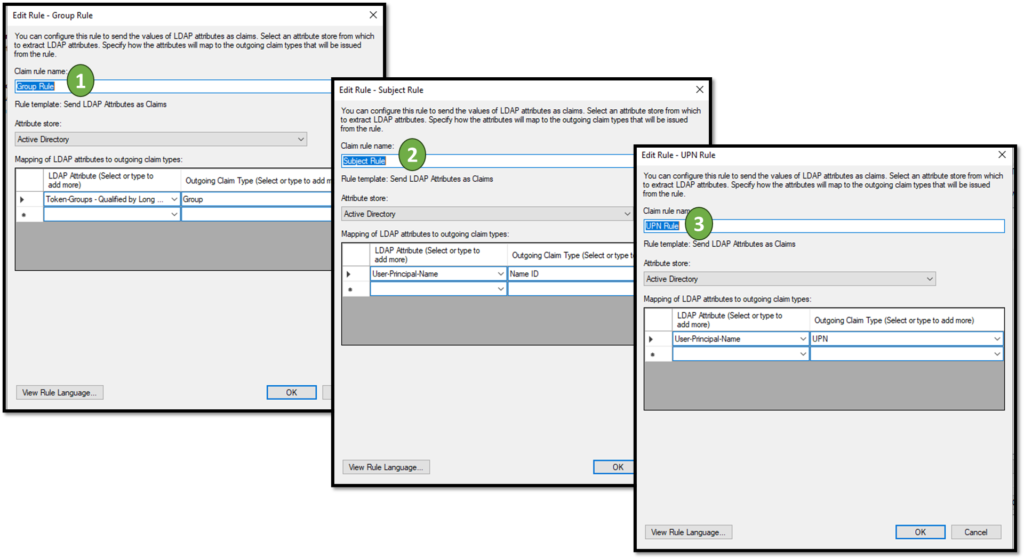
At this point, our Application Group was created and configured successfully!
Importing the CA Certificate into the vCenter Server
Open the vCenter Server (by vSphere Client), click on Menu –> Administration –> Under Certificates click on Certificate Management.
Search by “Trusted Root Certificates” and then click on ADD. Select the CA certificate and click on ADD:
(just to remember, this is the certificate of the CA that signed the certificate of the Microsoft ADFS service)
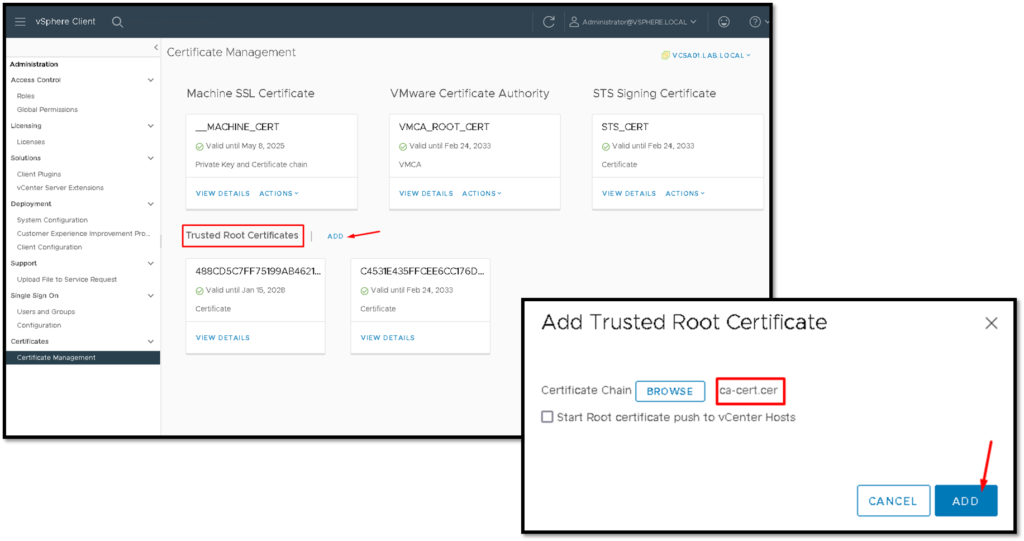
Changing the vCenter Identity Provider to Microsoft ADFS
Under Single Sign-On Configuration, click on “CHANGE IDENTITY PROVIDER”, select Microsoft ADFS, and click on NEXT to continue:
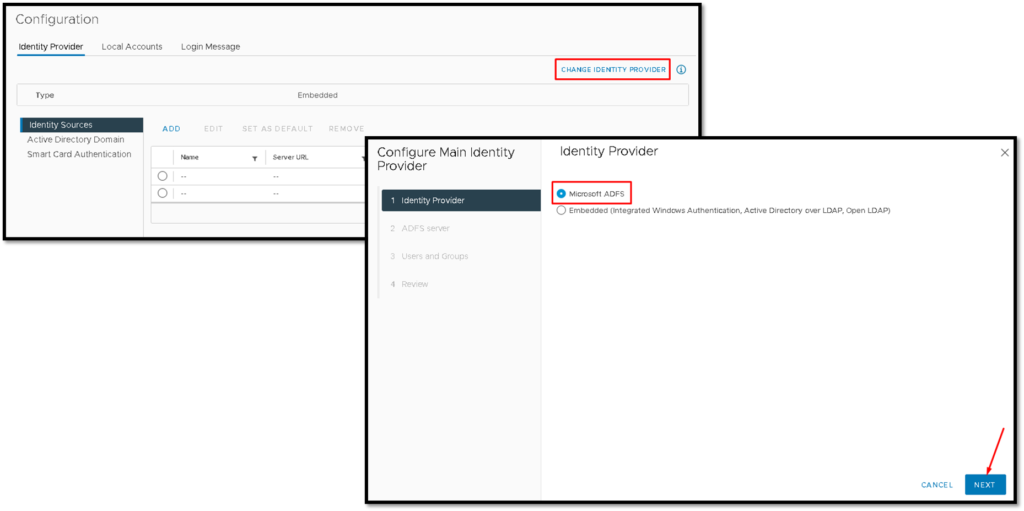
Under this page, we need to type the “Client Identifier” and “Shared secret” (both information you pasted in your text editor).
To get the “OpenID Address”, follow the below instructions:
Execute the Powershell with Admin Right and type the command:
Get-AdfsEndpoint | Select FullUrl | Select-String openid-configurationOutput example:
PS C:\Users\Administrator> Get-AdfsEndpoint | Select FullUrl | Select-String openid-configuration

@{FullUrl=https://fs.lab.local/adfs/.well-known/openid-configuration}


PS C:\Users\Administrator>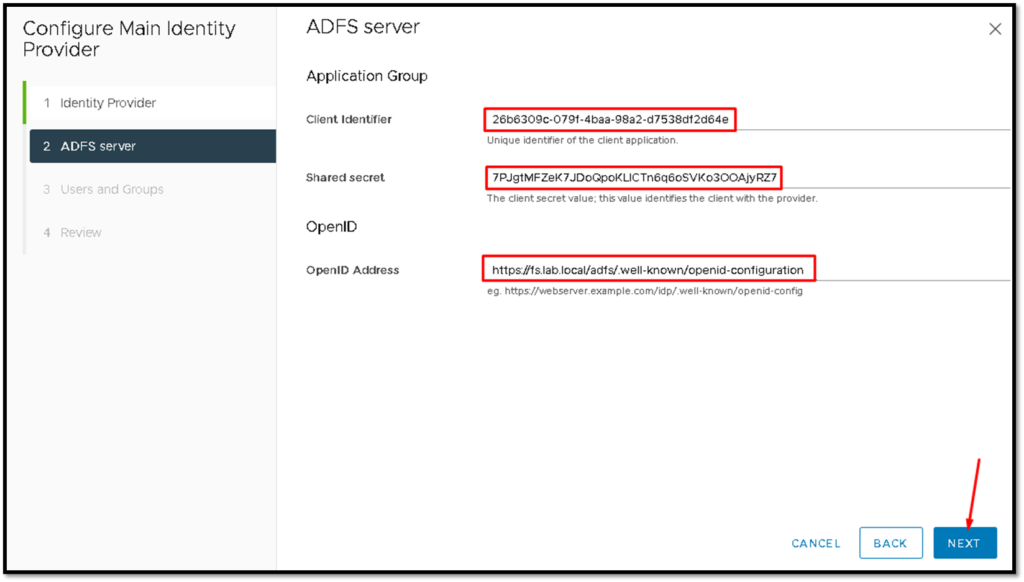
Change the red-highlighted configurations to your configurations:
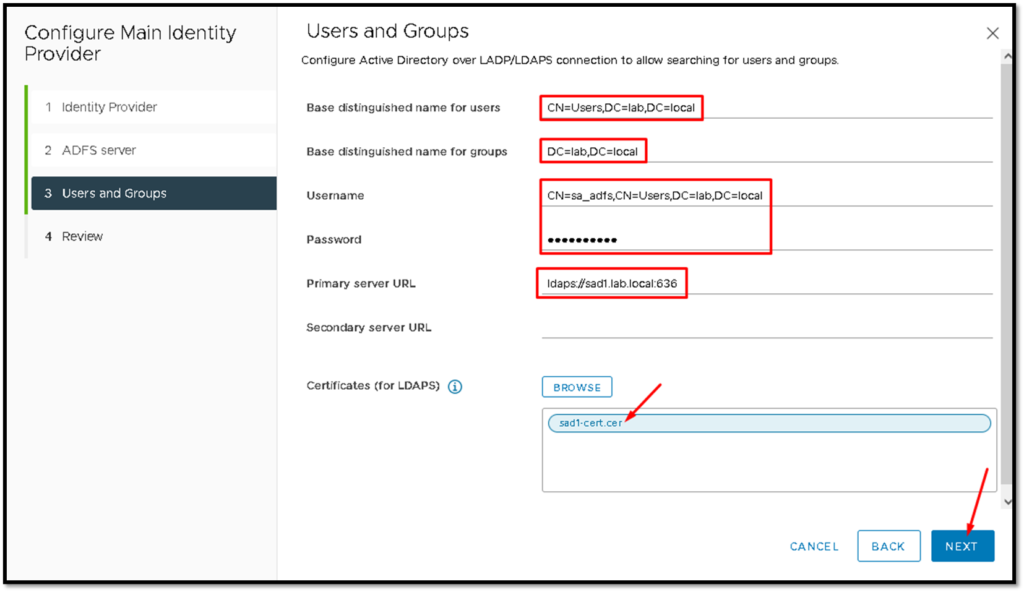
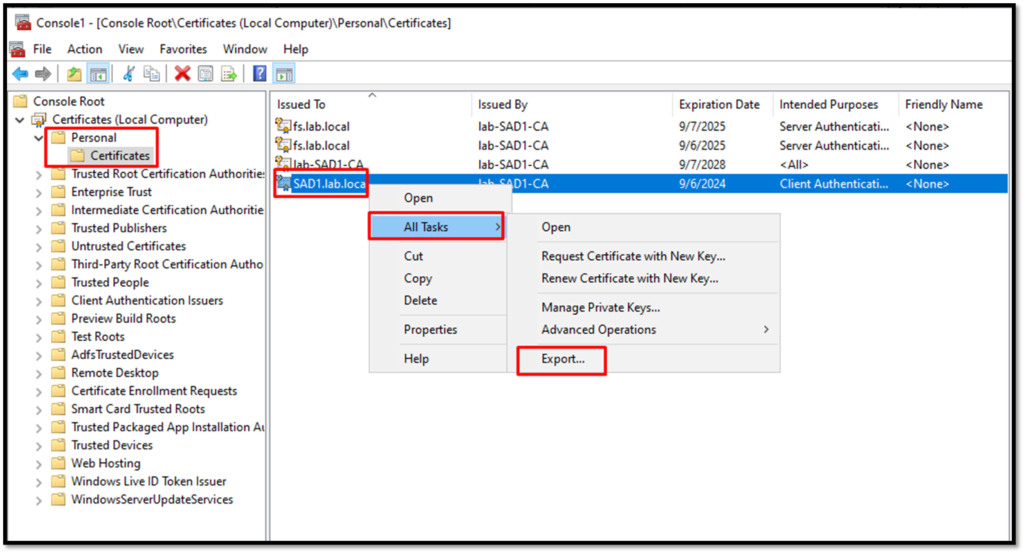
Tip: To get the certificate for your Active Directory host, follow the below instructions (in our example, the hostname of the AD is “sad1”) – We are using the MMC console and we have added the “Certificates” snap-in:
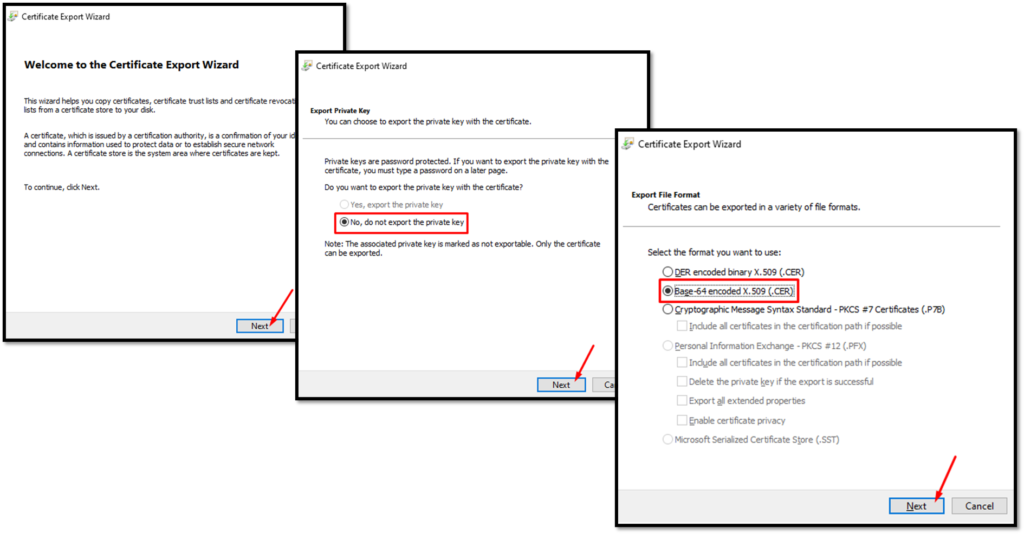
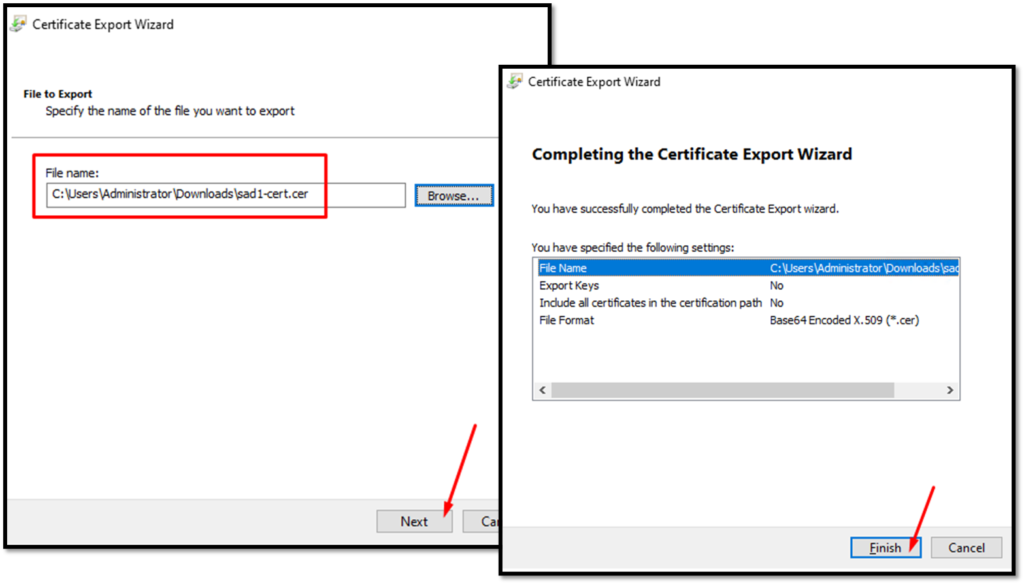
After that, click on FINISH:
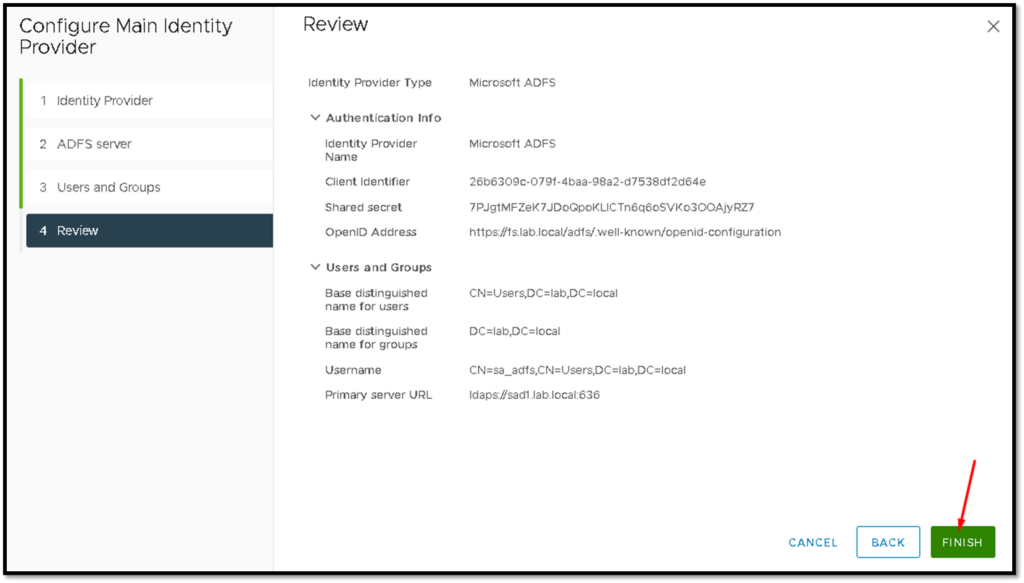
So, we have configured the vCenter Server to use the Microsoft ADFS:
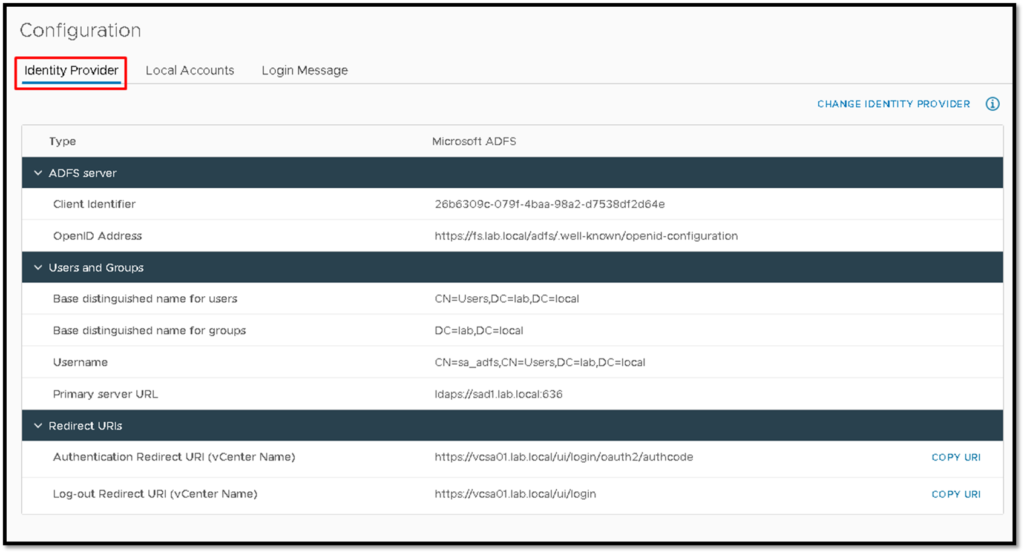
Logging in to the vCenter using an Active Directory User
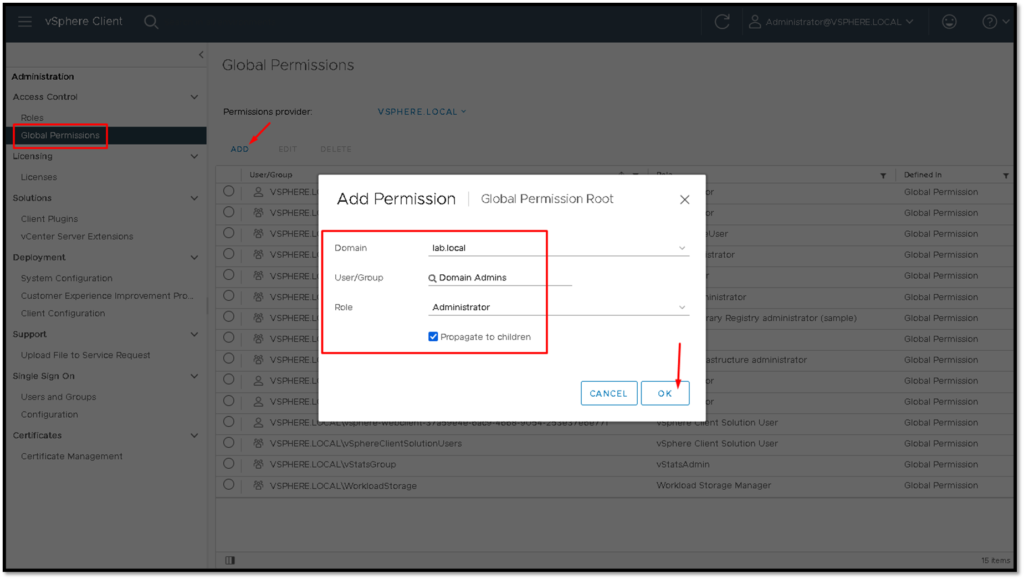
Under Global Permissions, we need to add the necessary permissions for those Active Directory Groups.
In this example, we are adding the AD Group “Domain Admins” and setting the “Administrator” role:
After that, we can access the vCenter Server by vSphere Client. Look that our connection will be redirected to the ADFS login page 🙂
This is exactly the desired behavior expected here 😉
Type your AD credential:
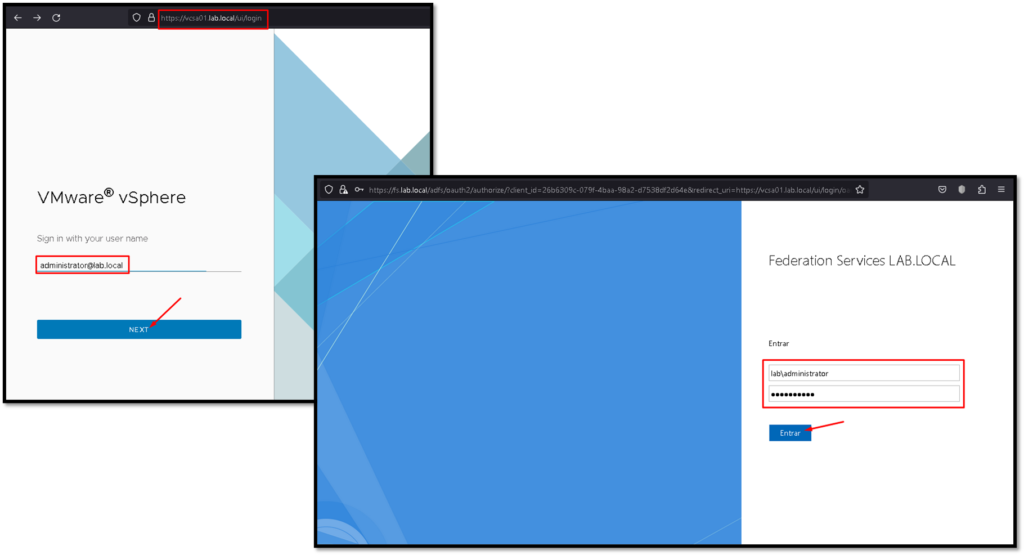
And that’s it!
You are logged in with an AD user using the ADFS service:
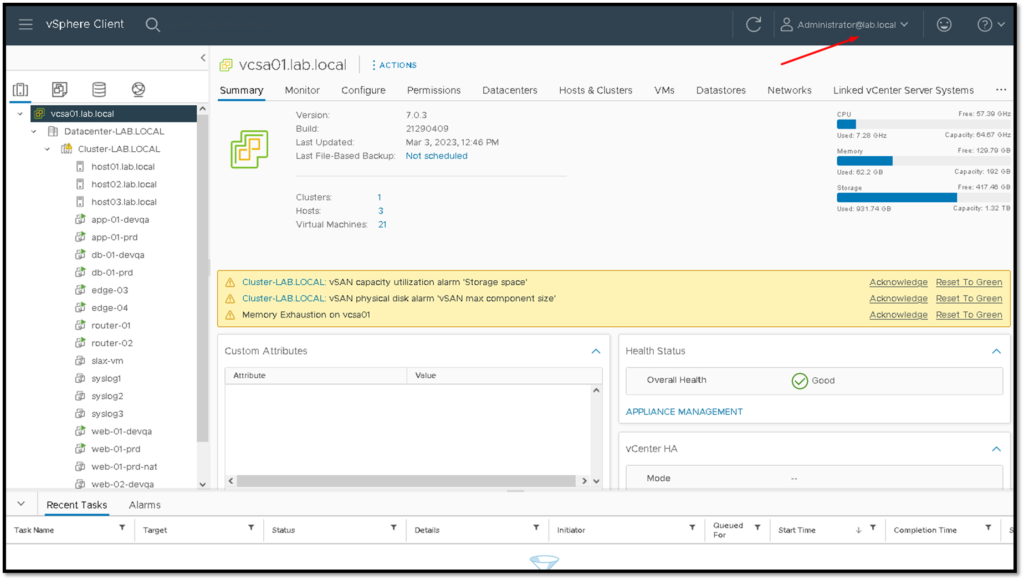
Enabling ADFS on an Existing Enhanced Linked Mode Configuration
vCenter Enhanced Linked Mode (ELM) allows you to log in to any single instance of vCenter Server and view and manage the inventories of all the vCenter Server systems in the group.
In our example, we have two vCenters Servers in ELM. When we access the first one, we are able to see the inventory of both vCenter Servers:
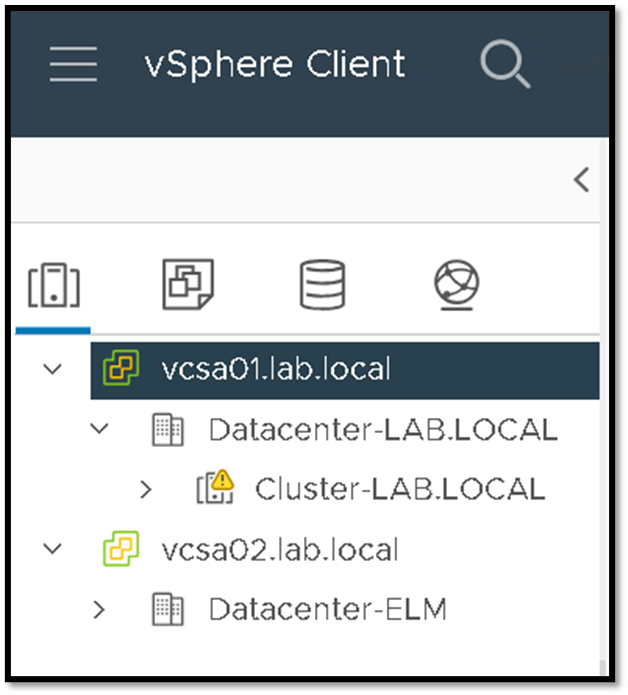
To enable ADFS on an existing Enhanced Linked Mode configuration:
- Deploy a minimum of two vCenter Server nodes in an Enhanced Linked Mode configuration;
- Configure ADFS on one of the linked vCenter Server nodes. The ADFS configuration is replicated to the other vCenter Server node;
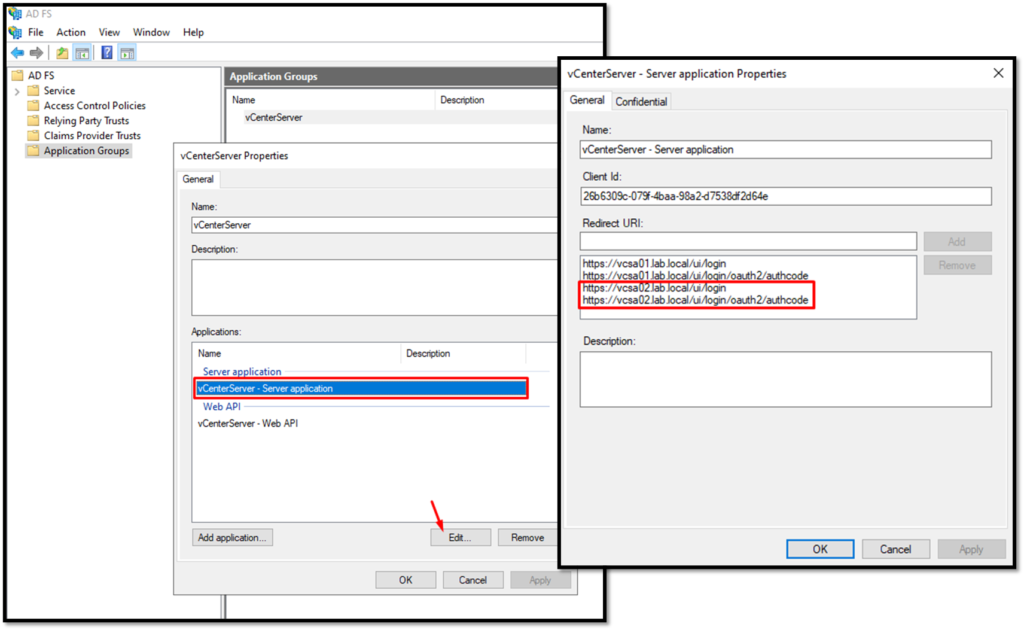
- Add all redirect URIs for both vCenter Server nodes to the configured OAuth Application Group in ADFS.
In our example, the vCenter Server vcsa01.lab.local is the first vCenter on the SSO domain.
The vCenter Server vcsa02.lab.local has been deployed later and joined on the SSO domain.
So, on the ADFS Application Group, I added all redirect URIs for the vCenter Server vcsa02.lab.local, as we can show in the picture below:
External references:
