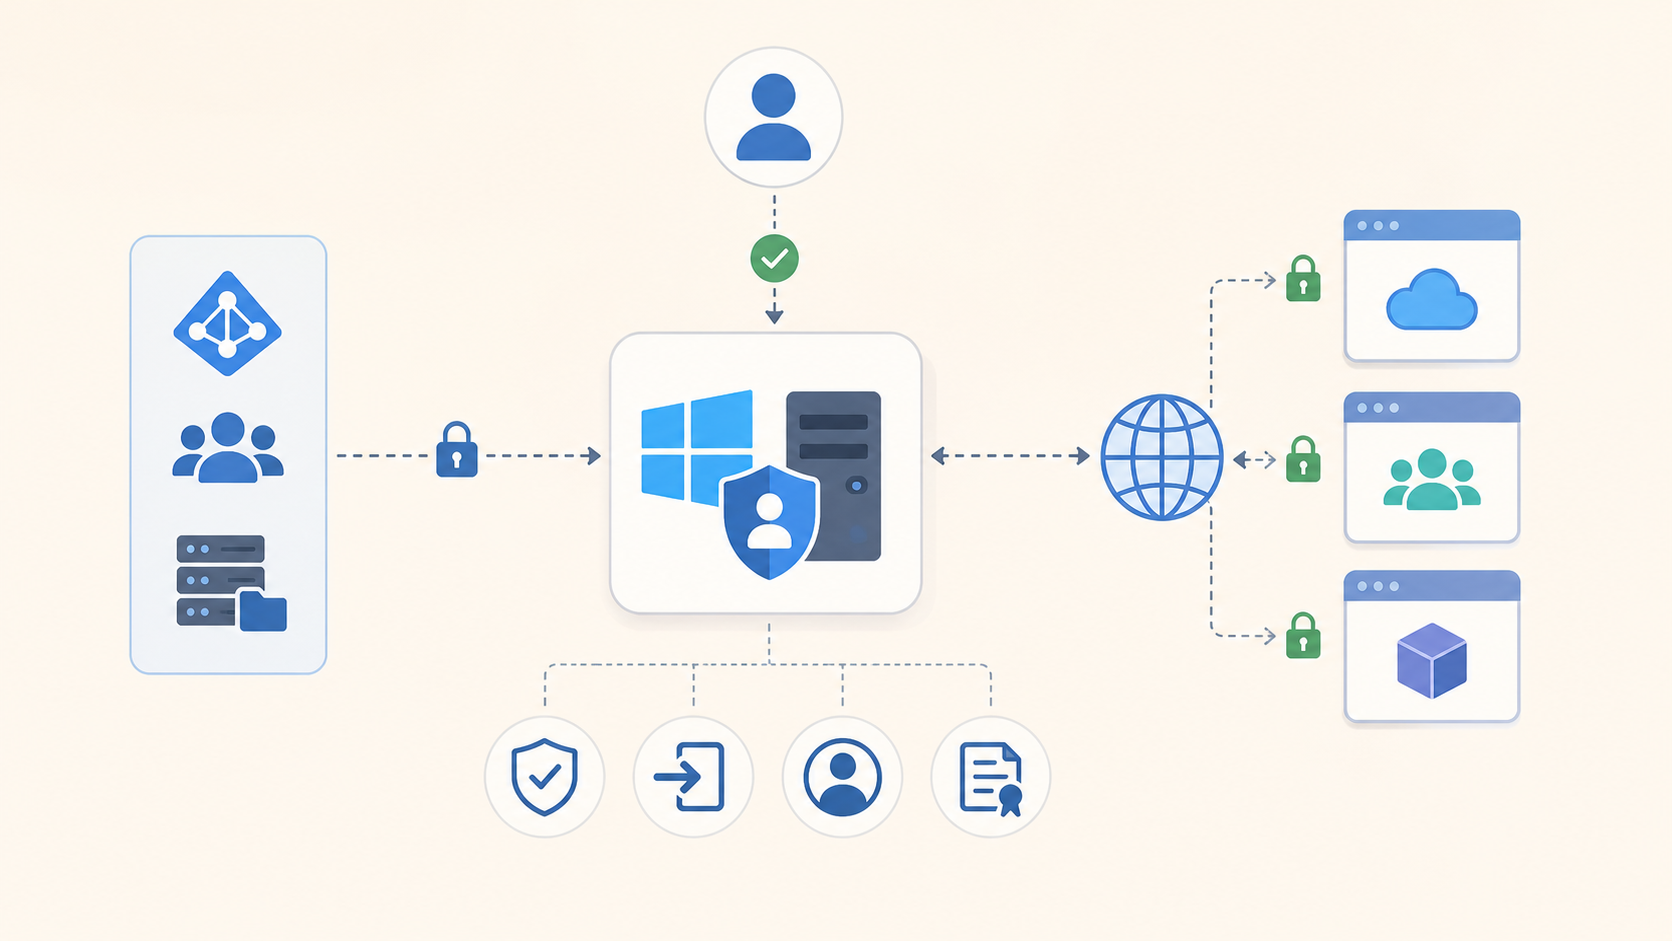
Setting Up Windows AD FS is an article that shows how to set up the Windows AD FS service to provide Federated Identity and Access Management.
AD FS Overview
AD FS is an acronym for Active Directory Federation Services. It enables Federated Identity and Access Management by securely sharing digital identity and entitlements rights across security and enterprise boundaries. AD FS extends the ability to use single sign-on functionality available within a single security or enterprise boundary to Internet-facing applications to enable customers, partners, and suppliers a streamlined user experience while accessing the web-based applications of an organization.
In other words, if your application supports integration with AD FS authentication services, you can use AD FS as an authentication server, with a modern security approach.
More details can be found in the below link:
First and Foremost
We need to attend to some requisites before setting up the AD FS service. Below we can see the check-list of actions that we need to perform:
- Setting up the necessary DNS entries
- Creating the Certificate for the AD FS service
- Installing the AD FS role
- Configuring the AD FS
Setting Up the Necessary DNS Entries
In our example, we are using a Windows Server 2022 Datacenter edition (But I believe the setup and configuration process is the same for older versions of Windows). On this server, we have some services enabled and running:
- AD CS (Active Directory Certificate Services)
- AD DS (Active Directory Domain Service)
- DHCP
- DNS
Note: You do not need to install each service as well. The only services that I recommend to be installed and configured are the AD DS and DNS.
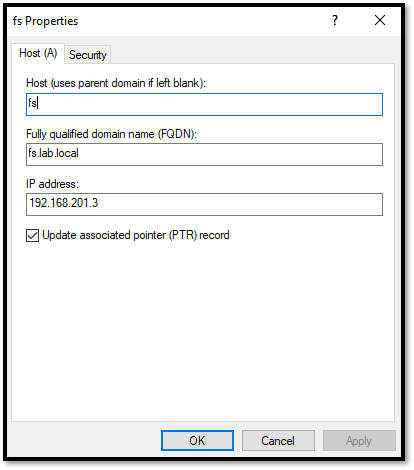
In your DNS services, create a type “A” entry for the name of the AD FS service. In our example, the AD FS service will use the FQDN “fs.lab.local”. So, the DNS entry is:
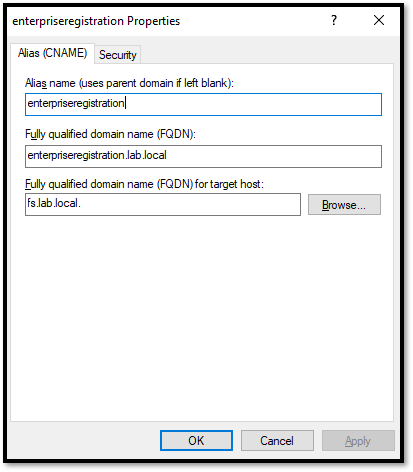
Additionally, you need to create a “CNAME” entry for “enterpriseregistration” pointing to the DNS entry that you created before. Look at our example:
Creating the Certificate for the AD FS service
The next step is to create the SSL certificate for the AD FS service.
Firstly, we need to create the Certificate Request. We have written an article that shows how to do that:
We will create the Certificate Request using the OpenSSL application. After installing the OpenSSL, open your preferred text editor and create the Certificate Request file (this file will be used to create the Certificate Request):
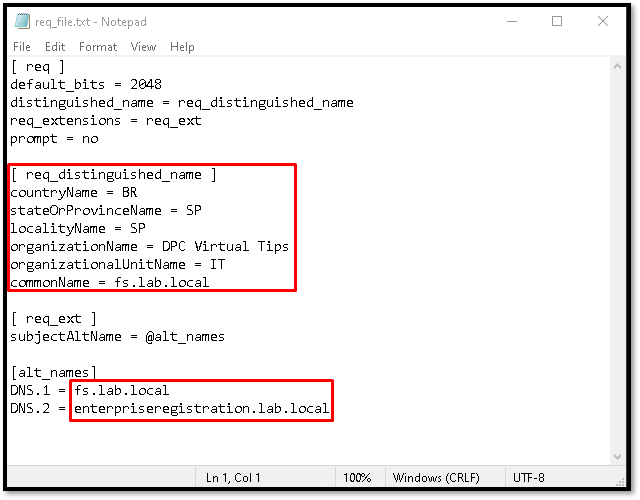
Note: You should adjust this file with your details. The sections highlighted in red should change to your values.
After that, create the Certificate Request with OpenSSL:
cd "C:\Program Files (x86)\OpenSSL-Win32\bin"

openssl.exe req -out C:\Users\Administrator\Desktop\FS-Cert\fs-cert.csr -newkey rsa:2048 -nodes -keyout C:\Users\Administrator\Desktop\FS-Cert\fs-cert.key -config C:\Users\Administrator\Desktop\FS-Cert\req_file.txt -sha256
Output example:
C:\Program Files (x86)\OpenSSL-Win32\bin>openssl.exe req -out C:\Users\Administrator\Desktop\FS-Cert\fs-cert.csr -newkey rsa:2048 -nodes -keyout C:\Users\Administrator\Desktop\FS-Cert\fs-cert.key -config C:\Users\Administrator\Desktop\FS-Cert\req_file.txt -sha256
Generating a RSA private key
......................................................++++
......................+++++
writing new private key to 'C:\Users\Administrator\Desktop\FS-Cert\fs-cert.key'
-----

C:\Program Files (x86)\OpenSSL-Win32\bin>
After that, we need to request the Certificate. Our server has the role of AD CS. So, we will use this CA to create the certificate for us. We also have written an article that explains how to do that:
https://dpcvirtualtips.com/requesting-a-certificate-for-an-internal-ca/
Open the website provided by the CA to request the certificate and follow the steps:
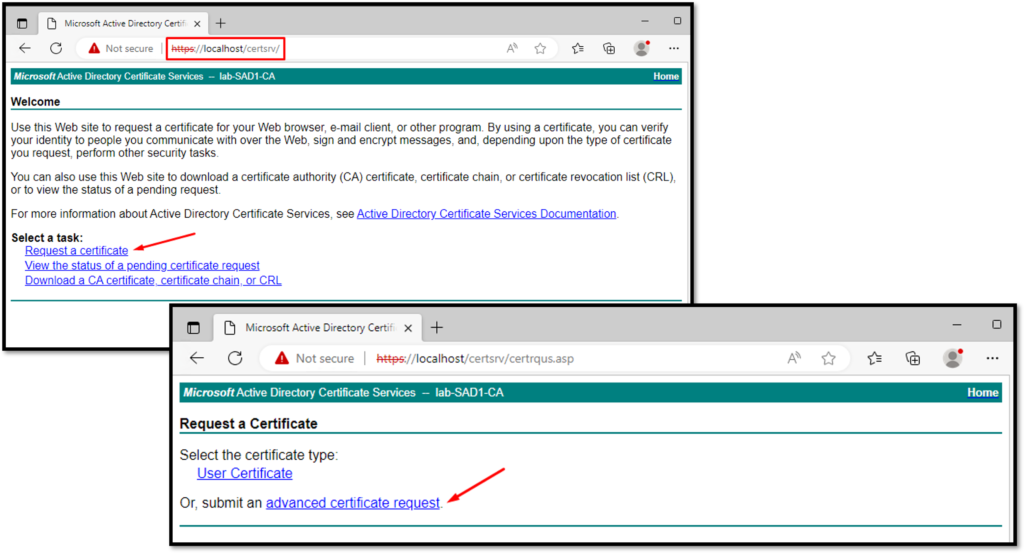
Here we need to copy the certificate request content and paste it, select the certificate template, and click on Submit. After a few seconds, the certificate will be available for downloading:
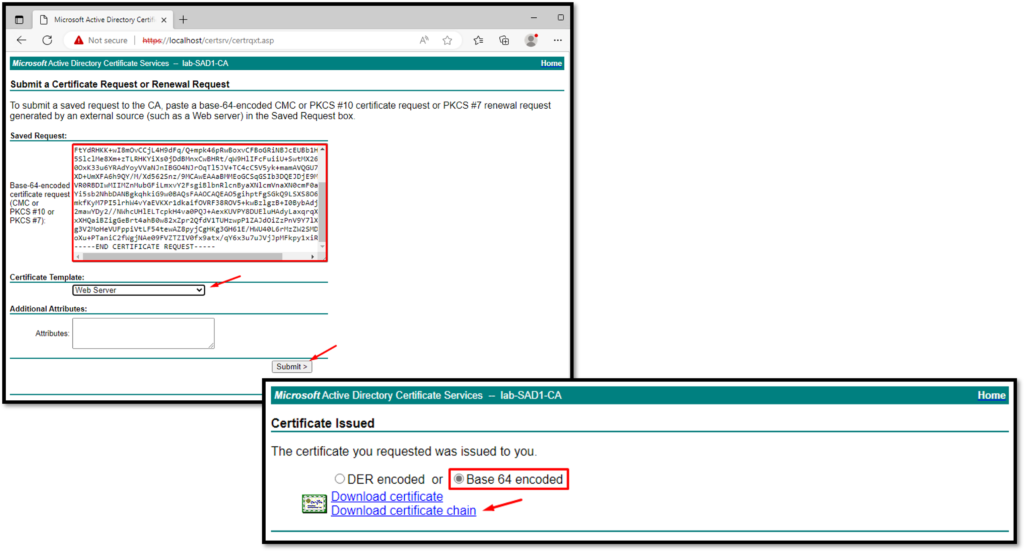
The last step here is to create the “pfx” certificate file. The AD FS service required this certificate file to be used in its configuration. We can create this file using OpenSSL too:
openssl pkcs12 -export -out C:\Users\Administrator\Desktop\FS-Cert\fs-cert.pfx -inkey C:\Users\Administrator\Desktop\FS-Cert\fs-cert.key -in C:\Users\Administrator\Desktop\FS-Cert\fs-cert.cerOutput example:
C:\Program Files (x86)\OpenSSL-Win32\bin>openssl pkcs12 -export -out C:\Users\Administrator\Desktop\FS-Cert\fs-cert.pfx -inkey C:\Users\Administrator\Desktop\FS-Cert\fs-cert.key -in C:\Users\Administrator\Desktop\FS-Cert\fs-cert.cer
Enter Export Password:
Verifying - Enter Export Password:

C:\Program Files (x86)\OpenSSL-Win32\bin>Note: You need to set up a password for this file.
Installing the AD FS Role
Basically, open the Server Manager and follow the below steps highlighted in yellow:
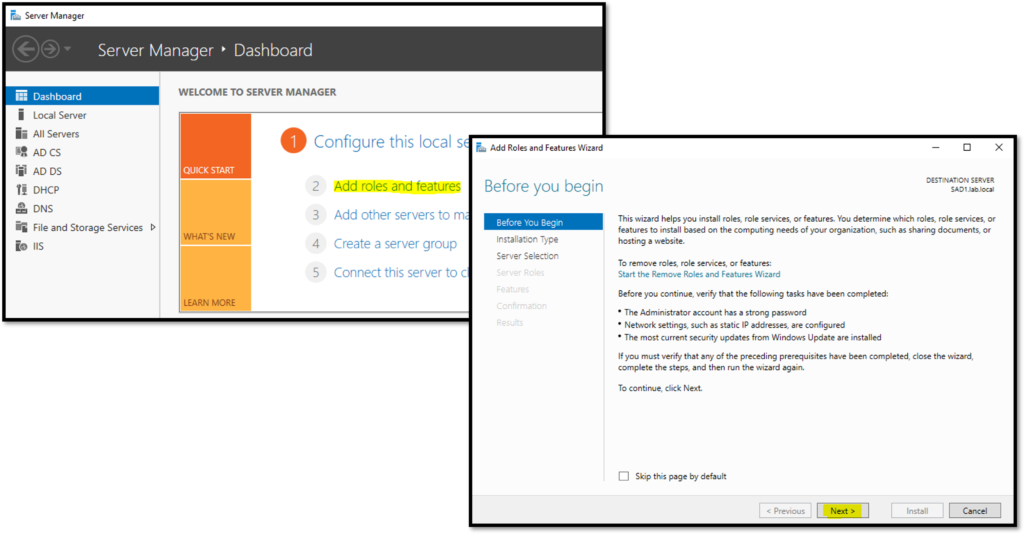
Selecting the Active Directory Federation Services and click on NEXT:
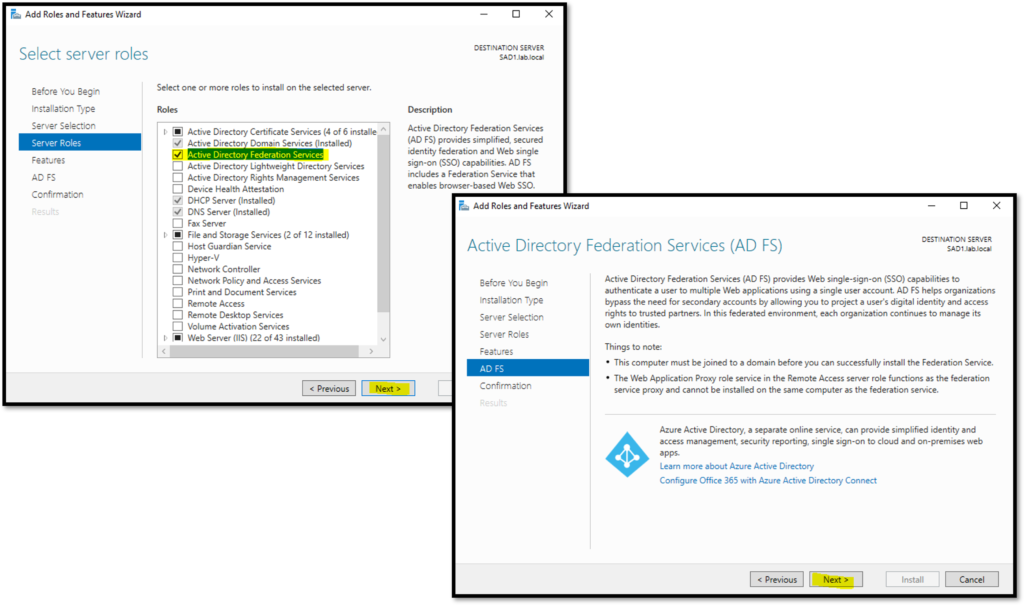
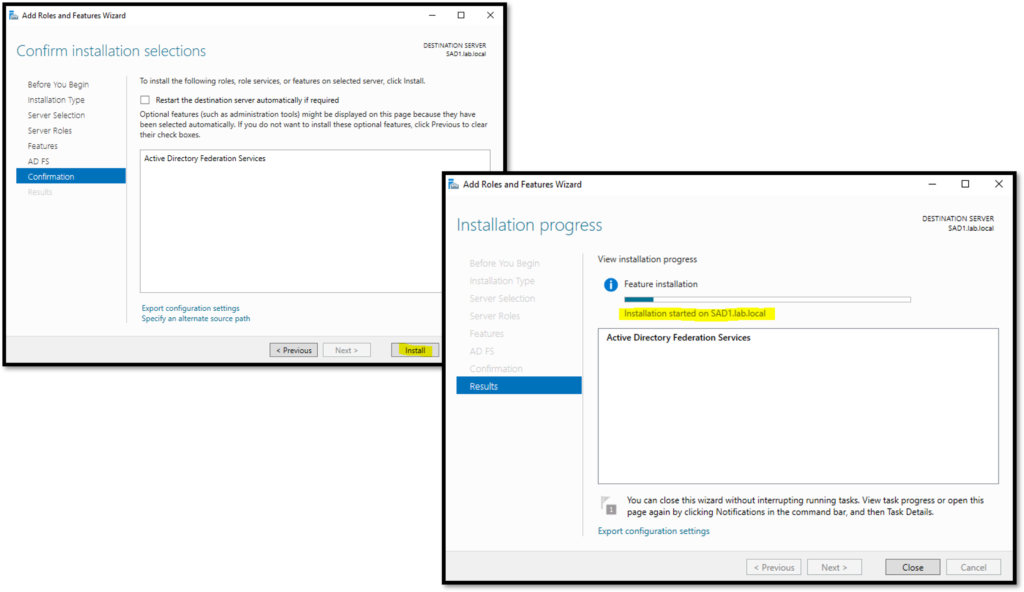
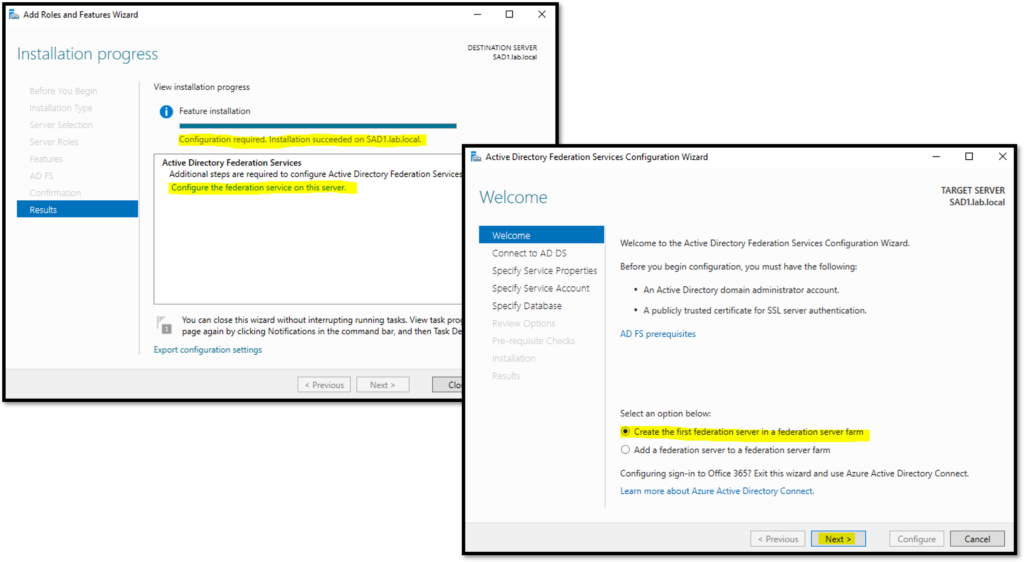
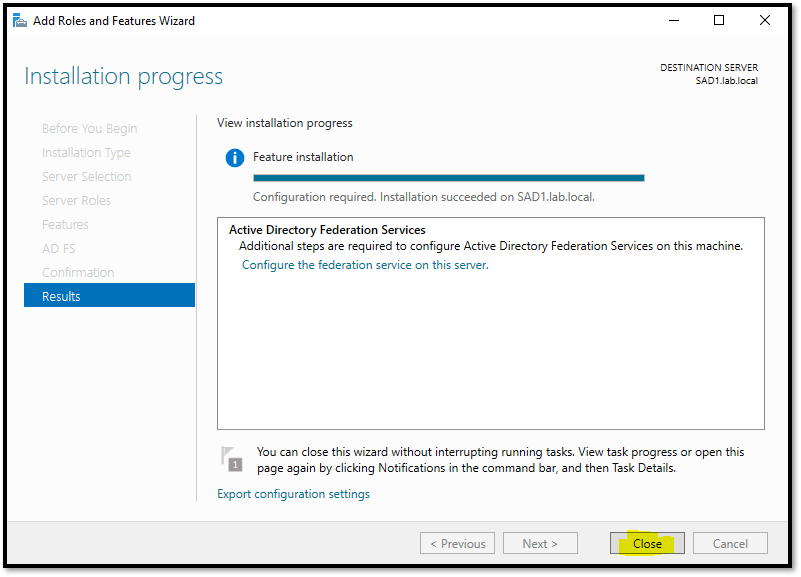
Here, the installation was finished. Consequently, click under “Configure the federation service on this service” to start the configuration wizard:
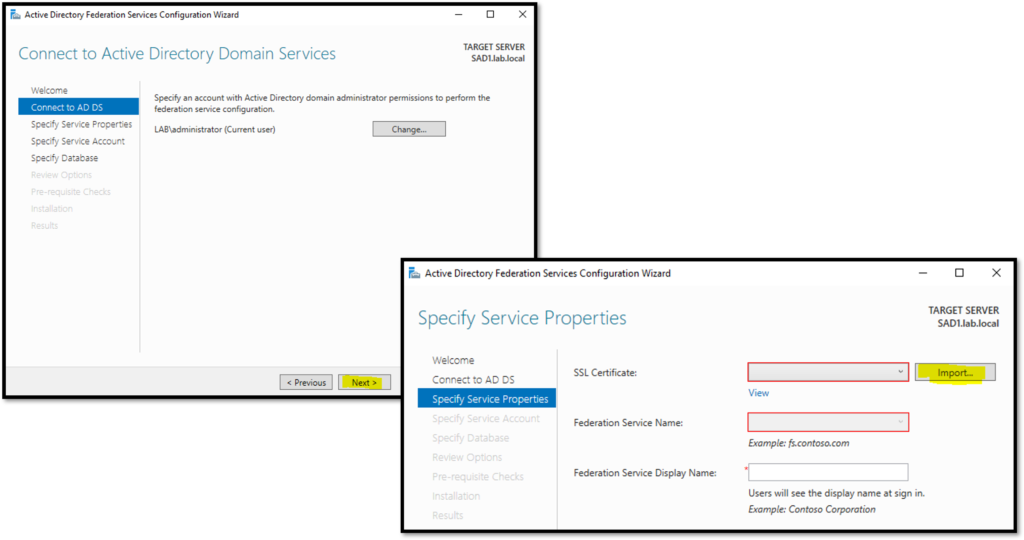
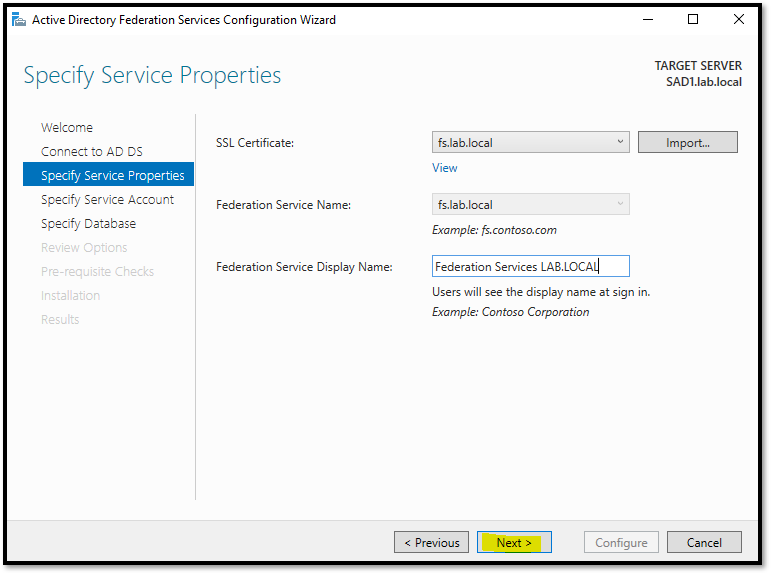
In the next step, we need to specify which user will be used for running the AD FS service. If you receive a message like shows in the below picture, open the Powershell with Admin Rights and type the below command. After that, you will be able to specify the user for this service:
Add-KdsRootKey -EffectiveImmediately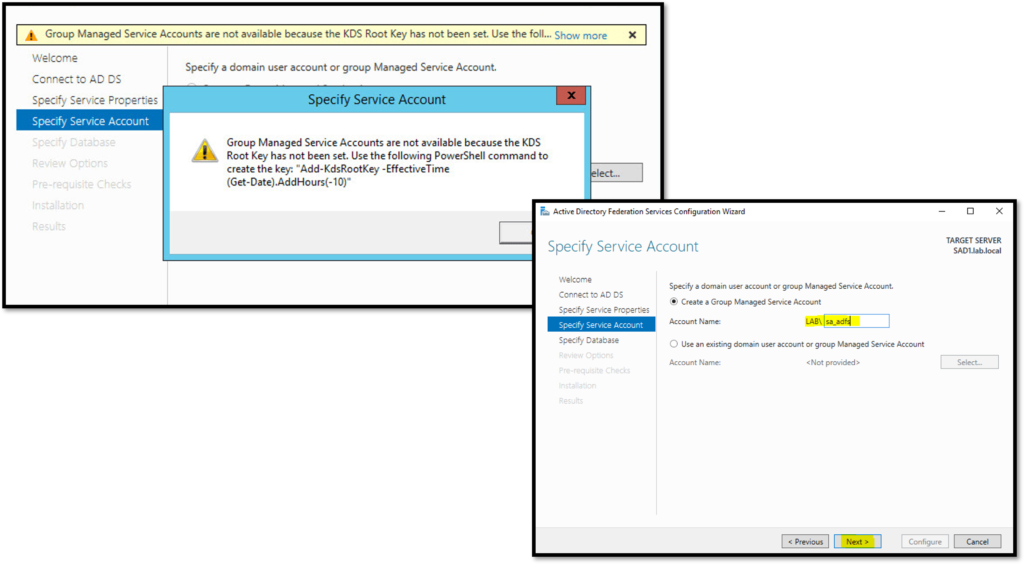
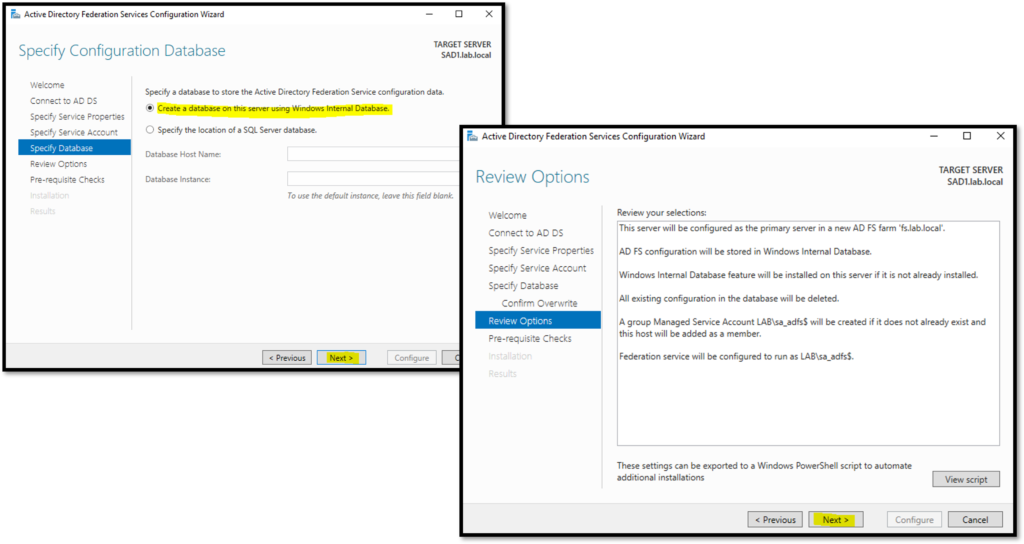
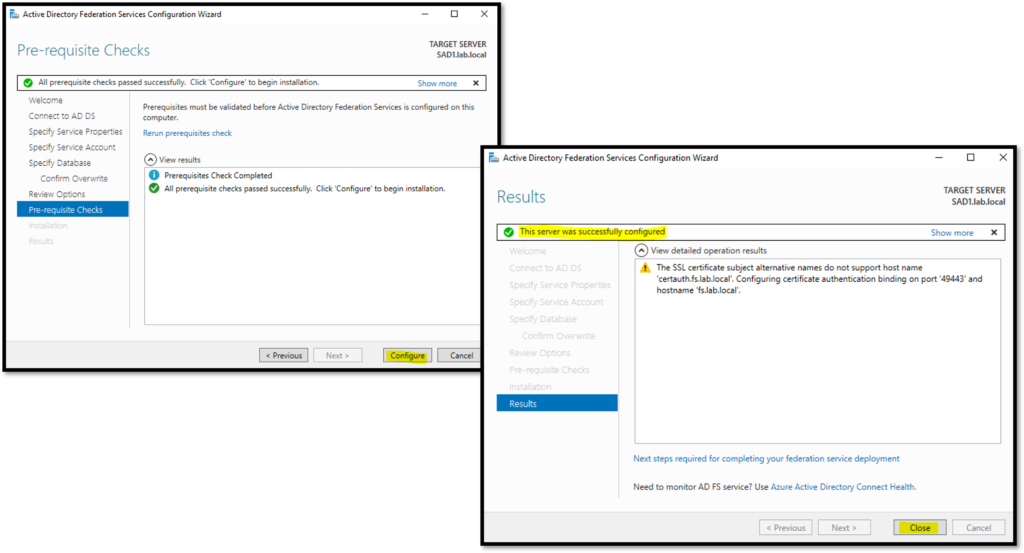
Here the configuration was finished. Click on “Close”:
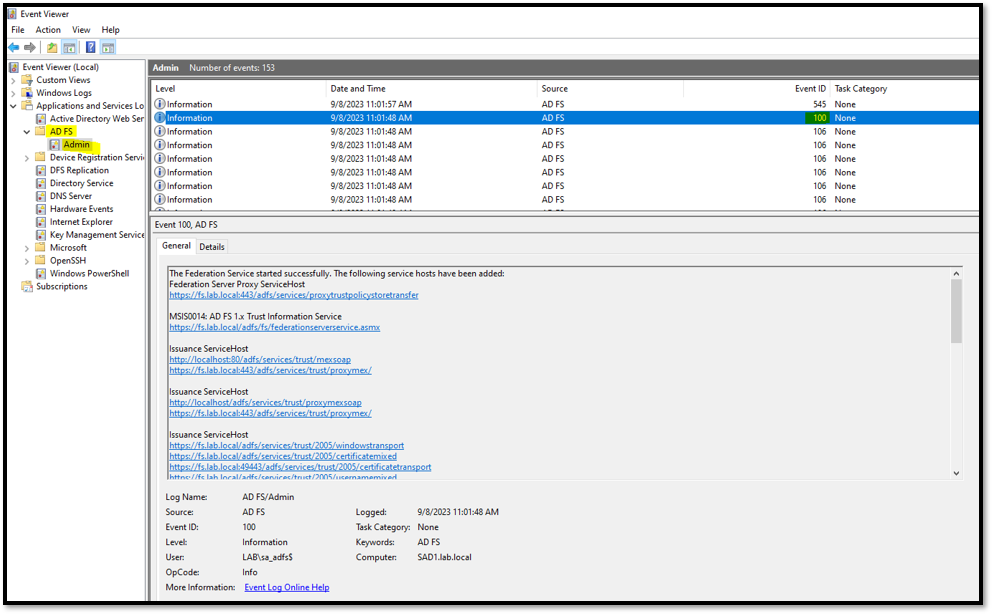
Open the Event View and go on the AD FS logs. You should see an Event ID 100, showing that the Federation Service started successfully:
To test the availability of the AD FS service, you can access the below web address.
It is expected to see an XML file like shown in the below picture:
https://fs.lab.local/adfs/fs/federationserverservice.asmx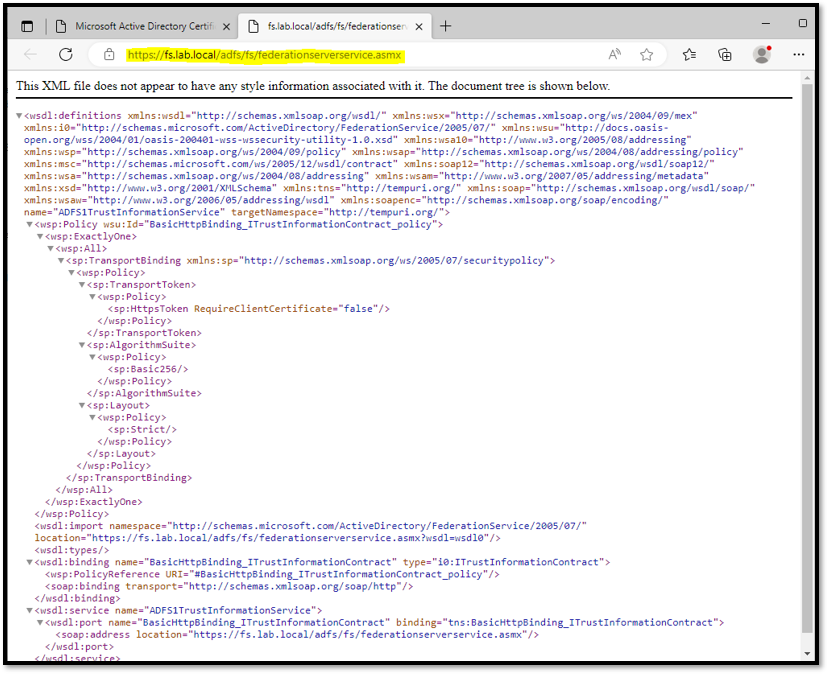
To enable the initial sign-on page just to test the AD FS service, open the Powershell with Admin Rights and type the below command:
Set-AdfsProperties -EnableIdPInitiatedSignonPage $true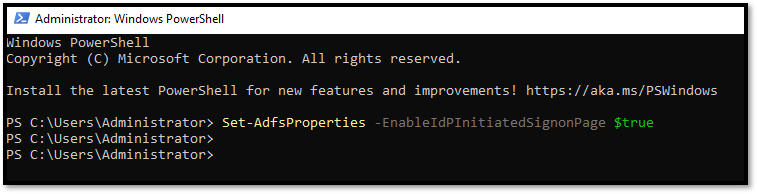
To test the service, open your browser and access the sign-on page. In our example, the web address is:
https://fs.lab.local/adfs/ls/idpinitiatedsignonClick on “Sign In”, type your Active Directory credentials, and click on “Sign In” again:
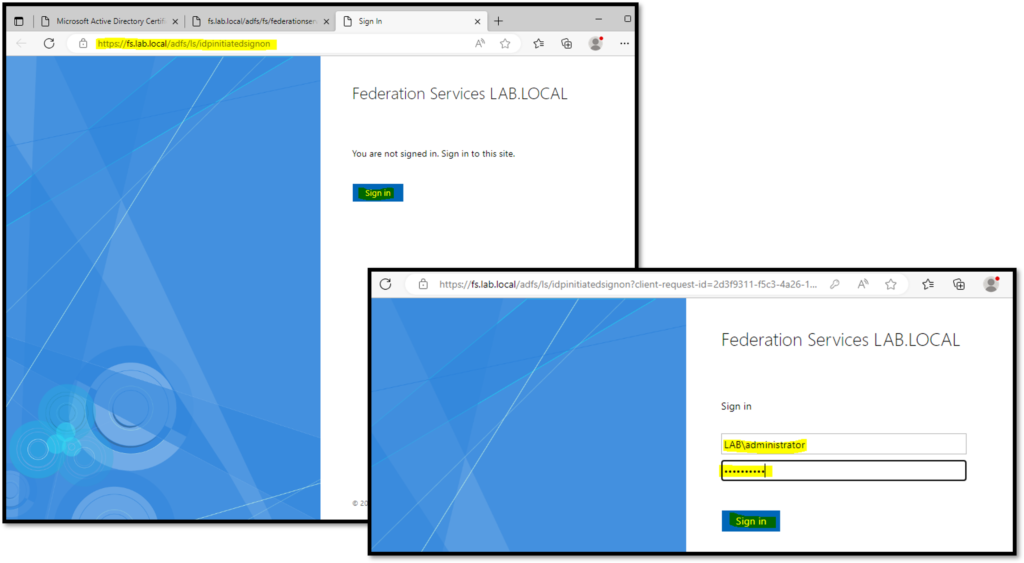
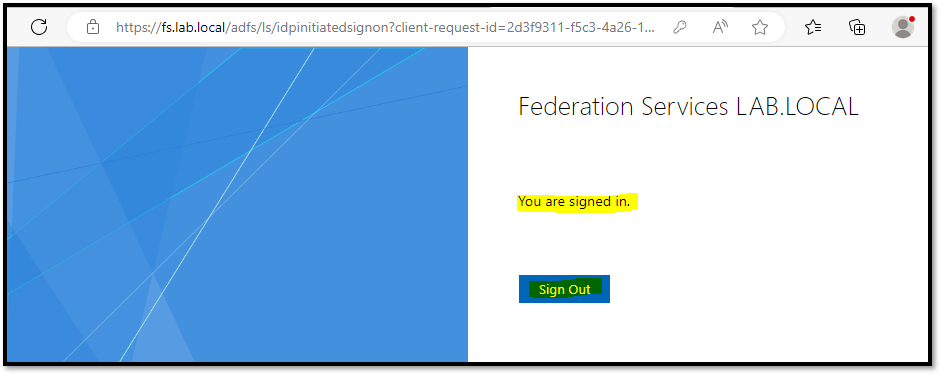
If you received a message “You are signed in”, your AD FS setup has been done successfully: