

Running a 3-Tier Application in the NSX will show details of the 3-Tier application model and how to create NSX DFW rules just to restrict access to a 3-Tier Application.
3-Tier Application Diagram
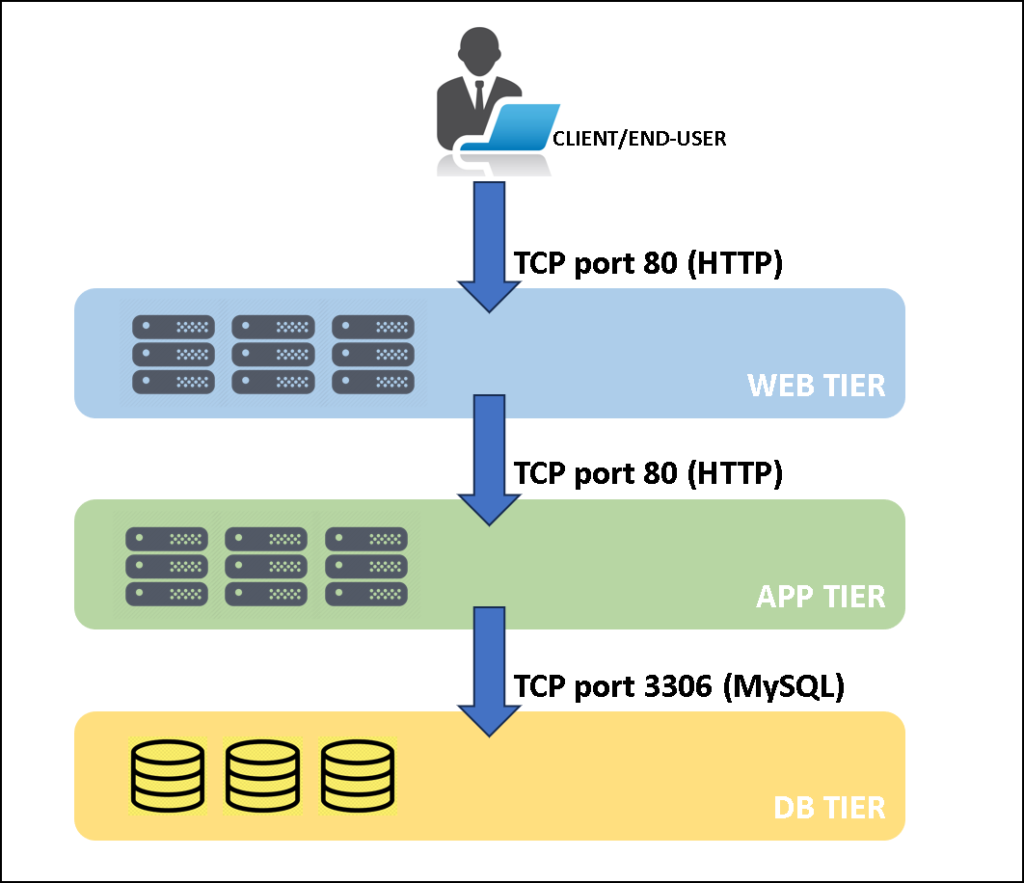
So, in the below picture, we have an example of our 3-Tier application diagram. As we can see, we have three tiers or layers and on each layer, we have some components that can be interacted with to provide the answer to the client’s requests.
The client can access a web application provided by the web tier. On this tier, we can have one or several VMs to provide this first communication channel for the client. After that, the web tier establishes communication with the app tier. On this tier (app), we also have one or several VMs to handle web requests from the web tier and push them to the database or db tier.
Look that the web tier does not have direct communication with the DB tier. We can enforce this restriction using the NSX Distributed Firewall Rules:
Deep Dive Into Each Tier of this Model
So, in the below picture, we can provide more details of this model.
For each tier, we have an NSX segment or virtual switch just to segment the tier’s traffic. Each NSX segment has its own L3 subnet.
On the web tier, we have three (3) VMs. Each VM is running a web server responsible for providing the web application interface – in this example (we will see later), our application is a basic web form.
On the app tier, we have three (3) VMs too. Each VM is running a web server responsible for handling the messages or data from the web tier, and pushing it to the database server on the db tier.
The db tier is currently made for one (1) VM. Here, we have the database running in this VM.
The client or end-user can access the web application form by using the address “http://web-form.lab.local”. The IP address for this FQDN is a Virtual IP (VIP), provided by the NSX Advanced Load Balancer (ALB). So, when the user requests this IP address or this FQDN, the NSX ALB handles the requisition and redirects it to a web server present on the Server Pool using the configured load balancer algorithm (round robin, least connections, and so on).
The same behavior occurs on the app tier. We have an address “http://app-form.lab.local” and the IP address for this FQDN is a Virtual IP provided by the NSX ALB.
In this example, for instance, the NSX ALB is responsible for balancing all access on the web and app tier 🙂
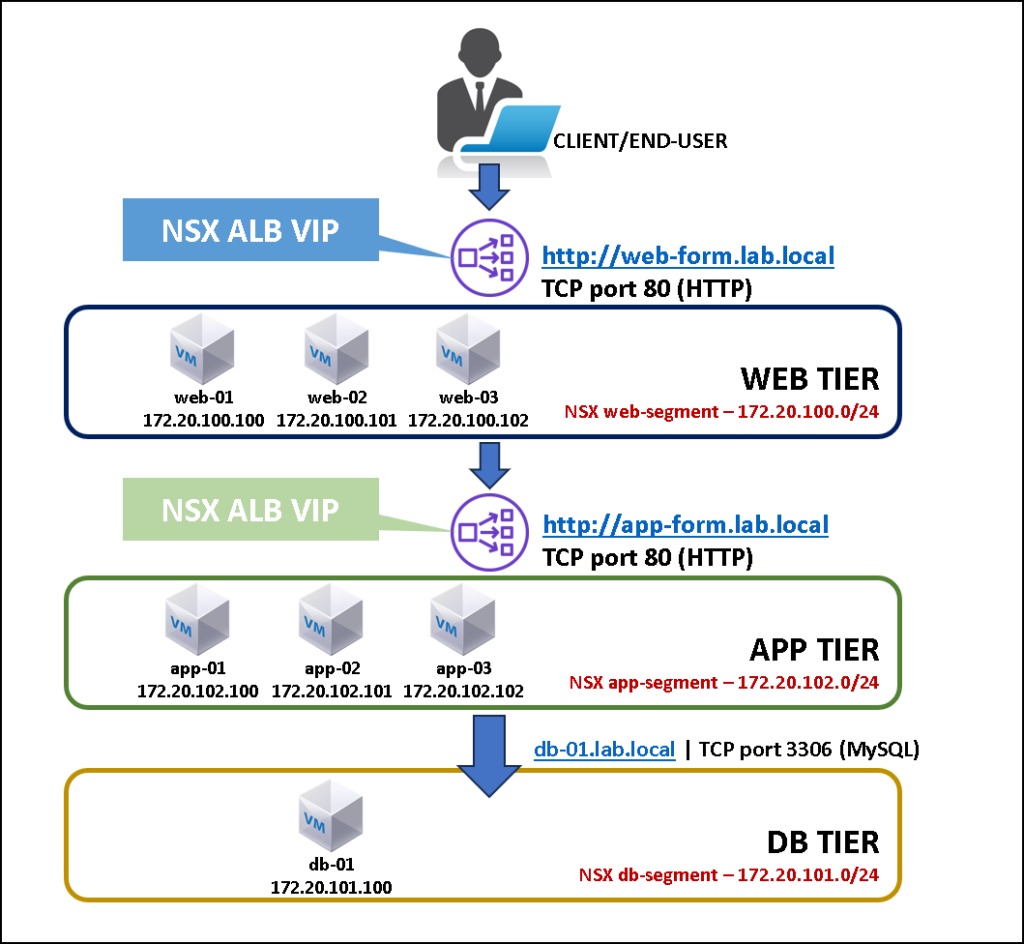
Notes: All VMs on all tiers are running the Linux Debian 11 x64. The web server is Apache2 with PHP support and the DB is MySQL.
I want to share with you some articles that we have written. These articles can help you install these components and make your life easier if you want to build your lab about that:
— Installing Linux Debian 11 from scratch:
https://dpcvirtualtips.com/installing-linux-debian-11/
— Installing the web server Apache2 on Debian 11:
https://dpcvirtualtips.com/installing-apache-with-php-on-debian-11/
— Installing the MySQL server on Debian 11:
https://dpcvirtualtips.com/installing-mysql-db-on-debian-11/
— Create a database, table, and insert data into a table on the MySQL server:
https://dpcvirtualtips.com/working-on-mysql-server-on-debian-11/
The Web Form Overview
As we told you, the client or end-user will access the web application form using the FQDN http://web-form.lab.local.
The below picture is an example of this simple web form:
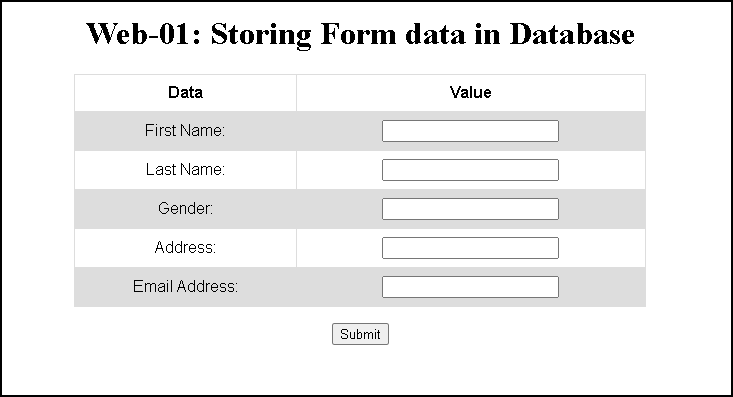
We created the “index.php” file inside the Apache2 root directory. Below, you can check the index.php content for the first web server (web-01) – all web servers have the same file. The only difference is highlighted in red:
root@Web-01:/var/www/html# cat index.php

<!DOCTYPE html>
<html>
<head>
<style>
table {
  font-family: arial, sans-serif;
  border-collapse: collapse;
  width: 30%;
}

td, th {
  border: 1px solid #dddddd;
  text-align: left;
  padding: 8px;
  text-align: center;
}

tr:nth-child(even) {
  background-color: #dddddd;
  text-align: center;
}

 table.center {
                margin-left: auto;
                margin-right: auto;
        }

</style>
</head>

<center>
<body>

 <h1>Web-01: Storing Form data in Database</h1>
 <form action="http://app-form.lab.local/insert.php" method="post">


<table class="center">
  <tr>
    <th>Data</th>
    <th>Value</th>
  </tr>
  <tr>
    <td>
     <label for="firstName">First Name:</label>
    </td>
    <td>
     <input type="text" name="first_name" id="firstName">
    </td>
  </tr>
  <tr>
    <td>
     <label for="lastName">Last Name:</label>
    </td>
    <td>
     <input type="text" name="last_name" id="lastName">
    </td>
  </tr>
  <tr>
    <td>
     <label for="Gender">Gender:</label>
    </td>
    <td>
     <input type="text" name="gender" id="Gender">
    </td>
  </tr>
  <tr>
    <td>
     <label for="Address">Address:</label>
    </td>
    <td>
     <input type="text" name="address" id="Address">
    </td>
  </tr>
  <tr>
    <td>
     <label for="emailAddress">Email Address:</label>
    </td>
   <td>
     <input type="text" name="email" id="emailAddress">
    </td>
  </tr>
</table>
<p></p>
<input type="submit" value="Submit">
</form>

</body>
</center>
</html>
When clicking on Submit, all data inputted by the user will be sent to the application servers on the app tier!
The Application Overview
The application is a PHP script, configured to handle the data sent from the web servers and send it to the database server.
We created the “insert.php” file inside the Apache2 root directory. All application servers have the same PHP script – the only difference is in the instruction highlight in red just to specify what application server sends the data to the database server:
root@app-01:/var/www/html# cat insert.php

<!DOCTYPE html>
<html>

<head>
    <title>Insert Page page</title>
</head>

<body>
    <center>
        <?php

        $dbhost = "db-01.lab.local";
        $dbuser = "thor";
        $dbpass = "Hjajxkkkakk87juaJllla223";
        $dbname = "SampleDB";
        $conn = new mysqli($dbhost, $dbuser, $dbpass, $dbname);

        // Check connection
        if($conn === false){
            die("ERROR: Could not connect. "
                . mysqli_connect_error());
        }

        // Taking all 5 values from the form data(input)
        $first_name = $_REQUEST['first_name'];
        $last_name = $_REQUEST['last_name'];
        $gender = $_REQUEST['gender'];
        $address = $_REQUEST['address'];
        $email = $_REQUEST['email'];

        // We are going to insert the data into our SampleDB table
        $sql = "INSERT INTO SampleTable VALUES ('$first_name',
            '$last_name','$gender','$address','$email')";

        // Check if the query is successful
        if(mysqli_query($conn, $sql)){
            echo "<h3>data stored in a database successfully from App-01!</h3>";

            echo nl2br("\n$first_name\n $last_name\n "
                . "$gender\n $address\n $email");
        } else{
            echo "ERROR: Hush! Sorry $sql. "
                . mysqli_error($conn);
        }

        // Close connection
        mysqli_close($conn);
        ?>

        <p></p>
        <a href="http://web-form.lab.local">
                <button>Back to Home</button>
        </a>


    </center>
</body>

</html>
The Database Overview
We are using a simple database called “SampleDB”. Inside this database, we have a table called “SampleTable”. We already created this simple table just to store the data inputted by the user on the web form.
You can read the following article to show details of how to create the database and table:
— Create a database, table, and insert data into a table on the MySQL server:
https://dpcvirtualtips.com/working-on-mysql-server-on-debian-11/
Accessing the Web Form Application
So, in the below video, we can show an example of how the client or end-user can interact with the web application. Furthermore, we can see little interaction among the tiers, and as a result, we can see the data inputted by the user into the database.
Looking at the beginning of the video, we can see that the user made a lot of requests and, for each request, the user accessed a different web server. The NSX Advanced Load Balancer is responsible for that. For each access, the load balancer algorithm redirects the user to a different web server 😉
Working on Distributed Firewall Rules to Filter the Traffic to our 3-Tier Application
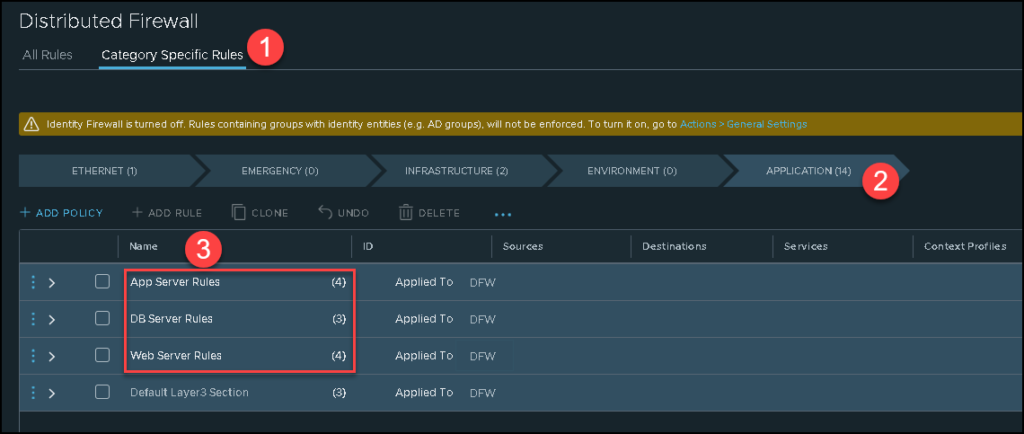
So, to filter or protect our 3-Tier application, we can use the DFW rules for that.
In this example, we already created 3 policies and under each one, we have a series of rules to achieve a specific aim:
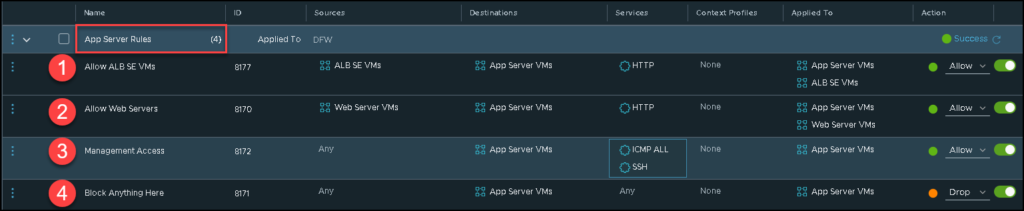
App Server Rules:
- 1- The first rule is responsible for allowing the HTTP traffic from the NSX ALB Service Engines to the App Servers. The Service Engine is a component of the NSX Advanced Load Balancer architecture;
- 2- The second rule is responsible for allowing the HTTP traffic from Web Servers to App Servers;
- 3- The third rule is responsible for allowing the management traffic (IMCP and SSH) to App Servers;
- 4- The last rule is responsible for dropping all the traffic that does not match any rule, as we can see in the below picture:
DB Server Rules:
- 1- The first rule is responsible for allowing the MySQL traffic from App Servers to DB Servers;
- 2- The second rule is responsible for allowing the management traffic (ICMP and SSH) to DB Servers;
- 3- The last rule is responsible for dropping all the traffic that does not match any rule, as we can see in the below picture:

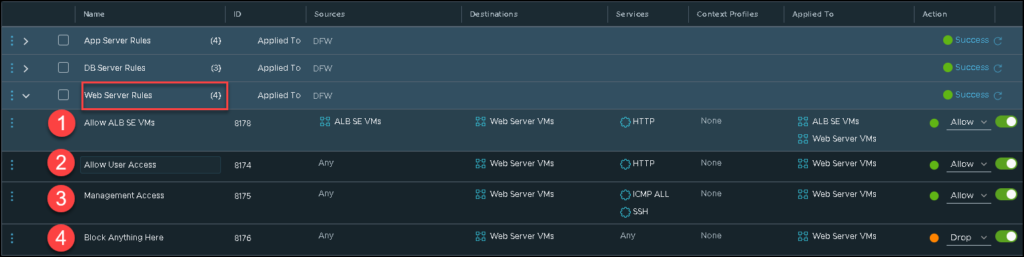
Web Server Rules:
- 1- The first rule is responsible for allowing the HTTP traffic from NSX ALB Service Engine VMs to Web Servers;
- 2- The second rule is responsible for allowing the HTTP traffic from client/end-user to Web Servers;
- 3- The third rule is responsible for allowing the management traffic (ICMP and SSH) to Web Servers;
- 4- The last rule is responsible for dropping all the traffic that does not match any rule, as we can see in the below picture:
Wrapping This Up
So, this simple article showed you more details of the 3-Tier application running in an NSX lab environment.
Look that you can create all NSX DFW rules as necessary to achieve your security goals. The NSX has a powerful distributed firewall that can help us in this case.
If you have any additional questions, please, feel free to reach me! I would be happy to help you 🙂
